Table of Contents >> Show >> Hide
- Why You’ll Love These Swirled Meringue Hearts
- What “Swirled” Actually Means (and Two Easy Ways to Do It)
- Ingredients for Swirled Meringue Hearts
- Tools You’ll Want (So the Hearts Don’t Become “Abstract Blobs”)
- Step-by-Step: How to Make Swirled Meringue Hearts
- 1) Prep the oven and pans
- 2) Whip egg whites to foamy, then soft peaks
- 3) Add sugar slowly (this is where crispness is born)
- 4) Beat to stiff peaks (the “holds its shape” moment)
- 5) Add flavor
- 6) Make the swirl
- 7) Pipe heart shapes (two beginner-friendly styles)
- 8) Bake low and slow, then cool slowly
- Flavor Ideas That Pair Perfectly With “Heart Cookies” Energy
- Common Meringue Problems (And How to Fix Them Without Crying)
- Food Safety Notes (Because We’re Adults Now)
- Make-Ahead, Storage, and Gifting Tips
- FAQ: Swirled Meringue Hearts
- Kitchen Notes: What Usually Happens When You Make These (A 500-Word Reality Add-On)
- Conclusion
Swirled Meringue Hearts are what happen when a cookie and a Valentine decide to be dramaticin the best way.
They’re light, crisp, glossy, and suspiciously fancy-looking for something made from egg whites and sugar.
The “swirl” part makes them look like you own matching linen napkins and say things like “notes of raspberry”
(even if you’re eating them straight off the cooling rack like a raccoon with a whisk).
This guide walks you through the foolproof basics (stiff peaks, sugar dissolving, low-and-slow baking) and the
fun parts (gel-color stripes, heart piping, flavor twists). You’ll also get a full troubleshooting sectionbecause
meringue is basically delicious science that occasionally chooses chaos.
Why You’ll Love These Swirled Meringue Hearts
- They’re naturally gluten-free and feel light (until you eat twelve “for quality control”).
- They’re made for gifting: crisp, pretty, and sturdy enough to travel when stored correctly.
- They’re customizable: colors, flavors, sprinkles, chocolate dipschoose your cookie mood.
- They look impressive even if you’re new to piping. Hearts are forgiving. Love is patient. So are these cookies.
What “Swirled” Actually Means (and Two Easy Ways to Do It)
Method A: Stripe the Inside of the Piping Bag (Bold, Clean Swirls)
This is the classic “candy-cane stripe” technique: paint thin lines of gel food coloring inside the piping bag,
then add plain meringue. As you pipe, the stripes naturally swirl through the cookie.
It’s the neatest look with the least mixing (aka: maximum drama, minimum effort).
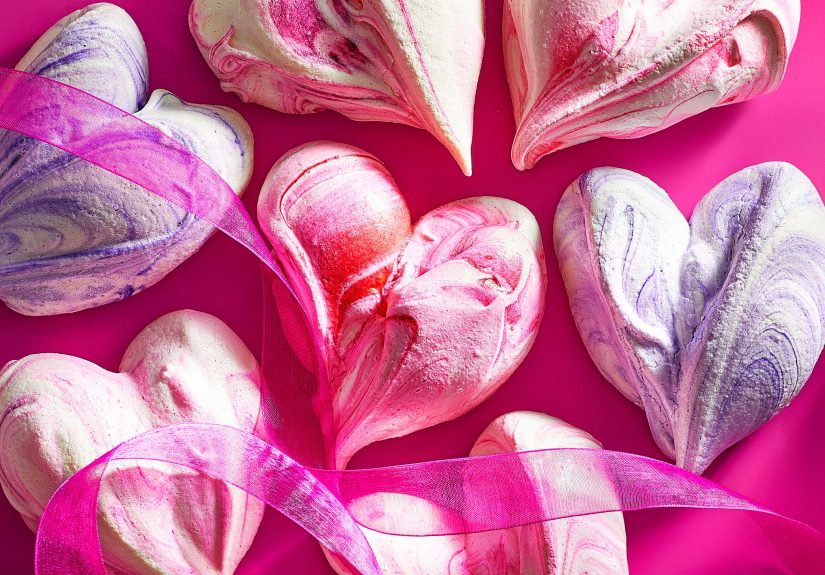
Method B: Marble-Fold Colored Meringue (Soft, Watercolor Swirls)
Tint a small portion of meringue, then gently fold it into the rest once or twice so you get ribbons rather than a solid color.
Think “marble cake,” not “pink wall paint.”
Ingredients for Swirled Meringue Hearts
This recipe makes about 30–50 small hearts depending on piping size.
- 4 large egg whites, room temperature
- 1 cup granulated sugar (superfine/caster works great if you have it)
- 1 teaspoon cream of tartar (stability insurance)
- 3/4 teaspoon cornstarch (optional but helpful for crisp structure)
- 1/8 teaspoon baking powder (optional; helps lift and texture)
- 1/2 to 3/4 teaspoon extract (vanilla, raspberry, strawberry, cake batter, peppermint, etc.)
- Gel food coloring (pink/red/purple for hearts; gel is best because it won’t water down the meringue)
- Pinch of salt (optional, but it makes sweet flavors pop)
Optional Add-Ons (Pick One or Two)
- Freeze-dried strawberry powder (for flavor and a natural pink tint)
- Mini chocolate chips (fold in very gently at the end)
- Sprinkles (add on top right after piping, before baking)
- Melted chocolate (dip bottoms after baking and cooling)
Tools You’ll Want (So the Hearts Don’t Become “Abstract Blobs”)
- Stand mixer or hand mixer
- Large clean mixing bowl (glass/metal is ideal)
- Parchment paper or silicone baking mats
- Piping bag + star tip (for ridges) or round tip (for smooth hearts)
- Small paintbrush or toothpick (for piping-bag stripes)
- Two baking sheets
Clean bowl rule: Any grease or yolk can stop egg whites from whipping properly. If you’re nervous, wipe the bowl and whisk with a little vinegar, then dry.
Step-by-Step: How to Make Swirled Meringue Hearts
1) Prep the oven and pans
- Heat oven to 200–225°F.
- Line baking sheets with parchment.
- Position racks in the upper and lower thirds if baking two trays at once.
Why the low temp? Meringues “bake” by drying out. High heat = browning and cracking, not the vibe for pastel hearts.
2) Whip egg whites to foamy, then soft peaks
- Add egg whites to the bowl.
- Begin mixing on medium until foamy.
- Add cream of tartar (and a pinch of salt if using).
- Beat until soft peaks formwhen the tip curls over like it’s waving hello.
3) Add sugar slowly (this is where crispness is born)
In a small bowl, mix sugar with cornstarch and baking powder (if using). Then:
- Increase mixer speed to medium-high.
- Add sugar graduallyabout 1 tablespoon at a time.
- Keep beating until the meringue is glossy and thick.
Quick test: Rub a tiny bit of meringue between your fingers. If you feel grit, the sugar hasn’t dissolved yetkeep mixing.
4) Beat to stiff peaks (the “holds its shape” moment)
You’re aiming for a shiny, marshmallowy meringue that stands straight up on the whisk without drooping.
If it looks like soft shaving foam, keep going. If it looks dry and curdled, you went too far.
5) Add flavor
Mix in extract briefly on low. Keep it lightmeringue loves subtle flavor, not a full-body perfume commercial.
6) Make the swirl
Option A: Stripe the piping bag
- Fit a piping bag with a star tip.
- Using a small brush (or a toothpick), paint 3–5 thin vertical stripes of gel color inside the bag.
- Spoon plain meringue into the bag.
Option B: Marble-fold
- Scoop about 1 cup of meringue into a small bowl.
- Tint it with gel coloring (start tinygel is powerful).
- Dollop the colored meringue back into the main bowl and fold 1–2 gentle turns for ribbons.
- Spoon into piping bag.
7) Pipe heart shapes (two beginner-friendly styles)
Style 1: The “Two Dots + Pull” Heart (Easiest)
- Hold piping bag straight up about 1/2 inch above the parchment.
- Pipe a small mound, stop pressure, and lift slightly.
- Pipe a second mound right next to it.
- Touch the tip between the two mounds and pull downward to form the point.
Style 2: The Outlined Heart (Prettiest Ridges)
- Pipe a “V” shape.
- Without lifting too far, trace back up the other side to meet at the top.
- Add a tiny inner swirl if you want a fuller heart.
Spacing: Meringues don’t spread much, so 1 inch apart is usually fine.
8) Bake low and slow, then cool slowly
- Bake at 200–225°F for 60–120 minutes depending on size (smaller = faster).
- You want them dry and crisp, with little to no browning.
- Turn off the oven and let them cool inside (door closed) for at least 30 minuteslonger is even better.
Doneness test: A fully dried meringue lifts cleanly from parchment and feels light, crisp, and hollow-ish.
If it sticks or feels tacky, keep drying.
Flavor Ideas That Pair Perfectly With “Heart Cookies” Energy
- Strawberry + vanilla: strawberry extract plus a tiny pinch of salt.
- Raspberry “cake-batter” hearts: cake-batter extract with pink and purple swirls.
- Peppermint swirl: peppermint extract with red stripes (winter holiday leftovers = victory).
- Chocolate-dipped romance: dip the bottoms in melted dark chocolate once cooled.
- Rose + vanilla: subtle floral vibes (go easyrose can get loud).
Common Meringue Problems (And How to Fix Them Without Crying)
Problem: The meringue won’t whip up
- Likely cause: Grease, yolk, or a not-clean bowl.
- Fix: Start over with a spotless bowl. Separate eggs one at a time into a small bowl so one broken yolk doesn’t ruin the whole batch.
Problem: Gritty meringue
- Likely cause: Sugar isn’t dissolved.
- Fix: Keep whipping until smooth. Next time, use superfine sugar or add sugar more slowly.
Problem: Hearts spread into puddles
- Likely cause: Under-whipped whites, sugar added too fast, or weak structure.
- Fix: Whip to true stiff peaks. Add sugar gradually. Use cream of tartar. Don’t skip the slow mixing phase.
Problem: Cracks
- Likely cause: Temperature shock (hot oven → cool room) or too-hot baking.
- Fix: Bake lower, and cool in the oven with the heat off. Keep cookies smaller for more even drying.
Problem: Sticky or soft meringues
- Likely cause: Humidity (meringues absorb moisture like it’s their hobby).
- Fix: Store airtight, add a food-safe desiccant packet, or store in the freezer for best crispness.
- Rescue tip: Re-crisp in a low oven (around 225°F) for 10–15 minutes, then cool completely.
Food Safety Notes (Because We’re Adults Now)
Classic meringue is made by whipping raw egg whites and then drying them in the oven. If you’re serving someone who is pregnant,
immunocompromised, or otherwise needs extra caution, consider using pasteurized egg whites or a Swiss meringue method
(warming egg whites and sugar together until the mixture reaches about 160°F, then whipping to stiff peaks).
You still bake the cookies the same way afterward.
Make-Ahead, Storage, and Gifting Tips
How long do Swirled Meringue Hearts last?
When kept dry and airtight, they can last around 1–2 weeks. Moisture is the enemy, so don’t store them next to brownies or anything steamy and cozy.
Best storage method for crispness
- Airtight container at room temperature, away from humidity.
- Freezer storage is surprisingly excellent for keeping them crisp (let them come to temp briefly before serving).
- Optional: add a food-safe desiccant packet to the container for extra protection.
How to gift them (without heartbreak)
- Pack in a tin or sturdy box with parchment between layers.
- Add padding (tissue paper or parchment crumples) so they don’t rattle.
- Keep them away from humidity (steamy kitchens, uncovered countertops, and that one friend who stores cookies next to a kettle).
FAQ: Swirled Meringue Hearts
Can I make these without a piping bag?
Yes. Spoon dollops onto the tray and use a toothpick to pull a point at the bottom. They won’t have sharp ridges, but they’ll still be cuteand still vanish quickly.
Why gel food coloring?
Gel coloring delivers strong color without adding much liquid, which helps the meringue stay stable and glossy.
Can I bake two trays at once?
Usually yes, as long as you rotate trays halfway through and your oven heats evenly. If your oven runs hot, keep it closer to 200°F and lengthen the drying time.
How do I keep them bright white (if I’m doing white hearts)?
Use clear vanilla or a different clear extract, and keep the oven low to avoid browning.
Kitchen Notes: What Usually Happens When You Make These (A 500-Word Reality Add-On)
There’s a specific kind of confidence that arrives the moment you start whipping egg whites. The bowl is clean,
the whites look innocent, and you think, “How hard could it be? It’s literally air.” Then meringue reminds you
it’s not just airit’s air with opinions.
The first “experience” most people have with Swirled Meringue Hearts is the mystery of time. Recipes say things like
“beat until stiff peaks,” as if stiff peaks are a scheduled meeting that begins at 7:15. In reality, stiff peaks show up when they feel like it.
Your mixer speed, bowl temperature, and how quickly you add sugar all matter. The good news: once you see the meringue turn glossy and thick,
it’s unmistakable. It goes from “soap bubbles” to “marshmallow cloud” and suddenly holds shape like it’s ready for a close-up.
The second classic moment is the coloring panic. You dip a toothpick into gel coloring, touch the meringue,
and it looks like nothing happenedso you do it again. Then you stir once and the meringue turns neon Barbie faster than you can say “Valentine’s.”
This is why the tiniest amount is the move. If you want romantic shades (blush, rose, soft purple), you’re painting with a feather, not a mop.
And if you’re striping the piping bag, thin lines are better than thick ones. Thick stripes can create bold streaks that look cool,
but they also make it easier to overdo the color and end up with “hot pink alarm bell hearts.”
Then comes the piping. The first heart often looks like a mouse ear situation. That’s normal. Piping is mostly muscle memory,
and your hands learn fast. The “two dots + pull” method is the friendly entry pointpipe two rounded bumps, then drag down
to create the point. After three or four tries, your hearts start looking like hearts. After ten, you’ll wonder why you ever doubted yourself.
If you’re going for the outlined heart shape, you’ll notice ridges matter: a star tip creates the swirly, bakery-style look that makes these cookies
feel extra special with zero extra effort.
The most relatable experience, though, is waiting out the bake. Meringues don’t “brown and smell done” like regular cookies.
They quietly dry. You peek. You tap one. You close the oven like you’re tucking them in. When you finally pull a tray and one heart sticks
to the parchment, it’s not a failureit’s a message: “I need more drying time.” Give it another 15–30 minutes, then cool in the oven.
That slow cool is the secret to fewer cracks and better texture.
Finally, there’s the satisfaction moment: you bite into one and it shatters delicately, dissolving into sweet crispness.
That’s when you realize why Swirled Meringue Hearts are so lovable. They’re equal parts dessert and decorationan edible little celebration.
And once you’ve made them once, you start imagining all the variations: red-and-white swirls, strawberry-dusted pink hearts, chocolate-dipped “fancy” hearts,
tiny hearts for cupcake toppers, big hearts for gift boxes. The technique becomes a template for joy. (And also, an excuse to buy more piping tips.)
Conclusion
Swirled Meringue Hearts are the rare baking project that checks every box: adorable, giftable, customizable, and genuinely fun to make.
Keep your bowl clean, add sugar slowly, whip to real stiff peaks, and dry them low and slow. Once you get the hang of the swirl technique,
you’ll be piping hearts for every occasion that could use a little extra cheerValentine’s Day, bridal showers, baby showers, Tuesday afternoons…
basically any time you want your dessert to look like it has a tiny bow on it.


