Table of Contents >> Show >> Hide
- What Is a Gmail Filter?
- Why You Might Want To Remove a Gmail Filter
- Before You Delete: Understand What Removing a Filter Does
- How To Remove a Gmail Filter on Desktop
- How To Edit a Gmail Filter Instead of Removing It
- Can You Remove Gmail Filters on the Mobile App?
- How To Remove a Filter That Deletes Emails Automatically
- How To Stop Gmail From Auto-Archiving Emails
- How To Remove a Gmail Filter That Applies the Wrong Label
- How To Remove a Gmail Forwarding Filter
- How To Find the Right Filter Faster
- Common Mistakes When Removing Gmail Filters
- Best Practices After Removing a Gmail Filter
- Troubleshooting: Emails Still Missing After Removing a Filter
- Should You Delete All Gmail Filters?
- Practical Examples of Gmail Filters You May Want To Remove
- Experience-Based Tips for Removing Gmail Filters
- Conclusion
Gmail filters are supposed to be helpful little inbox robots. They can archive newsletters, label client emails, forward receipts, delete junk, and generally behave like the tidy assistant we all pretend to be on Monday morning. But sometimes a filter goes rogue. Suddenly, important emails vanish into All Mail, a client message gets slapped with the wrong label, or your aunt’s cookie recipe keeps landing in Trash like it committed a felony.
If that sounds familiar, you probably need to remove a Gmail filter. The good news: deleting a filter in Gmail is simple once you know where Google has hidden the controls. The slightly annoying news: you usually need Gmail on a desktop browser, not just the mobile app, to manage filters properly. This guide walks you through exactly how to remove a Gmail filter, how to edit one instead of deleting it, what happens after removal, and how to avoid accidentally turning your inbox into a digital junk drawer.
What Is a Gmail Filter?
A Gmail filter is an automatic rule that tells Gmail what to do when a message matches certain conditions. For example, you can create a filter that says: “When an email comes from [email protected], apply the label Receipts and skip the Inbox.” You can also filter by subject line, keywords, sender, recipient, attachment status, size, and other search criteria.
Filters can perform actions such as archiving emails, marking them as read, starring them, applying labels, forwarding them, deleting them, or keeping them out of Spam. In theory, this is beautiful. In practice, one outdated filter can quietly misplace emails for months while you blame the Wi-Fi, Mercury retrograde, or “Gmail being weird.”
Why You Might Want To Remove a Gmail Filter
There are several perfectly normal reasons to delete a Gmail filter. Maybe you created a filter for an old job, a school project, a subscription, or a temporary event. Maybe the sender changed their email address. Maybe the filter is too broad and is catching messages it should leave alone. A filter using a domain like “@example.com” can be powerful, but it can also become a tiny bulldozer if you forget it exists.
You may also want to remove a Gmail filter if important emails are skipping the Inbox, going straight to Trash, being marked as read before you see them, or being forwarded to another address. In many “missing email” mysteries, the culprit is not a hacker in a hoodie. It is often an old filter sitting in Gmail settings, sipping coffee and causing chaos.
Before You Delete: Understand What Removing a Filter Does
Deleting a Gmail filter stops that rule from applying to future incoming emails. It does not automatically undo what the filter already did. If a filter archived emails last week, deleting the filter today will not magically move those old emails back to the Inbox. You will need to search for them and move them manually if necessary.
For example, if a filter was sending invoices to a “Finance” label and skipping the Inbox, deleting the filter stops new invoices from being auto-archived. But previous invoices remain wherever Gmail placed them. Think of filter deletion like firing a very confused assistant. The assistant stops making new mistakes, but you still need to clean up the filing cabinet.
How To Remove a Gmail Filter on Desktop
The most reliable way to remove a Gmail filter is through Gmail in a web browser on a computer. These steps work for most personal Gmail and Google Workspace accounts.
Step 1: Open Gmail in a Browser
Go to Gmail on your computer and sign in to the account where the filter exists. Make sure you are in the correct account, especially if you use multiple Gmail profiles. Deleting the wrong filter in the wrong account is the inbox version of putting salt in your coffee.
Step 2: Open Settings
In the top-right corner, click the gear icon. A quick settings panel will appear. From there, choose See all settings. This opens Gmail’s full settings page, where the deeper controls live.
Step 3: Go to “Filters and Blocked Addresses”
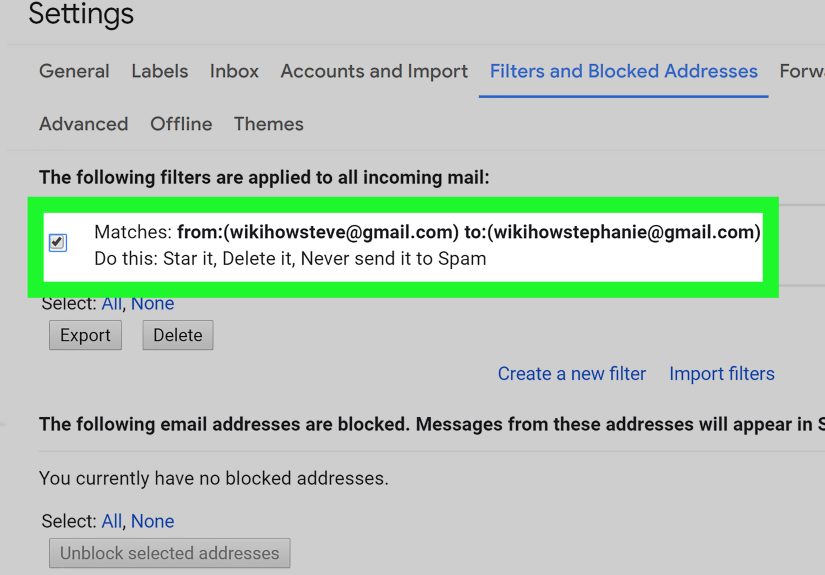
Across the top of the settings page, click the tab labeled Filters and Blocked Addresses. This page shows your existing filters and blocked senders. Gmail lists filter conditions and actions, so you can see what each rule matches and what it does.
Step 4: Find the Filter You Want To Remove
Review the list carefully. Look for the sender, subject keyword, label, forwarding action, or deletion rule that matches the problem you are trying to fix. If you have many filters, use your browser’s find tool with Ctrl + F on Windows or Command + F on Mac. Search for a sender name, email address, label, or keyword.
Step 5: Click “Delete”
Next to the filter, click delete. Gmail will ask you to confirm. Confirm the deletion, and the filter will be removed. From that point forward, Gmail will no longer apply that rule to new incoming mail.
How To Edit a Gmail Filter Instead of Removing It
Sometimes deleting the entire filter is unnecessary. If the filter is mostly useful but catches the wrong emails, editing it is smarter. For example, suppose you have a filter that sends all emails from a company domain to a “Work” label. If one sender from that domain should stay in your Inbox, you may be able to adjust the filter instead of deleting it completely.
To edit a Gmail filter, go to Settings > See all settings > Filters and Blocked Addresses. Find the filter and click edit. Gmail will show the search conditions first. Change the sender, subject, keywords, or other criteria, then continue to the action screen. Update what Gmail should do with matching messages, then save the filter.
Editing is best when the filter still has value. Deleting is best when the filter is outdated, confusing, duplicated, too broad, or simply no longer needed.
Can You Remove Gmail Filters on the Mobile App?
In most cases, Gmail’s mobile app is not the best place to manage filters. You can search, label, archive, delete, and organize email from the app, but full filter management is generally handled through Gmail’s desktop web interface. If you are on a phone or tablet, open Gmail in a browser and request the desktop version of the site if needed. It may feel cramped, but it is better than poking around the app wondering where Google hid the magic button.
For the cleanest experience, use a laptop or desktop computer. Filter settings are much easier to review when you can see the full list, conditions, and actions on a larger screen.
How To Remove a Filter That Deletes Emails Automatically
If Gmail is automatically deleting certain emails, a filter may be sending them to Trash. To fix this, open Filters and Blocked Addresses and look for filters that include the action Delete it. Pay close attention to the filter criteria. A rule that deletes messages from one sender may be fine. A rule that deletes messages containing a broad word like “invoice,” “account,” or “update” may be a problem wearing a fake mustache.
Click delete to remove the filter entirely, or click edit to narrow the rule. After removing it, check Trash for recent messages that may have been affected. Gmail Trash is temporary, so do not wait forever to rescue anything important.
How To Stop Gmail From Auto-Archiving Emails
If emails are skipping your Inbox but still appear in All Mail or under a label, a filter may be using the action Skip the Inbox. This is also known as archiving. It does not delete the email, but it hides it from the main Inbox view.
To stop this, go to your filters list and find rules that include Skip the Inbox. Delete the filter if you no longer need it, or edit it and remove that action. After saving the change, future matching messages should appear in your Inbox unless another rule affects them.
How To Remove a Gmail Filter That Applies the Wrong Label
Labels are one of Gmail’s best organization tools, but a bad filter can turn them into a confetti cannon. If messages keep receiving the wrong label, check your filters for the action Apply the label. Delete or edit the rule responsible.
Remember, removing the filter does not remove labels from old emails. To clean up older messages, search for the label, select the affected emails, and manually remove the label. This is a separate cleanup step, but it is worth doing if your label system has started looking like a sock drawer after laundry day.
How To Remove a Gmail Forwarding Filter
Some Gmail filters automatically forward matching messages to another email address. This is useful for receipts, work alerts, or shared administrative inboxes. It can also become a privacy problem if it is outdated or forgotten.
To remove a forwarding filter, open Filters and Blocked Addresses and look for filters with the action Forward it to. Delete the filter or edit it to remove the forwarding action. You should also check Gmail’s Forwarding and POP/IMAP settings if you want to confirm whether general forwarding is turned on for the whole account.
How To Find the Right Filter Faster
If you only have three filters, congratulations, you are living a peaceful digital life. If you have dozens or hundreds, finding the bad one takes a little detective work. Start by identifying the symptom. Are messages being deleted? Look for Delete it. Are they skipping the Inbox? Look for Skip the Inbox. Are they being forwarded? Look for Forward it to. Are they getting mislabeled? Search for that label name.
You can also search Gmail for an affected message, open it, and inspect clues. Check whether it has a label, whether it is in Trash, whether it is archived, or whether it was marked as read automatically. Then compare those clues with your filter list.
Common Mistakes When Removing Gmail Filters
Deleting the Wrong Filter
Before clicking delete, read both the conditions and actions. Two filters may look similar, especially if they use the same sender or label. When in doubt, edit the filter first to inspect it more closely.
Forgetting Old Emails Stay Where They Are
Removing a filter affects future messages. It does not reverse past actions. If old emails were archived, labeled, forwarded, or deleted, you need to handle those messages manually.
Confusing Filters With Blocked Addresses
The Filters and Blocked Addresses page contains both filters and blocked senders. Blocking a sender is different from creating a filter that deletes or labels messages. If you are trying to unblock someone, check the blocked addresses section as well as the filters section.
Assuming the Mobile App Has Every Setting
The Gmail app is great for everyday email, but desktop Gmail is better for managing advanced settings. If you cannot find filters on mobile, switch to a computer browser.
Best Practices After Removing a Gmail Filter
After deleting a filter, send yourself a test email or ask the sender to resend a message if practical. Confirm that new emails arrive where you expect them to appear. If the problem continues, another filter may be involved. Gmail applies multiple rules when messages match them, so one deleted filter may not be the only actor in the drama.
It is also a good idea to review your entire filter list once or twice a year. Delete outdated filters, rename confusing labels, and simplify rules that overlap. A clean filter system makes Gmail faster to understand and easier to trust.
Troubleshooting: Emails Still Missing After Removing a Filter
If messages are still missing after you remove a Gmail filter, check these locations: Trash, Spam, All Mail, Promotions, Social, Updates, and any custom labels. Also search by sender email address instead of relying only on the Inbox view.
If a message is in Spam, Gmail’s own spam detection may be involved rather than your custom filters. If it is in All Mail but not the Inbox, another archive rule may still be active. If it is in Trash, another delete filter or manual deletion may be responsible. Gmail search operators can help narrow the hunt. For example, you can search for a sender, a subject phrase, or messages with attachments.
Should You Delete All Gmail Filters?
Deleting all Gmail filters is tempting when your inbox feels cursed, but it is usually too drastic. Filters often perform useful work quietly in the background. Removing all of them can bring back newsletters, alerts, automated reports, and other inbox clutter you worked hard to control.
A better approach is to audit filters one by one. Delete outdated rules, edit overly broad ones, and keep the filters that still save time. Think of it like cleaning a closet. You do not need to burn down the house just because you found one ugly sweater.
Practical Examples of Gmail Filters You May Want To Remove
Example 1: Old Job Filter
You created a filter years ago that labeled emails from your old company and skipped the Inbox. Now a former coworker emails you about a new opportunity, but the message disappears into a dusty label. Remove or edit the filter so those emails land in your Inbox again.
Example 2: Overactive Newsletter Filter
You made a rule that archives anything with the word “sale.” Unfortunately, it also hides receipts, order confirmations, and customer service replies. Narrow the filter or delete it entirely.
Example 3: Accidental Delete Rule
You blocked an annoying sender by creating a filter that deletes messages from a domain. Later, a legitimate department from the same domain emails you. Remove the delete filter and create a more precise rule if necessary.
Experience-Based Tips for Removing Gmail Filters
After helping people troubleshoot Gmail issues, one pattern appears again and again: users often forget they created filters in the first place. Filters are quiet by design. They do not wave a flag every time they archive, label, or delete a message. That silence is useful when everything works, but it becomes confusing when something goes wrong. The first experience-based lesson is simple: when an email disappears, check filters early. Do not spend an hour refreshing the Inbox like it owes you money.
A practical habit is to name labels clearly and keep filters specific. Gmail filters themselves do not have friendly custom names in the same way files do, so the criteria must be understandable. A filter from “[email protected]” is easy to recognize. A filter with five keywords, three domains, and a vague action is harder to trust. When filters become too complicated, editing them later feels like decoding ancient cave writing, except the cave is your inbox and the drawings are promotional emails.
Another useful experience is to test before and after removing a filter. If you delete a rule that was auto-archiving messages from a sender, ask that sender to send a fresh email or send a test from a related account if possible. This confirms whether the filter was truly the cause. If the new message still does not appear in the Inbox, continue checking other filters, Spam, forwarding settings, and blocked addresses. Email problems often have more than one layer, like an onion, but less delicious.
For people who use Gmail for business, school, or client communication, filter cleanup should be part of routine inbox maintenance. Set a calendar reminder every few months to review your filters. Look for rules tied to old projects, former employers, expired subscriptions, outdated labels, or temporary campaigns. Delete what no longer serves you. The reward is not glamorous, but neither is missing an important email because a rule from 2019 decided to play hide-and-seek.
One final tip: do not panic-delete everything. When users get frustrated, they sometimes remove all filters at once. That can fix one problem while creating ten new annoyances. A careful review is safer. Start with filters that delete, forward, or skip the Inbox, because those actions are most likely to make emails seem missing. Then review labeling and marking rules. By working from the highest-impact actions downward, you clean up Gmail without destroying the helpful automation you actually use.
Note: Gmail menus and labels may change slightly as Google updates the interface, but the core process remains the same: open Gmail settings on desktop, go to Filters and Blocked Addresses, find the rule, then edit or delete it.
Conclusion
Removing a Gmail filter is a small task that can solve surprisingly large inbox problems. Whether messages are skipping your Inbox, going to Trash, receiving the wrong label, or forwarding somewhere they should not, the fix usually starts in Settings > See all settings > Filters and Blocked Addresses. From there, you can delete the filter completely or edit it so Gmail behaves like a helpful assistant again instead of a raccoon with admin privileges.
The key is to understand what the filter does before removing it. Deleting a filter stops future automation, but it does not undo past actions. After removal, check older messages manually and test new incoming emails to make sure everything works as expected. With a little maintenance, Gmail filters can remain powerful tools instead of mysterious inbox gremlins.