Table of Contents >> Show >> Hide
- What Is Loom Knitting?
- Why a Scarf Is the Perfect First Loom Project
- Supplies You Need to Knit a Scarf on a Loom
- Best Yarn and Loom Size for Beginners
- Basic Loom Knitting Terms You Should Know
- How to Knit a Scarf on a Loom Step by Step
- How to Make a Scarf That Does Not Curl
- Simple Stitch Options for a Loom Knit Scarf
- How Long Should a Loom Knit Scarf Be?
- How to Change Yarn Colors
- How to Bind Off a Loom Knit Scarf
- Finishing Touches: Fringe, Blocking, and Weaving Ends
- Common Loom Knitting Mistakes and How to Fix Them
- Beginner Pattern: Easy Loom Knit Scarf
- Creative Ways to Customize Your Loom Knit Scarf
- Care Tips for Your Finished Scarf
- Extra Experience: What I Learned From Knitting Scarves on a Loom
- Conclusion
Learning how to knit a scarf on a loom is one of the friendliest ways to enter the cozy world of yarn crafts. You do not need to juggle two needles, decode complicated abbreviations, or pretend you understand what “turn your work” means while your yarn slowly becomes a mysterious spaghetti nest. A knitting loom keeps the stitches organized for you, making it easier to create a warm, wearable scarf even if you have never knitted anything before.
A loom knit scarf is also a practical first project because it is flat, forgiving, and endlessly customizable. Want a chunky winter scarf that looks like it belongs in a mountain lodge? Use bulky yarn. Prefer a soft, drapey scarf for everyday outfits? Choose a medium-weight yarn and a relaxed stitch. Want stripes, fringe, or a scarf long enough to wrap around your neck twice like you are starring in a snow-day movie? The loom can handle that too.
This guide walks you through the supplies, setup, stitches, step-by-step instructions, finishing methods, troubleshooting tips, and real-life experience that make loom knitting a scarf easier and more enjoyable. By the end, you will know exactly how to knit a scarf on a loom from the first slip knot to the final fringe.
What Is Loom Knitting?
Loom knitting is a method of creating knitted fabric using a frame with pegs instead of traditional knitting needles. The yarn is wrapped around the pegs, and a loom hook lifts the lower loops over the upper loops to form stitches. The process is repetitive, calming, and surprisingly addictive. One moment you are “just trying it,” and the next you are wondering whether everyone in your family needs a scarf for the holidays.
Knitting looms come in several shapes, including round looms, long looms, rectangular looms, and adjustable looms. For scarves, long or rectangular looms are especially popular because they make it easy to create flat panels. However, round looms can also be used for flat scarves if you work back and forth instead of knitting continuously in a circle.
Why a Scarf Is the Perfect First Loom Project
A scarf is the classic beginner knitting project for a reason. It does not require shaping, sleeves, buttonholes, or the emotional drama of realizing your sweater has one arm longer than the other. With a scarf, you simply build rows until the piece reaches the length you want.
Loom knitting makes the project even more beginner-friendly. The pegs hold your stitches in place, which helps prevent dropped stitches and uneven rows. You can pause anytime without worrying that your entire project will escape. Scarves also let you practice the most important loom knitting skills: casting on, wrapping pegs, maintaining tension, knitting rows, binding off, and weaving in ends.
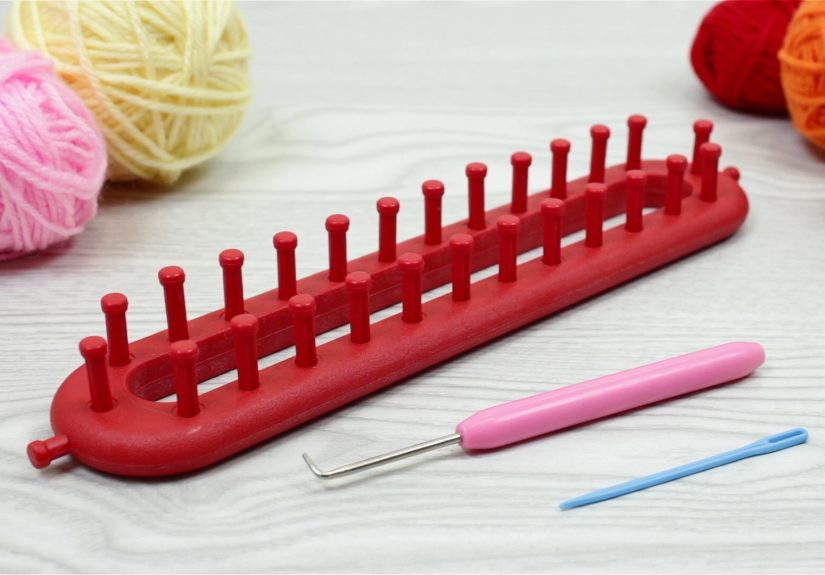
Supplies You Need to Knit a Scarf on a Loom
1. A Knitting Loom
For a beginner scarf, choose a long loom, rectangular loom, or round loom with enough pegs to create your preferred width. A scarf that is 6 to 8 inches wide is comfortable for most adults. A skinny fashion scarf may use fewer pegs, while a chunky winter scarf may use more.
2. Yarn
Medium-weight yarn is a reliable choice for beginners, while bulky or super bulky yarn creates a thicker, warmer scarf that works up faster. If your loom has wide spacing between pegs, thicker yarn usually fills the gaps better. If your loom has closer pegs, medium-weight yarn can produce a smoother fabric.
Soft acrylic, wool-blend, or washable yarn is ideal for scarves. Avoid very slippery yarn for your first project because it can slide around the pegs. Also avoid very fuzzy yarn at the beginning because it can make stitches harder to see. Once you are comfortable, fuzzy yarn can absolutely join the party.
3. Loom Hook
A loom hook is used to lift loops over the pegs. Most loom kits include one. If yours does not, buy a comfortable hook with a sturdy handle. Your hands will thank you after row number 137.
4. Scissors
You will need scissors to cut the yarn when you finish the scarf or change colors.
5. Tapestry Needle
A large-eye tapestry needle helps weave in yarn tails neatly. It is also useful for sewing ends together if you decide to turn your scarf into an infinity scarf.
6. Measuring Tape
A measuring tape helps you check scarf width and length. A typical adult scarf is about 60 to 70 inches long, but you can make yours shorter, longer, wider, or dramatically theatrical.
Best Yarn and Loom Size for Beginners
If this is your first loom scarf, choose a medium or bulky yarn in a light or medium color. Dark yarn looks elegant, but it can hide stitches and make mistakes harder to spot. Light gray, cream, soft blue, sage, or tan are excellent beginner colors because the loops are easy to see.
For a warm everyday scarf, bulky yarn on a long loom is a great combination. For a lighter scarf, use medium-weight yarn and a stitch that creates good structure, such as garter stitch or rib stitch. If your fabric looks too loose, try using two strands of medium-weight yarn held together as one. This creates a fuller fabric and helps close the gaps between stitches.
Basic Loom Knitting Terms You Should Know
Cast On
Casting on means placing the first row of loops onto the loom. This creates the foundation of your scarf.
Working Yarn
The working yarn is the yarn connected to the ball or skein. This is the yarn you wrap around the pegs as you knit.
Pegs
Pegs are the small posts on the loom that hold your loops. Each peg acts like a stitch holder.
Knit Over
To knit over, you use the loom hook to lift the bottom loop over the top loop and off the peg. This creates a stitch.
Bind Off
Binding off removes the finished scarf from the loom while securing the last row so it does not unravel.
How to Knit a Scarf on a Loom Step by Step
Step 1: Make a Slip Knot
Start by making a slip knot at the end of your yarn. Place the slip knot on the anchor peg if your loom has one. The anchor peg is usually located on the side of the loom and is not part of the actual scarf stitches. It simply holds the yarn in place while you begin.
Do not pull the slip knot too tight. You want it secure, not locked down like it is guarding a treasure chest.
Step 2: Choose Your Scarf Width
Decide how many pegs you want to use. For a narrow scarf, you might use 10 to 14 pegs. For a standard adult scarf, 16 to 24 pegs often works well, depending on the loom gauge and yarn thickness. The wider the scarf, the more pegs you use.
A good beginner target is about 7 inches wide. After you knit several rows, measure the fabric rather than relying only on peg count. Different yarns and stitches can change the final width.
Step 3: Cast On With the E-Wrap Method
The e-wrap cast-on is one of the easiest methods for beginners. Wrap the working yarn around each peg in a cursive “e” shape. Move from peg to peg until you have wrapped the number of pegs needed for your scarf width.
Keep the wraps relaxed. Tight loops are difficult to lift and can make your scarf stiff. Loose loops are easier to work with, but do not let them become floppy. Aim for gentle, even tension.
Step 4: Wrap a Second Row
After casting on the first row, wrap the same pegs again so each peg has two loops. The bottom loop is the older loop, and the top loop is the newer loop.
Step 5: Knit Over
Using the loom hook, lift the bottom loop over the top loop and over the peg. Repeat this on every peg in your scarf width. Congratulations: you have made your first row of loom knitting. It may not look like much yet, but neither does cookie dough before the oven gets involved.
Step 6: Continue Knitting Rows
Wrap the pegs again and knit the lower loops over the upper loops. Continue this process row after row. As the scarf grows, gently pull the fabric downward through the center or underside of the loom so the stitches settle evenly.
For a simple e-wrap scarf, repeat the same stitch until your scarf reaches the desired length. This creates a soft, stretchy fabric with a stockinette-style look. Keep in mind that e-wrap fabric may curl at the edges, especially with certain yarns. If you want a flatter scarf, consider using garter stitch or adding a border.
How to Make a Scarf That Does Not Curl
One common beginner surprise is curling. You finish several inches, admire your work, and then the edges roll inward like the scarf is trying to become a burrito. Curling happens because some knit stitches naturally pull the fabric in one direction.
To reduce curling, use a stitch pattern with more balance. Garter stitch is a great option because it alternates knit and purl-style rows, creating a fabric that lies flatter and looks attractive on both sides. Rib stitch is another strong choice because it alternates knit and purl stitches across the row, creating stretchy texture.
You can also add a border. For example, knit the first few and last few pegs in a garter-style edge while using e-wrap for the center. Another easy method is to block the finished scarf, which means gently shaping it with moisture and allowing it to dry flat. Blocking helps, but it cannot always defeat severe curling by itself, so stitch choice matters.
Simple Stitch Options for a Loom Knit Scarf
E-Wrap Stitch
The e-wrap stitch is fast, easy, and beginner-friendly. It creates a loose, stretchy fabric. It is excellent for chunky scarves, but it may curl at the edges.
U-Wrap Stitch
The u-wrap stitch is slightly tighter than the e-wrap stitch. Instead of wrapping all the way around the peg, the yarn forms a U shape in front of the peg before the lower loop is lifted over. This creates a neater, firmer fabric.
Flat Knit Stitch
The flat knit stitch makes a tighter stitch and uses less yarn than e-wrap. Beginners should avoid pulling too tightly with this stitch because it can become difficult to knit over.
Garter Stitch
Garter stitch is a favorite for scarves because it lies flatter and has a squishy texture. It is a little slower than e-wrap, but the finished scarf often looks more polished.
Figure Eight Stitch
On a long loom, the figure eight stitch wraps yarn between two rows of pegs, creating a thicker double-knit fabric. This is great for warm scarves and produces a finished look on both sides.
How Long Should a Loom Knit Scarf Be?
Scarf length depends on the wearer and style. A child’s scarf may be around 36 to 48 inches long. A standard adult scarf is often around 60 to 70 inches. A dramatic wrap-style scarf can be 72 inches or longer. If you are making a scarf as a gift, a safe adult length is about the height of the person wearing it.
Try wrapping the scarf around your neck while it is still on the loom, being careful not to pull stitches off the pegs. If it feels comfortable and gives you enough length to style, you are ready to bind off.
How to Change Yarn Colors
To make stripes, stop knitting at the end of a row. Cut the old color, leaving a 5- to 6-inch tail. Tie or join the new color near the edge, leaving another tail to weave in later. Continue knitting with the new color.
For clean stripes, change colors on the same side of the scarf each time. This keeps the transitions consistent. After finishing, weave the tails into the back of the scarf using a tapestry needle.
How to Bind Off a Loom Knit Scarf
Binding off is the final step that secures your stitches. A basic bind-off works well for most beginner scarves. Start at one end of the row. Move the loop from the second peg onto the first peg so the first peg has two loops. Knit the bottom loop over the top loop. Then move the remaining loop to the next peg. Repeat this process across the row until one loop remains.
Cut the working yarn, leaving a tail about 6 inches long. Pull the tail through the final loop and tighten gently. Do not yank it like you are starting a lawn mower. A neat, gentle finish looks better and keeps the edge flexible.
Finishing Touches: Fringe, Blocking, and Weaving Ends
Add Fringe
Fringe is optional, but it gives a scarf a classic handmade look. Cut several pieces of yarn twice the length you want the fringe to be. Fold each piece in half, pull the folded loop through the scarf edge with a crochet hook or tapestry needle, and pull the loose ends through the loop. Tighten gently.
Weave in Ends
Thread each yarn tail onto a tapestry needle and weave it through nearby stitches. Follow the path of the yarn so the tail disappears into the fabric. Trim any excess.
Block the Scarf
Blocking helps even out stitches and improve the scarf’s shape. For acrylic yarn, gentle steam blocking may help, but avoid direct heat that can damage fibers. For wool or wool blends, damp blocking often works well. Lay the scarf flat, shape it evenly, and let it dry completely.
Common Loom Knitting Mistakes and How to Fix Them
Your Loops Are Too Tight
If your hook struggles to lift the lower loops, your tension is probably too tight. Wrap the yarn more loosely on future rows. Your hands should feel relaxed, not like they are negotiating with the loom.
Your Scarf Is Too Loose
If the stitches look open and floppy, try using thicker yarn, holding two strands together, or switching to a tighter stitch such as u-wrap or flat knit.
The Edges Look Uneven
Uneven edges are common at first. Focus on wrapping the first and last pegs with consistent tension. You can also slip the first stitch of each row or use a border stitch for a cleaner edge.
You Dropped a Stitch
If a loop falls off a peg, place it back on the peg as soon as you notice. If it has unraveled down a row or two, use the loom hook to pull the loose strand back through the loop. Go slowly. Yarn is forgiving, but it appreciates patience.
Beginner Pattern: Easy Loom Knit Scarf
Finished Size
About 7 inches wide by 65 inches long.
Materials
- Long knitting loom or round loom used as a flat panel
- Bulky yarn or two strands of medium-weight yarn
- Loom hook
- Scissors
- Tapestry needle
- Measuring tape
Instructions
- Make a slip knot and place it on the anchor peg.
- Choose 18 to 22 pegs for a standard-width scarf.
- E-wrap each peg across the row.
- Wrap the pegs a second time.
- Lift the bottom loop over the top loop on each peg.
- Repeat wrapping and knitting over until the scarf measures about 65 inches.
- Bind off loosely.
- Weave in yarn tails.
- Add fringe if desired.
- Block lightly for a smoother finish.
Creative Ways to Customize Your Loom Knit Scarf
Once you understand the basic process, you can personalize your scarf in dozens of ways. Try wide stripes in two colors for a sporty look, or use a self-striping yarn for color changes without extra work. Add fringe for a traditional finish, pom-poms for a playful style, or sew the ends together to make an infinity scarf.
You can also experiment with texture. A garter stitch scarf looks classic and flat. A ribbed scarf feels stretchy and cozy. A figure eight scarf on a long loom creates a thick, double-layered fabric that is excellent for cold weather. As your confidence grows, your loom becomes less like a tool and more like a tiny scarf factory with pegs.
Care Tips for Your Finished Scarf
Always check the yarn label before washing. Many acrylic yarns are machine washable, while wool blends may need gentler care. Wash handmade scarves in cool water when possible, reshape them while damp, and lay them flat to dry. Hanging a wet scarf can stretch it out, especially if it is long or made with heavy yarn.
If the scarf pills after wear, use a fabric shaver or sweater comb carefully. Handmade scarves are meant to be worn, loved, and occasionally rescued from backpack zippers, coat buttons, and pets who believe yarn is a personal invitation.
Extra Experience: What I Learned From Knitting Scarves on a Loom
The first thing you learn when knitting a scarf on a loom is that tension matters more than speed. Beginners often want to wrap quickly because the process looks simple, but fast wrapping can lead to tight stitches, uneven edges, and sore hands. The best rhythm is steady and relaxed. If the yarn glides around the peg without pulling hard, you are probably doing it right.
Another helpful lesson is to measure the scarf after it has grown several inches. The first few rows can look strange, loose, or suspiciously unimpressive. Do not judge the whole project by the first inch. Loom knitting needs a little length before the fabric settles into its true shape. After 10 or 15 rows, the pattern becomes easier to see, and the scarf starts looking like something a human would proudly wear in public.
Yarn choice can completely change the experience. A soft bulky yarn makes the scarf grow quickly and hides small beginner mistakes. Medium-weight yarn gives more stitch definition, but it may require two strands held together if the loom has wide peg spacing. Very thin yarn on a large-gauge loom can look loose and net-like, which may be stylish if intentional but disappointing if you expected a cozy winter scarf.
Color also matters. Light-colored yarn makes learning easier because each loop is visible. Black yarn may look sleek, but it can turn evening knitting into a detective investigation. If you love dark colors, save them for your second or third scarf, when your hands already understand the motions.
The edges are usually where beginners notice the most inconsistency. One edge may look tidy while the other looks like it had a stressful morning. This is normal. The first and last pegs need gentle attention because they control the sides of the scarf. Wrapping them too tightly pulls the edge inward; wrapping them too loosely creates loops that stick out. After a few rows, your hands naturally learn the right pressure.
Taking breaks is also important. Loom knitting is easier than needle knitting for many people, but repetitive motion can still tire your hands. Short breaks keep the process enjoyable. Stretch your fingers, roll your shoulders, and resist the urge to finish the entire scarf in one heroic sitting. The scarf will wait. It is yarn, not a deadline with coffee breath.
One of the best practical tricks is to keep the working yarn feeding smoothly from the skein. If the yarn catches or tangles, your tension changes. Pull out a few feet of yarn before starting a row so you are not tugging at the skein while wrapping. This small habit makes the stitches more even and the process more relaxing.
Binding off deserves patience. Many beginners make a beautiful scarf and then bind off too tightly, creating one stiff, puckered end. Keep the bind-off loose enough to match the stretch of the scarf. If the final edge looks narrow, undo it carefully and try again with a softer hand.
Finally, the biggest lesson is that small imperfections rarely matter once the scarf is worn. A slightly uneven row or tiny tension change disappears in the overall texture. Handmade items have character. The goal is not factory perfection; the goal is a scarf that is warm, useful, and made by you. That is the charm. That is the win.
Conclusion
Knitting a scarf on a loom is simple enough for beginners and satisfying enough to keep experienced crafters coming back. With the right loom, soft yarn, relaxed tension, and a basic stitch pattern, you can create a scarf that looks beautiful and feels personal. Start with an easy e-wrap scarf, try garter stitch when you want flatter edges, and add fringe or stripes when you are ready to customize.
The best part is that loom knitting builds confidence quickly. Every row teaches your hands what to do next. Before long, you will not just know how to knit a scarf on a loom; you will be planning the next one, choosing colors like a yarn-store strategist, and casually saying things like, “Oh, I made this,” while pretending that is not the most satisfying sentence in the world.


