Table of Contents >> Show >> Hide
- Why Grilled Vegetables Are So Good (and So Easy to Mess Up)
- Step 1: Set Up the Grill for Success
- Step 2: Prep Vegetables Like You Mean It
- Step 3: Choose the Best Heat for Each Vegetable
- Step 4: Master Flavor Without Burning
- Step 5: Avoid the Most Common Grilling Mistakes
- A Foolproof Step-by-Step Workflow
- Food Safety and Smart Grilling Habits
- Do Grilled Vegetables Have to Be a Side Dish?
- Quick FAQ
- Conclusion
- Extended Experience Notes: 500+ Words of Real-World Grilling Lessons
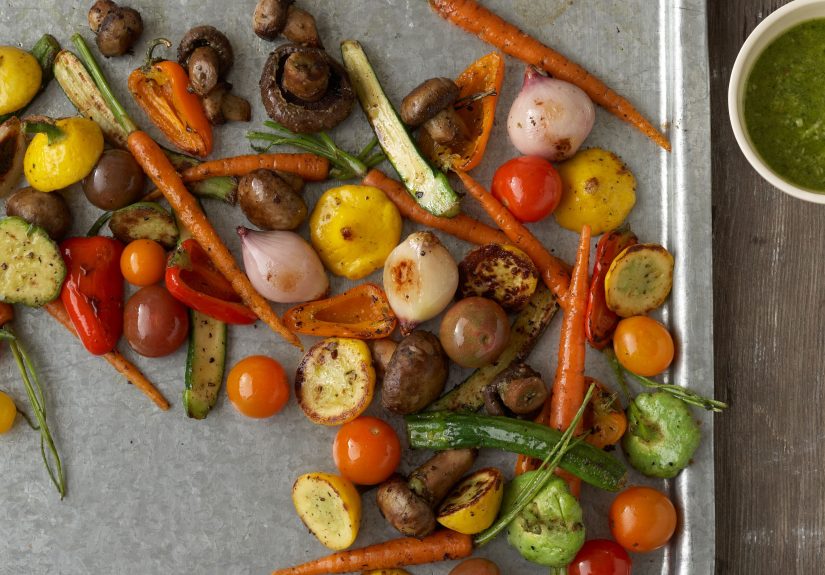
Grilled vegetables are the side dish that secretly wants to be the main event. Done right, they’re smoky, sweet, crisp-tender, and a little dramatic (in a good way). Done wrong, they’re either charred on the outside and raw in the middle, or they collapse into floppy sadness that tastes like regret. The good news: perfect grilled vegetables are not a chef-only skill. They come down to heat control, smart prep, and matching each vegetable to the right cut and cook time.
This guide gives you a repeatable, no-guesswork system you can use on gas, charcoal, or a grill pan. You’ll learn which vegetables grill best, how to season without burning, when to use direct versus indirect heat, and exactly how to avoid common mistakes. You’ll also get a practical vegetable timing chart and a real-world troubleshooting section, so even if your grill runs hot, your neighbors are distracting you, and someone keeps opening the lid “just to check,” your veggies still come out fantastic.
If your goal is simplegreat color, deep flavor, and vegetables people actually fight overthis is your playbook.
Why Grilled Vegetables Are So Good (and So Easy to Mess Up)
Vegetables are mostly water plus natural sugars. On a hot grill, that combo is magic: water evaporates, sugars caramelize, and you get sweetness plus smoky char. But the same physics can ruin dinner fast. Thin pieces dry out. Dense pieces burn before softening. Tiny pieces fall through the grates and become “tribute to the fire.”
The key is to treat vegetables by density and shape, not by wishful thinking. Asparagus is fast. Potatoes are slow. Zucchini planks are easy. Zucchini coins are chaos. Once you organize your prep around these realities, perfect results become routine.
Step 1: Set Up the Grill for Success
Build two heat zones
Use a hot zone for searing and a cooler zone for finishing. If the outside is darkening too quickly, slide vegetables to the cooler side to cook through gently. This one move prevents 90% of grill disasters.
Preheat fully, then clean
Preheat until the grates are truly hot before food goes on. Then brush grates clean. Hot, clean grates help vegetables release naturally and build better grill marks.
Use the right tools
- Long tongs for turning larger pieces
- Skewers for small items (mushrooms, cherry tomatoes, onion chunks)
- Grill basket for chopped mixed vegetables
- A sheet pan for staging (raw side and cooked side separate)
Step 2: Prep Vegetables Like You Mean It
Wash, then dry very well
Rinse produce under running water and skip soap or produce wash. Then dry thoroughly. Wet vegetables steam; dry vegetables sear. That difference is huge.
Cut for even cooking, not for aesthetics
Pretty cuts are nice. Even thickness is better. Uniform pieces cook at the same speed and brown consistently.
- Zucchini/squash: 1/2-inch planks or long slabs
- Eggplant: 1/2-inch rounds or planks
- Bell peppers: wide flat panels
- Onions: thick rings or wedges with root end intact
- Asparagus: whole spears, trimmed
- Potatoes/carrots: par-cook first, then grill to finish
Season in layers
The base formula is simple: light oil, kosher salt, black pepper before grilling. Finish with acid, herbs, and optional heat after grilling.
Translation: don’t drown vegetables in sugary marinade before they hit high heat. Save sticky glazes and sweet dressings for the end.
Step 3: Choose the Best Heat for Each Vegetable
Not every vegetable wants inferno mode. Tender vegetables love high heat and quick char. Dense vegetables need either medium heat plus time or a head start (par-boil, microwave steam, or roast-then-grill finish).
| Vegetable | Best Cut | Heat Level | Approx. Grill Time | Notes |
|---|---|---|---|---|
| Asparagus | Whole spears | Medium-high | 4–6 minutes | Turn once or twice; finish with lemon zest |
| Zucchini | 1/2-inch planks | Medium-high to high | 3–5 min/side | Don’t oversalt early; finish with vinaigrette |
| Bell peppers | Flat panels | Medium-high | 8–10 minutes | Great for sandwiches, bowls, pasta |
| Eggplant | 1/2-inch slices | Medium-high | 6–8 minutes | Brush oil lightly; eggplant absorbs fast |
| Mushrooms (portobello) | Whole caps | Medium-high | 2–4 min/side | Gills up first to keep juices in |
| Corn | Whole ears | Medium | 10–15 minutes | Turn occasionally until kernels spot-char |
| Onions | Thick rings/wedges | Medium | 8–12 minutes | Use skewers for rings if needed |
| Potatoes | Par-cooked wedges | Medium | 10–15 minutes after par-cook | Steam or boil first for creamy interior |
| Carrots | Halved lengthwise, par-cooked | Medium | 8–12 minutes after par-cook | Finish with honey-lime or herb butter |
Step 4: Master Flavor Without Burning
Use the “fat + salt + acid + fresh” formula
This is the easiest way to make grilled vegetables taste restaurant-level:
- Fat: olive oil or avocado oil
- Salt: kosher salt before and (lightly) after grilling
- Acid: lemon juice, sherry vinegar, balsamic, red wine vinegar
- Fresh: chopped parsley, dill, basil, cilantro, mint, scallions
Three fast finishing combos
- Lemon-Herb: olive oil + lemon + parsley + garlic
- Smoky-Spicy: olive oil + lime + chili flakes + cumin
- Balsamic-Garlic: balsamic + olive oil + oregano + black pepper
Add finishing sauces after grilling for maximum brightness and minimal scorching.
Step 5: Avoid the Most Common Grilling Mistakes
Mistake #1: Wrong-size cuts
Tiny pieces cook unevenly and drop through grates. Cut larger, flatter surfaces for better contact and easier flipping.
Mistake #2: One heat setting for everything
If everything is over the hottest part of the grill, something will burn. Use two zones and move food as needed.
Mistake #3: Over-oiling
A light coating is enough. Excess oil can cause flare-ups and bitter, smoky taste. If sticking is your issue, lightly oil clean grates and use proper preheat.
Mistake #4: Flipping too often
Put vegetables down, let them sear, then flip. If they stick, they’re usually not ready yet.
Mistake #5: No finishing salt or acid
Heat adds depth, but acid adds life. A squeeze of lemon can rescue a “meh” platter in seconds.
A Foolproof Step-by-Step Workflow
- Preheat grill (hot), clean grates.
- Create two zones (hot + medium/cool).
- Wash and dry vegetables thoroughly.
- Cut by density; keep thickness consistent.
- Par-cook dense vegetables if needed.
- Toss or brush with light oil, salt, pepper.
- Start dense vegetables first; quick-cook veggies later.
- Grill with lid as needed, flip once or twice.
- Move pieces that brown too fast to cooler zone.
- Finish with acid, herbs, and optional sauce.
- Serve warm or room temp (both are excellent).
Food Safety and Smart Grilling Habits
- Wash produce under running water; skip soap.
- Keep raw meat tools and platters away from ready-to-eat vegetables.
- Don’t reuse marinade that touched raw meat unless it’s boiled first.
- Refrigerate perishables promptly (especially in hot weather).
- If grilling mixed meals, cook meat to safe temperatures and use a food thermometer.
Do Grilled Vegetables Have to Be a Side Dish?
Absolutely not. Build a full meal around them:
- Grain bowls: grilled vegetables + quinoa + chickpeas + tahini
- Tacos: charred peppers, onions, mushrooms + avocado crema
- Pasta: grilled zucchini, eggplant, cherry tomatoes + ricotta
- Sandwiches: grilled portobello, peppers, provolone, arugula
- Salads: warm grilled vegetables over greens with vinaigrette
Quick FAQ
Should I salt vegetables before or after grilling?
Usually both, lightly. Salt before for base seasoning, then adjust after grilling for precision.
Can I grill frozen vegetables?
You can, but texture is usually softer and wetter. Fresh vegetables generally give better char and structure.
What if I don’t have an outdoor grill?
Use a stovetop grill pan, broiler, or cast-iron skillet. You’ll still get browning and concentrated flavor, though smoke profile differs.
How do I keep veggies from sticking?
Preheat thoroughly, clean grates, use a light oil film, and don’t flip too early.
Conclusion
Perfect grilled vegetables aren’t about luck. They’re about system: proper heat zones, smart cutting, light seasoning before grilling, and bright finishing flavors after. Once you stop treating all vegetables the same, your results get dramatically bettercleaner char, better texture, more flavor, and zero “burnt-outside-raw-inside” heartbreak.
Start with a simple lineup (zucchini, peppers, onions, mushrooms), follow the timing chart, and use finishing acid every single time. Soon, you’ll be the person whose vegetable platter disappears before the burgers are done. That’s not a side dish. That’s a victory.
Extended Experience Notes: 500+ Words of Real-World Grilling Lessons
One of the most useful lessons from home grillers is that confidence grows fastest when you repeat the same vegetable mix several times in a row. Instead of changing everything every weekend, many cooks pick a “core four” (zucchini, peppers, onions, mushrooms) and run the same setup until timing becomes second nature. By week three, they’re no longer guessing. They know exactly when zucchini is ready to flip by the color at the edges, how onions soften in the center before they caramelize on the outside, and how mushrooms shrink just enough when they’re juicy but not watery.
Another common experience: people often start too hot because high heat sounds exciting. In practice, medium-high with a backup cooler zone wins more often than full blast. A frequent story is this: first round gets dark too quickly, second round gets moved to a cooler side, and suddenly everything is betterless bitterness, more tenderness, and no panic flipping. The lesson isn’t “never use high heat.” It’s “use high heat strategically, not permanently.”
There’s also a pattern with seasoning. Early attempts often rely on thick bottled marinades loaded with sugar. The result can be patchy browning and occasional flare-ups. After a few cooks, people switch to a lighter pre-grill coat (oil, salt, pepper) and reserve sweet or acidic sauces for the finish. This tiny adjustment creates cleaner flavor and better color. It also keeps the grill easier to manage, because fewer drips mean fewer surprise flames.
Texture management is another repeated theme. Many cooks discover that slicing too thin is the hidden enemy. Thin cuts look elegant on a cutting board but can overcook in moments. Slightly thicker cutsespecially half-inch planks for squash and eggplanthold moisture better and are easier to flip. Similarly, when dense vegetables like carrots or potatoes refuse to cooperate, pre-cooking becomes the game changer. A short par-boil or steam softens the interior, then the grill adds smoky edges. That two-step method consistently turns “almost done” vegetables into actually delicious ones.
Timing logistics matter more than most people expect. Grillers who stage vegetables in waves usually report better outcomes than those who try to cook everything at once. Dense vegetables go first, quick vegetables go last, and finished vegetables rest on a tray while the next batch cooks. This wave approach lowers stress and prevents the classic scenario where asparagus is overdone while potatoes are still firm.
Serving strategy also changes how people perceive success. When vegetables are treated as a final composed dishfinished with lemon, herbs, maybe a crunchy topping like toasted nutsthey get eaten faster and judged more positively. When they’re dropped on the table plain, they’re seen as optional. The same grill marks, different finish, totally different reaction.
Finally, the most experienced home grillers almost always mention one mindset shift: stop chasing “perfect identical grill marks” and start chasing “balanced doneness + strong flavor.” Some pieces will char more than others. That’s normal and often desirable. The real win is a platter where every vegetable tastes intentionalseasoned, tender, and bright. If your vegetables disappear quickly, people ask for the method, and leftovers are mysteriously missing the next morning, you nailed it.


