Table of Contents >> Show >> Hide
- What “Sous Vide” Means (and What It Means in Real Life)
- How Sous Vide Cooking Works
- What You Need to Sous Vide at Home
- The Basic Sous Vide Workflow (a.k.a. “Set It and… Actually Forget It”)
- Why People Love Sous Vide (and Why It’s Not Just a Trend)
- What Sous Vide Is Not (Let’s Keep Expectations Deliciously Realistic)
- Food Safety: The Part You Should Actually Read
- Beginner-Friendly Time-and-Temperature Examples
- Common Sous Vide Mistakes (and How to Fix Them)
- Sous Vide FAQ
- of “Real-Life Sous Vide Experiences” (What People Usually Notice)
- Conclusion
- SEO Tags
Imagine your dinner taking a relaxing bath with a digital lifeguard watching the thermometer like it’s the Super Bowl.
That’s sous vide cooking in a nutshell: a gentle, precisely controlled water bath that brings food to
the exact doneness you wantthen holds it there until you’re ready to finish and serve.
Sous vide can sound fancy (because French), but it’s basically a very practical way to cook with fewer surprises.
If you’ve ever pulled a “perfect” steak out of the pan only to find it’s perfect for about 14 seconds, sous vide is
your new best friend.
What “Sous Vide” Means (and What It Means in Real Life)
“Sous vide” literally translates to “under vacuum,” referring to food sealed in a bag with the air removed.
In modern home kitchens, people use the term a little more loosely: it typically means cooking food in a precisely
temperature-controlled water bath, whether you use a vacuum sealer or a sturdy zipper-lock bag.
The big idea isn’t the bagit’s the temperature control. Water transfers heat efficiently, and a sous vide
circulator keeps that water at a steady temperature for as long as you need. That steadiness is what creates the magic.
How Sous Vide Cooking Works
Traditional cooking methods blast food with high heat and hope the center catches up before the outside becomes a science
experiment. Sous vide flips the script:
- You pick the target temperature (for example, 131°F for medium-rare steak).
- You seal the food in a bag so water stays out and flavors stay in.
- You cook in a water bath held exactly at that temperature.
- The food can’t “overshoot” the water temperature, so the inside and outside end up much closer in doneness.
This is why sous vide steak can be rosy from edge to edge instead of having a bullseye pattern of “gray ring, pink center,
existential disappointment.”
What You Need to Sous Vide at Home
1) An immersion circulator (the star of the show)
The most common setup is an immersion circulator: a wand-like device that clamps to a pot or container,
heats the water, and gently circulates it to keep the temperature consistent.
2) A container (a pot worksno crystal goblet required)
A stockpot is fine to start. Many people eventually upgrade to a clear polycarbonate container (restaurant-style) because
it’s roomy, stable, and easy to cover.
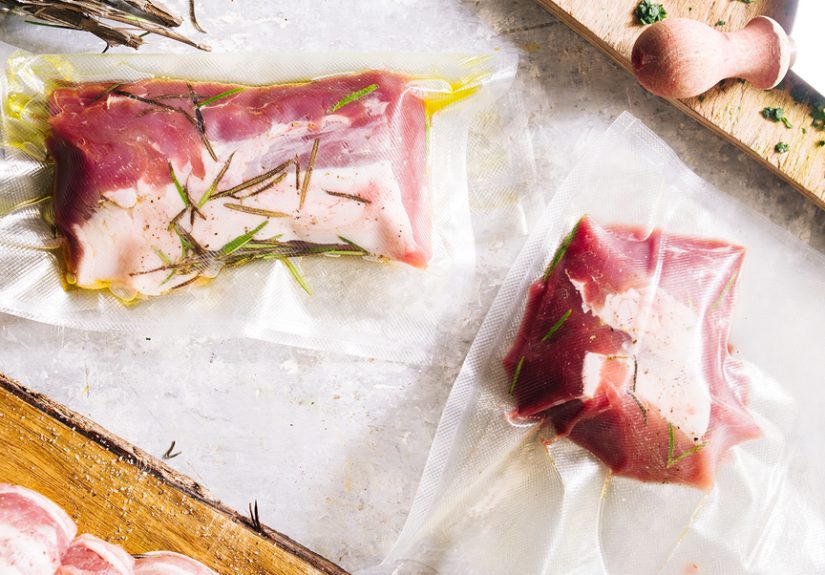
3) Bags: vacuum-seal or “water displacement”
You have two main options:
- Vacuum sealer bags (best for long cooks, batch cooking, and freezer storage).
-
Zipper-lock freezer bags using the water displacement method (a simple technique where you
lower the bag into the water so pressure pushes air out before sealing).
4) A way to finish food (because sous vide doesn’t brown)
Sous vide is amazing at doneness, but it won’t give you that craveable crust. Plan to finish with one of these:
- Hot skillet (cast iron is the classic)
- Grill
- Broiler
- Culinary torch (best as a helper, not the only heat source for most steaks)
The Basic Sous Vide Workflow (a.k.a. “Set It and… Actually Forget It”)
- Season the food. Salt, pepper, and simple aromatics go a long way. Keep it straightforward your first few tries.
- Bag it. Add a little fat if you want (butter, olive oil). Remove as much air as possible.
- Preheat the water bath. Clip on the circulator, set the temperature, and let the water come up to temp.
- Cook for the recommended time. Think “minutes to hours,” depending on the food and thickness.
- Remove, dry, and finish. Pat meat very dry so you sear (brown) instead of steam (sad).
- Serveor chill for later. Sous vide is great for meal prep when you chill safely and reheat gently.
Pro tip: label bags with the food, temp, and start time. Your future self will appreciate it when your fridge looks like
a delicious evidence locker.
Why People Love Sous Vide (and Why It’s Not Just a Trend)
- Precision: You decide what “done” meansthen you actually get it.
- Consistency: Once you like a result, you can repeat it reliably.
- Juicier proteins: Less moisture loss compared with many high-heat methods.
- More forgiving timing: Dinner doesn’t go from perfect to overcooked in a blink.
- Meal prep superpower: Cook, chill, store, then reheat and sear when needed.
What Sous Vide Is Not (Let’s Keep Expectations Deliciously Realistic)
Sous vide isn’t a shortcut to flavor on its own. It’s more like a precision tool:
- It doesn’t brown food (you still need a finishing step for crust and caramelization).
- It doesn’t fix poor seasoning (though it makes it easier to control results).
- It can be slower than pan-cooking for thin items (a thin fish fillet might be faster in a skillet).
Think of sous vide as a method that trades speed for control. If you value “perfectly cooked” over “done in 12 minutes,”
it’s a great trade.
Food Safety: The Part You Should Actually Read
Sous vide is safe when done correctlybut it’s also a method where safety matters because you’re often cooking at lower
temperatures for longer periods. Here are the key principles:
1) Time and temperature work together
Food safety isn’t only about hitting a single number. Many pathogens are reduced through a combination of
temperature + time (pasteurization). That’s why sous vide recipes specify both.
2) Know the USDA safe minimum internal temperatures
If you want a simple baseline, the USDA publishes safe minimum internal temperatures (for example, poultry is higher than
whole cuts of beef). Sous vide can achieve safety at lower temperatures when held long enough, but beginners may feel more
comfortable starting with the standard safe temp framework and reputable sous vide time/temperature charts.
3) Respect the “danger zone” and the 4-hour rule
One important food code concept: limiting how long food spends between refrigerator temps and hotter cooking temps.
In practical terms, avoid extended cooks at very low temperatures unless you’re following a validated sous vide chart.
As a general safety mindset, don’t let food linger too long in the range where bacteria can multiply quickly.
4) If you’re not serving immediately, cool it fast
Planning to chill and store your sous vide food? Rapid cooling matters. A common approach is an ice-water bath:
remove the bag from the hot water, submerge in lots of ice water, then refrigerate. The goal is to get the food cooled
quickly through the temperature range where pathogens grow best.
5) Vacuum-sealed is not shelf-stable
Reduced-oxygen packaging can change how certain bacteria behave. Don’t treat sous vide bags like pantry items.
Refrigerate promptly (or freeze), especially for longer storage.
Extra caution groups: pregnant people, older adults, young children, and anyone with a compromised immune
system should be especially careful with low-temperature cooking and follow trusted food safety guidance.
Beginner-Friendly Time-and-Temperature Examples
Times and temperatures vary by thickness, cut, and your preferred texture. These are common starting points many home cooks
use, but always rely on reputable sous vide guides and food safety principles:
| Food | Texture Goal | Typical Bath Temp | Typical Time | Finish |
|---|---|---|---|---|
| Steak (1–2 inches) | Medium-rare | 129–134°F | 1–3 hours | Hot sear 45–90 seconds/side |
| Chicken breast | Juicy, tender | 145–150°F | 1–2 hours | Quick sear for color |
| Pork chops | Moist, not dry | 140–145°F | 1–2 hours | Sear + rest briefly |
| Salmon | Silky, tender | 120–130°F | 30–45 minutes | Optional sear or serve as-is |
| Eggs (in shell) | Jammy / custardy | 140–145°F | 40–60 minutes | Serve or chill and peel later |
| Carrots | Tender, never mushy | 183°F | ~1 hour | Quick glaze in a skillet |
Notice vegetables are often cooked at much higher temperatures than meat. That’s because plant structure behaves differently:
you’re not “doneness-checking” muscle fibersyou’re persuading pectin to relax.
Common Sous Vide Mistakes (and How to Fix Them)
“My bag is floating like it’s trying to escape.”
Floating is usually trapped air, vapor expansion, or a leaky seal. Fix it by resealing, using water displacement more carefully,
or weighing the bag down (a clip + spoon trick works surprisingly well).
“My steak tastes… boiled?”
That’s almost always a finishing issue. Dry it thoroughly. Use a screaming-hot pan. Sear quickly. The goal is crust without
overcooking the interior you worked so hard to perfect.
“Everything’s tender, but the texture is weird.”
Sous vide is very good at tenderizingwhich can become too tender if you cook certain cuts too long. Follow a time range,
and think in terms of texture goals: “sliceable,” “fork-tender,” “shreddable,” etc.
“Water level dropped and my circulator yelled at me.”
Long cooks evaporate water. Cover the container with a lid, foil, or even plastic wrap (keeping it safely away from the device’s
hot parts). Some people use ping-pong balls as a floating insulation layeryes, really.
“The bag leaked and now my chicken is taking a bath bath.”
Double-bag sharp items. Avoid punctures from bones. Check zipper seals. And if you’re using zipper bags, choose freezer-grade ones.
Sous Vide FAQ
Do I need a vacuum sealer?
Not necessarily. Many people start with zipper-lock freezer bags and the water displacement method. A vacuum sealer is a nice upgrade
for batch cooking, longer cooks, and cleaner freezer storage.
Can I sous vide from frozen?
Often, yes. Many cooks add extra time (commonly 30–60 minutes, depending on thickness) because the water bath still has to warm the
center through the frozen stage. Use reputable guides for the specific food.
Is it okay to leave food in the bath “a little longer”?
One of sous vide’s perks is timing flexibility, but “longer” isn’t infinite. Past a certain point, texture changes (especially in
tender cuts). And at low temperatures, safety guidelines still apply. When in doubt, follow a trusted sous vide chart.
What’s the best first thing to cook sous vide?
If you want a quick win: steak, pork chops, salmon, or carrots. Eggs are also fun because you can dial in the exact yolk texture
you likelike choosing a streaming plan, but tastier.
of “Real-Life Sous Vide Experiences” (What People Usually Notice)
Most people’s first sous vide experience starts the same way: curiosity, a gadget that looks like it belongs in a science lab,
and a tiny voice in their head whispering, “Am I about to cook dinner in a bag like it’s a sweater in the wash?” Then the results
show up, and suddenly that tiny voice is asking where the next paycheck went because now it “needs” a dedicated container and
a vacuum sealer.
One common early moment is the steak revelation. Home cooks often expect sous vide to be “better,” but they don’t
expect the evenness. A pan-seared steak can be wonderful, but it’s easy to overshoot. Sous vide tends to produce that
consistent pink interior that looks like a restaurant sliced it on purpose. The finishing sear becomes the fun partalmost like
putting a crisp jacket on a perfectly cooked center. The first time you cut into it and it’s the color you wanted all the way through,
it feels suspiciously like cheating.
Then comes the bag behavior phase. People discover that food likes to float, especially fatty items or anything with
trapped air. There’s a weirdly satisfying learning curve: sealing better, using water displacement more slowly, clipping the bag to the
side, and weighing it down so it stays politely underwater. This is often when someone starts calling the setup “the hot tub,” which is
both accurate and mildly unsettling.
Another frequent experience is chicken skepticism turning into chicken loyalty. A lot of home cooks have been trained
to accept dry chicken breast as the price of “being safe.” With sous vide, many report that chicken breast becomes tender and juicy in a
way they didn’t think was possibleespecially when they follow a reputable time-and-temp guide and then sear quickly for color. The texture
is different from roasted chicken (less fibrous, more succulent), and that difference can be the whole point.
People also tend to fall in love with sous vide for weeknight logistics. Cooking ahead, chilling safely, and then finishing
quickly can make dinner feel less like a daily pop quiz. The experience is often described as “I did the hard part earlier,” which is the
kind of adulting energy everyone deserves.
Finally, there’s the vegetable surprise. Many expect sous vide to be a meat-only trick, then try carrots or potatoes and
realize the flavor can be more concentrated because the food cooks in its own juices. Once people notice that, they start experimenting:
infused oils, custards, cheesecake jars, even fruit. At that point, sous vide stops being a gadget and becomes a style of cookingone where
you’re not rushing heat, you’re guiding it.
Conclusion
Sous vide cooking is all about control: you choose the temperature, set the time, and let the water bath do the steady work.
The payoff is consistencyespecially with proteinsplus a smoother path to meal prep and restaurant-style results at home.
Start simple, respect food safety, finish with a proper sear, and you’ll see why so many people become sous vide evangelists
(the friendly kind, not the kind who judges your frying pan).


