Table of Contents >> Show >> Hide
- What Is a Stitched Leather Potholder, Exactly?
- Why Leather Works for Heat (and When It Doesn’t)
- Materials That Make (or Break) a Leather Potholder
- Design Options: From Minimalist Square to “Look What I Made”
- DIY Overview: How a Stitched Leather Potholder Comes Together
- Safety Checklist: Use It Like a Pro (Not Like a Cartoon)
- Care and Cleaning: Keep the Leather, Lose the Grime
- Troubleshooting: Common Issues (and Easy Fixes)
- Styling Ideas: Make It Pretty Without Making It Precious
- Real-World Experiences With Stitched Leather Potholders (What People Actually Notice)
- Conclusion
A stitched leather potholder is one of those kitchen items that feels oddly grown-up: it’s practical, durable, and just fancy enough to make you stand a little taller when you pull a Dutch oven out of the oven. It also has major “I own a cast-iron skillet and I’m not afraid to use it” energy.
But this isn’t just a rustic accessory you hang on a hook to impress guests who “totally love your vibe.” A well-made leather pot holder (or leather hot pad) can genuinely protect your hands and your countertopsespecially when it’s thoughtfully designed with the right leather, the right thickness, and strong stitching.
What Is a Stitched Leather Potholder, Exactly?
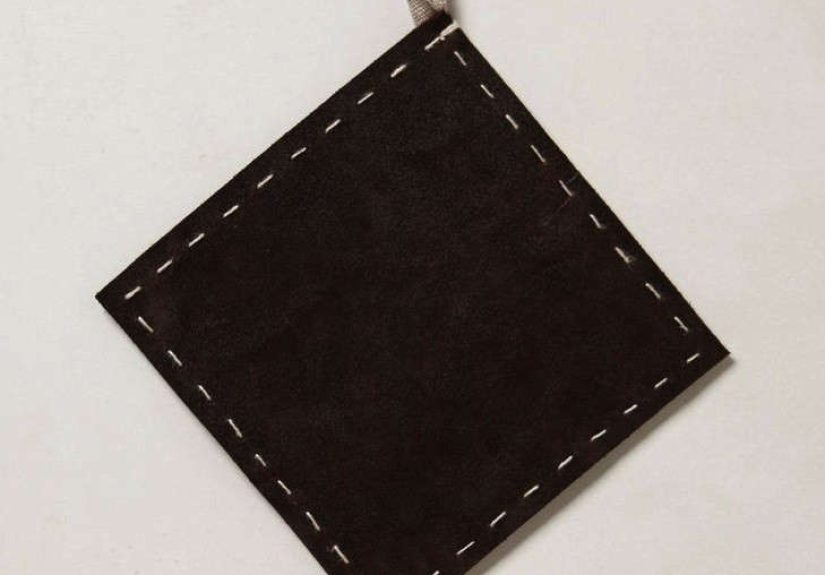
Think of it as the tougher cousin of a cotton potholder: a heat-resistant potholder made from one or more layers of leather, stitched together (often by hand) around the edges. Some versions are simple square hot pads. Others add a hanging loop, an inset grip panel, or a quilted-style stitch pattern that helps the layers stay snug and stable.
“Stitched” matters because seams do the heavy lifting. Sturdy stitching keeps layers aligned, reduces shifting, and helps the potholder hold its shape over time. And if you’re the DIY type, stitching is also your best friend because it means you can rely less on glue (and more on craftsmanship you can brag about without blushing).
Why Leather Works for Heat (and When It Doesn’t)
Leather is naturally dense and slow to transfer heat compared to many thin fabrics, which is why thick leather is often used in protective gear like gloves and aprons. For kitchen use, that density can translate to better “buffer time” when you’re grabbing a warm lid or sliding a hot baking dish onto a counter.
The big win: insulation + durability
A double-layer leather hot pad can feel surprisingly protective because heat has to travel through more material before it reaches your hand or surface. Some commercial suede leather hot pads are even marketed with high heat ratingsuseful as a general indicator that thick, layered construction can handle serious kitchen temperatures when used correctly.
The reality check: leather can scorch
Leather isn’t magic. It can dry out, darken, scorch, or degrade if you repeatedly hit it with very high heat or direct flame. Research on leather under fire/thermal conditions reports ignition-temperature values in the neighborhood of the low-to-mid 290°C range for certain leather samples, with thermal decomposition beginning below that depending on the material and conditionstranslation: leather can eventually burn if you push it hard enough, especially near open flame or extreme heat.
So the best mindset is this: a stitched leather potholder is excellent for “normal hot cookware handling,” but it’s not your “hold this directly over the stove flame while you do a victory speech” tool.
Materials That Make (or Break) a Leather Potholder
1) Leather type: suede vs. smooth, veg-tan vs. chrome-tan
For a potholder, you’re mainly shopping for thickness, grip, and comfort. Suede leather is popular because it has natural “traction,” which can help reduce slipping when you grab a lid or handle. Full-grain or top-grain smooth leather can also work wellespecially if it’s thick and paired with a grippy inset panel.
In leathercraft, you’ll often see two broad tanning categories:
- Vegetable-tanned leather (veg-tan): Known for structure, tooling friendliness, and a patina that deepens with age. Great for many leathercraft projects where you want firmness and shape.
- Chrome-tanned leather: Usually softer and more flexible, often available in many colors and finishes. Common in garments and upholstery, and frequently chosen when you want pliability.
For a stitched leather potholder, either can work, but your safest “success recipe” is thick leather (often 4–6 oz and up for each layer, depending on the design) plus smart construction. If you’re DIY-ing, choose leather sold for craft or utility use (not mystery scrap with unknown coatings).
2) Layering: the secret sauce for comfort
Many of the best-performing designs use two leather layers (or leather + an insulating core). That second layer isn’t just for dramait significantly improves heat protection and gives your stitching more to “bite” into.
Common layer pairings include:
- Leather + leather: Simple, durable, and very “heirloom kitchen.”
- Leather + wool felt or cotton batting: Adds insulation without a bulky look.
- Leather + textured grip panel: Helps with handling lids and slick cookware.
3) Thread: don’t let your stitches be the weak link
For stitching leather, you want thread that’s strong, abrasion-resistant, and not easily frayed by the edges of punched holes. Many leatherworkers use bonded polyester or bonded nylon thread (or waxed thread for hand-stitching). Polyester is often praised for UV and moisture resistance in general thread selection guidanceprobably not your potholder’s biggest issue unless you’re grilling outside every weekend, but still a nice durability bonus.
4) Stitching style: saddle stitch is a classic for a reason
If leatherwork had a “most trusted friend” stitch, it would be the saddle stitch. It uses two needles and one thread, creating a strong seam that can hold up even if one side gets nicked. Leather supply educators commonly teach saddle stitching as a foundational, durable method for hand-sewn leather goods, and it’s ideal for potholders because you want that seam to stay put through repeated bending and handling.
Design Options: From Minimalist Square to “Look What I Made”
The classic square hot pad
A square leather hot pad (roughly 7–9 inches) is the easiest format to use as both a potholder and trivet. It’s the go-to “grab a hot lid, save your counter” multitasker.
Inset grip panel
An inset panel can add style and function. It creates extra thickness in the centerright where heat is most concentratedand gives your fingers more grip.
Hanging loop
A hanging loop seems small until you don’t have one and your potholder ends up living in a drawer like a forgotten sock. Add the loop. Your future self will thank you.
DIY Overview: How a Stitched Leather Potholder Comes Together
If you’re making a DIY leather potholder, the workflow is refreshingly straightforward. Even beginner leathercrafters can get great results with patience and clean hole spacing.
Step 1: Choose a size and pattern
A common approach is an 8″ x 8″ main body with a smaller inset panel and a stitch guide areabig enough to protect your hand, small enough to handle comfortably.
Step 2: Cut leather cleanly
Use a sharp blade and a straight edge. Leather shows messy cuts the way white sneakers show mud.
Step 3: Mark and punch holes
Even spacing makes your stitching look professional. Leathercraft guides often recommend punching holes first (with chisels, an awl, or a punch) rather than trying to force a needle through thick leather and calling it “character.”
Step 4: Stitch (usually with saddle stitch)
Thread two needles, keep tension consistent, and stitch around the perimeter. A stitching pony (or any clamp setup) helps keep the work steady so your stitches stay clean and aligned.
Step 5: Finish edges
You can leave edges raw for a rugged look, or smooth/burnish for a cleaner finish. Rounded corners also help reduce curling and wear.
Safety Checklist: Use It Like a Pro (Not Like a Cartoon)
- Avoid open flame: Leather can scorch and eventually burn; don’t use it to handle items directly in flame contact.
- Watch for steam: Steam burns are fast and nasty. Leather helps with heat transfer, but it won’t “stop” steam the way you wish it would.
- Keep it dry: Moisture can increase heat transfer and can also stress leather over time.
- Test your potholder: Start with moderate heat tasks before trusting it with your hottest cookware.
- Retire it if it’s damaged: If it’s cracked, overly stiff, or badly scorched, promote it to “decor hook” duty.
Care and Cleaning: Keep the Leather, Lose the Grime
The best care routine is simple: wipe it down, don’t soak it, and don’t roast it on a radiator “to dry faster” (that’s how leather becomes a crunchy regret).
Quick cleaning routine
- Wipe with a dry or slightly damp soft cloth.
- If needed, use a small amount of leather-appropriate cleaner.
- Air dry at room temperatureaway from direct heat.
- Condition lightly once in a while to maintain flexibility (especially if the leather starts feeling dry).
Troubleshooting: Common Issues (and Easy Fixes)
“My potholder feels stiff.”
Thick leather can be firm at firstespecially veg-tan. Regular handling and light conditioning can help it relax over time. (Translation: it needs to live a little.)
“The edges are curling.”
Curling usually means uneven tension, uneven thickness, or moisture/heat stress. Rounded corners, consistent stitching, and double-layer construction help prevent it.
“My stitches look wobbly.”
This is almost always hole spacing or tension consistency. Stitching guides and a stable clamping setup make a huge difference, and most people see a big improvement after one project.
Styling Ideas: Make It Pretty Without Making It Precious
A stitched leather potholder doesn’t have to look like it belongs in a cabin (unless that’s your whole personality, in which case: carry on). You can make it modern, playful, or giftable with small design choices:
- Contrast thread: Cream thread on dark leather is chef’s-kiss level satisfying.
- Geometric stitching: Simple diamonds or parallel lines add texture and help stabilize layers.
- Embossed initials: Great for giftingespecially housewarming gifts that don’t scream “I panicked at the last minute.”
- Hanging loop hardware: A simple leather loop is great; a snap loop is even better for hooking onto oven handles.
Real-World Experiences With Stitched Leather Potholders (What People Actually Notice)
The first “experience” most people report with a stitched leather potholder is the satisfying confidence boost. Fabric potholders can feel flimsy when you’re dealing with heavy cookware, especially cast iron. A thick leather potholder feels more substantial in your handlike it’s actually participating in the job instead of cheering from the sidelines.
The second thing people notice is grip. Suede leather in particular tends to feel steady against metal handles and glass lids. That can matter more than you think when you’re lifting something heavy and you only get one chance to not drop it. A potholder that “grabs back” is comforting in the same way good tires are comfortingquietly preventing disaster.
Over the first couple of weeks, the leather usually starts to change. It softens slightly, and it may develop subtle darkening in the areas that see the most use. Many folks love this because it makes the potholder feel personalless like a store-bought object and more like a tool that’s part of their kitchen rhythm. (Yes, some people get sentimental about potholders. Kitchens do that.)
Another common observation: heat “buffer time” feels different. With a thick, double-layer leather hot pad, people often feel they have a little more time to adjust their grip or set something down without immediately feeling the heat punch through. That said, experienced home cooks also learn quickly that no potholder is a superhero. If you hold a screaming-hot pan too long, you’ll still feel it. The practical sweet spot is using leather for controlled moves: lift, shift, set down, done. Not “stand here and philosophize while holding a 450°F skillet.”
People who cook often also notice how a stitched leather potholder doubles as a trivet with less fuss. A fabric trivet can bunch up or slide. A leather trivet tends to stay where you put it, especially if it’s a thicker cut. That stability becomes particularly appreciated at the tablewhen you’re serving a hot dish and don’t want your trivet doing interpretive dance on your dining surface.
There are also “less glamorous” experienceslike realizing leather hates being soaked. Someone inevitably wipes it too aggressively with a wet sponge, then wonders why it feels stiff later. The learning curve is simple: wipe, don’t bathe. And if it does get damp, air dry it naturally. People who follow that rule tend to keep their potholders looking good for a long time, while people who don’t… end up with a decorative wall piece that “has character.”
Finally, a stitched leather potholder tends to become a small kitchen ritual object. It hangs where you can grab it quickly. It gets used for lids, baking trays, and hot serving dishes. It becomes the thing you reach for when you’re cooking on autopilotbecause it’s reliable. And for makers, there’s a bonus experience that never really gets old: every time someone compliments it, you get to casually say, “Oh, that? Yeah, it’s a stitched leather potholder,” as if you didn’t secretly practice your stitches like you were training for the Stitch Olympics.
Conclusion
A stitched leather potholder is one of the rare kitchen upgrades that’s both beautiful and genuinely useful. With the right leather, smart layering, and strong stitching, it can protect hands and surfaces, age gracefully, and add a little handcrafted charm to everyday cooking. Treat it well, keep it away from open flame, and it’ll earn its spot as a kitchen essentialnot just kitchen décor.