Table of Contents >> Show >> Hide
- Why Plastic Containers Make Ridiculously Good Pool Storage
- Pick the Right Container to Repurpose (So It Doesn’t Melt Into Sadness)
- Prep Your Container Like a Pro (Fast, Cheap, and Weirdly Satisfying)
- DIY Build #1: The Rolling Poolside “Grab-and-Go” Storage Cart
- DIY Build #2: Fence-Mounted Float + Noodle Station (The “Get It Off the Ground” Plan)
- DIY Build #3: The “Dry-Then-Store” Nested Bin System (No More Mildew Smell)
- Quick Mini-Hacks Using Repurposed Plastic Containers
- Important Safety Note: Pool Chemicals Are NOT a Repurposing Project
- Keep Your DIY Pool Storage Working All Summer
- Common Mistakes (So You Don’t Accidentally Build a Mosquito Spa)
- Conclusion: Cleaner Deck, Faster Cleanup, Happier Pool Days
- Real-World Experiences People Commonly Have With DIY Pool Storage (And What They Learn)
Pool season has a magical way of turning a peaceful backyard into a “Where did the goggles go?” scavenger hunt.
One minute you’re sipping lemonade, the next you’re stepping on a soggy dive toy like it’s a surprise LEGO.
The good news: you don’t need a fancy built-in cabana (or a second mortgage) to get organized.
With a few repurposed plastic containersplus some simple, practical tweaksyou can build
DIY pool storage that’s tough, water-friendly, and actually easy for real humans to maintain.
This guide walks you through smart container choices, quick prep tricks, and a few fun build options
from a rolling poolside caddy to a fence-mounted float station. You’ll get a system that dries fast,
keeps clutter under control, and makes cleanup feel less like a nightly ritual and more like a quick reset.
Why Plastic Containers Make Ridiculously Good Pool Storage
Plastic gets a bad rap (sometimes deserved), but for pool storage it’s basically the MVP:
it doesn’t rust, it wipes clean, and it can handle wet gear without throwing a tantrum.
Even better, repurposing what you already have keeps usable containers out of the trash and saves money.
What plastic does well in a pool zone
- Handles water: wet goggles, drippy toys, damp towelsno problem.
- Lightweight: easy for kids to carry (and for adults to relocate when storms roll in).
- Modular: you can stack, nest, label, and reorganize as your pool “collection” grows.
- Customizable: drill drainage, add hooks, attach wheels, or zip-tie compartments.
Pick the Right Container to Repurpose (So It Doesn’t Melt Into Sadness)
Not all containers are created equal. Some are built for indoor closets and will fade or get brittle outdoors.
For poolside use, choose containers that feel sturdy, have thicker walls, and don’t flex like a potato chip bag.
Great repurposing candidates
- Lidded storage totes (large): perfect for floaties, noodles, and inflatable games.
- Plastic laundry baskets (especially ventilated): great for quick-drop toy storage and drying.
- Milk crates: strong, open-sided, easy to hose out, and stackable.
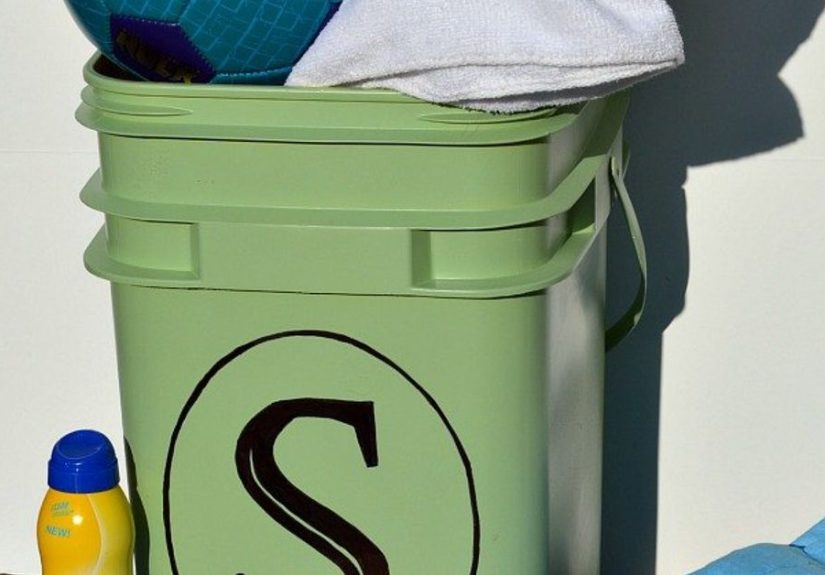
- 5-gallon buckets: ideal “rinse + corral” bins for small toys and tools.
- Detergent jugs & big shampoo bottles: cut into scoop bins or sunscreen caddies.
- Clear small bins with lids: best for goggles, earplugs, test strips, and spare parts.
Skip these (or use them only under cover)
- Thin, brittle clear bins that crack when bumped
- Flimsy snack containers (they warp, lids pop off, and bugs move in like they pay rent)
- Anything that previously held pool chemicals (more on chemical safety below)
Prep Your Container Like a Pro (Fast, Cheap, and Weirdly Satisfying)
Before you start bolting wheels onto things like you’re auditioning for a home makeover show,
do a little prep. This is what prevents mildew smells and “why is there a swamp in the bottom?” moments.
Container prep checklist
-
Deep clean: Wash with warm soapy water, rinse, and dry.
For stubborn smells, let it air out in shade for a day. -
Add drainage: Drill a few small holes in the bottom (and sometimes low on the sides).
Drainage is the difference between “fresh gear” and “science experiment.” - Smooth sharp edges: Sand any rough cut plastic so it doesn’t snag towels or scratch hands.
-
Label for speed: Use waterproof labels or a paint marker:
“GOGGLES,” “FLOATIES,” “POOL GAMES,” “SUNSCREEN,” “TEST KIT.” - Think airflow: If a bin has a lid, consider propping it slightly ajar after swim time to help items dry.
DIY Build #1: The Rolling Poolside “Grab-and-Go” Storage Cart
If you want one storage piece that acts like pool headquarters, this is it.
It’s part toy bin, part towel station, part “please stop leaving things on the deck” solution.
Best for
- Families with lots of small gear (goggles, rings, dive sticks)
- People who want to roll everything into shade or inside quickly
- Pool areas where you don’t want wall-mounted storage
Materials
- 1 large lidded plastic tote (sturdy)
- 4 swivel casters (optional but life-changing)
- Zip ties or outdoor-rated cable ties
- 1–2 repurposed detergent jugs (cleaned)
- Optional: short piece of PVC pipe for noodle holders
- Drill + bits, screwdriver, sandpaper
Steps
- Drain it: Drill 6–10 holes in the tote bottom (and a few low side holes if needed).
-
Wheel it: Attach casters with bolts and washers (or heavy-duty screws if appropriate).
Place wheels near corners for stability. -
Add “pockets”: Cut the top third off detergent jugs to create scoop-shaped bins.
Zip-tie them to the inside wall for sunscreen, brushes, or dive toys. -
Noodle corral (optional): Zip-tie PVC pipe vertically on the outside so noodles slide in upright.
This keeps noodles from escaping like inflatable noodles do. -
Label zones: Keep the most-grabbed items in the easiest-to-reach spot:
goggles and sunscreen up top, big toys below.
Pro tips
- Make it kid-proof: Use labels with pictures (goggles icon, float icon) so cleanup is faster.
- Don’t seal in wet gear: After swimming, leave the lid cracked open until everything dries.
- Add a “missing socks” mesh bag: A small mesh produce bag zip-tied inside is perfect for earplugs and small toys.
DIY Build #2: Fence-Mounted Float + Noodle Station (The “Get It Off the Ground” Plan)
Large pool toys take up space fast. Hanging them keeps them from turning into a soggy pile,
and it frees up your deck so you can walk without doing parkour.
This style of storage works especially well with hooks, baskets, and mesh bags.
Materials
- 1–2 milk crates or ventilated baskets
- Outdoor hooks or heavy-duty utility hooks
- Optional: a small pegboard panel (or a slat-wall section)
- Screws + washers (use rust-resistant hardware)
- Zip ties
Steps
- Pick the spot: Choose a fence or wall area near the pool but out of the splash zone.
-
Mount your base: Attach a pegboard panel or simply add hooks directly to a fence post.
Use washers so hardware doesn’t pull through. - Hang big items: Noodles, life vests, and float straps hang well on large hooks.
- Crate storage: Zip-tie a milk crate to the fence for smaller toys and tools.
- Mesh for tiny stuff: Add a mesh bag for goggles, dive rings, and “mystery plastic pieces.”
Make it look intentional (not “we panicked at 9 PM”)
- Use matching baskets/crates
- Keep labels uniform
- Group by category: “FLOATS,” “GOGGLES,” “GAMES,” “TOOLS”
DIY Build #3: The “Dry-Then-Store” Nested Bin System (No More Mildew Smell)
The secret to pool storage isn’t just where you put thingsit’s whether they can dry.
This build uses one big bin as the base and smaller ventilated containers inside it, so gear drains and airs out.
Materials
- 1 large plastic bin or tote (the “base”)
- 2–4 smaller baskets, colander-style bins, or perforated containers
- Drill + bits
- Optional: adhesive hooks inside the lid
Steps
- Drain the base: Drill multiple bottom holes so water can escape.
- Assign baskets: One for goggles, one for dive toys, one for straps/repair patches, one for sunscreen.
- Create a routine: After swimming, toss items into the correct basket and leave the lid cracked until dry.
- Bonus: Stick hooks inside the lid for goggles or swim caps so they don’t get buried.
Quick Mini-Hacks Using Repurposed Plastic Containers
Not every solution needs bolts and a drill. Here are small upgrades that add big organization wins.
Sunscreen + First Aid “Caddy”
Cut a large detergent bottle into a handled scoop bin. Store sunscreen, lip balm, aloe, and bandages.
The handle makes it easy to grab on the way out the door (and harder to “forget”).
Rinse Bucket for Small Toys
Use a 5-gallon bucket as a rinse station. Drop small toys in, swish, dump, and let them drip-dry.
Less gunk goes into storage, and your bins stay cleaner longer.
“Goggle Garage”
A clear lidded container labeled “GOGGLES” prevents the classic problem of scratched lenses and missing straps.
Add a small cloth in the bin so kids can wipe lenses before storing.
Important Safety Note: Pool Chemicals Are NOT a Repurposing Project
It’s tempting to “organize everything” into matching containers. Don’t do that with pool chemicals.
Keep chemicals in their original, labeled containers, store them locked up and
away from direct sunlight, and keep incompatible chemicals separated.
Also: never reuse empty chemical containers for any household purpose.
Safer chemical storage basics
- Original containers only: labels matter for safe handling and emergencies.
- Cool, dry, ventilated spot: avoid heat and moisture.
- Separate incompatible chemicals: store things like acids and chlorine products apart.
- Store liquids low: reduces spill risk onto other items.
- Keep away from flammables: don’t store near gasoline, paint, oily rags, or solvents.
- Lock them up: keep away from kids, pets, and curious visitors.
Keep Your DIY Pool Storage Working All Summer
Weekly 5-minute reset
- Dump out sand and leaves
- Quick rinse with hose
- Check drainage holes (clogs happen)
- Wipe sunscreen spills so bins don’t get slippery
Seasonal upgrades
- Add shade: if storage sits in direct sun all day, move it under an overhang or umbrella.
- Upgrade labels: if your marker fades, use waterproof labels or paint pen.
- Rotate inventory: ditch broken toys and donate what you no longer use.
Common Mistakes (So You Don’t Accidentally Build a Mosquito Spa)
- No drainage: the #1 reason storage starts smelling funky.
- Sealing wet gear: lids + wet towels = mildew city.
- Overstuffing: if it’s hard to put away, people stop putting it away.
- No “home” for small items: goggles and earplugs need their own mini bin or they vanish.
Conclusion: Cleaner Deck, Faster Cleanup, Happier Pool Days
Repurposed plastic containers are the unsung heroes of DIY pool storage: cheap (often free), easy to clean,
water-friendly, and customizable. Add drainage, create simple categories, and choose a setup that matches
how your household actually uses the pool. The result is a backyard that feels less chaotic and more like,
you know… a place you want to relax.
Real-World Experiences People Commonly Have With DIY Pool Storage (And What They Learn)
When people first set up pool storage, it usually starts with good intentions and a single bin:
“Everything goes here.” For about two days, it works. Then the bin becomes a wet pile of tangled straps,
foggy goggles, and one mysterious toy that squeaks when you touch itlike it’s trying to file a complaint.
The most common lesson DIYers share is that pool storage isn’t just about containment; it’s about
drying and speed.
One of the biggest “aha” moments happens after adding drainage holes. People often report that the smell
disappears almost overnight once water has a way out. Before drainage, even clean pool water sits at the bottom,
warms up, and turns the bin into a humid sauna that nobody asked for. After drainage, toys dry faster,
the bin stays lighter, and cleanup stops feeling like you’re hauling a miniature swamp.
Another common experience: the storage system improves dramatically the moment it becomes “one-step.”
Families notice that if kids have to open a lid, move three items, and dig for the right spot, things won’t get put away.
But if there’s a labeled basket for “GOGGLES” at eye level and a big open crate for “TOYS,” the odds of stuff
landing where it belongs go way up. People also find that picture labels (a simple goggle icon, a float icon)
can be surprisingly effectiveespecially when the end-of-day energy is low and everyone’s wrapped in towels like burritos.
DIYers who try fence-mounted storage often say they didn’t realize how much space floaties take up until they stopped
stacking them on the ground. Hanging noodles and vests feels like reclaiming square footage you forgot you had.
Plus, when large items are off the deck, the whole area looks instantly tidiereven if you still have a rogue flip-flop
living under the lounge chair. People also mention that hooks and mesh bags are perfect for “in-between” items:
the stuff too small for a big bin, too awkward for a shelf, and too likely to disappear into the grass.
A frequent mid-season upgrade is mobility. Those who add wheels to a large tote tend to love being able to roll
everything into shade, tuck it under a covered spot during rain, or move it closer to wherever the action is that day.
It also makes “end of day” cleanup faster: instead of carrying ten items, you roll one unit. The flip side is that
people learn to avoid overloading the rolling binbecause a super heavy cart becomes a “great idea” that never moves.
Keeping a rolling cart for daily-use gear and a separate storage spot for bulky floaties tends to work best.
Another relatable experience: the sunscreen station becomes the accidental hero of the whole setup.
Many people report fewer forgotten sunscreen moments once it has a dedicated caddy by the pool door
(and fewer frantic “Did anyone put on SPF?” shouts as someone cannonballs). The caddy also becomes a natural home
for bandages, aloe, and hair tiessmall things that always seem to be needed immediately and found never.
Finally, DIYers often say the system works best when it’s treated like a living thingnot a one-and-done project.
They tweak it: add a bin for new toys, retire the ones nobody uses, relabel when categories change, and adjust placement
when they realize the “perfect spot” is actually where the sprinkler hits every morning. The main takeaway is simple:
the best DIY pool storage isn’t the fanciestit’s the one that makes putting things away easier than leaving them out.


