Table of Contents >> Show >> Hide
- Why a Painted Christmas Village Hits Different
- Main Keyword and LSI Keywords You’ll Naturally Use
- Choose Your “House Type” First
- Materials and Tools
- Plan Your Village Like a Tiny Set Designer
- Step-by-Step: How to Paint Your Christmas Village Houses
- Step 1: Clean and Prep (Yes, Even If You’re Impatient)
- Step 2: Prime for Better Adhesion
- Step 3: Basecoat Like You Mean It
- Step 4: Add Shadows and Highlights (This Is Where “Hand-Painted” Happens)
- Step 5: Paint the Details That Make People Lean In
- Step 6: Roof Techniques That Don’t Look Like a Chocolate Bar
- Step 7: Add “Snow” Without Making It Look Like Frosting Soup
- Step 8: Seal It (So Your Village Survives Actual Human Life)
- Make Your Houses Glow: Lighting Tips
- Landscaping: Turn “Houses on a Shelf” Into a Whole Scene
- A Specific Example: The Gingerbread Village Makeover
- Troubleshooting: Fix the Stuff That Drives Crafters Nuts
- Display and Storage (Because Future-You Deserves Nice Things)
- Conclusion
- Extra: Experiences and Lessons From the Painted Village Life (About )
There are two types of people in December: the ones who say, “I’m keeping it simple this year,” and the ones who
accidentally build a tiny town on their mantel and start assigning the mayor a backstory. If you’re reading this,
congratulationsyou’re probably the mayor now.
A painted Christmas house village is one of those holiday crafts that looks wildly impressive, costs
surprisingly little (especially if you’re a proud thrift-store archaeologist), and gives your home that cozy “Hallmark
movie but with better snacks” energy. Whether you want a vintage-inspired Putz glitter hamlet, a modern
Scandinavian street of minimalist cabins, or a full gingerbread-themed neighborhood that would absolutely violate
several zoning laws, you can make it happen with paint, patience, and a willingness to get glitter in places glitter
should never be.
Why a Painted Christmas Village Hits Different
Mini holiday houses aren’t just decorthey’re nostalgia you can dust. A village display brings together color, light,
texture, and tiny details that make people lean in and smile. It’s also endlessly customizable: you can repaint old
ceramic pieces, build cardboard houses from scratch, or turn basic wood blanks into a charming street that looks
curated rather than chaotic.
Bonus: it’s one of the few holiday projects that can scale from “I made two cute cottages” to “I now own 37 buildings
and I’m negotiating a trade agreement with the bottlebrush forest.”
Main Keyword and LSI Keywords You’ll Naturally Use
As you build your painted Christmas house village, you’ll naturally touch on related terms that help
search engines (and humans) understand what you’re making: DIY Christmas village, miniature Christmas houses,
glitter houses, Putz houses, gingerbread village, faux snow, LED lights,
acrylic paint, and clear sealer. The trick is using them the way you’d talk about the projectno keyword
confetti required.
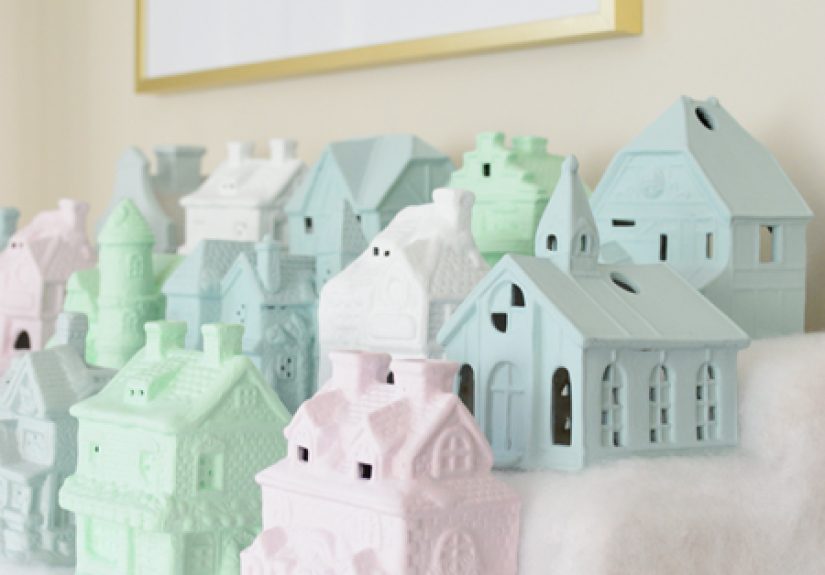
Choose Your “House Type” First
Before you paint anything, decide what you’re painting. Your base material changes the prep, the paint, and the final
vibe.
1) Ceramic or Porcelain Village Houses
These are the thrift-store heroes. They’re sturdy, already detailed, and look amazing repaintedespecially in a theme
like “gingerbread,” “white winter,” or “modern neutral.” Ceramic is forgiving, but it does need cleaning and (often)
priming so paint sticks and doesn’t chip when someone inevitably picks up the church by the steeple.
2) Wood Houses (Blanks, Birdhouses, or Dollhouse-Style Kits)
Wood is easy to paint and easy to customizeadd trim, shingles, window frames, little signs (“Hot Cocoa & Gossip”),
whatever makes you happy. You’ll want a sealer or primer to avoid the “why is my paint soaking into this like a sponge?”
moment.
3) Cardboard or Chipboard Houses (Glitter House / Putz Style)
If you love vintage sparkle, this is your lane. Cardboard houses can be painted, glittered, and lit from within for
that old-school glow. They’re also lightweight, so you can build a whole village without reinforcing your shelves like
you’re storing bowling balls.
4) Paper Houses (Printable Templates)
Paper houses are the fastest route to “wow.” Paint them, embellish them, and back them with warm light. The key is
protecting them from moisture, warping, and any holiday beverage that tries to become part of the display.
Materials and Tools
You don’t need fancy gear. You need the right basics and one or two “secret weapons” that make tiny houses look
professional.
Must-Haves
- Acrylic craft paint (matte or satin works great for village pieces)
- Primer (spray primer or brush-on, depending on your base)
- Brushes: one flat brush, one small detail brush, and one “I don’t care if it gets ruined” brush
- Painter’s tape (for crisp lines and saving your sanity)
- Fine sandpaper or sanding block
- Glue (craft glue, tacky glue, or hot glue for accessories)
- Clear sealer (matte, satin, or glosschoose your vibe)
- LED tea lights or mini string lights (avoid real flames in tiny towns)
Nice-to-Haves (a.k.a. The Glow-Up Kit)
- White paint pen or paint marker (instant “snowy trim”)
- Texture medium or snow paste (for realistic drifted snow)
- Fine glitter (for roofs that sparkle like they pay property taxes)
- Wax paper or glassine/acetate for windows
- Sponges (for stone/brick texture and quick shading)
Plan Your Village Like a Tiny Set Designer
The difference between “cute Christmas display” and “why does this look like a toy aisle exploded?” is planning.
Keep it simple:
Pick a Color Story
- Classic: red, green, cream, and snowy white
- Gingerbread: warm browns + white “icing” + candy accents
- Modern winter: black/white/wood + warm lights
- Vintage Putz: colorful paint + heavy glitter + retro charm
Decide on Scale (So It Looks Like One Town)
Mixing sizes is fine, but do it intentionally: taller buildings in the back, smaller in front. If one house looks like
it could comfortably park inside another house, that’s less “whimsical” and more “architectural horror.”
Map Your Layout Before You Glue Anything
Mock it up on the surface where it’ll livemantel, shelf, sideboard, windowsill. Add height using sturdy boxes,
stacked books, or tiered risers (covered with fabric or faux snow). You’re aiming for depth, not a single flat row of
sad buildings.
Step-by-Step: How to Paint Your Christmas Village Houses
Step 1: Clean and Prep (Yes, Even If You’re Impatient)
For ceramic: wash with mild soap and water, rinse well, and let dry completely. For wood: lightly sand any rough
edges. For cardboard/paper: make sure it’s cut cleanly and reinforced where needed (corners and rooflines).
Step 2: Prime for Better Adhesion
Primer helps paint stick and keeps old colors from ghosting through like a haunted Victorian backstory. Spray primer is
fast and smooth; brush-on primer gives you control. Either way, use thin coats and let them dry fully.
Step 3: Basecoat Like You Mean It
Choose your main wall color first. Two thin coats usually beat one thick coat (thick coats love to drip, and drips on
miniature houses look like the building is sweating).
Step 4: Add Shadows and Highlights (This Is Where “Hand-Painted” Happens)
Want your village to look dimensional, not flat? Do this:
- Dry brushing: load a tiny amount of lighter paint, wipe most off, then lightly skim raised details.
- Washes: thin a darker paint with water, brush it into creases, then wipe back the excess.
- Sponge texture: dab on slightly varied tones for stone, stucco, or aged wood effects.
Step 5: Paint the Details That Make People Lean In
Doors, shutters, wreaths, trim, signsthis is the fun part. Keep contrast in mind. A window frame that’s just barely
different from the wall color disappears at viewing distance. Tiny houses deserve bold choices.
Step 6: Roof Techniques That Don’t Look Like a Chocolate Bar
Roofs are a focal point. Here are reliable looks:
- Shingle highlight: basecoat dark, then dry brush a lighter tone across the raised edges.
- Metal roof: charcoal base + light silver dry brush for a weathered galvanized effect.
- Snowy roof: add snow paste in drifts near the ridge and chimney, then feather outward.
Step 7: Add “Snow” Without Making It Look Like Frosting Soup
Faux snow can be magical or tragic. The secret is restraint and texture.
- Snow paste / texture snow: looks realistic and stays putgreat for rooflines and window sills.
- Glue + white paint mix: gives a softer drift effect. Sprinkle fine glitter while wet for sparkle.
- Loose snow for the base: use craft snow products or soft fluffy batting strategically for drifts.
Tip: if you’re tempted to use pantry ingredients (like baking soda) for permanent displays, test first. Some DIY snow
mixes can yellow or clump over time, especially if exposed to humidity.
Step 8: Seal It (So Your Village Survives Actual Human Life)
A clear sealer protects your paint and helps reduce chipping. Matte sealers look cozy and realistic; gloss sealers
make colors pop and can help with wipe-clean durability. If you used glitter, a compatible topcoat can reduce flaking.
Use light coats, especially with spray sealers, and let them cure fully.
Make Your Houses Glow: Lighting Tips
A village looks 10x better when it’s lit from within. The goal is warm, soft lightnot “interrogation room.”
Window Tricks
- Line windows with glassine, vellum, acetate, or thin wax paper to diffuse light.
- Paint a faint warm-yellow wash around window frames for a “lit interior” illusion.
- Add tiny curtains from scrap fabric or paper for extra charm.
Best Light Sources
- LED tea lights: safe, easy, and perfect for single buildings.
- Micro LED string lights: ideal for multiple houses with one battery pack.
- Pre-lit village pieces: great if you’re repainting thrifted finds.
Landscaping: Turn “Houses on a Shelf” Into a Whole Scene
The buildings are the stars, but the landscaping is what makes it feel like a real place.
Base Ideas
- Foam board covered with white felt or batting for a snowfield
- Wood tray vignette for easy moving and storing
- Tiered display using sturdy boxes wrapped in white fabric
Details That Bring It to Life
- Paths: paint a winding road, add fine gravel, or create a “salted sidewalk” look with subtle texture.
- Trees: bottlebrush trees are classic; vary heights for realism.
- People: a few figurines tell a story. Too many and it’s a parade you didn’t approve.
- Texture: sprinkle craft snow in drifts, not everywhere at once.
A Specific Example: The Gingerbread Village Makeover
This is one of the most popular painted village looks because it’s both adorable and forgiving. Here’s the method:
- Source the houses: thrifted ceramic houses, small tin houses, or unfinished wood blanks.
- Basecoat: spray or brush a warm brown “cookie” color. Let it dry completely.
- Frosting: use white puffy paint, a white paint pen, or even hot glue (carefully) to draw icing lines on roof edges and windows.
- Texture snow: mix a little white paint with texture medium or a snow product for thicker drifts.
- Finish: add fine glitter while wet, then seal when fully dry.
The result looks high-endlike a designer gingerbread setwithout the stress of actual cookies collapsing into a sticky
architectural crisis.
Troubleshooting: Fix the Stuff That Drives Crafters Nuts
“My paint is streaky.”
Use thinner coats, a softer brush, and let each coat dry fully. Primer also helps a lot. If streaks persist, switch to
a sponge for basecoats on larger flat areas.
“My spray sealer turned cloudy.”
Cloudiness often happens with heavy coats or high humidity. Do multiple light coats, spray from the recommended
distance, and let each layer dry before adding another.
“My glitter is shedding like a stressed-out cat.”
Press glitter into wet adhesive (not just paint), tap off excess, and seal with a compatible clear coat using gentle
passes. For heavy glitter roofs, consider a glitter topcoat designed to lock sparkle in place.
“Everything looks… flat.”
Add contrast: darker shadows in creases, lighter highlights on raised details, and a pop color on doors/wreaths. A tiny
bit of depth makes a huge difference at miniature scale.
Display and Storage (Because Future-You Deserves Nice Things)
Display your village where it can shineliterally. Warm lighting, varying heights, and a cohesive color story will make
it look intentional. When the season ends, store buildings in a bin with soft packing material and keep delicate
embellishments from rubbing together. Label the bin so you don’t rediscover it in July and briefly question your life
choices.
Conclusion
Making a painted Christmas house village is part craft, part decorating, and part storytelling. Start
small, pick a theme, and build your technique with each house. By the end, you’ll have a display that looks custom,
feels nostalgic, and makes your space glowwithout needing to buy a whole new village every year.
Extra: Experiences and Lessons From the Painted Village Life (About )
If you’ve never made a miniature Christmas village before, your first build will teach you three things immediately:
(1) paint dries slower than your optimism, (2) glitter has a passport and will travel freely, and (3) tiny details are
weirdly addictive. One minute you’re basecoating a roof; the next you’re holding a toothpick like a surgeon because you
decided this house needs a microscopic wreath. That’s normal. Welcome.
One common “first-timer experience” is the accidental theme shift. You start out aiming for classic red-and-green, then
you spot a warm caramel paint and think, “What if this was gingerbread?” Suddenly you’re piping puffy paint like you’re
auditioning for a baking show, and your dining table looks like a snowstorm hit a candy factory. Embrace the pivot.
Villages evolve. So do their mayors.
Another universal moment: the Great Snow Debate. Everyone wants that cozy, drifted rooftop look, but nobody wants the
mess or the yellowing that can happen with certain DIY “snow” mixes over time. The craft world is full of experiments,
so it’s smart to test your snow technique on a scrap firstespecially if you plan to store the village and reuse it
for years. Snow paste and texture products tend to be more stable for permanent displays, while fluffy batting and
loose snow are great for bases because you can refresh them season to season.
Lighting is where people either feel like geniuses or briefly become electricians. The best lesson: keep it simple and
safe. Battery LED tea lights are a gift to humanity. If you’ve ever tried to thread a string of lights through five
tiny buildings while untangling the cord like it’s a holiday puzzle from the underworld, you understand why.
Diffusing windows with vellum or waxy paper is a small step that makes a big differencesuddenly your village glows
instead of glaring.
And then there’s the “too many accessories” moment. You add treescute. You add a pathcute. You add a deeralso cute.
Then you find tiny skiers, a tiny bench, a tiny mailbox, a tiny snowman with a tiny scarf… and your peaceful village
becomes a crowded festival. A good rule is to leave some negative space so the scene can breathe. Real towns have open
areas, too (and fewer inflatable reindeer, usually).
Finally: don’t underestimate how personal these villages get. People repaint houses to match childhood memories, family
homes, favorite travel spots, or an idealized “cozy winter town” that exists only in the heart and certain streaming
rom-coms. Every year you can add a building, repaint a piece, or swap the theme. That’s why this craft lastsyour
village grows with you, and it gets better every time you pick up a brush.


