Table of Contents >> Show >> Hide
- The “Caravan Camera” Origin Story: When a Darkroom Gets Wheels
- How a Camper Can Become a Camera: The Camera Obscura Logic
- The Build: From “Old Caravan” to Light-Tight Camera Body
- Inside the Portable Darkroom: The Part That Feels Like Actual Magic
- Why the Portraits Look Different: Ultra Large Format Doesn’t Do “Casual”
- The Public Experience: A Photo Booth That Teaches You Something
- It’s Not the Only Mobile Giant Camera: The Idea Has Cousins
- If You’re Not Ready to Convert a Camper, Here’s What You Can Steal From the Concept
- Conclusion: A Camper That Captures More Than a View
- Bonus: of “What It’s Like” to Shoot Inside a Camper-Camera
Some people buy a cheap camper to “get out into nature.” Brendan Barry bought one to turn nature into a photograph. Which is objectively funnier, because a normal camper’s main job is to sit quietly and collect pine needles. This one? It stares back.
The idea is wonderfully unhinged in the best old-school-photography way: take a dusty, bargain-priced caravan (around $200), strip it down, light-seal it, mount a massive lens on the side, andboomyou’ve got a working room-sized camera. Then, because you’re already living in chaos, you also make the inside a functioning darkroom so the picture can be shot and processed right there, like a traveling magic trick with chemistry.
This is the story (and the practical science) behind the “Caravan Camera” conceptwhy it works, how it’s built, why the portraits feel so different from digital, and what you can steal from the idea even if you’re not ready to convert a camper into a camera that demands its own parking spot.
The “Caravan Camera” Origin Story: When a Darkroom Gets Wheels
Before the camper-camera existed, Barry was already experimenting with ultra large format (ULF) photographythink huge negatives (like 16×20 inches), big lenses, and the kind of setup that makes strangers ask, “Is that a telescope or are you about to summon a Victorian ghost?” He’d built a rough 16×20 camera using simple materials and a borrowed long lens, and he even took the concept on the road to make portraits and learn what worked (and what leaked light like a sieve).
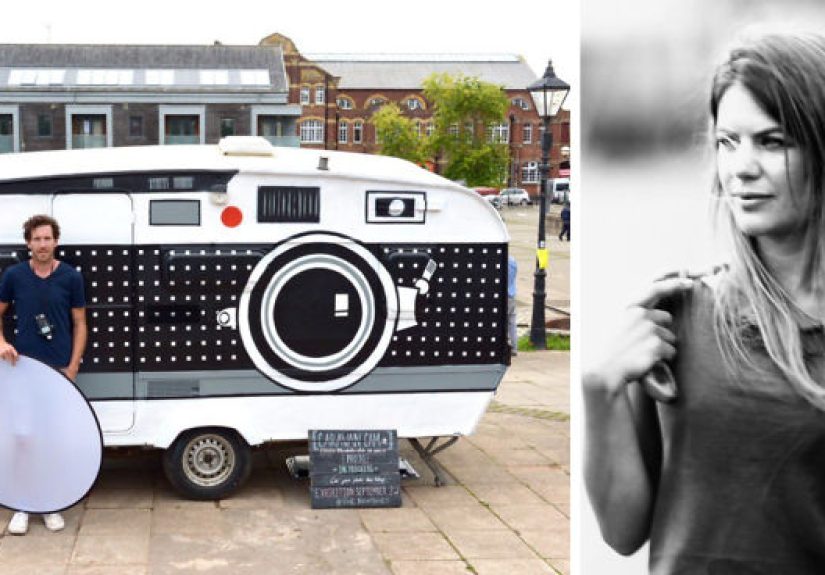
At some point, the obvious conclusion appeared: the camera shouldn’t merely travel with you. The camera should be the thing you travel in. So he bought an old caravan, emptied it, blacked it out, and turned the whole trailer into a giant camera bodysomething he could tow, park, and operate from the inside. Later, he used it in pop-up art settings where hundreds of people could step into the process and watch their portrait come alive in trays, which is basically the opposite of “post and forget.”
How a Camper Can Become a Camera: The Camera Obscura Logic
The core trick is ancient and beautifully simple: a camera obscura (“dark chamber”) is a dark space with a controlled opening that projects an upside-down image of the outside world onto an interior surface. People noticed this effect centuries ago with light passing through tiny holes into dark rooms. Swap the hole for a lens, and you get a brighter, sharper projection that behaves like a camerabecause it is one.
In a normal camera, the “dark chamber” is a box you hold in your hands. In a caravan camera, the “box” is a towable room. The front wall becomes the lens board. The back wall becomes the image plane where photographic paper or film sits. The entire trailer is essentially the camera body, which means:
- The longer the trailer (or the lens-to-paper distance), the larger the projected image and the more “large-format” the optical behavior feels.
- The darker (more light-tight) the interior, the more controllable the exposure and development steps become.
- The lens is everything. A big, long lens can create a distinctive looksmooth transitions, gentle falloff, and a sense of depth that doesn’t feel like a phone trying to fake it.
Once you accept that a camera is basically “a light-proof space with a lens and a place to hold light-sensitive material,” converting a camper into a camera stops sounding impossible and starts sounding like… a carpentry project that accidentally became art.
The Build: From “Old Caravan” to Light-Tight Camera Body
Turning a camper into a camera is not about fancy gadgets first. It’s about control. Light control. Space control. Workflow control. Here’s the practical anatomy of the build, in plain English:
1) Gut the interior and simplify the space
Camper interiors are built for comfort: windows, vents, shiny surfaces, little gaps where daylight sneaks in like it pays rent. A camera interior needs the opposite: a clean, controllable, dark shell. Stripping the inside creates a blank canvas for making it light-tight and functional.
2) Blackout everything (and then assume you missed a spot)
Light leaks are the enemy of large-format work. Blackout material, dark curtains, sealed seams, and careful attention around door frames, vents, and window edges are the unglamorous hero moves. The goal isn’t “kinda dark.” The goal is “if you drop a black sock, you will never see it again.”
3) Build a lens mount like it’s holding a small planet
A lens for ultra large format can be physically heavy and optically significant. It needs a sturdy mount, aligned properly, and sealed around the edges so no stray light enters. This mount becomes the “front standard” of your giant camera. If it flexes, shifts, or leaks, your image will show it.
4) Create a place for the image plane
Large-format cameras use a film holder or a back that keeps film/paper flat. In a camper, you’re essentially building a giant camera back. Some builds use a vertical surface with a frame for paper; others incorporate rails or a structure that holds materials securely and square to the lens. Flatness matterswrinkles and bowing can affect focus and sharpness across the image.
5) Add a portrait “stage” and keep it repeatable
Barry’s caravan camera was used for portrait-making in public/art settings, which means you need a consistent spot for a subject to stand and a consistent background. A simple white board or backdrop makes a big difference: it removes visual clutter and lets the person (and the optical character of the lens) do the talking.
Inside the Portable Darkroom: The Part That Feels Like Actual Magic
Here’s what makes the camper conversion extra special: it’s not just a camera. It’s a camera + lab. That means you can expose the paper/film and then immediately develop it inside the same controlled space, without rushing to a separate darkroom.
A practical tray-based darkroom workflow (especially for black-and-white paper processes) often looks like this:
- Developer: The image appears. This is the “oh wow it’s working” moment.
- Stop bath (or rinse): Halts development to keep timing consistent.
- Fixer: Makes the image permanent and light-safe.
- Wash: Removes residual chemistry so the print lasts.
Because the process uses chemicals, a mobile darkroom also needs something photographers sometimes ignore until their nose reminds them: ventilation. Darkrooms can produce irritating vapors (especially with stop bath and fixer), so good airflow, covered trays, and basic protective habits matter. Gloves and eye protection are not “overkill,” they’re “I like my skin and eyesight.”
And yes, you still need light control inside the darkroom area. Safelights (appropriate for the paper you’re using) help you work without fogging the material, but you still keep them dim and you test your setupbecause photographic paper is patient, but it is not forgiving.
Why the Portraits Look Different: Ultra Large Format Doesn’t Do “Casual”
ULF photography isn’t just “bigger.” It behaves differently. When you shoot a large negative, you can get:
- Detail that feels physical: Not “sharpened,” but genuinely information-rich.
- Smoother tonal transitions: Especially in black and white, midtones can feel creamy instead of crunchy.
- A distinct depth-of-field look: Depending on lens choice and camera geometry, focus falloff can look natural and cinematic rather than computational.
There’s also a psychological difference. A giant camera changes how people behave. When a subject sees a camper with a giant lens attached, they don’t default to “influencer face.” They get curious. They slow down. They commit to the moment. The portrait becomes a collaboration instead of a quick capture.
The Public Experience: A Photo Booth That Teaches You Something
One of the coolest parts of the caravan-camera concept is that it turns photography into a live performancewithout turning it into a circus. People can watch the process, ask questions, and see how an image becomes an object. That’s rare now, because most photography happens behind screens, inside apps, and under layers of automated “enhancement” that nobody understands but everyone accepts.
In pop-up art settings, the Caravan Camera functioned like a rolling classroom: people stepped up, posed, waited through a deliberate exposure, then walked inside to see their portrait develop. This kind of experience makes photography feel real again. Not because digital isn’t real, but because analog makes the steps visibleand visibility creates respect.
It’s Not the Only Mobile Giant Camera: The Idea Has Cousins
Barry isn’t alone in the “make a vehicle into a camera” universe. Other artists have turned trailers into camera obscuras that shoot on photographic paper and include built-in darkroom workflowsessentially mobile labs that merge craft, optics, and performance. The shared point isn’t novelty for novelty’s sake. It’s a reminder that photography is a physical process: light enters, time passes, chemistry locks it in.
And that’s why these projects resonate. They’re weird, yesbut the good kind of weird. The kind that makes you remember why photography was astonishing in the first place.
If You’re Not Ready to Convert a Camper, Here’s What You Can Steal From the Concept
You don’t need a tow hitch to learn from this. Here are practical, smaller-scale ways to borrow the same energy:
Try a simple camera obscura setup
Black out a room, cover a window with thick material, cut a small hole (or mount a lens safely), and observe the inverted projection on a white wall. It’s the same physicsjust without the camping equipment. It also teaches you how image brightness changes with aperture size and why lenses matter.
Shoot paper negatives
Photographic paper can be used as a negative material (especially in large-format or pinhole setups). It won’t behave exactly like filmcontrast and exposure handling differbut it’s accessible and wonderfully hands-on. The “one-of-a-kind object” feeling is part of the charm.
Build a micro-darkroom workflow
A tray-based black-and-white print workflow can be done in a controlled space with the right safelight, containers, and careful chemical handling. Ventilation and safe disposal practices still matter. The goal is not to be reckless; the goal is to be intentional.
Conclusion: A Camper That Captures More Than a View
“I turned a $200 camper into a giant camera and portable darkroom” sounds like a punchline until you realize it’s also a philosophy. It says: photography is not just a file. It’s a crafted object. It’s time, patience, optics, chemistry, and collaboration. And sometimes the most effective way to teach that truth is to build a camera so big people can stand inside it and feel the process happening around them.
So yesthis camper takes pictures instead of naps. But it also gives something back that’s increasingly rare: a sense of wonder that’s earned, not filtered.
Bonus: of “What It’s Like” to Shoot Inside a Camper-Camera
The first thing you notice inside a giant camera is the silence. Not “quiet room” silencemore like “snowfall” silence. Sound gets softened by fabric, by walls, by the fact that you’re inside a space designed to keep light out. And once your eyes adjust, you start to understand why early photographers talked about the darkroom like it was a separate world. It kind of is.
Working in a camper-camera forces you to slow down in a way modern photography rarely demands. You can’t machine-gun exposures. You can’t “spray and pray.” You prepare the space, set the subject, and commit. Even the simple act of stepping out to pose someone and stepping back in to operate the camera feels ceremonial, like you’re switching roles between director and technician.
Then there’s the psychological effect on your subject. With a phone camera, people perform. They pose with the expectation of instant review and instant approval. With a giant lens bolted to a caravan, people get curious instead of self-conscious. They ask what it is. They lean in. They become present. They hold still because they understandon some gut levelthat the process is physical and the camera is honest.
Exposure becomes a conversation with the weather. Bright sun? You’re grateful, but you also pay attention to harsh shadows. Overcast? Softer portraits, but you may need longer times. And because you’re often working with paper or large-format materials, you learn to watch the light the way painters do: not just “is it bright,” but “is it flattering,” “is it directional,” “is it kind.”
Finally, the development step feels like the best kind of suspense. In a world where your camera app shows you a finished-looking image before you’ve even fully decided you like the moment, watching an image rise in the developer tray is like seeing photography remember its own history. People gasp. They laugh. They point. They don’t scroll away. A portrait becomes a shared event, not a disposable asset.
If you’ve ever felt like photography got too easy, too fast, too infinitethis kind of process is the antidote. Not because it’s “better,” but because it makes every frame feel like it cost something: time, attention, care. And that cost is exactly what makes the result feel valuable.


