Table of Contents >> Show >> Hide
- What Are Truck Bed Lights?
- Tools and Materials You Will Need
- Plan the Wiring Before You Install Anything
- How to Wire Truck Bed Lights Step by Step
- Wiring Diagram for Truck Bed Lights
- Where Should You Put the Switch?
- Common Mistakes to Avoid
- Troubleshooting Truck Bed Lights
- Experience Notes: What Real Truck Owners Learn After Installing Bed Lights
- Final Thoughts
Truck beds are excellent at hauling lumber, coolers, camping gear, tools, muddy boots, mystery bolts, and that one ratchet strap that somehow ties itself into a sailor’s knot. What they are not always excellent at is visibility. Once the sun goes down, your truck bed can turn into a black hole with tailgate hinges. That is where truck bed lights come in.
Learning how to wire truck bed lights is one of the most useful weekend upgrades you can make to a pickup. A good LED lighting setup makes it easier to load tools before dawn, find gear at a campsite, unload groceries at night, or avoid stepping on a loose hitch pin that is apparently waiting to attack your foot. The project is also beginner-friendly if you plan the circuit carefully, protect the wiring with a fuse, use weather-resistant materials, and route everything away from heat, sharp metal, and moving suspension parts.
This guide walks through the full process: choosing lights, planning the wiring path, selecting a fuse and switch, grounding the circuit, mounting LED strips or pods, testing the system, and troubleshooting common problems. The goal is not just to make the lights turn on. The goal is to make them turn on reliably after rain, dust, vibration, potholes, and years of actual truck use.
What Are Truck Bed Lights?
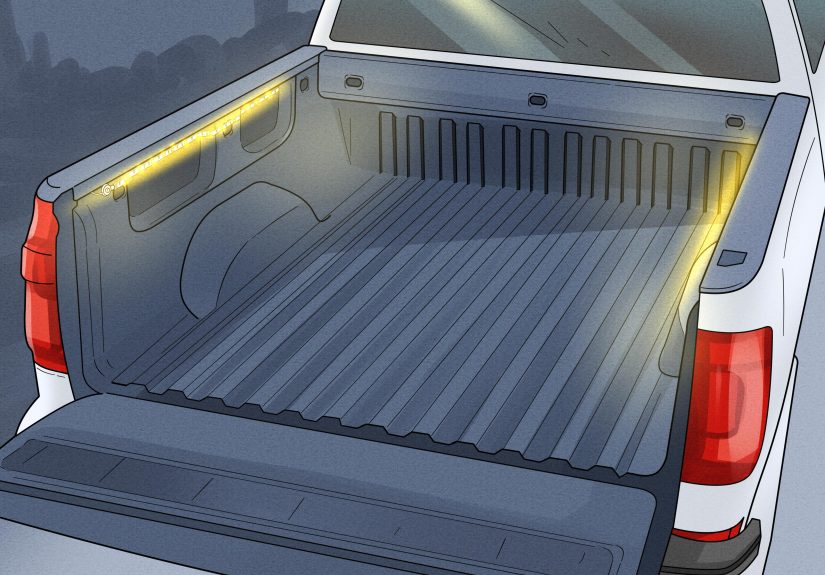
Truck bed lights are auxiliary lights mounted inside or around the cargo box of a pickup truck. They usually use 12-volt LED strips, LED pods, puck lights, or factory-style bed lamps. Most modern kits are designed to illuminate the bed without drawing much power, making LEDs the clear favorite over older incandescent lamps.
Some trucks already include factory cargo lamps or bed-mounted switches, but many owners want more light than the original setup provides. Aftermarket truck bed LED lights can be mounted under the bed rails, along the side walls, inside a tonneau cover frame, near the tailgate, or inside a toolbox. The best placement depends on how you use the truck. A contractor may want bright rail lighting across the full length of the bed, while a camper may prefer softer lights that do not turn the campsite into a football stadium.
Tools and Materials You Will Need
Before touching a wire, gather the right parts. A clean installation is much easier when you are not halfway under the truck realizing the only electrical tape you own has the adhesive strength of dry pasta.
Recommended Materials
- 12V LED truck bed light strips, pods, or a bed lighting kit
- Automotive primary wire, usually 18 AWG or 16 AWG for low-current LED lights
- Inline fuse holder and properly sized blade fuse
- Weatherproof on/off switch, rocker switch, or push-button switch
- Ring terminals, butt connectors, or waterproof crimp connectors
- Heat-shrink tubing
- Split wire loom or braided sleeve
- Zip ties or cable clamps
- Adhesion promoter or rubbing alcohol for LED strip mounting
- Multimeter or 12V test light
- Drill and step bit if installing a panel-mounted switch
- Rubber grommets for wires passing through metal
For most low-current LED bed light setups, 18-gauge wire is commonly sufficient, but longer wire runs, brighter lights, or multiple light strips may justify 16-gauge wire. When in doubt, go slightly heavier on wire size. Wire that is too small can heat up, waste voltage, and create reliability problems. Wire that is a little larger simply costs a few dollars more and sleeps better at night.
Plan the Wiring Before You Install Anything
The best truck bed light installations start with planning, not drilling. Decide where the lights will sit, where the switch will go, where power will come from, and where the ground connection will be made. A simple bed light circuit usually looks like this:
Battery or 12V source → inline fuse → switch → LED positive wire → LED negative wire → clean chassis ground.
You can also wire the switch on the ground side, but switching the positive side is more common for accessory lighting. Some kits include a relay harness. A relay is not always necessary for small LED strips, but it is useful when the lights draw more current, when you want a clean trigger circuit, or when you are wiring multiple accessories from a dedicated auxiliary fuse block.
Choose a Power Source
There are three common ways to power truck bed lights:
- Directly from the battery: This is reliable and simple, especially when paired with an inline fuse close to the battery.
- From an auxiliary fuse block: This is a clean option if your truck already has aftermarket accessories such as a compressor, inverter, or work lights.
- From an existing cargo light or bed light circuit: This may allow the new lights to work with the factory cargo switch, but you must confirm the circuit can safely handle the extra load.
For a universal installation, battery power with an inline fuse is often the most straightforward. If your truck has a factory upfitter switch system or an auxiliary power distribution point, check the owner’s manual or service information before connecting anything.
How to Wire Truck Bed Lights Step by Step
Step 1: Disconnect the Negative Battery Cable
Start by disconnecting the negative battery terminal. Yes, it is a small step. Yes, it feels boring. But it is also the step that keeps an accidental short from turning your relaxing weekend project into an expensive electrical scavenger hunt.
After disconnecting the battery, inspect the truck bed and underbody. Look for existing holes, grommets, frame openings, and safe wire paths. Avoid fuel lines, brake lines, exhaust pipes, driveshafts, suspension components, and sharp edges.
Step 2: Decide Where the Lights Should Mount
Most LED strip lights work best under the bed rails, pointed slightly downward. This placement hides the lights from direct impact and spreads illumination across the cargo area. LED pods can be mounted near the front corners, rear corners, or inside utility boxes. If you use a tonneau cover, make sure the lights do not interfere with folding, rolling, or clamping hardware.
Clean the mounting surface with rubbing alcohol before sticking adhesive-backed strips in place. Dirt, wax, bed liner overspray, and dust can weaken the adhesive. If the truck has a textured spray-in bed liner, consider using mechanical clips or small screws where appropriate, because adhesive alone may not last through heat, cold, and vibration.
Step 3: Mount the Switch
The switch should be easy to reach but protected from cargo damage. Common locations include the rear bed wall, inside the tailgate area, near a factory bed pocket, inside a toolbox, or on a small bracket under the bed rail. A weatherproof switch is strongly recommended because truck beds live a rough life. Rain, car washes, pressure washers, spilled drinks, and the occasional bag of mulch all have opinions about electronics.
If drilling a hole for a rocker or push-button switch, check behind the panel first. Never drill blindly into a truck bed wall. There may be wiring, structural supports, or other components hiding behind the metal. After drilling, deburr the hole and use a gasket or sealant if the switch does not include one.
Step 4: Run the Positive Wire
Route the positive wire from the power source to the switch, then from the switch to the lights. If you are running wire from the battery to the bed, follow factory harness paths whenever possible. Use split loom to protect the wire and secure it with zip ties or cable clamps every few inches. Keep the wire away from exhaust heat and moving parts.
Whenever wire passes through sheet metal, use an existing grommet or add a rubber grommet. If a wire rubs against bare metal long enough, the insulation can wear through and create a short. That is why grommets are not decorative little rubber donuts. They are tiny guardians of electrical peace.
Step 5: Install the Inline Fuse
Install an inline fuse holder as close to the power source as practical. The fuse protects the wire, not just the lights. If the wire shorts to ground, the fuse should open before the wire overheats.
To size the fuse, calculate the current draw of the lights. Use this simple formula:
Amps = Watts ÷ Volts
For example, if your LED bed lights draw 24 watts on a 12-volt system, the circuit uses about 2 amps. A 3-amp or 5-amp fuse may be suitable depending on the manufacturer’s recommendation and wire size. Do not install a large fuse just because it is available in the garage drawer. A 30-amp fuse on tiny LED wiring is like hiring a nightclub bouncer to guard a cupcake; it is the wrong kind of protection.
Step 6: Connect the Ground
LEDs need a clean ground to work properly. You can run the negative wire back to the battery negative terminal, but many truck bed light installations use a chassis ground near the bed or frame. Choose a solid metal grounding point, remove paint or corrosion, attach a ring terminal with a bolt or self-tapping screw, and protect the connection with dielectric grease or corrosion-resistant coating.
Bad grounds are responsible for many lighting headaches. If your lights flicker, glow dimly, or work only when the tailgate is slammed with the enthusiasm of a movie villain, check the ground connection first.
Step 7: Make Weather-Resistant Connections
Use quality crimp connectors, solder-and-seal connectors, or heat-shrink butt connectors. Ordinary indoor electrical connectors do not belong under a truck. After crimping, tug gently on each connection to make sure it is secure. Cover exposed terminals with heat shrink, and use loom to shield the finished harness.
If your LED strips or pods have plug-in connectors, point the connectors downward or sideways when possible so water does not sit inside them. Add dielectric grease to exposed plugs if recommended by the connector manufacturer.
Step 8: Test Before Final Mounting
Reconnect the battery and test the lights before permanently securing every wire. Flip the switch and confirm all lights turn on. Check the fuse holder, switch, and ground connection. Use a multimeter to verify voltage at the lights if something does not work.
Once the system works, turn it on for several minutes. Feel the wires and connectors. They should not get hot. Slight warmth from some light housings may be normal, but hot wiring is a warning sign. If anything smells burnt, melts, smokes, or behaves like it has chosen violence, disconnect power and inspect the circuit.
Wiring Diagram for Truck Bed Lights
Here is a simple text-based wiring diagram for a basic switched LED bed light setup:
If you are wiring multiple LED strips, you can connect them in parallel. That means all positive wires connect to the switched positive feed, and all negative wires connect to ground. Do not wire long 12V LED strips in a way that overloads one tiny connector at the beginning of the run. For longer installations, feed power from both sides or split the circuit as recommended by the light manufacturer.
Where Should You Put the Switch?
Switch placement depends on how you use the truck. A switch near the tailgate is convenient when loading cargo. A switch near the cab is useful if you access tools from the front of the bed. A switch inside a lockable toolbox helps prevent accidental use. Some owners install two switches using a proper two-way circuit or use a remote-control module, but the simple single-switch setup remains the most dependable.
If your truck already has a factory cargo lamp switch, you may be tempted to tap into it. That can work on some trucks, but modern vehicles often use body control modules, timed lighting circuits, and sensitive electronics. Before tapping a factory wire, confirm the circuit design and current capacity. When in doubt, use a dedicated fused circuit instead of making the truck’s computer wonder why the cargo lamp suddenly has a side hustle.
Common Mistakes to Avoid
Skipping the Fuse
Every added positive power wire should be protected by the correct fuse or circuit breaker. Without a fuse, a short circuit can overheat the wire. The fuse should be close to the power source so the entire run is protected.
Using Household Wire
Use automotive-grade stranded copper wire. Solid household wire is not designed for vehicle vibration. A pickup truck is not a living room wall, even if yours contains enough coffee cups to qualify as a studio apartment.
Mounting Lights Where Cargo Will Hit Them
Place lights under rails, behind lips, or in protected corners. If you regularly haul plywood, motorcycles, firewood, or equipment, think about where cargo slides during loading. A beautiful LED strip mounted in the wrong place can become a very expensive sticker.
Poor Grounding
A painted bolt is not always a good ground. A rusty bracket is worse. Use clean bare metal and secure the ground tightly. If the bed is isolated from the frame by mounts or coatings, run the ground to the frame or battery negative.
Leaving Wires Loose
Loose wires sag, rub, snag, and eventually fail. Secure the harness neatly and leave small service loops where needed. Do not stretch wires tight across moving areas.
Troubleshooting Truck Bed Lights
If the lights do not turn on, start with the basics. Check the fuse. Confirm battery voltage. Make sure the switch is wired correctly. Test for voltage at the light’s positive wire and check continuity to ground. Reverse polarity can prevent LEDs from working, so verify positive and negative connections.
If the lights flicker, inspect the ground, connectors, and switch. If only part of an LED strip works, the strip may be damaged or cut incorrectly. If the lights are dim, look for voltage drop from undersized wire, weak connections, or a poor ground. If the fuse keeps blowing, disconnect the lights and inspect the wiring for pinched insulation or a positive wire touching metal.
Experience Notes: What Real Truck Owners Learn After Installing Bed Lights
After wiring truck bed lights on work trucks, camping rigs, and daily drivers, a few lessons show up again and again. The first is that brightness is not everything. Many people buy the brightest LED strips they can find, install them under both bed rails, and then discover that opening the tailgate at night feels like staring into a tiny white sun. For work use, bright lights are great. For camping, fishing, or tailgate cooking, a slightly softer light or a dimmer switch can be much more pleasant.
The second lesson is that placement matters more than the number of LEDs. Four well-placed pods can outperform a long strip mounted where cargo blocks it. Lights under the side rails usually provide the best balance of protection and coverage. A small light near the tailgate is also helpful because the rear corners of the bed tend to become shadow zones, especially when the bed is loaded.
The third lesson is to overthink weatherproofing. That sounds funny, but it is true. Truck beds are not gentle environments. Even if the lights work perfectly in the driveway, rainwater, dust, road salt, and bed vibration will test every shortcut. Heat-shrink connectors, loom, grommets, and dielectric grease may feel excessive during installation, but they are exactly what keeps the setup working months later. The best wiring job is the one you forget about because it never causes drama.
The fourth lesson is to label the circuit. If you add a fuse near the battery, use a small label that says “bed lights.” Six months later, when you are checking fuses for another project, you will thank yourself. If you install an auxiliary fuse block, keep a simple diagram in the glove box or inside the fuse block cover. Future you deserves nice things.
The fifth lesson is that a tailgate-area switch is convenient, but it should not be placed where cargo can smash it. A flush waterproof rocker switch or rubber-covered push button works better than a tall toggle switch in most beds. If the truck hauls gravel, furniture, tools, or anything that slides, keep the switch tucked out of the impact zone.
The sixth lesson is to test the lights at night before calling the job finished. Daytime testing only proves the lights turn on. Night testing shows whether the beam pattern actually helps. You may find that one strip needs to move higher, a pod points into your eyes, or the toolbox casts a shadow over the exact area you wanted to illuminate. A ten-minute night check can save you from redoing the job later.
Finally, remember that neat wiring is not just about looks. A tidy harness is easier to troubleshoot, less likely to snag, and more resistant to vibration. Take the extra time to route wires along existing harnesses, secure them cleanly, and protect every pass-through. A truck bed light installation does not need to look like a show vehicle build, but it should look intentional. If your wiring resembles a plate of spaghetti that lost a fight, pause and clean it up.
Final Thoughts
Wiring truck bed lights is a practical upgrade that makes your pickup more useful every time daylight disappears. The safest method is simple: use quality 12V LED lights, run automotive-grade wire, protect the positive feed with a properly sized fuse, mount a weatherproof switch, create a clean ground, and protect the harness from abrasion, moisture, heat, and cargo damage.
The project does not require expert-level electrical skills, but it does reward patience. Measure twice, route carefully, crimp securely, test thoroughly, and resist the temptation to skip small protective parts. A good truck bed lighting setup should make the bed easier to use without causing electrical problems later. Done right, it is one of those upgrades you will use constantly and wonder why the truck did not come that way from the factory.
Note: This guide is for general educational purposes. Always follow your light manufacturer’s instructions and your vehicle’s service information. If you are unsure about wiring, fusing, or factory circuits, consult a qualified automotive technician.


