Table of Contents >> Show >> Hide
- What Is a Pom Pom Maker?
- Supplies You Need
- Choosing the Right Yarn for a Fluffy Pom Pom
- How to Use a Pom Pom Maker: Step-by-Step Tutorial
- How Much Yarn Should You Wrap?
- Common Pom Pom Maker Mistakes and How to Fix Them
- Creative Ways to Use Finished Pom Poms
- Beginner Tips for Better Pom Poms
- How to Make Multi-Color Pom Poms
- How to Attach a Pom Pom to a Hat
- Cleaning and Caring for Pom Poms
- Personal Experience: What Beginners Usually Learn After Making a Few Pom Poms
- Conclusion
Learning how to use a pom pom maker is one of those wonderfully low-pressure crafts where the worst-case scenario is still a fuzzy little yarn creature that looks like it has personality. Maybe it is not perfectly round on the first try. Maybe it has one suspiciously long strand sticking out like a cowlick. That is normal. Pom poms are forgiving, cheerful, and surprisingly addictive once you understand the simple rhythm: open, wrap, close, cut, tie, fluff, trim.
A pom pom maker is a small plastic tool designed to help you create round, even yarn pom poms without the guesswork of cardboard circles or finger wrapping. It is especially helpful for beginners because it holds the yarn in place, gives you a cutting groove, and makes it easier to create consistent sizes for hats, scarves, garlands, blankets, gift toppers, wreaths, classroom crafts, and home decor.
In this beginner-friendly tutorial, you will learn exactly how to use a pom pom maker, what supplies you need, how much yarn to wrap, how to tie the center securely, how to trim your pom pom into a fluffy ball, and how to avoid the most common mistakes. Consider this your cozy little roadmap to pom pom successno craft degree required.
What Is a Pom Pom Maker?
A pom pom maker is a reusable craft tool with two hinged sides or arms. Most popular versions open into curved sections, allowing you to wrap yarn around each side before closing the tool. Once the yarn is wrapped, you cut through the center groove, tie a strong piece of yarn around the middle, and open the tool to release the pom pom.
Compared with the old cardboard method, a pom pom maker is cleaner, faster, and more consistent. Cardboard circles work in a pinch, but they can bend, tear, or become floppy after a few rounds. A plastic pom pom maker keeps its shape and helps beginners produce neater results, especially when making several pom poms of the same size.
Supplies You Need
You do not need a large craft-room setup to make pom poms. In fact, this project is refreshingly simple. Gather the following supplies before you start:
- Pom pom maker: Choose the size that matches your project. Small makers are great for garlands and ornaments, while larger makers work well for hats and decorative accents.
- Yarn: Acrylic, wool, wool blends, and other fluffy yarns work well. Cotton can be used, but it usually creates a less fluffy pom pom.
- Sharp scissors: Small, pointed scissors are especially helpful for cutting through the groove of the maker.
- Strong tying yarn or thread: Use a sturdy strand to secure the center. It should be strong enough to pull tightly without snapping.
- Optional finishing tools: A comb, small brush, lint roller, or fabric scissors can help with shaping and cleanup.
Choosing the Right Yarn for a Fluffy Pom Pom
The yarn you choose affects the final look more than beginners often expect. A soft acrylic yarn is affordable, easy to find, and excellent for practice. Wool and wool-blend yarns tend to create plush, full pom poms with a more premium feel. Bulky yarn makes large pom poms faster, while thinner yarn can create dense, delicate pom poms if you wrap enough layers.
Best Yarn Types for Beginners
If this is your first time using a pom pom maker, start with medium-weight acrylic yarn. It is inexpensive, forgiving, and easy to trim. Once you feel confident, try wool blends, variegated yarn, chunky yarn, or even multiple colors wrapped together.
Yarns That Can Be Tricky
Slippery yarn, very thin yarn, and loosely spun yarn can be harder to control. Cotton yarn often creates a pom pom that looks more like a tassel because it does not fluff up as easily. That does not mean cotton is forbiddenthis is not yarn jailbut it may not give you the soft round puff you are imagining.
How to Use a Pom Pom Maker: Step-by-Step Tutorial
The process is simple once you understand the structure of the tool. Most pom pom makers have two sets of arms. You wrap one side, close it, wrap the other side, close it, cut through the center, tie the middle, and open the maker. Let’s walk through it carefully.
Step 1: Open the Pom Pom Maker
Open the arms of your pom pom maker so both curved sections are extended. If your tool has two matching halves, make sure the pieces are aligned correctly before wrapping. The maker should feel stable in your hand, not twisted or half-open.
Hold the pom pom maker in one hand and the yarn tail in the other. You do not need to tie the yarn to the tool. Simply hold the tail against the arm and begin wrapping over it. After a few wraps, the yarn will secure itself.
Step 2: Wrap the First Side Evenly
Start wrapping yarn around the first pair of arms. Move back and forth across the curved section instead of piling all the yarn in one spot. Even wrapping helps create a rounder pom pom and reduces trimming later.
For a fluffy pom pom, wrap generously. A sparse wrap creates a thin pom pom that may look more like a tired dandelion than a cheerful puff. The fuller the arms are, the denser the final pom pom will be. However, do not overstuff the maker so much that it refuses to close. If the tool is fighting you, the yarn has won, and it is time to stop.
Step 3: Close the First Side
Once the first side is wrapped, close that set of arms back into the center of the maker. Keep light pressure on the yarn so it does not loosen. Trim the yarn from the skein only if needed, or continue directly to the other side if your tool allows a smooth transition.
Step 4: Wrap the Second Side
Open the second pair of arms and wrap it the same way. Try to match the fullness of the first side. If one side has much more yarn than the other, your pom pom may come out lopsided and need more trimming.
For multi-color pom poms, this is where you can get creative. Wrap one color on one side and another color on the second side for a half-and-half pom pom. Alternate colors in layers for a confetti effect. Wrap small sections of different colors for a speckled look. The pom pom maker gives you better control than finger wrapping, which makes color experiments easier.
Step 5: Close the Maker Completely
After both sides are wrapped, close the second side. Make sure all arms are snapped or folded into place. The tool should now look compact, with yarn wrapped around both sides and a visible cutting groove around the center.
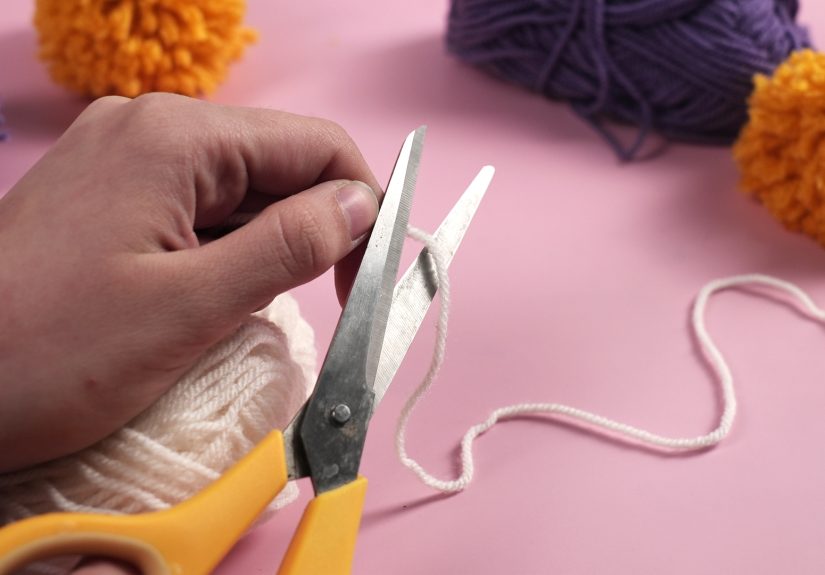
Step 6: Cut Through the Center Groove
Insert sharp scissors into the groove between the two halves of the pom pom maker. Carefully cut along one side, then the other. Hold the maker firmly so it does not pop open while you cut.
This step is where good scissors matter. Dull scissors will chew the yarn instead of slicing it, which can make your pom pom look ragged before it even gets its grand debut. Small pointed scissors usually fit into the groove best.
Step 7: Tie the Center Tightly
Cut a separate piece of strong yarn, usually long enough to wrap around the center and tie securely. Slide it into the center groove where you just cut. Wrap it around the middle of the pom pom and pull it tight.
This is the most important step in the entire tutorial. The center tie holds all the yarn strands together. If it is too loose, your pom pom may shed strands or fall apart. Tie a firm knot, wrap again if needed, and tie a second knot. Pull tightly, but do not yank so hard that the tying strand breaks.
Step 8: Open the Pom Pom Maker
Once the center is secure, open the arms of the maker. Then gently pull apart the two halves of the tool to release the pom pom. Your pom pom may look wild at first. Do not panic. Freshly released pom poms often look like they just woke up from a nap under a couch cushion.
Step 9: Fluff and Trim
Roll the pom pom gently between your palms to fluff it. Shake it lightly, then begin trimming any uneven strands. Turn the pom pom as you trim so you shape it evenly from all sides.
Use small cuts rather than aggressive chopping. It is easier to remove more yarn than to magically glue it back on after giving your pom pom an accidental haircut. Trim slowly until the pom pom becomes round, full, and balanced.
How Much Yarn Should You Wrap?
There is no single perfect number of wraps because yarn thickness, maker size, and desired fullness all matter. As a general rule, wrap until the arms look full and evenly covered. For a dense pom pom, add several layers. For a softer, looser pom pom, use fewer layers.
Beginners often under-wrap because they worry about wasting yarn. The result is usually a thin pom pom with gaps. If you want a plush pom pom for a beanie, garland, or keychain, be generous. A pom pom is basically a tiny yarn celebration, and celebrations should not be stingy.
Common Pom Pom Maker Mistakes and How to Fix Them
Mistake 1: The Pom Pom Falls Apart
The center knot was probably too loose. Use strong yarn or thread for tying, pull firmly, and double knot. Some crafters wrap the center twice before tying to create extra security.
Mistake 2: The Pom Pom Looks Flat
You may not have wrapped enough yarn. Try adding more layers next time. Also check your yarn type. Fluffier yarns create fuller pom poms.
Mistake 3: One Side Is Bigger Than the Other
The two sides were wrapped unevenly. Count your passes if you want consistency, especially when making matching pom poms for a pair of slippers, a garland, or a decorative border.
Mistake 4: The Pom Pom Has Long Random Strands
That is normal. Trim them gradually. Rotate the pom pom often and shape it like a sphere. Think of yourself as a tiny topiary artist, except the shrub is yarn and nobody is judging your landscaping skills.
Mistake 5: The Yarn Is Hard to Cut
Use sharper scissors and avoid overfilling the maker. If the tool is packed too tightly, cutting becomes difficult and the arms may strain.
Creative Ways to Use Finished Pom Poms
Once you know how to use a pom pom maker, you can add pom poms to almost anything that needs a playful touch. They are popular on winter hats, scarf ends, baby blankets, handmade cards, gift wrap, nursery decor, holiday ornaments, party garlands, bookmarks, zipper pulls, wreaths, baskets, and wall hangings.
For a classic beanie topper, leave the center tying strands long and use them to sew the pom pom securely onto the hat. For garlands, thread a needle with strong string and pass it through the center of each pom pom. For gift wrap, tie a pom pom onto ribbon instead of using a disposable bow. It instantly makes the package feel handmade and charming.
Beginner Tips for Better Pom Poms
- Wrap evenly: Move back and forth across each arm for a balanced shape.
- Use more yarn than you think: Dense wrapping creates fuller pom poms.
- Tie tightly: A secure center knot prevents shedding.
- Trim slowly: Small snips give you better control.
- Save scraps: Tiny yarn trimmings can be used as stuffing for small craft projects.
- Practice with affordable yarn: Save fancy yarn for later, once your pom pom confidence has arrived wearing sunglasses.
How to Make Multi-Color Pom Poms
Multi-color pom poms are easy with a pom pom maker. For a two-tone pom pom, wrap one side with one color and the opposite side with another. For stripes, alternate layers of yarn as you wrap. For a confetti effect, hold two or three colors together and wrap them at the same time.
You can also create themed pom poms for holidays. Use red, white, and blue yarn for Fourth of July garlands; orange, black, and purple for Halloween decorations; red, green, and white for Christmas ornaments; or soft pastels for baby shower decor. The basic method stays the same, but the colors change the personality completely.
How to Attach a Pom Pom to a Hat
To attach a pom pom to a hat, keep the long strands from the center tie. Thread them through the top of the hat using a yarn needle. Tie the strands securely on the inside of the hat. For extra stability, tie several knots or sew the pom pom down with matching yarn.
If you want a removable pom pom, you can attach it with a button, snap, or small loop system. This is helpful if the hat needs washing. Yarn pom poms can become misshapen in the laundry, so removable toppers are practical as well as cute.
Cleaning and Caring for Pom Poms
Pom poms are low-maintenance, but they are not indestructible. If your pom pom gets flattened, roll it between your hands and fluff it gently. A light steam from a safe distance can help revive some yarns, but avoid soaking unless the yarn label says it can handle washing.
For dusty decor pom poms, shake them outside or use a lint roller gently. If a strand comes loose, trim it instead of pulling. Pulling can loosen the center and cause more shedding.
Personal Experience: What Beginners Usually Learn After Making a Few Pom Poms
The first thing most beginners discover is that pom poms look questionable before they look adorable. When you open the maker, the pom pom may appear uneven, floppy, or slightly dramatic. This is not failure. This is simply the “before coffee” stage of pom pom making. Trimming is where the magic happens.
One of the biggest lessons is that wrapping more yarn almost always improves the result. Many beginners wrap lightly because they want to be careful, but sparse wrapping creates a pom pom with gaps. Once you try a generously wrapped pom pom, the difference is obvious. It feels fuller, trims better, and looks more professional. The sweet spot is full but not overstuffed. If the pom pom maker closes comfortably, you are probably in good shape.
Another experience worth mentioning is the importance of the center tie. It feels like a small detail, but it decides whether your pom pom survives life in the real world. A loose center knot can cause strands to slide out, especially if the pom pom is attached to a hat, bag, or child’s craft project that will be handled often. Use a sturdy tying strand and pull it tight. If you are nervous, tie it once, wrap again, and tie another knot. Pom poms enjoy security. They are fluffy, not reckless.
Trimming also takes practice. At first, it is tempting to keep cutting until the pom pom is perfectly round. Then suddenly it is half the size you planned, and you are holding a very tiny puff with big emotional consequences. The trick is to trim in small snips while rotating the pom pom. Look at it from the top, bottom, and sides. Set it down, pick it up again, and check the silhouette. The more slowly you trim, the better the final shape.
Beginners also learn that different yarns produce very different personalities. Acrylic yarn is cheerful and reliable. Wool yarn can look plush and luxurious. Chunky yarn creates big pom poms quickly, while thinner yarn requires more wrapping but can create a dense, polished finish. Variegated yarn is especially fun because the color changes do the design work for you. You wrap, cut, tie, and suddenly the pom pom looks like it attended art school.
If you are making several pom poms for one project, consistency matters. Use the same pom pom maker size, the same yarn, and roughly the same amount of wrapping for each one. Counting wraps or counting passes across the arm can help, especially for garlands or blanket corners. That said, handmade pom poms do not need to be identical. A little variation adds charm and reminds everyone that a real person made them, not a pom pom robot in a suspiciously cozy factory.
Finally, pom pom making is a great beginner craft because it rewards patience without requiring perfection. You can make one while watching TV, listening to music, teaching kids a yarn craft, or using up leftover yarn from knitting and crochet projects. The process is simple enough to learn quickly but flexible enough to keep experimenting. Once you master the basic pom pom maker tutorial, you can play with color blocking, stripes, garlands, ornaments, wall art, and accessories. One pom pom becomes five, then ten, and suddenly you are looking around your home wondering what else could use a fluffy upgrade. The answer, obviously, is almost everything.
Conclusion
Learning how to use a pom pom maker is easy, fun, and beginner-friendly. With a simple tool, a ball of yarn, sharp scissors, and a little trimming patience, you can create fluffy pom poms for hats, scarves, garlands, gifts, home decor, and countless craft projects. The key steps are simple: wrap both sides evenly, close the maker, cut through the groove, tie the center tightly, release the pom pom, and trim it into shape.
Your first pom pom may not be perfect, but it will teach you exactly what to adjust next time. Add more yarn for fullness, tighten the center knot for durability, and trim slowly for a rounder finish. Before long, you will be making pom poms with the confidence of someone who owns both yarn and a plan.


