Table of Contents >> Show >> Hide
- Why Steam Cleaning an Oven Works
- What You Need
- How to Steam Clean an Oven: 10 Steps
- Step 1: Read the Owner’s Manual First
- Step 2: Make Sure the Oven Is Completely Cool
- Step 3: Remove Racks, Thermometers, Pans, and Loose Accessories
- Step 4: Wipe Out Loose Debris and Heavy Grease
- Step 5: Add Water the Right Way
- Step 6: Run the Steam Clean Cycle or Heat the Oven Gently
- Step 7: Keep the Door Closed During the Cycle
- Step 8: Let the Oven Cool Slightly, Then Wipe It Down
- Step 9: Tackle Stubborn Spots Gently
- Step 10: Dry the Interior and Build Better Habits
- Common Mistakes to Avoid
- When to Use Steam Clean vs. Self-Clean
- Conclusion
- Real-Life Experiences With Steam Cleaning an Oven
- SEO Tags
If your oven currently looks like it survived a lasagna uprising, take heart. Steam cleaning is one of the easiest ways to freshen up an oven without turning your kitchen into a chemical battlefield. It works especially well for light to moderate grease, splatters, and mystery crumbs that have been hanging around since “that one casserole night.” Better yet, steam cleaning is usually quicker and lower-odor than a high-heat self-clean cycle, which is great news for people who enjoy breathing normally.
The trick is simple: heat plus water creates steam, steam softens grime, and softened grime finally stops acting like it pays rent. Some ovens come with a built-in steam clean feature, while others can be cleaned with a manual steam method using an oven-safe dish of water. Either way, the goal is the same: loosen the mess so you can wipe it away with far less scrubbing and far less dramatic sighing.
Before you start, one important truth deserves the spotlight: every oven has its own personality. Some models want water poured directly on the oven floor, some use a tray or reservoir, some recommend filtered water, and some say tap water is fine. Translation: your owner’s manual is not optional reading here. It is the difference between “look how shiny this is” and “why did I do that?”
Why Steam Cleaning an Oven Works
Steam cleaning uses moisture and moderate heat to loosen food residue instead of burning it off at extremely high temperatures. That makes it ideal for regular maintenance and smaller messes. If your oven has a few grease spots, dried sauce splashes, or cookie crumbs turned into carbon confetti, steam cleaning can make cleanup much easier.
It is not always the hero for every disaster. Heavy, baked-on grease and thick layers of burned residue may need a second cycle, a gentle scrub with a non-abrasive pad, or a different cleaning method recommended by the manufacturer. Think of steam cleaning as the smart weekly or monthly reset, not the magical solution for an oven that has been ignored since the previous presidential administration.
What You Need
- Microfiber cloths or soft cleaning rags
- A sponge
- Warm water
- An oven-safe baking dish or metal pan if your oven does not have a steam clean cycle
- A non-abrasive scrubber or nylon brush
- Optional: lemon slices or a little white vinegar for odor control
- Optional: baking soda paste for stubborn spots after steaming
Avoid steel wool, harsh abrasives, and aggressive scraping tools unless your manufacturer explicitly approves them. Your oven should end this process cleaner, not emotionally scarred.
How to Steam Clean an Oven: 10 Steps
Step 1: Read the Owner’s Manual First
Yes, this is the least glamorous step. No, you should not skip it. Some ovens have a dedicated Steam Clean button. Others have a feature with a different name. Some want one cup of water. Some want closer to 12 ounces. Some want the water on the cavity floor; others want it in a tray. This is why “my cousin said it worked on her oven” is not a user manual.
Look up three things before you begin: whether your oven has a steam clean cycle, where the water should go, and whether the racks should stay in or come out. Most manufacturers say to remove racks and accessories before cleaning. Start here, and the rest of the job becomes much easier.
Step 2: Make Sure the Oven Is Completely Cool
Steam cleaning starts with a cool oven, not one that is still radiating “pizza night” heat. If you just finished baking, give the oven enough time to cool down completely. This protects you from burns and helps you clean more safely and comfortably.
A cool oven also gives you a chance to inspect the mess honestly. Is it mostly crumbs and light grease? Great. Steam cleaning is your friend. Is there a thick black layer of burned-on goo that looks like it has its own backstory? Steam may still help, but you should be prepared for a second round or some gentle manual cleaning afterward.
Step 3: Remove Racks, Thermometers, Pans, and Loose Accessories
Take out everything that does not need to be in the oven. That usually means racks, thermometers, pizza stones, air fry trays, dividers, and stray foil that somehow migrated to the bottom. Steam works best when it can reach the interior surfaces directly.
This is also a good moment to clean the racks separately. A soak in warm, soapy water often does the trick. If you leave racks in when the manual says not to, they can discolor or become harder to slide later. No one wants an oven rack that moves like it is negotiating a labor contract.
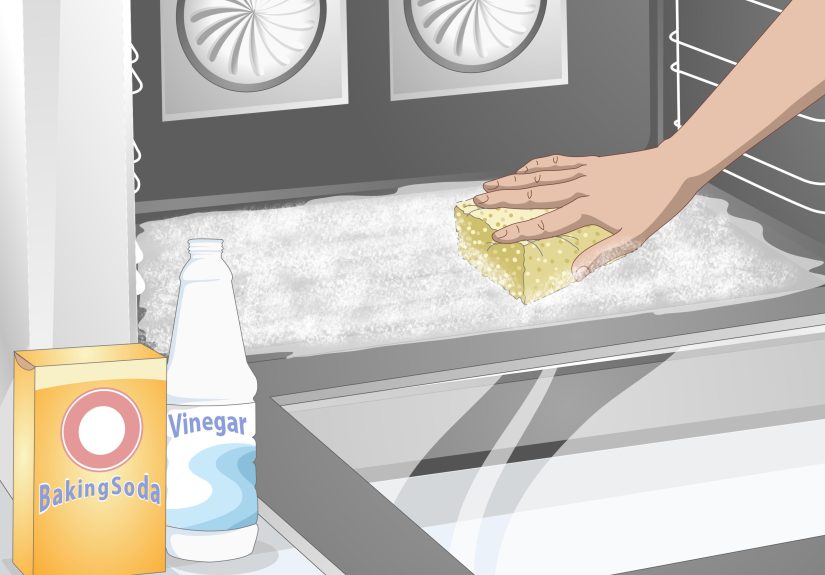
Step 4: Wipe Out Loose Debris and Heavy Grease
Steam cleaning is excellent at loosening grime, but it is not a miracle for piles of burnt crumbs or puddles of greasy residue. Use a damp cloth, paper towel, or soft scraper to remove loose debris first. This gives the steam a better chance to target the stuck-on mess rather than wasting energy on dry junk.
If you see thick grease on the oven floor, wipe up as much as possible before starting. This step improves results and helps prevent smells. Consider it pre-cleaning for people who would rather wipe once now than scrub five times later.
Step 5: Add Water the Right Way
Now it is time for the star of the show: water. If your oven has a steam clean cycle, follow the model instructions exactly. Many ovens use about one cup of water, though some specify 12 ounces or direct you to use a tray or reservoir. If your manual suggests filtered, distilled, or tap water, follow that guidance instead of playing home appliance roulette.
If your oven does not have a steam clean cycle, place hot water in an oven-safe dish or pan and set it inside the oven. Some people add lemon slices for a fresher smell, and that can be helpful for light grease and odors. Just remember that lemon is a helper, not a superhero.
Step 6: Run the Steam Clean Cycle or Heat the Oven Gently
If your oven has a steam clean setting, select it and let the oven do its thing. Many built-in cycles run for around 20 to 50 minutes, depending on the brand and model. During that time, the steam helps soften residue so it can be wiped away later.
If you are using the manual method, heat the oven according to safe guidance for that approach and keep the water dish inside long enough to build steam. The goal is warm, moist loosening power, not an inferno. This is definitely not the moment to improvise with random temperatures because an internet stranger once felt lucky.
Step 7: Keep the Door Closed During the Cycle
It is tempting to peek. Resist. Opening the door lets out the steam and reduces the cleaning effect. It can also expose you to a rush of hot moisture, which is not fun and not smart.
Many manufacturers specifically warn against opening the oven during the steam clean cycle because the water at the bottom will be hot. Let the cycle finish. Your oven has a plan. Trust the process for once in your life.
Step 8: Let the Oven Cool Slightly, Then Wipe It Down
Once the cycle ends, give the oven a little time to cool so you can work safely. Do not wait forever, though. The best moment to wipe is when the residue is still softened. Use a microfiber cloth or sponge to remove moisture, loosened grime, and any softened splatters from the walls, floor, and door.
You may be surprised how easily the mess comes off at this stage. This is the payoff moment, when past-you apologizes to present-you and present-you finally gets to feel superior.
Step 9: Tackle Stubborn Spots Gently
If some grime is still clinging on for dear life, use a non-abrasive scrubber or nylon brush. For stubborn grease, a small amount of baking soda paste can help after the steam has loosened the surface. Apply it gently, let it sit briefly, and wipe again with a damp cloth.
Do not attack the oven with metal tools, razor blades, or harsh cleaners unless the manufacturer says that is safe. Steam cleaning is supposed to reduce drama, not create a repair bill. If the oven is still heavily soiled after this step, a second steam cycle may work better than aggressive scrubbing.
Step 10: Dry the Interior and Build Better Habits
Finish by drying the interior with a clean cloth. Make sure you wipe the door glass, corners, and the lower cavity where water may collect. Once everything is dry, return the racks and accessories.
To keep your oven from becoming a grease museum again, wipe up fresh spills once the oven cools after cooking. You do not need a full deep clean after every meal, but quick maintenance makes a huge difference. Steam cleaning works best when it is used regularly for light to moderate buildup, not as a last-resort rescue mission.
Common Mistakes to Avoid
- Skipping the manual: The right method depends on the model.
- Using the wrong amount of water: More is not always better.
- Leaving racks in when the manual says remove them: This can affect finish and performance.
- Opening the door mid-cycle: Goodbye, steam. Hello, disappointment.
- Expecting steam to fix severe carbon buildup in one pass: For heavy messes, you may need extra cleaning.
- Using harsh abrasives: Your oven interior is not a sidewalk.
When to Use Steam Clean vs. Self-Clean
Steam clean is usually the better choice for quick upkeep, fresh spills, light grease, and people who want a lower-odor cleanup. It is faster, gentler, and easier to fit into a normal routine. Self-clean, by contrast, uses extremely high heat and is often more powerful for serious buildup, but it can take longer and create more odor and heat in the kitchen.
If your oven has both options, a smart strategy is to use steam clean regularly and reserve self-clean for the occasional deep reset. In other words, do not wait until your oven looks like it moonlights as a charcoal forge.
Conclusion
Steam cleaning an oven is one of those household jobs that sounds fancier than it really is. Once you know the basic routine, it becomes a practical, low-stress way to keep your appliance looking decent and smelling less like ancient pizza. Start with a cool oven, follow your manual, let steam do the softening, and finish with a gentle wipe-down. That is the whole game plan.
The best part is that you do not need to turn cleaning day into a full theatrical production. With the right steps, steam cleaning can be fast, effective, and surprisingly satisfying. Your oven may never send a thank-you note, but it will stop looking like a crime scene, and honestly, that is enough.
Real-Life Experiences With Steam Cleaning an Oven
The first time many people try steam cleaning, they expect one of two outcomes: either absolutely nothing will happen, or the oven will emerge looking like it was detailed by angels. The real experience is more practical and, in a weirdly satisfying way, better than both extremes. Steam cleaning usually does not produce an instant television-commercial transformation, but it does make the job feel dramatically easier. Instead of scraping at every splatter like you are excavating an archaeological site, you are mostly wiping, nudging, and muttering, “Well, that was easier than I thought.”
A common experience is discovering that timing matters more than effort. People who steam clean their oven after a recent spill often get excellent results. Sauce splatters, cheese drips, and light grease tend to soften quickly, especially when the mess has not had six months to bond with the metal on a spiritual level. On the other hand, people who wait forever usually find that steam cleaning still helps, but it becomes the first round of battle rather than the entire war. The oven gets looser, softer, and less intimidating, but stubborn spots may still need a second cycle or a baking soda touch-up.
Another real-world lesson is that odor control can be a surprisingly big win. A lot of people try steam cleaning because they are tired of that faint burnt smell every time they preheat the oven. Even when the interior is not visibly awful, small bits of grease and old splatter can create that “something toasted in here and it was not bread” smell. After a good steam clean and wipe-down, the oven often smells noticeably fresher. That alone makes the process feel worth it.
People also learn quickly that the manual is not just legal decoration. One oven wants a cup of water on the bottom. Another wants water in a tray. Another wants a specific button sequence that feels like entering a cheat code in a video game. The owners who get the best results are almost always the ones who spend two minutes checking the instructions before turning their oven into an experiment.
Perhaps the most universal experience is this: steam cleaning works best as a habit, not a heroic intervention. Once people realize they can do a quick cycle every so often, the oven stays manageable. The job stops being dreadful because it never reaches nightmare status. That is the secret. Steam cleaning is not magic, but in a busy kitchen, it can feel pretty close.