Table of Contents >> Show >> Hide
- Quick Navigation
- Step 0: Diagnose the Problem (Because “Stuck” Has Many Personalities)
- Safety + Setup (Two Minutes Now = Two Hours Saved Later)
- Step 1: Gentle Methods That Prevent a Bad Day
- Step 2: Penetrating OilUse It Like a Pro
- Step 3: Bring the Thunder (Impact Without Destruction)
- Step 4: Make a New Bite When the Head Is Damaged
- Step 5: Screw Extractors and Left-Hand Drill Bits (When You’re Done Being Nice)
- Step 6: Last ResortDrill the Head Off (Cleanly)
- Special Cases (Because Screws Love Being Unique)
- Fast Troubleshooting Table
- How to Prevent Stuck Screws Next Time
- of DIY Experiences: What Stuck Screws Taught Me (and a Few Projects Too)
- Conclusion
A stuck screw is nature’s way of reminding you that patience is a toolright next to the hammer you’re
definitely about to grab. Whether the screw is rusted solid, painted into place, or the head is halfway
stripped and laughing at you, there’s almost always a clean, DIY-friendly way to get it out without turning your
project into modern art.
This guide walks you from the gentlest “don’t make it worse” techniques to the heavy-hitters like impact drivers,
screw extractors, and drilling off the head. Along the way, you’ll learn what causes stuck screws, which method to
try first, and how to avoid snapping the screw (or your spirit).
Quick Navigation
- Diagnose the kind of “stuck” you have
- Safety and setup that saves projects
- Gentle methods: grip, pressure, and traction
- Penetrating oil: how to use it correctly
- Impact methods: shock + twist
- Make a new bite: slot, Torx trick, drill deeper
- Screw extractors and left-hand bits
- Last resort: drill the head off
- Special cases (wood, brass, tiny screws, hex)
- Preventing stuck screws in the future
- of real-world DIY experiences
Step 0: Diagnose the Problem (Because “Stuck” Has Many Personalities)
Before you reach for power tools, figure out why the screw won’t move. The right diagnosis saves
time and prevents damage.
Common stuck-screw situations
- Rust/corrosion: common outdoors, bathrooms, basements, and anything metal-on-metal.
- Paint or caulk: trim screws, hinges, and hardware “sealed” by layers of finish.
- Overdriven screw: sunk too deep into wood or drywall; head is below the surface.
- Threadlocker: some machine screws are installed with locking compound (often feels “glued”).
- Cam-out / stripped head: the driver bit slips and chews up the recess.
- Partially broken screw: head snaps off, leaving a shank behind.
If the screw head is still crisp, you’re in luckstart gentle. If the head is already stripped, move quickly to
“new bite” methods before it becomes a perfectly round, perfectly useless metal button.
Safety + Setup (Two Minutes Now = Two Hours Saved Later)
Basic safety
- Wear eye protection: cutting wheels, drill bits, and flying rust don’t care about your plans.
- Ventilation matters: penetrating oils and aerosols need airflow.
- Gloves, but smartly: avoid loose gloves around spinning drills.
Protect the work
- Mask nearby surfaces with painter’s tape (especially painted trim and delicate finishes).
- If you’re working on a removable part, clamp it to a bench so you can apply firm downward pressure.
- Clean the screw head with a pick or awlpaint, dirt, and rust reduce grip.
Step 1: Gentle Methods That Prevent a Bad Day
1) Use the correct bitand use a good one
A worn driver bit is a stripped-screw factory. Choose a bit that fits snugly and sits fully in the recess.
If a Phillips bit wiggles, try the next size up. For square (Robertson), Torx, or hex screws, match the size
precisely“close enough” is how heads get rounded.
2) Switch to a manual screwdriver (yes, really)
Drills are great at speed. Stuck screws need control. A sturdy manual screwdriver lets you apply steady
downward pressure while turning slowlyoften enough to break the initial bond.
3) Add downward force and a gentle “seat” tap
Place the driver in the screw head, press down hard, and give the handle a few light taps with a hammer.
This seats the bit deeper and can help break rust or paint adhesion.
4) Try the rubber band (or friction booster) trick for slightly stripped heads
If the head is just starting to strip, lay a wide rubber band over the screw head and drive through it.
The rubber fills gaps and increases friction. No rubber band? A small piece of abrasive pad, steel wool,
or even a dab of gritty cleanser can sometimes add enough bite.
5) Rock it: tighten a hair, then loosen
Sounds backwards, works surprisingly often. Turn the screw slightly tighter firstjust a whisperthen
reverse. That tiny movement can break corrosion and free the threads. (Don’t crank it tighter; this is a nudge,
not a gym session.)
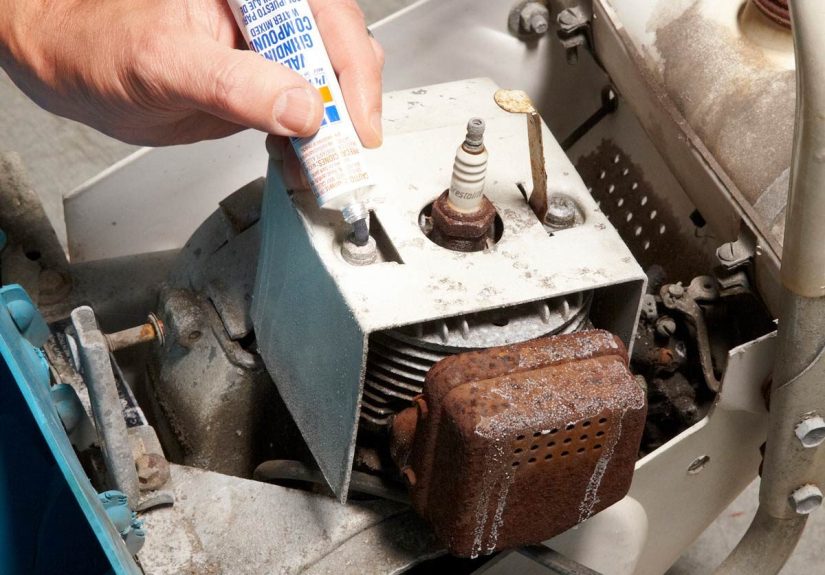
Step 2: Penetrating OilUse It Like a Pro
Penetrating oil isn’t instant magic. It’s a sneaky liquid that creeps into thread gaps and breaks down rust bonds.
The trick is giving it time and helping it travel.
How to apply penetrating oil properly
- Spray precisely: aim at where the screw meets the material (threads area), not just the head.
- Wait: give it a few minutes at minimum; longer for heavy rust.
- Tap to “vibrate”: lightly tap around the head to help the oil wick into the threads.
- Reapply if needed: two rounds beat one impatient round.
Penetrants are especially helpful for screws in metal, outdoor hardware, and anything with visible corrosion.
If the screw is in wood, use penetrant sparingly and wipe excesstoo much can stain certain woods or finishes.
Step 3: Bring the Thunder (Impact Without Destruction)
Impact driver (cordless) in reverse
A cordless impact driver can be excellent for stubborn screws because it delivers rapid twisting force while the
bit stays engaged. Use a high-quality bit, keep the driver aligned straight, press firmly, and start slow. Short
bursts in reverse often beat one long, overheated struggle.
Manual impact screwdriver (the secret weapon for stubborn Phillips and flathead screws)
This old-school tool converts a hammer strike into a turning motion. It’s tailor-made for stuck screws because
the impact both shocks the threads and twists the fastener, helping prevent cam-out. It’s particularly
handy on door hardware, old hinges, lawn equipment, and any screw that laughs at normal screwdrivers.
Pro move: set the bit, preload the tool in the “loosen” direction, press it into the screw head, then strike
firmly with a hammer. Repeat. Your screw may pretend it’s still stuck… right up until it isn’t.
Step 4: Make a New Bite When the Head Is Damaged
1) Hammer in a Torx bit
For a partially stripped Phillips head, choose a Torx bit that’s slightly oversized and tap it into the damaged
recess with a hammer. The star shape bites into fresh metal. Then remove with a manual screwdriver handle or
a driver (low speed, straight alignment).
2) Cut a new slot for a flathead
If the screw head is accessible, use a rotary tool with a thin cutting wheel to cut a straight slot across the
head. Then seat a flathead screwdriver firmly and turn slowly. This is also great for wide, shallow, chewed-up
screw heads that no longer accept their original driver type.
3) Drill a small “deeper socket” into the head
Sometimes the bit slips because the recess is too shallow or rounded. Carefully drilling a small hole into the
head can give your driver bit a deeper place to grab. Use the right drill bit for metal and go slowlydrill too
far and the head can snap off when you don’t want it to.
Step 5: Screw Extractors and Left-Hand Drill Bits (When You’re Done Being Nice)
A screw extractor kit is purpose-built for damaged fasteners. Many kits use a two-step process:
a drill/reaming end to create a bite point, and an extractor end that grabs and turns the screw out.
Some sets also include left-hand drill bits, which can back a screw out while drilling.
Extractor method (step-by-step)
- Center punch the head: make a small dimple so your drill doesn’t wander.
- Drill a pilot hole: use the size recommended by your extractor kit; drill straight.
- Insert the extractor: seat it firmly in the hole.
- Turn counterclockwise: use a wrench/handle for controlled torque.
Go slow and stay aligned. Extractors are hardenedgreat at biting, also great at snapping if you apply sideways
force. If an extractor breaks inside the screw, it becomes much harder to drill out, so treat it like a precision
tool, not a crowbar.
Left-hand drill bit method (bonus trick)
A left-hand bit spins counterclockwise. As it drills into the screw, it sometimes “catches” and unscrews the
fastener without needing an extractor. It’s especially useful on machine screws and bolts where corrosion is
moderate, not catastrophic.
Step 6: Last ResortDrill the Head Off (Cleanly)
If the head is too far gone and nothing will bite, drilling off the head can save the dayespecially for hinges,
brackets, and hardware where you just need the part removed.
How it works
- Select a drill bit slightly larger than the screw’s shank but smaller than the head’s widest diameter.
- Drill straight into the head until it separates (you’ll feel it “pop” as the head releases).
- Remove the attached part (hinge, bracket, etc.).
- Now grab the remaining screw shank with locking pliers and back it out.
If the shank won’t budge, apply penetrant again, add gentle heat if appropriate, and work it back and forth.
Worst case, you may need to drill out the remaining shank and repair the hole (wood plug, dowel, thread insert,
or retap threads depending on the material).
Special Cases (Because Screws Love Being Unique)
Stuck screws in wood (especially outdoor projects)
- If the head is buried, dig around it carefully with an awl so the bit can seat fully.
- Try an impact driver with a fresh bitoften the quickest win.
- If the screw spins but won’t lift, gently pry upward under the head (if accessible) while backing it out.
Brass screws (soft metal, easy to strip)
- Always use a perfectly fitting driver and firm downward pressure.
- Stop early if it starts to strip; switch to slot-cutting or extractor methods sooner.
Tiny screws in electronics
- Use the correct precision bit (often Philips #00/#000, Torx, or small hex).
- If lightly stripped, try a rubber band or a tiny dab of adhesive friction booster (carefully).
- If all else fails, a rotary tool slot (with extreme care) can work, but protect surrounding plastic and boards.
Stripped Allen/hex screws
- Try a slightly larger hex key (imperial vs metric mismatch is common).
- Add a thin layer of tape or rubber to increase bite.
- Hammer in a Torx bit to bite into the rounded hex socket.
Fast Troubleshooting Table
| What You See | Likely Cause | Best First Move | Next Step If It Fails |
|---|---|---|---|
| Bit slips but head isn’t destroyed | Wrong/worn bit, shallow seating | New correct bit + strong downward pressure | Tap to seat + rubber band friction |
| Rust around screw, won’t budge | Corrosion bond | Penetrating oil + wait + tap | Manual impact screwdriver |
| Head is rounded/chewed up | Stripped recess | Hammer in Torx bit | Cut a slot or use extractor |
| Head snaps off | Over-torque, corrosion, fatigue | Grip shank with locking pliers | Left-hand bit / extractor / drill out |
| Hardware won’t come off | Screw head stuck, part binding | Pry gently while unscrewing | Drill head off, then remove shank |
How to Prevent Stuck Screws Next Time
Use the right fastener for the job
Cheap screws strip easier. Outdoor projects need corrosion-resistant screws. Structural jobs need structural-rated
fasteners. Matching the screw to the material is prevention disguised as shopping.
Pre-drill and drive with control
- Drill pilot holes in hardwoods and dense materials.
- Start screws by hand to avoid cross-threading.
- Use lower speed and appropriate clutch settings on drills to prevent overdriving.
Reduce future seizure
- For metal fasteners in harsh conditions, consider anti-seize (when appropriate for the application).
- Avoid painting hardware shut; score paint lines around screw heads before removal.
- Store bits properly and replace them when wornbits are cheaper than ruined projects.
of DIY Experiences: What Stuck Screws Taught Me (and a Few Projects Too)
The first time I met a truly stuck screw, it was on an outdoor gate hinge that had survived several summers,
a couple of storms, and at least one ambitious power-washing session. The Phillips heads looked innocentuntil
my driver bit started spinning like it was auditioning for a ceiling fan. Lesson one: outdoor screws aren’t stuck;
they’re bonded. A good penetrating oil, a little patience, and a few taps around the hinge turned “never”
into “finally.” It didn’t come out fast, but it came out cleanand I didn’t end up replacing the whole hinge.
Another classic: painted-over hardware. I once tried removing cabinet hinges that had been repainted so many times
the screw heads had the crisp detail of a candle. Before you even twist, score around the head with a utility knife
and scrape the recess clean. Without that step, you’re basically turning paint into glue and then blaming the screw
for being “dramatic.” Once the paint seal breaks, the screw often behaves like a normal citizen again.
Then there are the screws that aren’t rustedjust overconfident. Like the time I found a machine screw on a
lawn tool that clearly had threadlocker on it. That one wouldn’t budge with steady hand torque alone. The fix was
shock: a manual impact screwdriver. One solid strike, then another, and suddenly the screw loosened as if it had
simply needed a motivational speech delivered via hammer.
My personal “why do I own a rotary tool?” moment came on a cheap interior door handle. The screw head stripped early
(soft metal, cheap hardware, predictable outcome). Rubber band didn’t help. Oversize bit didn’t help. So I cut a clean
slot across the head and used a wide flathead screwdriver with strong downward pressure. That slot turned the screw
from “rounded blob” into “removable fastener” in about 30 seconds. Bonus lesson: cutting a slot feels intense, but it’s
often less destructive than fighting a stripped head for 20 minutes.
The most satisfying recovery, though, was drilling the head off a stubborn hinge screw. It sounds scarylike you’re
officially admitting defeatbut it’s actually controlled and elegant when done right. Once the hinge came off, the screw
shank was exposed, and locking pliers finally had something to grab. The screw backed out with far less drama than the
earlier attempts. That’s the weird truth of stuck screws: sometimes the fastest fix is the one that looks the most
aggressive, because it gives you better access and cleaner leverage.
In the end, stuck screws taught me three habits that save projects: (1) stop the moment a bit starts slipping,
(2) escalate methods in a smart ordertraction, penetrant, impact, new bite, extraction, and only then drillingand
(3) keep a few specialty tools around (manual impact driver, extractor kit, fresh bits). Because someday, a tiny piece of
hardware will decide it runs the house. And it’s nice to have a plan when that happens.
Conclusion
Removing a stuck screw is part technique, part strategy, and part refusing to be emotionally manipulated by a fastener.
Start with the gentlest methods (proper bit, pressure, seating taps), add penetrating oil when corrosion is involved,
step up to impact tools for stubborn screws, then create a new bite or use an extractor when the head is damaged. If all
else fails, drilling the head off can be the cleanest path to victory. The best outcome isn’t just “screw removed”it’s
“project saved.”


