Table of Contents >> Show >> Hide
- Before You Start: Safety, Tools, and a 60-Second Reality Check
- Way #1: Remove a Standard Ceiling Fixture (Flush or Semi-Flush Mount)
- Way #2: Remove a Hanging Pendant or Chandelier (Chain or Downrod)
- Troubleshooting Weird Wiring Without Losing Your Cool
- After the Fixture Is Down: Leave It Safe and Patch-Ready
- FAQ: Quick Answers That Prevent Slow Disasters
- Real-World Experiences: The Stuff People Learn Mid-Ladder (About )
- Conclusion
Removing a light fixture sounds like one of those “sure, I can do that” projectsright up until you’re on a ladder,
holding a surprise-heavy glass dome with one hand and realizing the other hand is… also busy. The good news: most
ceiling fixtures come down in a predictable way, and you don’t need wizard skillsjust patience, a tester, and a
healthy respect for electricity (aka: the invisible house gremlin that bites).
Below are the two best ways to remove a light fixture based on how it’s mounted: a standard
flush/semi-flush fixture, and a hanging pendant/chandelier. I’ll also cover what to do when the wiring looks like
it time-traveled from 1957, how to keep the junction box happy, and how to leave everything safe if you’re not
installing a new light the same day.
Before You Start: Safety, Tools, and a 60-Second Reality Check
1) Turn off power the right way (not the “I flipped the switch, so it’s fine” way)
The wall switch is a control, not a guarantee. For safe ceiling light removal, do this instead:
- Turn the light off at the wall switch. This prevents someone from “helpfully” flipping it on.
- Shut off the circuit breaker that feeds the light.
-
Test before you touch. Use a non-contact voltage tester on every wire in the box and on the
fixture wiring. No beep/light = you can keep going. Beep/light = you did not win this roundgo find the correct breaker. - Label or tape the breaker so nobody turns it back on mid-project.
If you don’t own a non-contact voltage tester yet, congratulationsyou’ve found your next $15 hero.
It’s cheaper than a trip to urgent care and dramatically less annoying than explaining to your friends why your hair smells like toasted regret.
2) Tools and supplies you’ll actually use
- Non-contact voltage tester (and/or a multimeter if you’re comfortable using one)
- Flathead + Phillips screwdriver
- Wire strippers/cutters
- Needle-nose pliers
- Step ladder (stable, properly rated)
- Flashlight or headlamp (because the power is off… remember?)
- Wire connectors (wire nuts) in the right size
- Electrical tape + a marker for labeling wires
- A small container for screws (optional, but highly recommended if you enjoy not losing screws)
- A soft towel/blanket to protect the floor and catch falling “oops” parts
3) Know your limits (and your ceiling box limits)
Most modern ceiling boxes and mounting systems can handle typical light fixtures, but very heavy fixtures
(think big chandeliers) may require a box and brace rated for the load. As a practical rule, if the fixture feels like
it could double as gym equipment, don’t assume the existing box is ready for it.
Also: if you see brittle insulation, aluminum wiring, scorched wire nuts, a loose junction box, or anything that looks
like it has already survived one small electrical incidentpause and consider calling a licensed electrician.
DIY is great. DIY plus mystery wiring is how you end up with a new hobby: “Googling electrical code at 2 a.m.”
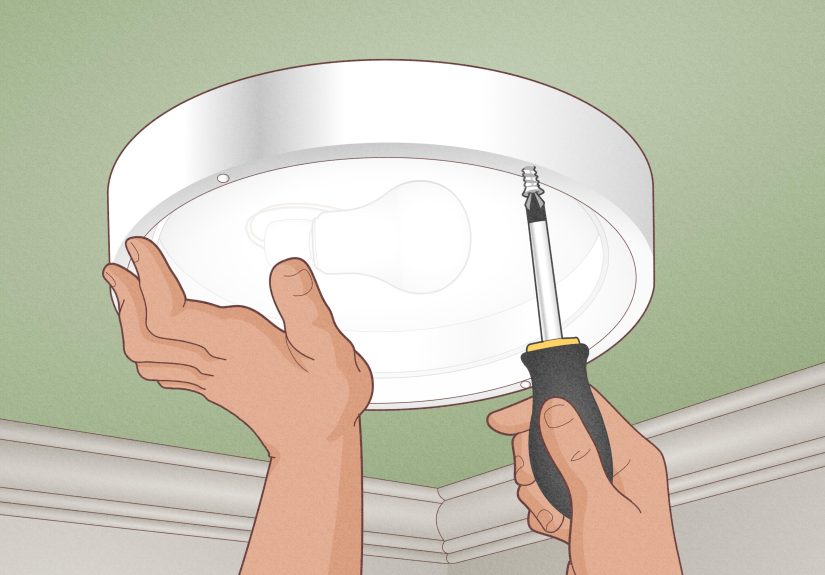
Way #1: Remove a Standard Ceiling Fixture (Flush or Semi-Flush Mount)
This is the most common style: a light that hugs the ceiling, usually held by a decorative nut, a ring, or a couple of
screws hiding behind a canopy. Here’s how to remove a ceiling light fixture cleanly and safely.
Step-by-step
-
Power off + test. Turn off the breaker, then confirm with your voltage tester at the fixture and the box.
Yes, again. Safety loves repetition. -
Remove bulbs, shades, and glass first. Take off anything fragile or heavy (globes, covers, decorative cages).
Set it on a towel somewhere safesomewhere the family cat cannot “inspect” it. -
Support the fixture. If it’s small, you can usually hold it with one hand while loosening hardware.
If it’s bigger, recruit a helper to support the weight while you undo screws. -
Remove the canopy/cover. You might find:
- A center finial or decorative nut (common on domes)
- Two screws on opposite sides (common on modern fixtures)
- A threaded collar ring that twists off (common on older styles)
Pro tip: if paint has “glued” the canopy to the ceiling, score around the edge lightly with a utility knife before pulling.
-
Lower the fixture gently and take a photo. Once the canopy is down, you’ll see the wire connections.
Snap a clear photo before you touch anything. Your future self will say thank you. -
Disconnect the wires (ground last). Usually you’ll see:
- Hot (often black or red)
- Neutral (often white)
- Ground (bare copper or green)
Twist off the wire nuts, separate the connections, and keep the house wires from slipping back into the box.
Order that tends to feel easiest: hot, neutral, then ground.
(Some guides prefer ground first when installing; removing is mainly about control and clarity. The big rule is: power is off and verified.) -
Cap and secure the house wires if you’re stopping here. If you’re not installing a new fixture immediately:
- Put a wire nut on each exposed conductor (hot, neutral, ground).
- Gently fold the wires back into the box.
- Install a blank cover plate on the box.
Leaving exposed wires hanging out is not a “temporary solution.” It’s a “temporary invitation to chaos.”
-
Remove the mounting bracket (if needed). Many fixtures use a mounting strap/crossbar screwed into the junction box.
If you’re replacing the light, you may keep the strap if the new fixture uses the same styleotherwise remove it.
Common hiccups (and how to handle them)
-
The screws won’t budge: Apply firm pressure, use the correct bit size, and try a manual screwdriver before a drill.
Stripped screws are how “quick projects” become “hardware store field trips.” -
The wires are too short: Don’t yank. If you’re installing a new fixture and need more length, this may require
pigtails and proper splicing in the box. If you’re unsure, call a pro. - The box moves: A loose electrical box is a problem. Fixtures shouldn’t wobble. Plan to re-secure the box before installing anything new.
Way #2: Remove a Hanging Pendant or Chandelier (Chain or Downrod)
Pendants and chandeliers add style, mood, andduring removalgravity-based surprises. The core idea is the same as Way #1,
but there’s extra hardware because the fixture hangs from a chain or a rigid rod.
Step-by-step
-
Power off + test. Breaker off, then test the wires at the canopy/box.
Don’t skip this because you “feel lucky.” Electricity does not care about your vibes. -
Lighten the load. Remove bulbs, glass shades, crystalsanything detachable. For large chandeliers,
remove parts in sections if the design allows it. -
Support the fixture. Have a helper hold the fixture from below. If it’s heavy, use a sturdy hook, strap,
or temporary support (like a small step stool under the fixture) so you’re not playing “ceiling bowling.” -
Lower the canopy. Most canopies are held by two side screws or a decorative nut. Once loosened,
slide the canopy down the chain/rod to reveal the wiring connections and the mounting bracket. -
Take a photo and label wires. Especially important for pendants, because wires may run through the chain/rod
and you’ll want to reassemble in the same order later. -
Disconnect wire nuts and separate conductors. Hot to hot, neutral to neutral, ground to grounddisconnect carefully.
Cap the house wires if you’re not installing a new fixture right away. -
Detach the hanging hardware.
-
If it’s a chain: there’s usually a quick link or hook at the top connecting the chain to the mounting bracket loop.
Unhook it once the wires are free and the fixture is supported. - If it’s a downrod: there may be a threaded coupling or set screw at the top. Support the rod and unthread it carefully.
-
If it’s a chain: there’s usually a quick link or hook at the top connecting the chain to the mounting bracket loop.
- Remove the mounting bracket (optional). If you’re replacing with a different pendant system, remove the old bracket.
- Make the box safe. Cap the wires, tuck them into the box, and install a blank cover if you’re pausing the project.
A quick note about extra weight
Hanging fixtures can put extra stress on the ceiling box and bracket. If the box is loose, undersized, cracked,
or not rated for the fixture, don’t “hope it’ll hold.” Fix the support first.
Heavy fixtures may need a fan/fixture-rated brace box assembly designed for significant loads.
Troubleshooting Weird Wiring Without Losing Your Cool
Sometimes you remove the canopy and discover a wire party you did not RSVP to: multiple whites, multiple blacks,
a red wire doing its own thing, and a ground wire that’s… absent. Here’s how to handle common scenarios safely.
“Why are there more than three wires?”
It’s normal for a ceiling box to contain additional wires if power feeds through to other lights/outlets.
Do not disconnect bundles that aren’t part of the fixture. Your goal is to remove only the fixture’s leads
from the existing connections. If multiple wires are under one wire nut, take a photo, label, and re-cap exactly as found.
“All the wires look the same color. Great.”
In older homes, insulation can fade, get dusty, or be re-marked by a previous DIYer with… imagination.
If you can’t confidently identify hot vs. neutral, stop and use a proper tester/multimeter methodor call an electrician.
A common situation is a switch loop, where a white wire may be used as a hot conductor and should be marked,
but you should never assume without testing.
“There’s no ground wire.”
Some older wiring systems don’t provide a ground conductor. This can affect what fixtures you can install and how you bond the box.
In many cases, a metal box may be grounded through conduit or other approved meansbut verifying that correctly takes know-how.
If you’re not sure, this is a smart place to bring in a licensed electrician.
“The insulation is cloth-covered or crumbling.”
That’s a red flag. Brittle insulation can crack when you move it, exposing conductors and increasing shock/fire risk.
If you see deteriorated insulation, pause the DIY plan and consider professional help. Upgrading wiring or adding a proper junction point
is not the place for guess-and-check.
“The ceiling box is loose or cracked.”
Don’t install a new fixture into a box that wiggles. The box should be firmly fastened to framing or an approved brace system.
A loose box can lead to movement, loose connections, and long-term problems. Fix the support before you hang anything new.
After the Fixture Is Down: Leave It Safe and Patch-Ready
Whether you’re replacing the fixture today or patching the ceiling next weekend, your goal is to leave the electrical box safe:
- Cap each conductor with an appropriately sized wire nut.
- Tuck wires neatly into the box (no sharp bends, no pinched insulation).
- Install a blank cover plate on the ceiling box.
- Keep the breaker off until the cover is on and the area is clear.
- If the box is damaged or loose, address that before re-energizing the circuit.
FAQ: Quick Answers That Prevent Slow Disasters
Can I remove a light fixture by just turning off the wall switch?
You can, but you shouldn’t. Turning off the breaker and verifying with a tester is the safer standard,
because switches can be miswired, shared neutrals exist, and someone can flip the switch back on.
Do I need a helper?
For small flush-mount lights, maybe not. For anything heavy, awkward, high-ceilinged, or glass-laden: yes.
A helper can support the fixture and stabilize the laddertwo things your elbows are famously bad at doing simultaneously.
What if my breaker panel isn’t labeled?
Turn the light on, then flip breakers one at a time until the light goes off. Confirm with a tester at the fixture.
Once you find the right breaker, label it. Future-you deserves nice things.
Is it okay to leave the wires exposed while I run to the store?
Cap the wires and install a cover plate before leaving. Even “just for a minute” is long enough for accidents,
curious kids, pets, or an unfortunate bump to turn your ceiling into a live science experiment.
When should I call an electrician?
Call a pro if you see damaged insulation, aluminum wiring, no grounding path you can verify, a loose/damaged box,
repeated tripped breakers, scorch marks, or if you simply can’t identify the wiring confidently.
Real-World Experiences: The Stuff People Learn Mid-Ladder (About )
If you read enough DIY forums (or listen to enough neighbors), you’ll notice the same “light fixture removal”
experiences pop up like clockwork. Here are the greatest hitsso you can skip the part where you discover them
while balancing on a ladder like a confused flamingo.
Experience #1: “I turned off the switch and still got a tester beep.”
This is incredibly common. Sometimes the switch interrupts the neutral instead of the hot (not ideal), sometimes
the box contains always-hot conductors feeding other circuits, and sometimes the “right breaker” is not the breaker
you think it is. The takeaway people repeat most is: test before you touch, every time, on every wire.
It’s the cheapest confidence boost you can buy.
Experience #2: “The fixture came off… and the ceiling paint came with it.”
Painted-over canopies are sneaky. Homeowners often describe a gentle tug turning into a sudden “POP” and a bonus
ring of peeled paint. Scoring the edge of the canopy with a utility knife before pulling is one of those tiny steps
that feels fussyuntil it saves you from an unexpected drywall makeover.
Experience #3: “Why are there five white wires under one wire nut?”
Because ceiling boxes are often a junction point for other parts of the circuit. A lot of people panic and start
untwisting everything to “make it simpler.” That’s where trouble starts. The smarter move is to disconnect only the
fixture leads and leave the existing splices intact. Photos, labels, and patience beat “I’ll remember how it was”
(spoiler: you won’t).
Experience #4: “The chandelier is heavier than it looked online.”
Online shopping has many joys, including the joy of discovering that “classic iron farmhouse statement piece”
translates to “small planet with light bulbs.” People frequently say the removal went fine until the last screw,
when gravity tried to claim ownership. If a fixture feels heavy, treat it heavy: remove glass/crystals first, use
a helper, and consider temporary support under the fixture while you disconnect wiring.
Experience #5: “I finished, turned the breaker on, and… nothing.”
The usual causes are loose wire nut connections, mismatched conductors, or a ground/neutral/hot that wasn’t actually
what it seemed. This is why many DIYers now do a “connection quality ritual”: twist conductors neatly, tighten wire
nuts firmly, gently tug each wire to confirm it’s secure, tuck wires carefully so nothing is pinched, and only then
reassemble the canopy. It feels slow, but it’s faster than taking it all down again.
In short, the most common “experience-based wisdom” is boringbut it works: kill power at the breaker, test every wire,
take photos, support the fixture, and don’t improvise when something looks unusual. That’s not fearthat’s competence
with a sense of humor.
Conclusion
Removing a light fixture is one of the most satisfying home upgrades because the payoff is immediate: the old thing is gone,
and you’re one step closer to better lighting (or at least a ceiling that doesn’t scream “previous owner special”).
Stick to the right workflowbreaker off, test before you touch, support the fixture, disconnect cleanly, and leave the box safe.
Use Way #1 for standard flush mounts, Way #2 for pendants and chandeliers, and tap out for professional help when wiring or support looks questionable.
Your ceiling will thank you. Your fingers will also thank you. Loudly. By not getting shocked.


