Table of Contents >> Show >> Hide
- Meet Coleus: The Color MVP
- Where to Plant Coleus for the Best Color
- When to Plant Coleus Outdoors
- How to Plant Coleus in Garden Beds
- How to Grow Coleus in Containers (Porch Pots, Window Boxes, and Hanging Baskets)
- Coleus Watering: The #1 Care Skill
- Fertilizing Coleus Without Turning It Into a Lanky Mess
- Pinching and Pruning: The Secret to Bushy Coleus
- Keeping Coleus Gorgeous All Season
- Common Coleus Problems (and What to Do)
- How to Overwinter Coleus (Keep It Going Past Frost)
- How to Propagate Coleus From Cuttings
- Design Ideas: Making Coleus Look Like You Hired a Garden Stylist
- Quick Coleus Care Checklist
- Real-World Coleus Experiences: What Usually Happens (and How to Win Anyway)
- Conclusion
Coleus is the plant equivalent of showing up to a party in a sequined jacket: bold, dramatic, and somehow still easy to get along with.
If you’ve ever wanted a garden (or porch pot) that looks “designed” without requiring a horticulture degree, coleus is your new best friend.
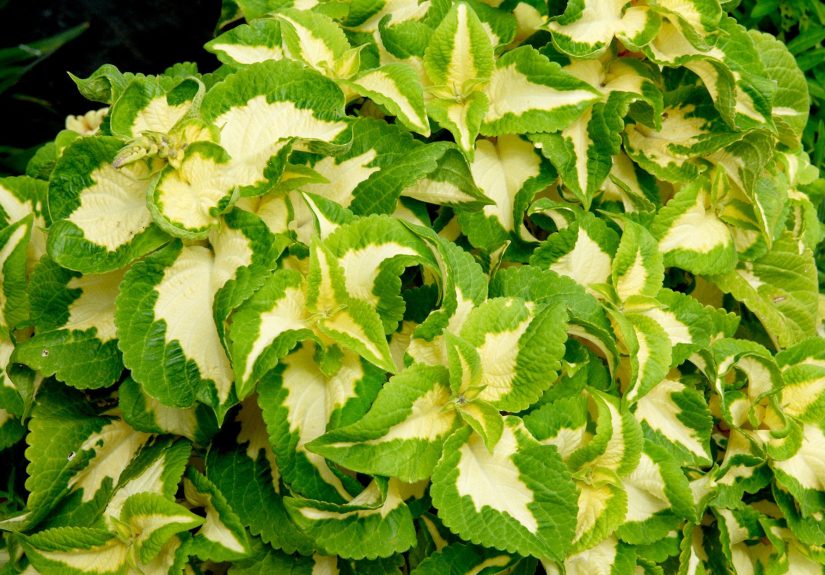
It’s grown mainly for its jaw-dropping foliagelime green, burgundy, hot pink, chartreuse, chocolate, near-black, and every psychedelic swirl in between.
This guide walks you through how to plant and care for coleus plants in beds and containers, how to keep them full and bushy,
how to avoid common problems, and how to keep your favorites going year after yeareven if winter usually treats your garden like an eviction notice.
Meet Coleus: The Color MVP
Coleus (often sold as Coleus or Plectranthus scutellarioides depending on labeling) is a tender perennial in warm climates,
but most gardeners grow it as an annual. Translation: it loves warm weather, hates frost, and thrives when you treat it like the leafy superstar it is.
Why gardeners love it
- Color without flowers: Leaves do the heavy lifting all season.
- Flexible light needs: Traditional varieties shine in shade; newer “sun coleus” handle more sunlight.
- Easy to shape: A little pinching turns one stem into a fluffy, full plant.
- Ridiculously easy to propagate: One plant can become many with simple cuttings.
Where to Plant Coleus for the Best Color
Light: shade, sun, and the “Goldilocks” zone
Classic coleus prefers bright shade or morning sun with afternoon shade. Too much deep shade can cause stretching (aka “leggy teen phase”),
while intense all-day sun can scorch leavesespecially in hotter regions.
Newer cultivars marketed as sun coleus can tolerate (and sometimes prefer) more sun, but they’ll usually need more frequent watering.
If you’re not sure what you have, start with morning sun + afternoon shade. It’s the safest “color + comfort” combo.
Soil: rich, well-draining, and not a swamp
Coleus likes soil that holds moisture but drains wellthink “wrung-out sponge,” not “puddle.” In garden beds, improve heavy soil with compost.
In pots, use a quality potting mix and make sure the container has drainage holes. (Coleus does not enjoy wet feet.)
Spacing: give it room to glow
Most upright coleus looks best when spaced about 12–18 inches apart, depending on the variety’s mature size.
Crowding reduces airflow and increases disease risk, so let your plants breathe.
When to Plant Coleus Outdoors
Coleus is warm-weather only. Plant it outdoors after the last frost, when nights are reliably mild.
If temperatures dip, coleus sulksgrowth slows, leaves can get damaged, and the whole vibe goes downhill.
Starting from nursery plants vs. seed
- Nursery transplants: Fastest, easiest, and most predictable for color and leaf pattern.
- Seed: Fun if you like surprises. Many seed-grown coleus won’t match the parent plant exactly, especially named cultivars.
How to Plant Coleus in Garden Beds
Step-by-step planting
- Pick the spot: Bright shade or morning sun/afternoon shade is a great default.
- Prep the soil: Mix in compost for better drainage and nutrition.
- Dig the hole: About as deep as the nursery pot and twice as wide.
- Plant at the same depth: Don’t bury the stem deeper than it was in the pot.
- Water thoroughly: Settle soil around the roots.
- Mulch lightly: Helps retain moisture and keeps soil temperature stable (leave a little space around the stem).
Pro tip: harden off if needed
If your coleus has been living the cozy indoor greenhouse life, ease it into outdoor conditions over a few daysespecially if sun exposure will increase.
A gradual transition reduces leaf scorch and transplant shock.
How to Grow Coleus in Containers (Porch Pots, Window Boxes, and Hanging Baskets)
Coleus is a container champion because you can move it to chase the best light, dodge heat waves, and rearrange color schemes like you’re redecorating
but with plants.
Container must-haves
- Drainage holes: Non-negotiable.
- Quality potting mix: Light, well-draining, and designed for containers.
- A pot sized for growth: Too small dries fast; too big stays wet too long. Aim for “roomy, not cavernous.”
Watering containers
Potted coleus dries out faster than in-ground plantssometimes much faster. In warm weather, daily watering isn’t unusual.
Water until you see runoff, then empty saucers so roots don’t sit in water.
Coleus Watering: The #1 Care Skill
Coleus likes consistent moisture. The goal is to avoid extremes: not bone dry, not waterlogged.
A simple rule: water when the top 1–2 inches of soil feels dry.
Signs you’re underwatering
- Leaves droop (often dramatically, like a soap opera).
- Leaf edges crisp or curl.
- Growth stalls.
Signs you’re overwatering
- Yellowing leaves and mushy stems.
- Soil stays wet for days.
- Plant looks tired even after watering.
Fertilizing Coleus Without Turning It Into a Lanky Mess
Coleus isn’t a heavy feeder, but it does appreciate steady nutritionespecially in containers.
The trick is to feed enough to support new leafy growth without encouraging nonstop flowering or weak, stretched stems.
In garden beds
- Work compost into the soil at planting.
- If growth slows mid-season, use a balanced fertilizer lightly according to label directions.
In containers
- Use a slow-release fertilizer at planting, or
- Feed with a liquid fertilizer on a regular schedule (often every 2 weeks at label strength, or weekly at half strength).
If your coleus gets tall and floppy, ease up on fertilizer and make sure it’s getting the right amount of light.
Pinching and Pruning: The Secret to Bushy Coleus
Want coleus that looks like a lush, rounded color-cloud instead of a single stick with leaves? Pinch it.
Pinching means snipping or pinching off the top growth just above a set of leaves. This encourages branching.
How to pinch correctly
- Find a growing tip (the newest top growth).
- Pinch or snip just above a leaf node (where leaves attach).
- Repeat every couple of weeks early in the season.
What about flowers?
Coleus can bloom with small flowers on spikes, especially later in summer.
Many gardeners remove flower spikes to keep the plant focused on foliage and to prevent legginess.
If you love pollinators and don’t mind the bloom spikes, you can leave somebut if your goal is a dense, leafy plant, snip them off.
Keeping Coleus Gorgeous All Season
Mulch and moisture management
A thin layer of mulch in beds helps hold soil moisture and reduces stress during heat.
For containers, consider grouping pots together to reduce evaporation and protect roots from baking in afternoon sun.
Rotate containers
If your plant leans toward the light, rotate the pot every few days for even growth and a balanced shape.
Refresh leggy plants mid-season
If coleus starts to look stretched, cut it back by up to one-third. It rebounds quickly in warm weather,
especially if you keep watering consistent and give it reasonable light.
Common Coleus Problems (and What to Do)
Pests
Coleus can attract the usual suspects, especially when grown indoors or in sheltered spots:
aphids, whiteflies, mealybugs, and spider mites.
- First response: Rinse pests off with a strong stream of water.
- Next step: Use insecticidal soap or horticultural oil, following label directions.
- Indoor prevention: Inspect new plants before bringing them inside.
Diseases
The biggest disease headline for coleus is downy mildew, which can cause leaf spotting, distortion, and leaf drop.
Good airflow, spacing, and avoiding prolonged leaf wetness are your best prevention tools.
If you suspect downy mildew, remove affected plants promptly to limit spread.
Root rot is the other common issuealmost always tied to overwatering or poor drainage.
If soil stays wet and the plant declines, improve drainage and adjust watering.
How to Overwinter Coleus (Keep It Going Past Frost)
If you’ve found a coleus variety you adore, you don’t have to say goodbye at the first frost.
You have two reliable options: bring the plant inside, or take cuttings and overwinter the next generation.
Option 1: Bring the whole plant indoors
- Before frost, inspect for pests and rinse the plant.
- Pot it up (if it’s in the ground) using fresh potting mix.
- Place in bright, indirect light (a sunny window can work, or use grow lights).
- Water less in winterkeep it lightly moist, not soggy.
- Pinch tips occasionally to keep growth compact.
Option 2: Take cuttings (the easiest, most foolproof method)
Cuttings are often the simplest way to overwinter coleusless space, fewer pests, and fresh, vigorous plants in spring.
How to Propagate Coleus From Cuttings
Water method
- Snip a 4–6 inch stem just below a leaf node.
- Remove leaves from the lower half.
- Place the stem in a jar of clean water, keeping leaves above the waterline.
- Change water every few days.
- When roots are a couple inches long, pot it up.
Soil method
- Take a 4–6 inch cutting and remove lower leaves.
- Optional: dip the end in rooting hormone.
- Insert into moist potting mix (bury at least one node).
- Cover loosely with a clear bag to hold humidity (don’t let plastic touch leaves).
- Keep warm and bright (indirect light). Roots usually form quickly.
Design Ideas: Making Coleus Look Like You Hired a Garden Stylist
In shade beds
- Pair lime-green coleus with dark-leaf varieties for contrast.
- Mix with hostas, caladiums, and impatiens for a “lush resort garden” effect.
- Use repeating colors (burgundy + burgundy) to make plantings look intentional.
In containers
- Thriller: Upright coleus in the center.
- Filler: Begonias or torenia around it.
- Spiller: Trailing coleus or sweet potato vine draping over the edge.
Quick Coleus Care Checklist
- Light: Bright shade or morning sun; “sun coleus” tolerates more sun.
- Soil: Rich, well-draining, evenly moist.
- Water: When top 1–2 inches are dry; containers need more frequent watering.
- Fertilizer: Light, steady feedingespecially in pots.
- Pinch: Regularly for bushiness; remove flower spikes if you want more foliage.
- Overwinter: Bring indoors or take cuttings before frost.
Real-World Coleus Experiences: What Usually Happens (and How to Win Anyway)
Coleus care sounds simple on paperlight, water, pinch, repeatbut real gardens have heat waves, vacations, surprise shade, and that one pot that dries out
faster than you can say “why is it dramatic again?” Here are some common coleus experiences gardeners run into, plus what tends to work best.
Experience #1: “My coleus was perfect… then it got tall and weird.”
This is the most common mid-season plot twist. Often the plant is getting too little light (deep shade) or it hasn’t been pinched regularly.
The fix is refreshingly satisfying: cut it back by about one-third and start pinching new growth tips weekly for a bit. If it’s in heavy shade, move a container
to brighter shade or morning sun. In beds, thin nearby plants if they’re smothering it. Within a couple of weeks, coleus usually rebounds like nothing happened,
which is honestly the emotional resilience we all deserve.
Experience #2: “It droops every afternoon like it’s auditioning for a tragedy.”
Afternoon droop often means the plant is hot and thirsty, especially in containers or sun-heavy spots. The key is checking the soil, not guessing.
If the top couple inches are dry, water deeply. If the soil is still moist and it droops anyway, it may be heat stressgive it afternoon shade if possible.
Many gardeners find that moving a pot just a few feet (out of the fiercest sun) changes everything. If you’re planting in a hot climate, morning sun + afternoon shade
is the “coleus spa day” schedule.
Experience #3: “My colors faded and now it looks… polite.”
Fading color can happen with too much shade (less pigment), too much intense sun (bleaching), or inconsistent watering.
Try bright shade or filtered sun and keep moisture steady. Also, avoid overfeeding. Lots of fertilizer can push fast, soft growth that looks washed out.
A balanced, moderate feeding routine usually keeps color vivid without turning your plant into a lanky green teenager.
Experience #4: “I watered lovingly. Now it’s yellow and sad.”
“Loving” watering is sometimes the problem. Coleus wants moisture, but it wants oxygen at the roots too.
Yellowing plus constantly wet soil screams poor drainage. In pots, make sure drainage holes are open and the potting mix isn’t compacted.
In beds, amend heavy soil with compost and avoid low spots where water collects. If you catch it early, improving drainage and adjusting watering can save the plant.
Experience #5: “I want this exact coleus again next year.”
This is where coleus becomes dangerously addictivein the best way. The simplest path is cuttings.
Late summer is prime time: snip a few stems, root them in water or soil, and keep the baby plants indoors through winter.
In spring, you’ll have fresh starts that match your favorite plant exactly. Many gardeners end up overwintering cuttings not just to “save money,”
but because it feels like winning a small, leafy lottery.
If coleus teaches anything, it’s that a little attention goes a long wayand a quick haircut fixes more problems than you’d expect.
Keep it warm, keep it evenly moist, and pinch like you mean it. Your reward is months of color that looks custom-designed, even if you planted it in yesterday’s
T-shirt and a questionable amount of optimism.
Conclusion
Coleus is one of the easiest ways to add high-impact color to gardens and containerswithout depending on blooms.
Nail the basics (light, moisture, drainage), pinch for fullness, feed moderately, and you’ll get a season-long show.
And if you fall in love with a variety? Take cuttings before frost and keep the color party going next year.


