Table of Contents >> Show >> Hide
- What Is a TENS Unit?
- How to Place Electrodes for a TENS Unit: 11 Steps
- Step 1: Read Your Device Manual First
- Step 2: Identify the Pain Area Clearly
- Step 3: Check for Safety Red Flags
- Step 4: Clean and Dry the Skin
- Step 5: Turn the TENS Unit Off Before Applying Pads
- Step 6: Place Pads Around, Not Directly on, the Pain
- Step 7: Keep Pads at Least One Inch Apart
- Step 8: Avoid Dangerous Placement Zones
- Step 9: Start With the Lowest Intensity
- Step 10: Test the Placement for Comfort and Coverage
- Step 11: Remove Pads Carefully and Check Your Skin
- Common TENS Electrode Placement Examples
- Tips for Better TENS Pad Placement
- Common Mistakes to Avoid
- Real-World Experiences: What TENS Placement Feels Like in Practice
- Conclusion
Learning how to place electrodes for a TENS unit sounds like it should require a medical degree, a wall chart, and possibly a dramatic soundtrack. Thankfully, it is much simpler than that. A TENS unit, short for transcutaneous electrical nerve stimulation, is a small device that sends gentle electrical pulses through adhesive electrode pads placed on the skin. Those pulses may help reduce pain signals and create a soothing tingling sensation in the targeted area.
The key phrase here is “placed on the skin.” Electrode placement is not decoration. You are not putting stickers on a laptop. Where you place the pads can affect comfort, effectiveness, and safety. A good placement may feel like a pleasant buzzing around the painful area. A poor placement may feel awkward, too sharp, or about as useful as putting a bandage on your shoe.
This guide explains how to place TENS unit pads in 11 practical steps, with safety tips, common placement examples, and real-life experience notes. It is written for general educational use, not as a replacement for advice from a doctor, physical therapist, or the instructions that came with your specific device.
Important note: Do not use a TENS unit if you have a pacemaker, implanted defibrillator, certain implanted electronic devices, unexplained pain, serious heart concerns, epilepsy, or pregnancy unless a healthcare professional says it is safe for you. Never place electrodes on broken skin, the front of the neck, across the chest, over the eyes, inside the mouth, or near water.
What Is a TENS Unit?
A TENS unit is a portable pain-relief device that uses low-voltage electrical stimulation. It usually includes a controller, lead wires, and sticky electrode pads. When the pads are attached to clean skin and the unit is turned on, the device sends controlled pulses through the electrodes.
People often use TENS therapy for temporary relief from sore muscles, back pain, joint discomfort, shoulder tension, knee pain, and certain chronic pain conditions. It does not “fix” the underlying cause of pain, and it should not be used to ignore symptoms that need medical care. Think of it as a helpful volume knob for discomfort, not a magic eraser.
How to Place Electrodes for a TENS Unit: 11 Steps
Step 1: Read Your Device Manual First
Before sticking anything anywhere, read the instructions that came with your TENS unit. Different models may have different pad sizes, channel settings, pulse modes, safety warnings, and recommended session lengths. Some devices have two pads, while others use four or more.
Look for information about electrode placement, intensity levels, treatment time, cleaning, battery use, and pad care. The manual is not just paper confetti in the box. It is the map that keeps your TENS session from turning into a guessing game.
Step 2: Identify the Pain Area Clearly
TENS electrodes are typically placed around the painful area, near the nerves supplying that area, or along the surrounding muscle tissue. Before applying the pads, point to the discomfort as specifically as possible. Is the pain in the center of the lower back, one side of the neck, around the knee, near the shoulder blade, or along the calf?
Avoid placing pads randomly. A clear target helps you decide whether to bracket the pain, place pads above and below it, or place pads on either side of the sore muscle. For broad pain, four pads may provide better coverage. For smaller areas, two pads may be enough.
Step 3: Check for Safety Red Flags
Do not place TENS electrodes over irritated, infected, numb, fragile, or broken skin. Avoid wounds, rashes, burns, fresh scars, and areas with poor sensation. If you cannot feel the stimulation properly, you may not notice that the intensity is too high.
You should also avoid using TENS while sleeping, bathing, showering, swimming, driving, or operating machinery. Water and electricity are not a team-building exercise. If your pain is sudden, severe, unexplained, or linked with symptoms such as chest pain, fainting, shortness of breath, weakness, or confusion, skip the TENS unit and seek medical help.
Step 4: Clean and Dry the Skin
Good electrode placement starts with clean skin. Wash the area with mild soap and water, then dry it completely. Remove lotion, oil, sweat, and dirt because they can prevent pads from sticking properly. Poor contact can make the stimulation feel uneven, prickly, or weaker than expected.
If the area is very hairy, the pads may not adhere well. You do not need to conduct a full landscaping project, but trimming excess hair may help the electrodes sit flat. Do not apply pads immediately after shaving if the skin is irritated.
Step 5: Turn the TENS Unit Off Before Applying Pads
Always make sure the device is turned off before attaching, moving, or removing electrodes. This simple step helps prevent surprise zaps and keeps the process comfortable. Connect the lead wires to the pads and device according to the manual.
If your unit has two channels, keep each pair of pads working together. Do not tangle wires or place one pad from one channel far away from its partner unless your clinician has specifically instructed you to do so.
Step 6: Place Pads Around, Not Directly on, the Pain
A common method is to “bracket” the painful area. This means placing one electrode on one side of the pain and the second electrode on the opposite side. The current then travels between the pads through the target region.
For example, if your lower back hurts on the left side, you might place two pads on the muscles around that sore area, not directly on the spine. If using four pads, you might create a loose square around the painful zone. The goal is to surround the discomfort, not pin it down like a wrestling referee.
Step 7: Keep Pads at Least One Inch Apart
Avoid placing electrodes so close that they touch or nearly touch. Pads that are too close may concentrate the sensation in a tiny area and reduce the useful coverage. As a general rule, keep pads at least one inch apart, and often farther apart for larger body areas.
The larger the painful region, the more space you may need between pads. For a shoulder or knee, a few inches may be enough. For the lower back, pads may be placed farther apart around the painful area, depending on body size and comfort.
Step 8: Avoid Dangerous Placement Zones
Some areas are no-go zones for TENS electrode placement. Do not place pads on the front or sides of the neck, over the throat, across the chest, over the heart, on the head, over the eyes, inside the mouth, on the genitals, or over broken skin. Also avoid placing pads directly over areas with blood clots, active infection, or unexplained swelling.
Be especially cautious with neck pain. Pads may sometimes be placed on the upper back or shoulder muscles, but never on the front of the neck. If your pain is near the head, jaw, chest, or throat, get professional guidance before using TENS.
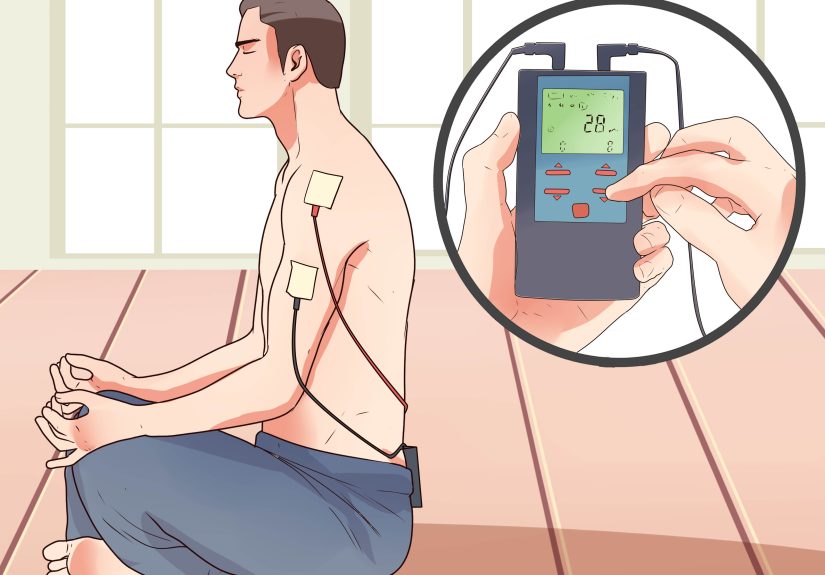
Step 9: Start With the Lowest Intensity
Once the pads are attached, turn the unit on at the lowest setting. Increase the intensity slowly until you feel a strong but comfortable tingling, buzzing, or tapping sensation. It should not feel sharp, burning, painful, or shocking.
More intensity does not automatically mean better relief. The goal is comfort and consistency. If your muscles jump dramatically or the sensation makes you want to launch the device across the room, lower the setting.
Step 10: Test the Placement for Comfort and Coverage
Give the placement a few minutes. Ask yourself: Do I feel the stimulation around the painful area? Is it comfortable? Is one pad biting while the other feels invisible? If the sensation is uneven, turn the device off before adjusting the pads.
Sometimes moving a pad one or two inches can make a big difference. TENS placement often involves small adjustments. You are not failing; you are fine-tuning. The best location is usually the one that gives comfortable coverage without irritating the skin.
Step 11: Remove Pads Carefully and Check Your Skin
When your session is finished, turn the device off before removing the electrodes. Peel the pads gently from the edge instead of yanking the wires. Check your skin for redness, itching, irritation, or discomfort. Mild temporary redness may happen, but irritation that lasts or worsens is a sign to stop and ask a healthcare professional.
Place the pads back on their plastic liner and store them as directed. Pads that are dry, dirty, curled, or no longer sticky may deliver uneven stimulation and should be replaced.
Common TENS Electrode Placement Examples
Lower Back Pain
For lower back pain, place pads on the muscles around the sore area, not directly on the spine. With two pads, place one on each side of the painful region. With four pads, form a rectangle or square around the discomfort. Keep the pads on soft tissue and avoid placing them over bony points.
Neck and Shoulder Tension
For upper shoulder tension, place pads on the upper trapezius or shoulder blade region, depending on where the pain is located. Never place electrodes on the front of the neck or throat. If pain travels into the arm, or if you have numbness, weakness, or headaches, talk with a clinician before using TENS.
Knee Pain
For knee discomfort, place pads around the knee joint on the soft tissue, not directly on the kneecap. One pad may go above the painful area and one below it, or pads may be placed on either side of the knee. Keep them secure so they do not peel off when you bend your leg.
Shoulder Pain
For shoulder pain, place pads around the painful muscle area, such as the front and back of the shoulder or around the shoulder blade, depending on where the discomfort sits. Avoid placing pads across the chest or in a way that sends current through the heart area.
Sciatica-Like Discomfort
For pain that travels from the lower back into the hip or leg, placement can be tricky. Some people place pads around the lower back or hip region, while others need guidance from a physical therapist. Do not place pads over numb skin or areas where sensation is reduced.
Tips for Better TENS Pad Placement
Use the Right Pad Size
Larger pads spread stimulation over a broader area and may feel gentler. Smaller pads target a tighter area but can feel more intense. Use pads recommended for your device and body area.
Rotate Placement Slightly
If you use TENS frequently, avoid placing pads in the exact same spot every time. Slightly rotating placement can reduce the chance of skin irritation. Do not move into unsafe zones just to “change things up.”
Do Not Put Pads Over Medication Patches
Avoid placing electrodes over or near medicated patches unless your healthcare provider gives specific approval. Heat, stimulation, or skin changes may affect how medication is absorbed.
Stop If It Feels Wrong
TENS should feel strong but tolerable. Stop using it if you feel burning, sharp pain, dizziness, nausea, unusual heartbeat sensations, skin irritation, or worsening symptoms. Pain relief should not require a heroic facial expression.
Common Mistakes to Avoid
One common mistake is placing pads directly on the most painful point and turning the intensity up too high. This may feel harsh and may not give the best coverage. Another mistake is using old pads that barely stick. Poor contact can create an uncomfortable sensation and reduce effectiveness.
People also sometimes forget to turn the unit off before moving pads. That is a quick way to give yourself a tiny electric surprise and a dramatic new respect for instruction manuals. Always power down first.
Finally, do not treat TENS as a cure-all. If pain keeps returning, spreads, worsens, or affects daily movement, it is worth getting evaluated. A TENS unit can help manage symptoms, but the bigger win is understanding why the pain is there in the first place.
Real-World Experiences: What TENS Placement Feels Like in Practice
In real life, learning how to place electrodes for a TENS unit is often less like following a perfect diagram and more like tuning a radio. You start with a general area, make small adjustments, and eventually find the spot where the signal feels clear. The first attempt may not be magical. That is normal. Even people who use TENS regularly often adjust pad placement depending on the day, the muscle, the chair they sat in too long, or the mysterious way a shoulder can become angry after “sleeping normally.”
A common experience is that the painful area is not always the best place to put the electrodes. For example, someone with lower back discomfort may feel better when pads are placed slightly to the sides of the spine on the surrounding muscles instead of directly over the sore point. Someone with shoulder tightness may find that placing pads around the shoulder blade gives better coverage than placing them right on top of the tender knot. This is why bracketing the pain often works well: it lets the stimulation pass through the region instead of poking one tiny spot.
Another real-world lesson is that skin preparation matters more than people expect. Pads stick better to clean, dry skin. If lotion, sweat, or body oil is sitting on the surface, the electrodes may peel up at the edges. When that happens, the stimulation can feel uneven or prickly. Many users assume the device is too strong, when the real culprit is a pad making poor contact. Clean skin is not glamorous, but neither is a half-attached electrode flapping like a tiny electrical pancake.
Intensity is another area where beginners often overdo it. The best setting is not the highest setting you can tolerate. It is the strongest comfortable setting that creates a steady, pleasant sensation without pain. Some people expect TENS to feel like a deep massage, but it is usually more like a buzzing, tapping, or tingling feeling. If muscles twitch slightly, that may happen depending on settings and placement, but the session should not feel aggressive.
Pad life also affects the experience. Fresh pads usually feel smooth and consistent. Old pads may dry out, lose stickiness, and deliver stimulation unevenly. If you keep raising the intensity but the sensation still feels weak or scratchy, the pads may be the problem. Replacing worn electrodes can make the device feel brand-new again, like giving your TENS unit a cup of coffee and a motivational speech.
Finally, the most helpful habit is keeping notes. Write down where you placed the pads, which mode you used, how long the session lasted, and how your body felt afterward. Over time, you may notice patterns. Maybe two pads work well for knee discomfort, while four pads feel better for broad lower back soreness. Maybe morning sessions help more than late-night sessions. Small observations can turn guesswork into a personalized routine.
Conclusion
Placing electrodes for a TENS unit is part science, part safety, and part patient experimenting within sensible boundaries. Start with the manual, clean the skin, avoid risky areas, place pads around the pain, begin at low intensity, and adjust slowly. The best electrode placement is comfortable, secure, and targeted to the area you are trying to manage.
A TENS unit can be a useful tool for temporary pain relief, but it is not a substitute for medical diagnosis or treatment. When in doubt, ask a physical therapist, doctor, or qualified healthcare provider to show you safe placement for your specific pain pattern. Your nerves will appreciate the professionalism.


