Table of Contents >> Show >> Hide
- What Makes Alcohol Ink Different?
- Supplies You Need Before You Start
- How to Paint with Alcohol Ink: 15 Steps
- Step 1: Set Up a Safe, Easy-to-Clean Workspace
- Step 2: Put on Gloves and Keep Paper Towels Nearby
- Step 3: Choose the Right Surface
- Step 4: Tape Down Your Surface
- Step 5: Pick a Small Color Palette
- Step 6: Test the Colors on a Scrap Piece
- Step 7: Add a Small Amount of Blending Solution
- Step 8: Drop in Your First Color
- Step 9: Add a Second Color Beside, Not on Top of, the First
- Step 10: Tilt the Surface to Guide the Flow
- Step 11: Use a Hand Blower for Soft, Feathered Effects
- Step 12: Build Depth with Layers
- Step 13: Lift Highlights and Clean Up Busy Areas
- Step 14: Add Details Only After the Main Shape Works
- Step 15: Let It Dry Fully, Then Seal It Properly
- Common Mistakes Beginners Make
- Best Project Ideas for Alcohol Ink Art
- How to Get Better Results Every Time
- Final Thoughts
- Real-World Experiences With Alcohol Ink Painting
Note: This article is formatted for web publishing and intentionally leaves out source links.
Alcohol ink painting is what happens when color decides to stop behaving politely. Instead of sitting still like traditional paint, alcohol ink blooms, glides, separates, and creates wildly beautiful patterns on smooth, non-porous surfaces. That is exactly why beginners love it and also why beginners sometimes stare at their first piece like, “Well… that escalated quickly.”
The good news is that learning how to paint with alcohol ink does not require an art degree, a giant studio, or mystical creative powers. You just need the right surface, a few basic tools, a willingness to experiment, and enough patience to let the ink do its dramatic little dance. Once you understand the flow of the medium, you can create abstract art, marbled effects, floral shapes, wispy landscapes, and layered textures that look far more advanced than they are.
In this guide, you will learn exactly how to paint with alcohol ink in 15 clear steps, plus practical tips for avoiding muddy color, choosing the best supplies, and finishing your artwork so it actually stays gorgeous. Let’s make something that looks expensive and slightly magical.
What Makes Alcohol Ink Different?
Alcohol ink is a fast-drying, highly saturated dye-based medium designed for slick, smooth, non-porous surfaces. Unlike acrylic paint, it does not behave like frosting on a cake. It spreads, evaporates quickly, and stays movable for a short window, especially when you introduce blending solution or isopropyl alcohol. That gives you those dreamy, smoky, feathery transitions that make alcohol ink art so recognizable.
Because the medium moves so freely, painting with alcohol ink is part planning and part letting go. Think of it less like coloring inside the lines and more like directing a tiny, colorful weather system. You influence it, but you do not bully it.
Supplies You Need Before You Start
Before jumping into the 15 steps, gather your basics:
- Alcohol inks in 2–5 colors
- Yupo paper, synthetic paper, ceramic tile, or another non-porous surface
- Alcohol blending solution or a compatible isopropyl alcohol for art use
- Nitrile or disposable gloves
- Paper towels or lint-free wipes
- Cotton swabs or a small detail brush
- A hand blower, air puffer, or similar tool for moving ink
- Painter’s tape or a non-slip mat
- A compatible spray varnish or final finish for sealing
One important safety reminder: alcohol inks and blending solutions are solvent-based. Work in a well-ventilated area, keep them away from open flames or heat sources, protect your skin, and avoid treating this like a kitchen science show. Pretty art is the goal. Accidental chaos is not.
How to Paint with Alcohol Ink: 15 Steps
Step 1: Set Up a Safe, Easy-to-Clean Workspace
Cover your table with a protective sheet or disposable paper. Open windows, turn on ventilation, and keep your supplies away from candles, sparks, or anything hot. Alcohol ink likes to travel, and your desk may become a colorful crime scene if you are not prepared.
Step 2: Put on Gloves and Keep Paper Towels Nearby
Alcohol ink stains skin, fingers, nails, and your dignity if you were planning to look polished afterward. Gloves help you stay clean, and paper towels help you catch spills, blot excess solution, and rescue areas that become too dark.
Step 3: Choose the Right Surface
If you are a beginner, start with Yupo paper or another synthetic, non-porous paper. It is smooth, durable, and forgiving enough for practice. Ceramic tile is another great starter option because it is inexpensive, sturdy, and easy to wipe down. Traditional watercolor paper is not ideal because alcohol ink needs a slick surface to move properly.
Step 4: Tape Down Your Surface
Secure the edges with painter’s tape if you are using paper. This prevents sliding, keeps your piece flatter, and can leave a nice clean border when you peel it away later. It is a tiny step that makes you feel much more organized, which is helpful when the ink starts doing gymnastics.
Step 5: Pick a Small Color Palette
Resist the urge to use every color in the set on your first try. Start with two or three colors plus metallic or black only if you want extra contrast. A tighter palette is easier to control and less likely to turn into accidental mud. Good beginner combinations include blue and teal, pink and orange, or purple and magenta.
Step 6: Test the Colors on a Scrap Piece
Before touching your final surface, drop a little ink on a scrap piece of Yupo or the edge of your tile. Some colors spread more aggressively than others, some dry darker, and some look surprisingly bossy once they meet blending solution. A 30-second test can save your whole composition.
Step 7: Add a Small Amount of Blending Solution
Place a few drops of blending solution or compatible alcohol onto your surface. This gives the ink room to move and helps create soft, fluid edges. Do not flood the whole piece unless you are going for a very loose effect. Too much liquid can make everything run together like a watercolor meltdown.
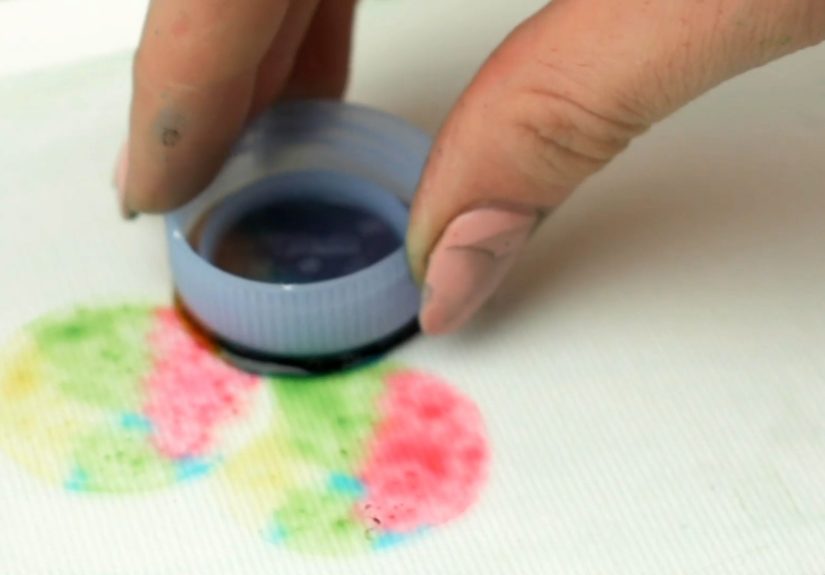
Step 8: Drop in Your First Color
Add your lightest or main color first. Watch how it spreads. This is the moment when alcohol ink reminds you that it is not paint in the usual sense. It blooms outward, creates soft halos, and immediately starts building organic shapes. Let that happen before you jump in to “fix” it.
Step 9: Add a Second Color Beside, Not on Top of, the First
Place your next color close enough to interact but not so close that it swallows everything whole. When colors meet at the edges, you get more interesting transitions. When you dump one directly over the other too soon, you often get a darker blob that looks less artistic and more “printer error.”
Step 10: Tilt the Surface to Guide the Flow
Lift the paper or tile gently and tilt it in different directions. Gravity becomes your assistant here. You can guide the ink into rivers, curved petals, cloudy gradients, or long wispy trails. This is one of the easiest ways to create movement without overworking the piece.
Step 11: Use a Hand Blower for Soft, Feathered Effects
A hand blower or air puffer can push the ink into delicate tendrils, floral edges, or layered abstract shapes. Short bursts work better than dramatic gusts. You are trying to shape the flow, not launch the ink into another zip code. This technique is especially useful for creating petal-like forms and atmospheric backgrounds.
Step 12: Build Depth with Layers
Once part of the surface has settled, add a few more drops of color in selected spots. Layering is where your piece starts to look intentional rather than lucky. Use darker tones sparingly to create depth, shadow, or contrast. Too many heavy layers all at once can flatten the airy look that makes alcohol ink art appealing in the first place.
Step 13: Lift Highlights and Clean Up Busy Areas
If an area becomes too dark or muddy, dab it lightly with a paper towel, cotton swab, or clean brush with a touch of blending solution. Lifting color can create highlights, negative space, and little glowing areas that make the composition feel more balanced. Think of this as editing, not erasing.
Step 14: Add Details Only After the Main Shape Works
Now you can use a fine brush, metallic ink, or a controlled dropper to add veins, outlines, dots, or small accents. This is where flowers, stone-like textures, or abstract focal points come to life. The trick is to stop before the piece gets fussy. Alcohol ink usually looks best when it still feels fluid and spontaneous.
Step 15: Let It Dry Fully, Then Seal It Properly
Do not rush to seal the piece while it is still tacky or shifting. Let it dry fully according to your product directions and room conditions. Then use a finish that is compatible with alcohol ink. Many artists prefer a light spray varnish process before any final topcoat. If you plan to frame the work, keep it out of direct sunlight when possible, since bright light can fade dye-based color over time.
Common Mistakes Beginners Make
One of the biggest beginner mistakes is overworking the piece. Alcohol ink is beautiful because it moves naturally. If you keep poking, blowing, dropping, and tilting long after the composition looked good, you can lose those gorgeous soft edges and end up with a muddy patchwork. In alcohol ink, knowing when to stop is basically a superpower.
Another common issue is using the wrong surface. If your ink seems stubborn, dull, or oddly sticky, your paper may be absorbing too much. Non-porous surfaces matter. So does cleanliness. Even a little oil or dust on the surface can affect how the ink spreads.
Beginners also tend to use too many colors at once. The result is usually not “vibrant masterpiece.” It is usually “storm cloud with commitment issues.” Keep your palette focused, especially while learning.
Best Project Ideas for Alcohol Ink Art
Once you understand the basic process, alcohol ink becomes a playground for creative projects. You can make abstract wall art on Yupo paper, colorful ceramic tiles, decorative glass panels, bookmarks, greeting card backgrounds, coasters, and marbled paper elements for mixed media. Some artists also mount finished ink pieces onto wood panels for display.
If you want a beginner-friendly project, start with small abstract pieces. Small formats help you learn how the medium flows without wasting supplies. They are also much easier to finish, frame, or repurpose into gifts.
How to Get Better Results Every Time
The fastest way to improve is to stop expecting the exact same result twice. Alcohol ink is responsive, not robotic. Humidity, surface texture, color density, how much solution you use, and how quickly you move all affect the final look. Treat each piece as a conversation with the medium, not a battle against it.
Take photos of your favorite experiments, even the weird ones. Sometimes the piece that feels “wrong” teaches you the most. You may discover that a color combo you almost wiped away becomes your new signature style. Art is funny like that.
It also helps to work in rounds. Make three or four small pieces in one session rather than betting your whole creative mood on a single masterpiece. That approach keeps the pressure low and gives you more chances to learn what kinds of movement, layering, and detail work you like best.
Final Thoughts
Learning how to paint with alcohol ink is really about learning how to guide motion, color, and timing. The medium rewards curiosity more than perfection. Start with the right surface, keep your palette simple, use controlled layers, and let the ink breathe. Some of the most striking results come from allowing the medium to do what it does naturally rather than forcing it to behave like traditional paint.
If your first piece looks a little chaotic, welcome to the club. That is not failure. That is initiation. With a bit of practice, you will figure out when to tilt, when to layer, when to lift, and when to walk away before you lovingly ruin your own masterpiece. Once that clicks, alcohol ink painting becomes ridiculously fun.
Real-World Experiences With Alcohol Ink Painting
One of the most common experiences beginners have with alcohol ink is surprise at how fast everything happens. You place one tiny drop on the surface, and within seconds it spreads into a shape that looks planned, dramatic, and slightly smarter than you feel in the moment. That instant movement is thrilling, but it also teaches an important lesson: hesitation and panic are not useful painting tools. The artists who enjoy alcohol ink the most usually learn to stay relaxed and respond instead of overreacting.
Another frequent experience is realizing that your favorite piece was not the one you planned. Many people begin with a very specific idea, like a flower, a galaxy, or a stone texture. Then the ink moves in a totally different direction and creates something better. What looked like a mistake becomes a branch, a petal edge, a cloud bank, or an elegant abstract shape. Alcohol ink has a funny way of rewarding flexibility. It humbles control freaks, but in a surprisingly charming manner.
There is also the classic beginner moment when someone adds too many colors because all of them look exciting in the bottle. At first, the piece feels bold and fearless. Ten seconds later, it resembles a very emotional puddle. Almost everyone who sticks with alcohol ink has had that experience at least once. The upside is that it quickly teaches color discipline. After a few muddy experiments, artists start choosing palettes more thoughtfully and get much stronger results.
People also notice that mood matters when painting with alcohol ink. If you rush in, the piece often looks rushed. If you slow down, test your colors, and let each layer settle, the final work feels more intentional. It is one of those mediums that reflects your energy back at you. Calm decisions usually create cleaner transitions, better contrast, and more confidence in the composition.
Another real-world lesson is that small format practice changes everything. Many beginners assume they need to create a large finished artwork right away, but the best progress often comes from making a bunch of tiny studies. A few five-inch experiments can teach more about flow, blending, and lifting than one oversized piece that feels intimidating. Small work removes the pressure and encourages play, which is exactly where alcohol ink tends to shine.
Then there is the experience of learning when to stop. This may be the hardest skill of all. A piece looks beautiful, so naturally you think, “Maybe one more drop.” Sometimes that extra drop is perfect. Other times it turns your elegant composition into a blotchy science project. Many experienced artists say their biggest improvement came from recognizing the moment when the artwork was done, even if it did not match the original vision perfectly.
Finally, people who keep painting with alcohol ink often talk about how addictive the medium becomes. Not in a dramatic, cancel-your-weekend kind of way, but in that very real “I just want to try one more color combination” way. Because every piece is slightly unpredictable, the process stays exciting. You can return to the same supplies again and again and still discover new effects. That mix of beauty, spontaneity, and experimentation is what makes alcohol ink painting so satisfying. It is expressive, a little wild, and endlessly teachable. In other words, it is exactly the kind of art form that keeps creative people coming back for more.