Table of Contents >> Show >> Hide
- Step 1: Do a 20-Minute Kitchen “Traffic Report”
- Step 2: Declutter Like a Pro (Without Getting Stuck)
- Step 3: Organize by Zones (The Secret Sauce of Functional Kitchens)
- Step 4: Set Up Cabinets for Speed (Not Storage Olympics)
- Step 5: Pantry Organization That Stays Organized
- Step 6: Drawer Organization (AKA: End the “Utensil Soup”)
- Step 7: Countertops That Help You Cook (Not Just Collect Stuff)
- Step 8: The Under-Sink Zone (Where Sponges Go to Multiply)
- Step 9: Small-Kitchen Tricks That Feel Like Extra Square Footage
- Step 10: Make It Stick With a Maintenance Routine (That Takes Minutes)
- Quick Checklist: Functional Kitchen Organization in One Page
- Real-Life Organizing Experiences (500+ Words You’ll Actually Relate To)
- Conclusion
A functional kitchen isn’t the one with the most cabinetsit’s the one where your spatula doesn’t play hide-and-seek
every Tuesday at 6:12 p.m. If your drawers have become a “miscellaneous museum” (feat. five bottle openers and one
mystery Allen key), you don’t need a remodel. You need a system.
The goal of kitchen organization is simple: make the easy things easier. Daily cooking should feel like
a smooth playlist, not a chaotic shuffle. Below is a practical, no-fluff plan used by organizing pros and home editors:
declutter with purpose, build zones that match how you cook, then set up storage so you can find things fastand put
them away even faster.
Step 1: Do a 20-Minute Kitchen “Traffic Report”
Before you buy bins, labels, or a “life-changing” acrylic riser, watch how you actually use the kitchen for one day.
Ask:
- Where do you prep? (Counter by the sink? Island? That one square foot you defend like a tiny kingdom?)
- Where do you cook? (Stove + nearby drawer/cabinet access matters.)
- Where do dishes land? (Dishwasher? Drying rack? Counter pile that “temporarily” lives there?)
- Who uses the kitchen? Adults, kids, roommates, snack goblins, all of the above.
This quick “traffic report” keeps you from organizing your kitchen for a fantasy version of yourself who bakes sourdough
daily and never buys chips.
Step 2: Declutter Like a Pro (Without Getting Stuck)
Decluttering is not about becoming a minimalist monk. It’s about removing the stuff that makes your kitchen harder to use.
The easiest approach is to declutter by category, not by cabinet.
Declutter in 6 fast categories
- Duplicates: Keep your favorites. Donate the rest (yes, even the third ladle).
- Broken or annoying items: If it leaks, wobbles, or makes you mutter under your breathgoodbye.
- “Aspirational” gadgets: If you haven’t used it in a year, it’s not a hobby; it’s clutter.
- Mismatched containers and lids: Recycle the orphans. Keep a single, stackable system.
- Expired pantry items: Toss old spices and mystery grains that predate your last phone upgrade.
- Random non-kitchen stuff: Batteries, papers, toolsgive them a real home elsewhere.
Pro tip: set a timer for 30 minutes. Declutter in sprints so you don’t end up sitting on the floor reading nutrition labels
from a 2019 granola bar like it’s historical literature.
Step 3: Organize by Zones (The Secret Sauce of Functional Kitchens)
The most functional kitchen organization systems are built around zones. Instead of storing items by where they
“fit,” store them by where they’re used. Think like a restaurant line cook: everything has a station.
The 7 kitchen zones that cover almost everyone
- Prep Zone: cutting boards, knives, mixing bowls, measuring tools, colanders
- Cooking Zone: pots/pans, spatulas, oils, salt, spices you use weekly
- Baking Zone: flour, sugar, baking powder/soda, sheets, cooling racks, mixers
- Pantry Zone: dry goods, snacks, canned items, backups
- Coffee/Breakfast Zone: mugs, coffee/tea, sweeteners, filters, blender (if used daily)
- Lunch/Grab-and-Go Zone: containers, wraps, baggies, kids’ snacks, water bottles
- Clean-Up Zone: dish soap, sponges, towels, trash bags, dishwasher pods
Zones reduce steps, prevent “kitchen pinball” (bouncing between cabinets), and make it easier for everyone else in the house to put things back
where they belong.
Step 4: Set Up Cabinets for Speed (Not Storage Olympics)
Cabinets should prioritize access. You’re not trying to see how many items you can cram into one shelf like a suitcase
before a budget airline flight. Use these placement rules:
Cabinet placement rules that actually work
- Daily-use items go between waist and eye level.
- Heavy items (pots, appliances) go low to avoid shoulder strain and accidental doom.
- Rarely used items go high or deep (holiday platters, specialty tools).
- Store vertically when possible: baking sheets, cutting boards, trays, and lids.
Tools that multiply cabinet space (without a renovation)
- Shelf risers: create a second “floor” for plates, bowls, or canned goods.
- Turntables (Lazy Susans): perfect for oils, condiments, nut buttersanything that loves to disappear in corners.
- Pull-out bins or sliding shelves: especially in base cabinets where items get lost in the back.
- Door-mounted racks: foil, wrap, spices, cleaning suppliesif the door closes, it counts as real estate.
Example: A practical layout for a typical kitchen
Here’s a real-world cabinet map that makes cooking faster:
- Cabinet near stove: sauté pan, saucepan, pot holders, cooking utensils, oils, salt/pepper, weeknight spices
- Drawer near prep counter: knives (safely), cutting tools, measuring cups/spoons, peeler, can opener
- Cabinet near sink: colanders, salad spinner, mixing bowls (prep + rinse workflow)
- Upper cabinet by dishwasher: everyday plates, bowls, glasses (put-away becomes a two-step process)
Step 5: Pantry Organization That Stays Organized
A functional pantry is less “Pinterest showroom” and more “mini grocery store.” The trick is visibility and grouping.
When you can see what you have, you stop buying your fourth cinnamon.
Pantry setup in 5 moves
- Empty + wipe down: crumbs are not a food group.
- Group by category: baking, breakfast, snacks, dinner staples, canned goods, sauces, drinks, backstock.
- Use containers strategically: clear bins for snacks; airtight containers for flour, sugar, rice, pasta.
- Label like you mean it: labels reduce decision fatigue and keep family members from “creative” storage choices.
- Use FIFO: “first in, first out”move older items forward so they get used.
Pantry “levels” that reduce chaos
- Eye level: most-used staples (oats, pasta, canned tomatoes, everyday snacks)
- Kid level: school snacks, juice boxes, grab-and-go items (so they don’t climb shelves like tiny mountaineers)
- Top shelves: backstock and rarely used items
- Bottom shelves: heavy items like beverages and bulk goods
If you’re short on space, consider a dedicated snack drawer or snack bin. It prevents the pantry from becoming a daily rummage zone
where granola bars go in and wrappers come out.
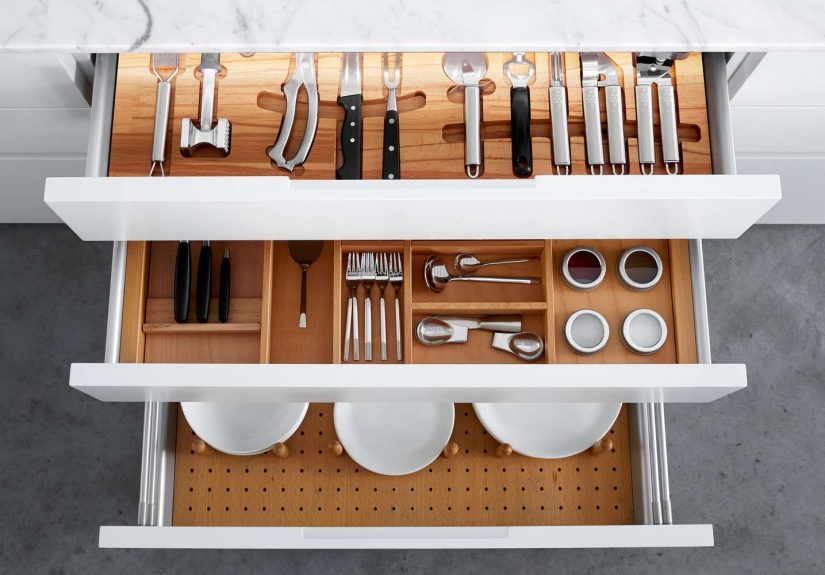
Step 6: Drawer Organization (AKA: End the “Utensil Soup”)
Drawers are where kitchens go to forget. The cure is simple: give each category a boundary.
What to do with your top 3 drawers
- Top drawer near prep: daily tools (measuring spoons, peeler, tongs, thermometer, scissors)
- Cutlery drawer: flatware + steak knives (use a real organizer so forks stop migrating)
- Wrap + bag drawer: foil, plastic wrap, parchment, baggies, clips (bonus points for a built-in cutter organizer)
Knife safety note
If you store knives in a drawer, use a knife tray or in-drawer block. Loose knives are how you end up doing unplanned
finger aerobics.
Step 7: Countertops That Help You Cook (Not Just Collect Stuff)
Clear counters aren’t about aesthetics; they’re about workspace. Try this rule:
keep only what you use daily on the countertop.
Smart countertop zones
- Prep strip: one clear counter section for chopping and mixing (protect it like it’s VIP seating).
- Coffee station: machine + mugs + supplies grouped together to prevent morning scavenger hunts.
- Landing pad: a small tray/bowl for keys and mailso paper doesn’t colonize your cutting board.
If you love appliances but hate clutter, create an “appliance garage” in a cabinet: store the blender, air fryer, or stand mixer
close to where you use it, not on the counter as permanent decor.
Step 8: The Under-Sink Zone (Where Sponges Go to Multiply)
Under the sink can be functional if you treat it like a mini supply closet:
- Use a caddy: put daily supplies in a pull-out bin so you’re not spelunking for dish pods.
- Add a tension rod: hang spray bottles by their triggers to free up floor space.
- Separate categories: dishwashing vs. surface cleaning vs. trash bags.
- Keep safety in mind: if kids are around, store harsh cleaners up high or use child locks.
Step 9: Small-Kitchen Tricks That Feel Like Extra Square Footage
If your kitchen is small, organization isn’t optionalit’s survival. Use overlooked spaces:
- Vertical storage: magnetic knife strips, wall rails, hooks for utensils or mugs.
- Inside cabinet doors: slim racks for spices, wraps, cutting boards, measuring spoons.
- Narrow gaps: slim rolling carts for oils, canned goods, or baking supplies.
- Double duty shelves: risers and stackable bins create layers without blocking visibility.
The key is to avoid “tiny space doom piles.” In small kitchens, one messy corner becomes the whole kitchen’s personality.
Give every small category a container, and the mess stops spreading.
Step 10: Make It Stick With a Maintenance Routine (That Takes Minutes)
Organization fails when it requires perfection. Instead, build a light routine:
The 5-minute daily reset
- Put items back in their zones (don’t put it downput it away).
- Clear the prep strip (tomorrow-you will be emotionally grateful).
- Do a quick “counter sweep” into the landing pad or mail spot.
The 15-minute weekly tune-up
- Wipe pantry shelves where crumbs gather.
- Check produce and leftovers so nothing becomes a science project.
- Re-set the snack bin and rotate older items forward (FIFO).
The monthly “one drawer” rule
Once a month, pick one drawer or one cabinet and reset it. This prevents the slow creep back into chaos without requiring a full weekend overhaul.
Quick Checklist: Functional Kitchen Organization in One Page
- Declutter first (duplicates, broken items, unused gadgets, expired food).
- Create zones based on how you cook and who uses the kitchen.
- Store by frequency: daily items accessible, rare items higher/deeper.
- Use simple organizers: risers, bins, turntables, dividers, pull-outs.
- Label key areas (pantry bins, backstock, snacks, baking).
- Keep counters functional: daily-use only, plus a landing pad.
- Maintain lightly: 5 minutes daily, 15 minutes weekly, one drawer monthly.
Real-Life Organizing Experiences (500+ Words You’ll Actually Relate To)
If you’ve ever tried to “organize the kitchen” and ended up moving the same pile around three times, you’re not alone.
Real kitchens come with real habits: tired weeknights, last-minute lunches, and the occasional “Where did the measuring cups go?”
Here are a few common real-life scenarios that show how functional kitchen organization plays out beyond the checklist.
Experience #1: The “We Cook Every Night” Household
In busy households that cook most nights, the biggest pain point is usually prep frictiontoo many steps between grabbing tools,
ingredients, and cookware. The fix often isn’t more storage; it’s better placement. When knives and cutting boards live near the prep counter,
bowls and colanders sit near the sink, and oils/spices stay near the stove, cooking suddenly takes fewer trips across the kitchen.
People consistently report that once zones are set, weeknight cooking feels faster and less stressfulbecause you stop “starting over” every time you cook.
Even small changes like moving salt, pepper, and your top ten spices into a single easy-to-reach spot can shave minutes off dinner and reduce the urge
to abandon cooking altogether and order takeout “just this once.”
Experience #2: The Snack Vortex (Kids, Roommates, or Both)
Many kitchens don’t get messy because of dinnerthey get messy because of snacking. Snacks are high-frequency items, and high-frequency items
need the simplest system. Families often find that placing kid-friendly snacks at kid height (in a bin or drawer) instantly reduces pantry chaos.
Roommate kitchens improve when there’s a clearly labeled snack section and a “backstock” shelf so extras don’t spill into every open space.
The magic here is psychological: when the system is obvious, people follow it. When it’s vague, the pantry becomes a free-for-all and the chips end up next
to the flour like they’re trying to start a band.
Experience #3: The Tiny Apartment Kitchen That Feels Impossible
Small kitchens feel hardest because clutter is magnified: one crowded counter can wipe out your only prep space. People in small spaces often get the best results
from choosing a single “prep strip” and protecting it ruthlessly. The second breakthrough is vertical storage: magnetic strips, wall hooks, door racks, and stackable bins
can make a tiny kitchen feel surprisingly capable. The third is container disciplineusing a consistent set of stackable food containers and letting go of mismatched pieces
that won’t stack. That simple shift often frees an entire shelf because you’re no longer playing “lid roulette” every time you pack leftovers.
Experience #4: The “I Bought Organizers but It Still Got Messy” Moment
This is incredibly commonand it usually comes down to two things: organizers without categories, or categories without maintenance.
If everything is in a bin but the bin contains random stuff, you’ve just created a nicer-looking junk pile. The real turning point is labeling categories that match your life:
“Weeknight cooking,” “Baking,” “Breakfast,” “Snacks,” “Backstock,” “Lunch supplies.” Once categories are clear, maintenance becomes easier because you can reset a space quickly.
And when things get chaotic again (because life happens), a functional system makes recovery faster: you know where items belong, so tidying isn’t decision-heavy.
In other words: you’re not failing at organization; your system just wasn’t designed for real human behavior.
The biggest takeaway from real-life kitchen organization journeys is this: function beats perfection. Your kitchen doesn’t need to look like a catalog.
It needs to support your routinesweekday dinners, quick breakfasts, and the occasional baking spree. Build zones, reduce friction, and keep the system simple enough that you’ll
actually use it when you’re tired. That’s the version of “organized” that lasts.
Conclusion
A more functional kitchen isn’t about buying a mountain of organizersit’s about building a layout that matches how you live.
Declutter what gets in the way, create zones so items live where they’re used, and set up storage so daily cooking is smooth and predictable.
Then keep it going with quick resets instead of heroic overhauls. Your future self (and your future countertops) will thank you.


