Table of Contents >> Show >> Hide
- Before You Start: Safety First (Because We Like Our Homes Un-Singed)
- Why Cereal Boxes Work Shockingly Well
- Tools and Materials
- Step 1: Choose a Pendant Shape That Looks Expensive (Without Acting Expensive)
- Step 2: Build the Cereal-Box Cardboard Skeleton
- Step 3: Add the Support Ring (So Your Shade Doesn’t Go Wobbly)
- Step 4: Mix Papier-Mâché Paste (Three Reliable Options)
- Step 5: Papier-Mâché the Shade (The Fun, Messy Part)
- Step 6: Smooth, Prime, and Paint for a Designer Finish
- Step 7: Install the Cord Set (Safest Shade + Hardware Combo)
- Style Variations That Look Like You Bought Them at a Fancy Shop
- Troubleshooting: Fixes for the Most Common “Oops” Moments
- Maintenance: Keep It Cute for the Long Haul
- Real-World Experiences: What Making These Pendants Is Actually Like (500+ Words)
- Conclusion: Your Ceiling Deserves Better Than “Builder Basic”
If you’ve ever looked at a designer pendant light and thought, “Wow, gorgeous… and also I enjoy eating this week,”
this project is for you. With a couple of cereal boxes, some newspaper, and good old papier-mâché, you can build
a lightweight, sculptural pendant shade that looks customwithout the custom price tag.
This guide walks you through a sturdy cereal-box “skeleton,” a smooth papier-mâché shell, and finishes that range
from modern plaster vibes to warm metallic glow. It’s messy in the fun way (think: kindergarten nostalgia, but make it chic),
and the results can genuinely look boutique.
Before You Start: Safety First (Because We Like Our Homes Un-Singed)
Papier-mâché and lighting can absolutely coexistwhen you design for low heat and proper clearance.
Your shade is paper-based, so treat safety like the main character, not a cameo.
Non-negotiable safety rules
- Use LED bulbs only. LEDs run much cooler than incandescent bulbs, which is why they’re widely recommended for paper shades and lantern-style projects.
- Keep space between the bulb and shade. Aim for about 2–4 inches of clearance around the bulb so heat can escape.
- Use a UL/ETL-listed pendant cord set and socket. Don’t DIY the wiring from random partsuse certified components made for household voltage.
- Never let paper touch the bulb. Not “almost touching.” Not “I swear it’s fine.” Touching is a no.
- If you’re hardwiring to a ceiling box, get adult help or a licensed electrician. Turn off power at the breaker before touching any wiring.
Why Cereal Boxes Work Shockingly Well
Cereal box cardboard is thin, flexible, and easy to cut cleanlyperfect for forming curves and cylinders.
When reinforced with tape and a few internal supports, it becomes a surprisingly strong base for papier-mâché.
Think of it like building a lampshade “corset”: the cardboard gives the piece structure, and the papier-mâché adds the finished,
sculptural shell. Also: it’s the only time you’ll be grateful your household bought the family-size box.
Tools and Materials
Core supplies
- 2–3 clean cereal boxes (more if you’re going big)
- Newspaper (or brown kraft paper for a smoother final texture)
- Masking tape
- Hot glue gun + glue sticks
- Scissors + craft knife
- Ruler or measuring tape
- Mixing bowl + whisk
- Paintbrush (cheap is finethis is not a fancy-brush moment)
- Plastic table cover or trash bags to protect your workspace
- Apron or old shirt you don’t love anymore
For the inside support “ring”
- Thick cardboard (shipping box cardboard works great)
- Bamboo skewers or thin wooden dowels
For finishing
- Primer (latex or multi-surface)
- Paint (chalk-style paint, latex wall paint, or acrylic craft paint)
- Optional: metallic leaf (copper/gold), leaf adhesive, and a sponge brush
- Optional: clear sealer (water-based polyurethane or matte acrylic sealer)
Lighting hardware
- UL/ETL-listed pendant cord set with socket (plug-in or hardwire style)
- LED bulb (choose warm white for cozy glow)
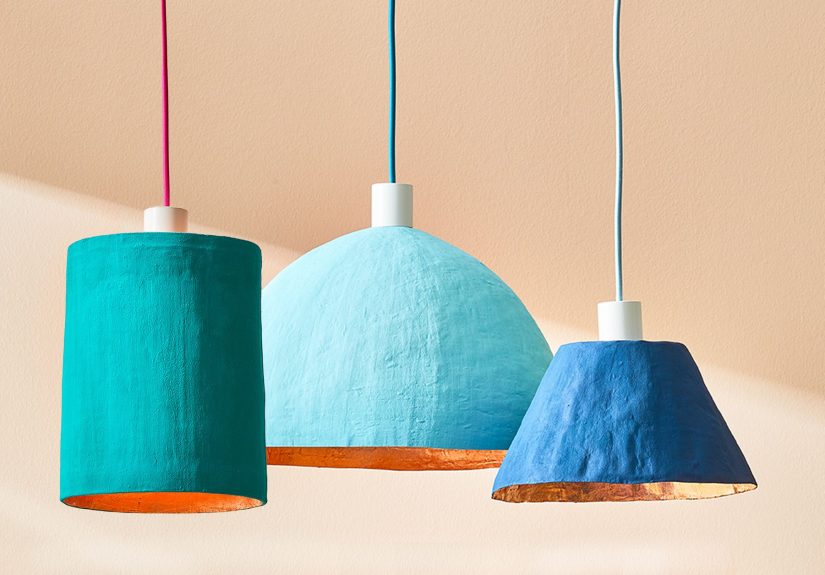
Step 1: Choose a Pendant Shape That Looks Expensive (Without Acting Expensive)
A simple cylinder is the easiest and looks modern immediatelyespecially in matte white, soft beige, or a textured “plaster” finish.
But you can also taper it, scallop the bottom edge, or add ribs for a high-end silhouette.
Size planning (simple guidelines)
- Small nook or hallway: 10–12 inches diameter
- Kitchen island (single pendant): 14–18 inches diameter
- Kitchen island (set of 2–3): 10–14 inches diameter each
- Dining table: Often 16–20 inches diameter (depending on table width and ceiling height)
If you want a more “designer” look, make the shade a bit wider than you thinkvisual volume reads fancy.
(This is also why shoulder pads had a moment. Let’s not repeat that moment, but you get the concept.)
Step 2: Build the Cereal-Box Cardboard Skeleton
A. Cut and form the main cylinder
- Open cereal boxes along seams and flatten them.
- Cut large rectangles that match your desired shade height and circumference.
- Curve the cardboard into a cylinder. Overlap the seam by about 1/2–1 inch.
- Hot-glue the seam, then reinforce with masking tape on both sides (inside and outside).
B. Create an inner ledge to hold the support ring
- Cut thin cardboard strips about 1/2 inch wide.
- Glue them inside the cylinder near the top edge to form a small “shelf.”
- This ledge will support the ring that holds your socket opening and keeps the shade centered.
Step 3: Add the Support Ring (So Your Shade Doesn’t Go Wobbly)
This inner “sandwich” is what makes the whole thing feel legit. It supports the socket opening and helps keep the shade
round and stable over time.
- Cut two thick-cardboard circles, about 3–4 inches wide (like two sturdy donuts without the delicious middle).
- Trace the socket opening in the center and cut a hole slightly larger than the socket so it can pass through smoothly.
- Cut 4 pieces of bamboo skewer (about 3 inches long each).
- Hot-glue the skewer pieces between the two circles as spacers (like a tiny bridge structure).
- Set the ring assembly onto the inner ledge you made inside the cylinder and glue it in place.
- Reinforce with masking tape if needed.
Now your shade has a stable top structure that can handle the gentle tugging of the cord and keeps the bulb centered.
Translation: it won’t look like it’s melting off the ceiling in a slow-motion tragedy.
Step 4: Mix Papier-Mâché Paste (Three Reliable Options)
There are multiple “correct” papier-mâché pastes because craft people are passionate and also because different climates exist.
Pick one based on your priorities: speed, smoothness, or clarity.
Option 1: Cooked flour paste (strong, smooth)
- Warm water in a saucepan and add a little salt.
- Whisk flour with cold water separately until lump-free.
- Combine and gently cook while stirring until it thickens (pudding-like), then cool.
Option 2: No-cook flour paste (fast, classic)
- Whisk flour and water in a bowl until it looks like cake batter.
- Add a pinch of salt if you’re worried about mold in humid weather.
Option 3: Glue-based paste (dries clearer, great for translucent looks)
- Mix white glue (PVA) with water until it’s brushable, not watery.
- This is especially good if you’re layering tissue paper and want light to glow through cleanly.
Step 5: Papier-Mâché the Shade (The Fun, Messy Part)
Set up your workspace first. Cover your table with plastic, keep a towel nearby, and accept that your fingers are now paintbrushes.
(Congratulations. You are art.)
A. Prep your paper strips
- Tear newspaper into strips about 1 inch wide (tearing creates softer edges that blend better than scissors-cut strips).
- Make shorter pieces for wrapping curves and edges.
B. Keep the shape round while you work
Place an inflated balloon inside the cylinder (or use a bowl, pot, or mixing bowl form) to help maintain shape as you apply layers.
You can rest the shade in a bowl while it dries so it doesn’t flatten on one side.
C. Apply layers (inside and outside)
- Dip a strip into paste and gently run it between two fingers to remove excess (think “coated,” not “souped”).
- Apply strips vertically around the shade, overlapping slightly.
- Add a horizontal layer next (crisscrossing strengthens the structure).
- Cover the inside toothis helps stiffness and makes the shade feel finished.
- Add smaller strips around the top ring and skewer supports so everything feels integrated.
How many layers do you need?
For a sturdy pendant shade, aim for 3–6 full layers, letting the shade dry between major rounds.
More layers = more durability, but also more drying time. The goal is “rigid and lightweight,” not “accidentally forged a paper boulder.”
Drying tips (aka “how to avoid the sad sag”)
- Let it dry overnight at minimum. In humid climates, give it 24–48 hours.
- Use a fan to speed drying and reduce mold risk.
- Rotate the shade occasionally so it dries evenly.
Step 6: Smooth, Prime, and Paint for a Designer Finish
Papier-mâché has texture, and texture is trendy. But you want it to look intentionallike “handcrafted,” not “last-minute science fair.”
A. Light sanding (optional)
Once fully dry, you can gently sand rough edges. Don’t go aggressivethis isn’t drywall.
Just knock down any sharp paper ridges.
B. Prime
Primer seals the surface and helps paint look even. A simple latex primer works beautifully and can make your final color pop.
C. Paint styles that always look good
- Matte plaster look: warm white, creamy beige, or soft greige
- Modern color-block: neutral outside + bold inside
- Textured “stone”: sponged layers of off-white and sand
- Terrazzo speckle: flick tiny paint dots across a neutral base
D. Optional: Metallic leaf on the inside (the “wow” factor)
Adding copper or gold leaf inside creates a warm, glowy effect when the light is onlike your pendant is quietly living its best life.
Apply leaf adhesive inside, let it get tacky, then press leaf sheets gently with a sponge brush.
E. Seal (recommended)
Finish with a water-based clear sealer. Matte sealers keep it modern; satin adds a subtle glow.
Sealing also helps protect against humidity and fingerprints.
Step 7: Install the Cord Set (Safest Shade + Hardware Combo)
The easiest and safest setup is a plug-in pendant cord set: you thread the cord through the top hole,
secure the socket, add an LED bulb, and hang it from a ceiling hook rated for the weight.
Installation checklist
- Make sure the socket fits comfortably through the top ring opening.
- Confirm the shade hangs level (adjust by trimming the top edge or adding small internal shims if needed).
- Use a lightweight LED bulb (warm white looks especially good with metallic interiors).
- Check bulb clearance (aim for 2–4 inches from shade surfaces).
- Turn on the light for 15 minutes and gently feel around the shade. It should stay cool-to-warm, not hot.
Style Variations That Look Like You Bought Them at a Fancy Shop
1) Scalloped edge pendant
Before papier-mâché, draw scallops along the bottom edge of your cylinder and cut them out.
After finishing, paint it matte white for a modern “soft geometry” vibe.
2) Ribbed pendant (easy “artisan” texture)
Glue thin cardboard strips vertically around the outside of the cylinder before papier-mâché.
When you cover it, subtle ribs appearsimilar to high-end ceramic shades.
3) Two-tone with a surprise interior
Paint the outside a calm neutral and the inside a warm metallic or terracotta.
Off = minimalist. On = cozy glow. It’s basically a personality reveal.
4) Tissue-paper translucency
Use a glue-based paste and finish with tissue paper layers on the final coat.
The light will diffuse softly, especially with warm LEDs.
5) “Stoneware” speckle
After priming, lightly flick darker paint specks with a stiff brush.
Seal matte. Suddenly, your cereal box is giving boutique pottery energy.
Troubleshooting: Fixes for the Most Common “Oops” Moments
Problem: The shade warped while drying
- Dry it supported (balloon inside, or rest it in a bowl).
- Rotate it every few hours.
- Apply layers evenly inside and out to balance tension.
Problem: It smells a little… floury
- Make sure it’s fully dry (fans help).
- Prime and seal it.
- In humid climates, consider glue-based paste for future projects.
Problem: Paint looks patchy
- Primer firstalways.
- Use two thin coats of paint instead of one thick coat.
- Sand lightly between coats if the texture is too bumpy.
Problem: The top hole is too small for the socket
- Carefully widen it with a craft knife.
- Reinforce edges with glue and a small ring of paper strips.
Maintenance: Keep It Cute for the Long Haul
- Dust gently with a microfiber cloth or soft duster.
- Avoid moisturepapier-mâché is not a spa enthusiast.
- Stick with LED bulbs and re-check clearance if you swap bulb shapes.
- Touch-ups are easy: a little leftover paint and a quick reseal can refresh scuffs.
Real-World Experiences: What Making These Pendants Is Actually Like (500+ Words)
People often start this project thinking it’s going to feel like a quick craftthen they realize it’s more like a mini design build.
Not in a scary way. More in a “wow, I just made something that looks like it belongs in a magazine” way. One of the most common
experiences is discovering that the shape stage is where your pendant becomes stylish. A perfectly even cylinder reads
modern; a slightly organic edge reads artsy; a tapered form reads designer. Makers who love their final result usually spend a few extra
minutes trimming and refining the cardboard skeleton before adding any paste. It’s the craft version of steaming your shirt before a photo.
Another shared experience: the first layer feels suspiciously flimsy. That’s normal. The cardboard skeleton might look
like it could star in a “before” photo forever, and the wet paper strips can feel like you’re making a damp newspaper costume for a lamp.
The magic happens after the second and third layers when you start alternating directionsvertical strips, then horizontal stripsbecause
the shade suddenly firms up. Many people say there’s a moment around layer three where you tap it lightly and think, “Oh. This is real now.”
Drying is the part that tests patience, especially in humid weather. A frequent lesson: thin, even layers dry better than thick,
gloopy layers. When paste is too heavy, the shade can sag or take forever to dry, and that’s when craft regret sneaks in.
Using a fan is a game-changer, and rotating the shade every so often helps it keep its shape. Some makers even keep the balloon inside
longer than expected because it prevents the cylinder from slowly flattening on one side like a sad cardboard pancake.
Finishing is where confidence skyrockets. People who prime first almost always get a cleaner, more “store-bought” look, while skipping primer
often leads to patchy paint and extra coats. One popular experience is falling in love with matte finisheschalky whites, warm creams, and
soft clay tonesbecause papier-mâché already has texture, and matte paint makes that texture look intentional. Adding a metallic interior
(like copper or gold) is also a common “why didn’t I do this sooner?” moment. Even if the outside is simple, the inside glow makes the pendant
feel expensive when the light turns on.
Then there’s the safety “aha.” Many first-timers assume any bulb is fine until they learn how much heat different bulbs produce. Makers who
switch to a small warm LED often notice the shade stays comfortably cool and the light looks softer and more flattering. It’s also common to
do a short “test run” after hanging: turn it on for 10–15 minutes, check warmth, confirm clearance, and adjust if needed. That tiny habit
builds confidenceespecially if you’re gifting a pendant or installing it in a high-traffic area like a kitchen.
Finally, the most relatable experience: once you make one, you start eyeing every box in your recycling bin like it owes you rent.
Pasta boxes become “potential ribs,” shipping cardboard becomes “support rings,” and suddenly you’re not throwing things awayyou’re
curating raw materials. The best part is that each pendant can be slightly different: one smooth and minimal for a bedroom corner, one
scalloped and playful for a breakfast nook, one with a metallic interior that makes dinner guests say, “Wait… you made that?”
And yes, you get to answer: “Yep. It used to be cereal.”


