Table of Contents >> Show >> Hide
- First, What “Plaster of Paris” Actually Means
- Quick Materials Checklist
- Safety & Setup (The “Boring” Part That Saves Your Day)
- The Golden Rules of Mixing (So It Doesn’t Turn Into Lumpy Oatmeal)
- Recipe 1: Classic All-Purpose Plaster (Best for Ornaments, Small Molds, and “My First Cast”)
- Recipe 2: Extra-Strong Glue-Boosted Plaster (For Decor Pieces That Get Handled)
- Recipe 3: Slow-Set, Super-Smooth Casting Mix (For Cleaner Detail and Less “Oh No It’s Setting!”)
- Drying, Demolding, and Finishing (Where Good Casts Become Great)
- Cleanup & Disposal (A Love Letter to Your Pipes)
- FAQ: Quick Answers to Common “Wait, What?” Moments
- Real-World Experiences and Lessons from the Craft Table (Extra Tips That Feel Like Cheat Codes)
- Conclusion
Plaster of Paris is the craft world’s version of instant mashed potatoes: add water, stir, and suddenly you’re holding
something that goes from “soupy” to “solid” while you’re still deciding what movie to put on. It’s cheap, easy to find,
and wildly usefulmolds, casts, ornaments, sculpting bases, repair patches, Halloween props, you name it.
This guide gives you three simple, reliable Plaster of Paris “recipes” (mixes) you can use for different goals:
a classic all-purpose batch, a tougher glue-boosted version for pieces that get handled, and a slow-set mix for calmer
pours and cleaner detail. You’ll also get mixing rules that prevent lumps, finishing tips, and cleanup advice that saves
your plumbing from becoming a modern art installation.
First, What “Plaster of Paris” Actually Means
Plaster of Paris is a gypsum-based powder that hardens when mixed with water. The hardening happens because the powder
rehydrates and forms interlocking crystalsbasically a tiny mineral forest that locks everything together. That process
also gives off heat (an exothermic reaction), which is normal… and also why you shouldn’t make huge thick blobs in your
hand and call it “science.”
Important truth-without-the-drama: most DIYers aren’t truly “making” Plaster of Paris powder at home. The powder is
produced industrially by heating gypsum to remove some chemically bound water. At home, the practical version of
“making plaster of Paris” is mixing the store-bought powder into a usable casting slurry. That’s what we’re doing here.
(And honestly? It’s the fun part anyway.)
Quick Materials Checklist
- Plaster of Paris powder (craft, hardware, or art supply stores)
- Clean water (room temp or cool, depending on the recipe)
- Bucket or mixing bowl (dedicate one if you do this often)
- Measuring cup(s) or a kitchen scale (scale = more consistent results)
- Mixing tool (spatula, paint stirrer, or whisk)
- Gloves + dust mask (gypsum dust is not a snack for your lungs)
- Drop cloth/newspaper (because plaster finds the one surface you forgot to protect)
- Mold release (petroleum jelly, cooking spray, or a commercial mold release)
Safety & Setup (The “Boring” Part That Saves Your Day)
You don’t need a hazmat suit, but a little respect goes a long way:
- Wear a dust mask when handling dry powder, and mix in a ventilated space.
- Protect eyes and skin if you’re sensitivefine powders can irritate.
- Expect heat as it sets. Thick masses can get surprisingly warm.
- Do not cast directly on skin with a big, solid pour. (Plaster bandage methods exist, but that’s a different project.)
- Never pour leftover plaster down the drain. It hardens in pipes like it’s trying to win a plumbing championship.
The Golden Rules of Mixing (So It Doesn’t Turn Into Lumpy Oatmeal)
If you only remember one section, make it this one. Most plaster problems come from rushed mixing or the wrong order.
Rule 1: Water first, plaster second
Always measure water into the bowl first, then sprinkle plaster into the water. If you dump water onto a pile of plaster,
you’ll trap dry pockets and create lumps that refuse to die.
Rule 2: “Sift and soak” beats “dump and panic”
Sprinkle plaster evenly until small dry “islands” stop disappearing quickly. Then let it soak for about 60–120 seconds.
This wets the particles evenly and reduces clumps.
Rule 3: Mix gently, then decisively
Stir slowly at first to avoid whipping in bubbles. Once it’s uniform, mix a bit more firmly to smooth it out.
Total mixing time is usually shortabout 1–2 minutes for small batches.
Rule 4: Don’t “retemper” set plaster
If it starts thickening, don’t add more water and try to bring it back to life. That weakens the structure and can cause
chalky, crumbly casts. Instead, mix smaller batches so you can pour before it tightens.
Rule 5: Ratio matters more than “vibes”
Many products work well around 2 parts plaster powder to 1 part water by volume.
Some manufacturer instructions also specify ratios by weight (for example, about 70 parts water to 100 parts plaster by weight
for certain molding plasters). Volume is convenient; weight is more consistent. Pick one approach and repeat it.
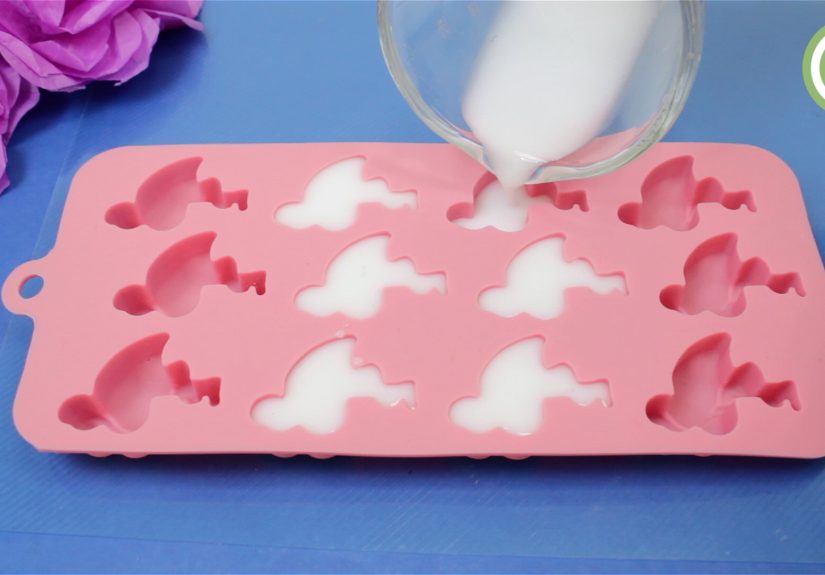
Recipe 1: Classic All-Purpose Plaster (Best for Ornaments, Small Molds, and “My First Cast”)
This is the dependable, everyday mix: smooth, pourable, and quick-setting with crisp detail. Use it for small sculptures,
holiday ornaments, handprint plaques, and simple mold pours.
Classic Ratio
- 2 parts plaster powder : 1 part water (by volume)
Example Batch (Great for small molds)
- 1 cup water
- 2 cups plaster of Paris powder
Steps
- Prep the mold: Apply a thin coat of mold release. If it’s a silicone mold, you may not need much.
- Measure water into the bowl.
- Sprinkle plaster into water until the surface looks “snowy” and small islands linger.
- Let it soak 1–2 minutes.
- Mix 1–2 minutes until it looks like smooth pancake batter.
- Pour slowly into the mold. Tap the mold on the table to release trapped bubbles.
- Wait for initial set: It will warm up and firm. Small pieces can often be demolded in 30–60 minutes.
- Dry fully: Let it air-dry 24–48 hours (longer for thick pours) before sealing or painting.
What You Should Notice (A little analysis)
If your mix is too thick, it won’t flow into fine detail and may trap bubbles. If it’s too thin, you’ll get a weaker cast
with more shrinkage and a chalkier feel. The “pancake batter” consistency is a sweet spot because it’s fluid enough to pour,
but concentrated enough to form a tight crystal network as it sets.
Troubleshooting
- Lumps: You added plaster too fast or didn’t soak. Sprinkle slower next time.
- Bubbles/pinholes: Stirred too aggressively or poured too fast. Tap/vibrate the mold after pouring.
- Weak edges: Too much water, or demolded too early. Let it set longer before removing.
Recipe 2: Extra-Strong Glue-Boosted Plaster (For Decor Pieces That Get Handled)
Regular plaster can be brittle, especially around thin edges. Adding a small amount of PVA (white school glue) or a
water-based bonding additive can improve toughness and reduce chipping. Think: coasters, small trays, wall hangings,
or anything you’ll pick up often.
Glue-Boosted Ratio (Simple and Beginner-Friendly)
- Replace 10–25% of the water with PVA glue (start small; you can increase later)
- Then keep the same overall plaster-to-liquid approach as Recipe 1
Example Batch (A sturdy “small tray” mix)
- 3/4 cup water
- 1/4 cup white glue (PVA)
- 2 cups plaster of Paris powder
Steps
- Mix liquids first: Stir water + glue until uniform. (It should look like slightly cloudy milk.)
- Sprinkle plaster into the liquid, soak 1–2 minutes, then mix until smooth.
- Pour and tap as usual to reduce bubbles.
- Allow extra drying time: Glue can slow drying, so be patient before sealing/painting.
Why It Works
Plaster hardens by growing gypsum crystals; glue adds a flexible binder around that mineral structure. You still get the
crispness of plaster, but with a little “give,” which helps pieces survive bumps and handling.
Pro Tips
- Don’t overdo glue: Too much can make the surface rubbery or affect paint adhesion.
- Test a small batch first: Different brands of plaster and glue can behave slightly differently.
- Use a sealant before painting: It improves color consistency and helps paint stick evenly.
Recipe 3: Slow-Set, Super-Smooth Casting Mix (For Cleaner Detail and Less “Oh No It’s Setting!”)
Sometimes you want more working timeespecially if you’re pouring multiple small cavities, embedding a hanger, or trying
to avoid bubbles in a detailed mold. This recipe focuses on a calmer pour with fewer surface defects.
Slow-Set Recipe Add-Ins
- Cool water (naturally slows set compared to warm water)
- A tiny splash of vinegar to extend working time
- 1–2 drops dish soap as a surfactant to help bubbles rise and pop
Example Batch (Detail-friendly pour)
- 1 cup cool water
- 1 teaspoon white vinegar
- 1–2 drops dish soap
- 2 cups plaster of Paris powder
Steps
- Combine the water + vinegar + dish soap in your mixing bowl.
- Sprinkle plaster into the liquid slowly and evenly.
- Soak 1–2 minutes, then mix gently until smooth.
- Pour in a thin stream into one corner of the mold and let it flow across. This reduces trapped air.
- Tap and wait: You should notice a slightly longer workable window.
Why This Helps
Working time is affected by temperature, additives, and mixing intensity. Cool water slows the hydration reaction.
A small amount of vinegar can retard the set slightly, giving you more time to pour neatly. Dish soap reduces surface
tension, which can help bubbles release instead of clinging to the mold like they pay rent.
Use Cases
- Ornate silicone molds
- Thin-letter details (monograms, textures)
- Projects where you need time to place inserts (magnets, hooks, hanging wire)
Drying, Demolding, and Finishing (Where Good Casts Become Great)
Set Time vs. Dry Time
Plaster often sets in under an hour, but it can take a day or two to fully dry depending on thickness and humidity.
If you paint too soon, the trapped moisture can cause blotchy paint, weak adhesion, or slow curing. When in doubt, wait.
Your future self will thank you.
Sanding Without Making a Dust Storm
Sanding plaster creates fine dust. Wear a mask, sand gently, and consider doing it outdoors. Start with a medium grit
(like 120–180) for shaping, then finish with a finer grit (220+) for a smoother surface.
Seal Before You Paint
Plaster is porouslike a tiny sponge made of rocks. Sealing helps paint look more even and prevents it from soaking in
unpredictably. Easy seal options include:
- Acrylic sealer (matte or gloss)
- Gesso (great under paint)
- A thin glue-and-water mix (use lightly; test first)
Painting Ideas
- Acrylic paint for bright color and easy cleanup
- Chalk paint for a soft, matte look
- Rub ’n Buff or metallic wax for instant “fancy”
Cleanup & Disposal (A Love Letter to Your Pipes)
Plaster and drains are not friends. Even “just a little rinse” can settle and harden over time. Use a simple rinse-bucket
system instead:
- Scrape excess plaster into the trash before washing anything.
- Rinse tools in a dedicated bucket of water, not the sink.
- Let the sediment settle at the bottom (plaster sinks).
- Carefully pour off the clearer water (avoid sending sludge anywhere).
- Let the remaining slurry harden, then knock it out and throw it away.
This one habit prevents most “why is my drain suddenly a sculpture?” disasters.
FAQ: Quick Answers to Common “Wait, What?” Moments
How long do I have before it sets?
Many mixes start thickening within 10–15 minutes and firm up significantly within 20–40 minutes, depending on product,
water temperature, and additives. If you’re new to it, mix smaller batches so you can pour comfortably.
Can I make plaster of Paris without buying the powder?
You can make plaster-like craft mixes (like flour-and-water paste, cornstarch mixes, or paper mache), but they won’t behave
like real plaster of Paris. They generally dry slower, shrink more, and aren’t as crisp or strong. If you need true casting
performance, the actual gypsum plaster powder is worth it.
Why did my cast crack?
Common causes include too much water (weaker structure), demolding too early, drying too fast (especially in hot, dry air),
or pouring a very thick piece that heats up and dries unevenly. Try the glue-boosted recipe, keep to a consistent ratio,
and let it dry slowly at room temperature.
How do I store plaster powder?
Keep it sealed and dry. Moisture in the air can start the reaction early, leading to poor set and weak results. If your
plaster starts behaving oddly (grainy, fast-setting, or weak), the bag may have absorbed moisture.
Real-World Experiences and Lessons from the Craft Table (Extra Tips That Feel Like Cheat Codes)
People often expect plaster of Paris to behave like cake batter: mix it, pour it, done. In real life, it’s more like a
temperamental pancake batter that’s also secretly a chemistry experiment. Here are common experiences makers run intoand
what tends to fix them.
1) “My first batch was perfect… for about 30 seconds.” This is the classic rookie surprise. Plaster doesn’t give you
infinite working time, and stirring faster doesn’t negotiate a better deal. The fix isn’t heroic mixingit’s smaller batches.
Instead of one giant bowl, do two or three mini pours. You’ll waste less, panic less, and you’ll actually have time to tap
the mold and chase out bubbles.
2) “I got lumps the size of gnocchi.” Lumps usually happen because the powder hits water in a pile and forms a wet shell
around a dry center. Once that happens, you can whisk until next Tuesday and still find mystery chunks. The “sprinkle and soak”
method feels slow, but it saves your finish. Many experienced crafters treat sprinkling like seasoning: steady, even coverage
instead of dumping the whole shaker at once.
3) “The bubbles ruined my pretty mold.” Bubbles love corners, letters, and texturesbasically anything you cast plaster
for. Two habits help: pour in a thin stream into one spot and let the plaster flow (instead of splashing it everywhere), and
tap the mold firmly on the table for 20–30 seconds after pouring. For extra-detail molds, the slow-set recipe plus a couple
drops of dish soap can make the difference between “pitted” and “polished.”
4) “It felt hard, so I painted it… and the paint looked weird.” Plaster can feel solid while still holding a lot of
moisture inside. That moisture changes how paint absorbs and dries, which can create blotches or dull patches. A good rule
many makers follow: if the piece still feels cool to the touch compared to the room, it’s probably still drying. Waiting
another day often improves paint results more than buying “better paint.”
5) “Edges chip when I breathe near them.” Thin edges are naturally fragile in standard plaster. If your project includes
sharp corners (coasters, trays, ornaments with thin outlines), the glue-boosted mix tends to hold up better. Another practical
trick is to slightly round edges with sandpaper before paintingtiny bevels reduce the chance of a corner snapping off during
everyday handling.
6) “Cleanup is the real villain.” Most people learn the drain rule the hard way, usually while staring at a sink that
drains like it’s taking a thoughtful break. The rinse-bucket system feels like an extra step, but it becomes automatic fast:
scrape, rinse in bucket, let settle, toss the hardened sludge. It’s the difference between a five-minute cleanup and a weekend
of regretting your life choices.
7) “My best results came when I wrote things down.” Plaster is surprisingly consistent if you treat it like a recipe.
Keep a little note on your phone: which ratio you used, room temperature, how long it took to set, and whether you liked the
detail. After two or three projects, you’ll have a personalized “perfect mix” that behaves the way you want.
The overall pattern is simple: plaster rewards patience at the start (sprinkle, soak, mix gently) and patience at the end
(dry fully before finishing). Once you respect those two moments, the rest feels easyand honestly kind of addictive.
Conclusion
Plaster of Paris is one of the easiest ways to turn an idea into a real, paintable objectfast. Start with the classic
2:1 mix for most projects, reach for the glue-boosted recipe when you need extra durability, and use the slow-set version
when detail and working time matter most. Mix water-first, sprinkle and soak, pour gently, let it dry fully, and treat your
drains like the delicate treasures they are. Do that, and you’ll be cranking out crisp casts like you’ve been doing it for years.


