Table of Contents >> Show >> Hide
- Why Leaf-Shaped Pavers Are Worth Making
- Best Leaves for Making Leaf-Shaped Pavers
- Materials and Tools You Will Need
- Safety First: Concrete Is Not Just Fancy Mud
- Step-by-Step Guide: How to Make Leaf-Shaped Pavers
- Step 1: Prepare the Work Area
- Step 2: Build a Sand Bed
- Step 3: Position the Leaf Vein-Side Up
- Step 4: Apply Release Agent
- Step 5: Mix the Concrete
- Step 6: Add the First Layer of Concrete
- Step 7: Add Reinforcement
- Step 8: Build the Final Thickness
- Step 9: Cover and Cure
- Step 10: Remove the Leaf
- Step 11: Let the Paver Continue Curing
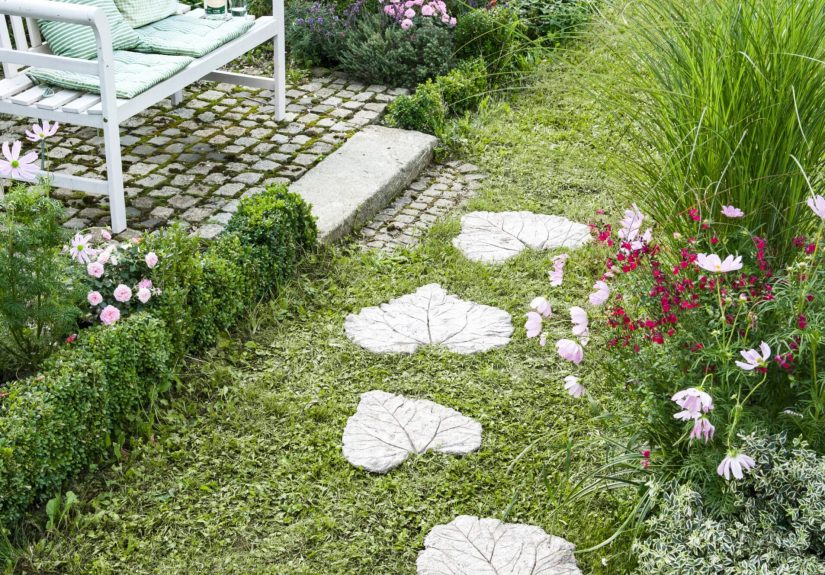
- How to Install Leaf-Shaped Pavers in the Garden
- Design Ideas for Leaf-Shaped Pavers
- Common Mistakes to Avoid
- Finishing Options: Stain, Seal, or Leave Natural?
- Maintenance Tips for Long-Lasting Leaf Pavers
- Real-World Experience: Lessons From Making Leaf-Shaped Pavers
- Conclusion
Leaf-shaped pavers are what happens when a garden path decides to put on a little drama. Instead of buying plain square stepping stones that look like they were designed by a tired calculator, you can make concrete pavers that capture the veins, curves, and character of real leaves. The result is practical, durable, and wonderfully organiclike Mother Nature got a weekend DIY show and a bag of concrete.
This guide explains how to make leaf-shaped pavers using real leaves as molds or texture stamps, concrete or sand-topping mix, basic tools, and a little patience. You will learn how to choose the right leaf, mix concrete properly, shape the paver, cure it, install it safely, and avoid the common mistakes that turn a charming garden project into a gray pancake with commitment issues.
Why Leaf-Shaped Pavers Are Worth Making
Leaf-shaped pavers bring a handmade, natural look to garden paths, patios, side yards, vegetable gardens, and quiet corners where you pretend you are “checking the plants” but are actually escaping emails. Unlike standard pavers, each piece can be unique because every leaf has its own vein pattern, outline, and personality.
They also make excellent beginner concrete projects. You do not need a professional mold, expensive tools, or construction experience. The project is small enough to control, yet useful enough to feel satisfying when finished. A few leaf pavers can create a stepping path through mulch. A dozen can form a whimsical walkway. One large paver can become a decorative accent under a birdbath or planter.
Best Leaves for Making Leaf-Shaped Pavers
The most important “tool” in this project is the leaf. Large leaves with strong veins create the clearest texture. Rhubarb, hosta, elephant ear, burdock, magnolia, sunflower, pumpkin, squash, and fig leaves are popular options. The deeper the veins, the more dramatic the finished paver will look.
What to Look for in a Leaf
Choose a leaf that is fresh, flexible, and free from large holes. A slightly imperfect edge is fine; in fact, it often makes the finished paver look more natural. Avoid dry or brittle leaves because they may crack or curl before the concrete sets. Also avoid tiny delicate leaves if you plan to walk on the finished stone. They may look beautiful, but unless you are a fairy with very considerate shoes, they are usually too small for practical stepping stones.
Leaf Size and Walking Comfort
For a functional garden paver, aim for a finished stone that is large enough for an adult foot to land comfortably. A good target is about 12 to 18 inches across for decorative stepping stones, or larger if you are using giant leaves. Smaller leaf pavers can still be used as edging, planter accents, or decorative pieces tucked into flower beds.
Materials and Tools You Will Need
Before you start, gather everything in one place. Concrete is not the kind of material that enjoys waiting while you wander around looking for gloves. Once mixed, it begins to firm up, so preparation saves stress.
Materials
- Large fresh leaves with visible veins
- Concrete mix, crack-resistant concrete mix, or sand-topping mix
- Clean water
- Play sand or damp builder’s sand for shaping support
- Cooking spray, vegetable oil, or mold release
- Wire mesh, hardware cloth, or fiberglass mesh for reinforcement
- Plastic wrap, trash bags, or a plastic sheet for curing
- Paver sand or gravel for installation
- Optional concrete pigment or masonry-safe stain
- Optional concrete sealer for outdoor durability
Tools
- Rubber gloves or waterproof work gloves
- Safety glasses
- Dust mask or respirator for mixing dry concrete
- Wheelbarrow, mixing tub, or sturdy bucket
- Trowel, margin trowel, or small shovel
- Scissors or wire cutters for mesh
- Spray bottle for misting
- Level for installation
- Garden trowel or spade
Safety First: Concrete Is Not Just Fancy Mud
Concrete looks harmless when it is sitting in a bag, but cement-based products can irritate skin, eyes, and lungs. Wear gloves, safety glasses, and a dust mask when handling dry mix. Mix outdoors or in a well-ventilated area. Do not let wet concrete sit on your skin, and never use concrete to cast any part of the body. Concrete can heat as it cures and can cause serious burns.
Keep children and pets away from the mixing area unless they are closely supervised. This can be a family-friendly craft, but the concrete mixing step belongs to adults or older teens with proper protection. The decorating and path-planning parts are much safer places for little helpers to contribute.
Step-by-Step Guide: How to Make Leaf-Shaped Pavers
There are two common methods for making leaf-shaped pavers. The first method uses the real leaf as a texture form, placing concrete directly over the back side of the leaf. This creates a raised-vein impression on the finished paver. The second method uses a shallow mold and presses a leaf into the surface. For the most natural leaf shape, the first method usually gives the best result.
Step 1: Prepare the Work Area
Choose a flat outdoor work surface where the pavers can cure undisturbed for at least 24 to 48 hours. A piece of plywood, a plastic-covered table, or a firm patch of ground can work. Spread a plastic sheet or tarp underneath the project to catch spills. Concrete crumbs in the lawn are not charming. They are just future mysteries for the lawn mower.
Step 2: Build a Sand Bed
Pour damp sand into a mound slightly larger than your leaf. Shape it into a gentle dome or shallow cushion. This support helps the finished paver look natural rather than completely flat. A slight curve also allows water to run off the surface instead of pooling in the middle.
Do not make the sand mound too steep. A dramatic curve may look artistic, but it can make the paver unstable underfoot. Think “soft natural contour,” not “concrete taco.”
Step 3: Position the Leaf Vein-Side Up
Place the leaf upside down on the sand bed, with the underside and raised veins facing up. This is the side that creates the strongest texture. Smooth the leaf gently so it follows the sand shape. If the leaf has small holes, you can patch the top side with tape before flipping it over, but avoid putting tape where the concrete will touch because the tape pattern may transfer.
Step 4: Apply Release Agent
Lightly coat the leaf with cooking spray, vegetable oil, or a mold-release product. Use a thin layer. Too much oil can blur the vein detail or leave greasy spots. The goal is to help the leaf peel away after curing without turning your paver into a salad dressing experiment.
Step 5: Mix the Concrete
Add dry concrete mix to your mixing tub, then gradually add water according to the product directions. Mix until the concrete reaches a stiff, moldable consistency. It should hold its shape when piled onto the leaf, similar to thick oatmeal or cookie dough that made questionable life choices. Avoid a soupy mix. Too much water weakens concrete, increases shrinkage, and makes the paver more likely to crack.
If you want colored pavers, add concrete pigment to the mixing water before combining it with the dry mix. Earthy tones such as charcoal, terra cotta, buff, brown, or mossy gray usually look best in garden settings. Start with less pigment than you think you need; subtle color often ages more gracefully outdoors.
Step 6: Add the First Layer of Concrete
With gloved hands or a trowel, gently place concrete onto the center of the leaf. Press it down carefully so it fills the vein details. Work from the center outward, following the shape of the leaf. Keep the first layer about 1 inch thick. Tap and pat the concrete to release trapped air bubbles, especially along the main veins.
Do not drag the concrete aggressively across the leaf. Dragging can tear the leaf or smear the pattern. Instead, place small amounts and press them into position. This step is messy, slow, and oddly satisfyingbasically the adult version of making mud pies, but with better curb appeal.
Step 7: Add Reinforcement
Cut a piece of wire mesh, hardware cloth, or fiberglass mesh slightly smaller than the leaf shape. Place it over the first layer of concrete, keeping it away from the outer edges. Reinforcement helps reduce cracking, especially for larger pavers or pieces that will be walked on.
Do not let metal mesh stick out of the concrete. Exposed wire can rust and create sharp edges. The mesh should be fully embedded between layers, like the useful middle child of the paver family.
Step 8: Build the Final Thickness
Add more concrete over the reinforcement until the paver is about 1.5 to 2 inches thick. For large leaves, stay closer to 2 inches. Thin pavers may crack under foot traffic, while overly thick pavers become heavy and harder to install. Shape the edges with your gloved hands or trowel, following the natural outline of the leaf.
Pay extra attention to the stem area. Large leaf stems create a deeper groove, which can become a weak point if the concrete is too thin. Add a little extra thickness along the center vein and stem zone for strength.
Step 9: Cover and Cure
Cover the paver loosely with plastic wrap, a trash bag, or a plastic sheet. This helps retain moisture while the concrete cures. Leave it undisturbed for at least 24 to 48 hours, depending on the mix, temperature, and thickness. Warm, dry weather may require light misting to keep the concrete from drying too quickly.
Curing is not the same as drying. Concrete gains strength through hydration, a chemical reaction between cement and water. If it dries out too fast, it can become weaker and more prone to surface cracks. Keep it shaded, protected from wind, and above freezing while it firms up.
Step 10: Remove the Leaf
After the paver is firm enough to handle, carefully flip it over and peel away the leaf. Some pieces may come off easily; others may cling like they signed a long-term lease. Use a soft brush, wooden stick, or water to remove stubborn bits. Avoid metal tools that can scratch the surface.
At this stage, the paver may look pale or uneven. That is normal. Concrete color changes as it cures. Give it time before deciding whether to stain or seal it.
Step 11: Let the Paver Continue Curing
Even if the paver feels hard after a day or two, it is still gaining strength. Let it cure for several more days before installing it in a high-traffic area. For best durability, allow the paver to cure as long as practical before heavy use. Full concrete strength develops over time, so patience is your invisible building material.
How to Install Leaf-Shaped Pavers in the Garden
A beautiful paver still needs a stable base. If you simply drop it on uneven soil, it may wobble, crack, or become a toe-stubbing trap. Proper installation keeps your DIY leaf stepping stones safe and attractive.
Plan the Path
Lay the finished pavers where you want them before digging. Walk the route naturally and adjust spacing so your feet land comfortably in the center of each stone. Most stepping paths work well when stones are spaced according to a normal stride, often around 6 to 8 inches between edges, but your stride and paver size matter more than a strict number.
Trace and Dig
Trace around each paver with a garden trowel or edging tool. Remove the paver and dig out the marked area. The hole should be deep enough to fit the paver plus a thin leveling layer of sand or gravel. Set the paver so the top sits slightly above the surrounding soil or mulch. This helps prevent mud from washing over it.
Add a Stable Base
For light garden use, a compacted layer of sand may be enough. For better drainage and long-term stability, add a few inches of compacted gravel, then a thin layer of leveling sand. The base should be firm, flat, and slightly sloped if drainage is needed. Set the paver in place and check it with a level.
Test for Wobble
Step gently on the paver. If it rocks, lift it and adjust the sand underneath. A wobbling paver is more likely to crack because pressure concentrates in one spot. When it feels solid, fill around the edges with soil, mulch, pea gravel, or groundcover plants.
Design Ideas for Leaf-Shaped Pavers
Leaf-shaped pavers can be rustic, elegant, playful, or modern depending on how you finish and arrange them. For a woodland look, leave the concrete natural gray and install the stones through mulch or mossy groundcovers. For a cottage garden, use different leaf shapes and let creeping thyme or sedum grow between them. For a more polished design, use one type of leaf and one concrete color throughout the path.
Create a Botanical Trail
Use several types of leaves to create a garden walkway that feels like a plant collection underfoot. Label nearby plants with small markers, and your path becomes part walkway, part outdoor classroom. This is especially fun for families, school gardens, or anyone who enjoys quietly becoming the neighborhood plant nerd.
Make a Focal Point
A single oversized leaf paver can become a focal point near a bench, fountain, birdbath, or container garden. Use a giant hosta or elephant ear leaf for maximum impact. Add a light stain after curing to enhance the vein details.
Use Color Carefully
Concrete pigments can add warmth, but natural garden colors usually work best. Charcoal, slate, tan, terra cotta, and soft brown blend well outdoors. Bright green concrete may sound fun, but it can look less like a leaf and more like a confused pancake from a cartoon kitchen.
Common Mistakes to Avoid
Using Concrete That Is Too Wet
Watery concrete is easier to pour, but it often creates weaker pavers with more cracks. Use only enough water to make the mix workable and moldable. If the mix slumps off the leaf, it is too wet.
Making the Paver Too Thin
Thin edges look delicate, but they break easily. Keep the body of the paver around 1.5 to 2 inches thick and reinforce larger pieces. You can taper the edges slightly for a natural look, but do not make them paper-thin.
Skipping Reinforcement
Small decorative pavers may survive without mesh, but larger walking stones benefit from reinforcement. Mesh adds strength without changing the appearance.
Demolding Too Soon
Concrete may seem firm on the surface before it is strong enough to handle. Removing the leaf too early can crack the paver or damage details. When in doubt, wait longer.
Installing on Uneven Soil
A poor base can ruin a good paver. Always level and support each stone. If the paver rocks, fix the base before walking on it regularly.
Finishing Options: Stain, Seal, or Leave Natural?
Natural concrete has a soft gray look that works in many landscapes. Over time, it weathers and blends into the garden. If you want more contrast, use masonry stain or diluted outdoor concrete color after the paver has cured. Apply color lightly to the vein grooves, then wipe the surface so the texture stands out.
Sealer is optional but useful in wet climates, freeze-thaw regions, or areas with heavy foot traffic. Choose a breathable concrete or paver sealer designed for outdoor use. A natural-look sealer preserves the handmade appearance, while a wet-look sealer darkens the color and adds sheen. Test any finish on the back of one paver first.
Maintenance Tips for Long-Lasting Leaf Pavers
Leaf-shaped pavers do not need much maintenance, but a little care keeps them looking good. Sweep off soil and leaves regularly. Rinse with water when dirt settles into the vein grooves. Avoid harsh deicing salts because they can damage concrete surfaces. If a paver shifts after heavy rain or freeze-thaw movement, lift it, re-level the base, and set it again.
If small chips appear along the edges, do not panic. Handmade garden pavers are allowed to age. A few imperfections often make them look more natural. However, large cracks usually mean the paver was too thin, cured too quickly, or lacked proper support underneath.
Real-World Experience: Lessons From Making Leaf-Shaped Pavers
The first thing you learn when making leaf-shaped pavers is that leaves are not passive craft supplies. They curl, wrinkle, tear, flop, and sometimes behave as if they have read the instructions and chosen rebellion. The best results usually come from gathering more leaves than you think you need. If you plan to make six pavers, collect ten or twelve leaves. Some will have hidden insect holes, weak stems, or edges that fold at exactly the wrong moment.
Another practical lesson is that the underside of the leaf is everything. Beginners often place the pretty top side against the concrete, then wonder why the finished texture looks shy. The underside usually has the strongest veins, and those veins create the dramatic raised pattern after the leaf is removed. Turning the leaf upside down feels backward at first, but it is the secret handshake of this project.
Mixing concrete also teaches humility. Add water slowly. The difference between “perfectly moldable” and “gray soup disaster” can be one enthusiastic splash. A stiff mix may seem harder to work with, but it holds the leaf shape better and produces a stronger paver. If the concrete is too dry, it crumbles and refuses to capture detail. If it is too wet, it slides off the leaf like it has somewhere better to be. The sweet spot is thick, damp, and packable.
Reinforcement is one of those steps that feels optional until the day a beautiful paver cracks across the main vein. Large leaves often have a deep center groove, and that groove can become the weakest line in the finished stone. Adding mesh between two layers of concrete gives the paver much better staying power. It is not glamorous, but neither is remaking a cracked stepping stone while muttering at a rhubarb plant.
Curing requires patience, which is inconvenient because peeling the leaf off is the most exciting part. Still, waiting is worth it. Removing the leaf too early can chip details or break thin edges. Covering the paver with plastic and keeping it shaded helps the concrete cure more evenly. In hot weather, a light misting can prevent the surface from drying too quickly. Think of curing as the quiet backstage work that makes the final reveal possible.
Installation matters just as much as casting. A perfectly made paver can fail if it sits on lumpy soil. Taking time to dig a shallow pocket, add sand or gravel, and test for wobble makes the path safer and more durable. The best test is simple: step on the paver from different angles. If it rocks, fix it immediately. Future you, carrying a watering can and not looking down, will be grateful.
The most enjoyable part is watching the pavers settle visually into the garden. At first, fresh concrete can look a little bright and new. After a few rains, some dust, and a bit of plant growth around the edges, the stones begin to look like they have always belonged there. That is the magic of leaf-shaped pavers: they are handmade, useful, and imperfect in exactly the right way.
Conclusion
Learning how to make leaf-shaped pavers is a rewarding way to turn ordinary concrete into garden art. With the right leaves, a stiff concrete mix, careful shaping, proper curing, and a stable base, you can create durable DIY leaf stepping stones that bring texture and charm to any outdoor space. The process is affordable, creative, and forgiving enough for beginners, yet customizable enough for serious garden lovers.
The key is to respect the basics: choose bold leaves, protect yourself while mixing concrete, build enough thickness, reinforce larger pavers, cure slowly, and install each stone securely. Do that, and your garden path will look less like a hardware-store aisle and more like a trail designed by nature with a little help from your weekend ambition.
Note: Always follow the instructions on your specific concrete product label, especially for water ratios, curing time, safety gear, and outdoor use conditions.