Table of Contents >> Show >> Hide
- Before You Start: This Is an Adults-Only Craft
- Why Dried Flower Resin Coasters Are So Popular
- What You’ll Need for a Beautiful Result
- How to Choose and Dry Flowers the Right Way
- Plan the Design Before the Resin Enters the Chat
- A Smart, Clean Workflow for Assembly
- How to Make the Colors Look Better, Not Louder
- Common Problems and How to Avoid Them
- Ways to Style and Use Finished Coasters
- What the Experience Is Really Like: of Honest Resin-Coaster Reality
- Final Thoughts
- SEO Tags
Some DIY projects whisper weekend hobby. This one practically sings from the craft table in full soprano. Colorful resin coasters with dried flowers are equal parts home décor, memory keeper, and “Wait, you made those?” conversation starter. They look expensive, feel personal, and somehow make even a plain glass of iced tea look like it showed up dressed for brunch.
If you love botanical crafts, this project checks every box: color, texture, customization, and gift-worthy charm. The secret is not stuffing a mold with every petal you can find like a floral hoarder in a glitter emergency. The real magic comes from thoughtful flower prep, clean composition, and patience. Yes, patience. I know. The least fun supply in the room.
Before You Start: This Is an Adults-Only Craft
Uncured resin is not the same thing as harmless craft glue. If you are publishing or sharing this tutorial, it is smart to frame resin projects as adults-only and remind readers to follow the exact label directions for the resin they buy. Wear protective gear, work with strong airflow, and never improvise with chemical products. If younger crafters want the same pressed-flower look, a safer alternative is decorating ready-made coasters with sealed pressed flowers and a clear, non-resin top finish.
Why Dried Flower Resin Coasters Are So Popular
There is a reason dried flower coasters keep showing up in craft blogs, gift guides, and “how did she make that?” Pinterest rabbit holes. They combine two trends people never seem to get tired of: botanical décor and handmade functional pieces. A coaster is useful, small enough to finish without dedicating your whole dining table for a month, and easy to personalize for weddings, birthdays, housewarmings, or just because your coffee table deserves a glow-up.
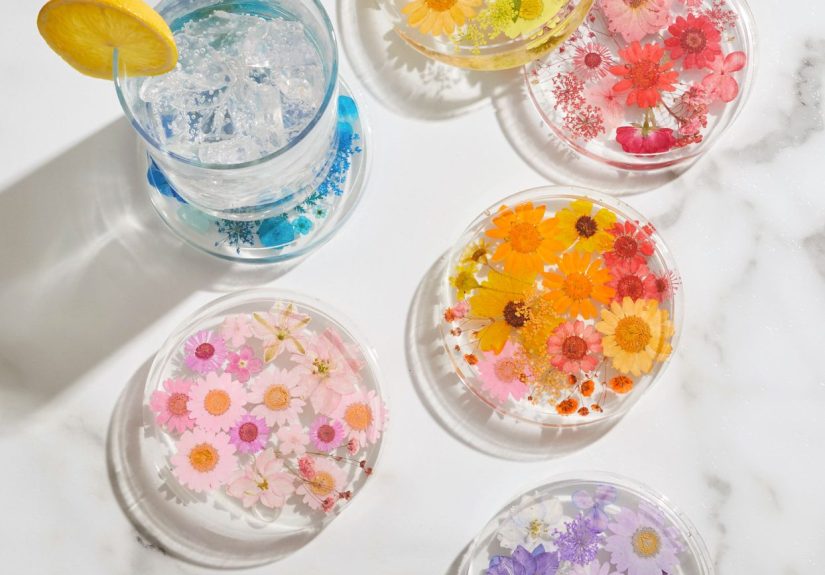
The dried flower element adds softness to a material that can otherwise feel cold or glassy. Tiny blooms, pressed petals, fern fronds, and delicate greenery look suspended like little nature snapshots. Add a touch of color through tinted resin, mica powder, or subtle flakes, and suddenly your coaster is not just protecting furniture. It is auditioning for a leading role in your living room.
What You’ll Need for a Beautiful Result
Botanical materials
Choose flowers that dry flat and hold shape well. Good options include pansies, daisies, Queen Anne’s lace, chamomile, baby’s breath, small fern cuttings, thin leaves, and individual petals from larger blooms. Flowers that are extremely thick or still damp tend to cause trouble, and “trouble” in resin usually means cloudiness, browning, or a coaster that looks like it trapped weather inside.
Coaster basics
You will also want silicone coaster molds, tweezers, a protected work surface, a dust-free curing area, and small non-slip bumpers for the finished underside. For the resin portion, adults should choose a clear casting resin intended for molds and follow the manufacturer’s safety and measuring instructions exactly. That last part matters more than people want it to. Resin is not a “close enough” kind of medium.
Color and decoration
If you want colorful resin coasters instead of plain crystal-clear ones, keep the effects controlled. Soft translucent tints usually flatter flowers better than loud opaque swirls. A blush tone under white petals, a pale blue edge around yellow flowers, or a champagne shimmer with fern details often looks elegant without overwhelming the botanicals. Gold flakes can work too, but use them with restraint unless your goal is “Victorian greenhouse meets disco ball.”
How to Choose and Dry Flowers the Right Way
The flowers are the stars, so do not treat them like background extras. Pick blooms in good condition, ideally before they become limp or overblown. The fresher and flatter they start, the better they tend to preserve. Remove bulky stems and excess foliage before drying.
For pressing, place flowers between clean absorbent paper inside a heavy book or flower press. For air-drying, hang small bunches upside down in a warm, dry, dark place with good airflow. Darkness helps preserve color, and dryness helps prevent rot. That matters because moisture is the sworn enemy of clear results. If flowers still hold water, they can discolor, create haze, or release bubbles later.
The best dried flowers for coasters feel papery, not cool or flexible. If a bloom still feels soft and alive, it is not ready. And if you are emotionally attached to the flower, all the more reason to dry it completely before using it. Nothing ruins a sentimental keepsake faster than trapping a damp memory in plastic and discovering it turned murky a week later.
Plan the Design Before the Resin Enters the Chat
One of the easiest beginner mistakes is designing while pouring. That is like trying to plate a cake while it is still in the oven. Before any resin is handled, dry-fit your flowers inside the mold. Move pieces around. Try asymmetrical clusters, a central bloom with a halo of petals, or a crescent shape that leaves clear negative space. These small layout choices make the coaster look intentional instead of accidental.
Think in layers and contrast. Tiny white flowers pop against pale green leaves. Warm-toned petals look rich next to amber or peach tints. Ferns and thin stems add movement. Petals can soften hard edges. Clear space is useful too; every square inch does not need decoration. A little breathing room helps the flowers look delicate rather than crowded.
A practical trick is to sort botanicals into three groups before you begin: focal pieces, supporting pieces, and filler. Your focal piece might be one pansy or daisy head. Supporting pieces could be smaller blossoms or leaves. Filler can be petals, tiny buds, or subtle flecks. When people say a coaster looks “professional,” this kind of visual hierarchy is usually why.
A Smart, Clean Workflow for Assembly
Because resin products vary, adults should follow the exact label instructions for measuring, mixing, working time, and cure time. What stays consistent from project to project is the overall workflow.
1. Prep the space
Protect the table, make sure the surface is level, and set up in a well-ventilated area. Keep dust, pet hair, and snack crumbs away from the curing zone. Resin has a supernatural ability to attract the one floating speck in the room. You will not see it until everything is glossy and permanent, which is a special kind of craft heartbreak.
2. Clean the mold
Any lint or residue inside a silicone mold can show up in the finished coaster. Start clean and keep fingertips off the interior as much as possible.
3. Arrange the dried flowers
Some makers prefer placing flowers after a thin base layer has begun to settle, while others build the composition more gradually. Either way, the goal is simple: keep the flowers flat, visible, and balanced. Use tweezers instead of fingers so petals do not tear or shift.
4. Build visual depth
If your design includes tinted resin, metallic flakes, or extra petals, add them in a way that supports the flowers rather than swallowing them. A botanical coaster should still look botanical. If viewers need a detective, a magnifying glass, and a flashlight to locate the flower, the embellishments won.
5. Let it cure fully
Do not rush demolding. Fully cured resin is what gives coasters their satisfying, glassy finish. Once removed, add small clear bumpers or protective pads to the underside so the coaster sits neatly and does not skate across the table like it is late for an appointment.
How to Make the Colors Look Better, Not Louder
“Colorful” does not have to mean neon chaos. In fact, dried flowers usually look best when the color supports their natural shape. Try soft jewel tones, gentle translucent washes, or a faint tinted border. Blue with white petals feels crisp. Pink with cream flowers feels romantic. Green paired with ferns looks fresh and modern. Amber or honey tones can make wildflowers feel vintage in the best possible way.
If your flowers are already vivid, keep the resin mostly clear. If the botanicals are pale, add just enough tint to create contrast. The aim is harmony, not a craft project that yells from across the room. Unless yelling is your décor style. In that case, I respect your commitment.
Common Problems and How to Avoid Them
Cloudy results
This usually points back to moisture, contamination, or poor workspace conditions. Flowers must be thoroughly dried, and molds must be clean.
Floating flowers
Thin, lightweight botanicals can shift. Planning the composition and building the design carefully helps keep them where you actually want them instead of drifting into a petal traffic jam.
Too many bubbles
Bubbles often come from rushed handling, damp inclusions, or overworking the material. A calm, organized setup is your friend here. So is not treating the project like a speed round on a game show.
Faded petals
Some color change is normal with dried flowers. Starting with good-quality blooms, drying them in dark conditions, and choosing naturally sturdy varieties improves your odds.
Tacky or uneven finish
This is why label instructions matter. Resin rewards precision and punishes guesswork. It is less “free-spirited art” and more “beautiful chemistry with a pretty side hustle.”
Ways to Style and Use Finished Coasters
Once your floral resin coasters are done, the fun continues. Tie a set with ribbon for a housewarming gift. Make four coasters from flowers collected during one season for a meaningful memory set. Use birth-month flowers for birthday presents. Create a bridal set with blooms that match a wedding palette. Even a simple mix of white baby’s breath and gold accents can look boutique-worthy on a coffee table or bar cart.
You can also coordinate coaster sets by mood. Make one collection with meadow-inspired greens and creams, another with sunset tones, and another with cool blue tints and fern details. Suddenly you are not just making coasters. You are curating tiny tabletop galleries, which sounds dramatic, but honestly, it is true.
What the Experience Is Really Like: of Honest Resin-Coaster Reality
Making colorful resin coasters with dried flowers sounds dreamy in theory, and in many ways it is. You gather pretty blooms, line them up like tiny art supplies from a cottagecore fever dream, and imagine the finished set catching sunlight on your coffee table. But the real experience is a mix of creativity, patience, and a little humility. Resin has a way of reminding people that “crafty” and “careful” are supposed to be friends, not distant relatives who avoid each other at family reunions.
The first thing many people notice is how much the flower prep matters. You can spend a lot of time thinking about colors, molds, and final styling, but if the flowers are not dry enough, the whole project gets moody. That is why seasoned crafters tend to become almost weirdly protective of their dried petals. They do not toss them around. They do not rush the pressing stage. They store them flat, dry, and organized, like precious little botanical celebrities.
Another common experience is surprise over composition. When you lay flowers on the table, they may look random and charming. Once placed in a coaster shape, though, every petal suddenly feels louder. A flower turned slightly the wrong way can throw off the whole look. Too much filler can hide the focal bloom. Too little contrast can make the design feel sleepy. That is why mock layouts are so helpful. The best part? Once you start seeing how a coaster comes together, your eye gets better fast. By the second or third piece, most people become dramatically more decisive, as if they have been promoted to creative director of a very tiny botanical museum.
The waiting is also part of the experience. Resin is not one of those instant-gratification crafts where you slap things together, post a photo five minutes later, and move on with your life. There is setup, careful arranging, and then the hardest stage of all: leaving it alone. No poking. No checking every seven seconds. No hovering over it like a worried parent at a school concert. Letting the project cure undisturbed is part of what creates that smooth, polished finish people love.
And then comes the reveal. Demolding a finished coaster is one of the most satisfying moments in crafting. You get that glossy shine, the flowers look suspended in place, and the whole piece feels more substantial than most beginner projects. Even when a coaster is not perfect, it often still looks lovely. Small variations can add handmade character, especially when the flowers themselves are delicate and organic.
Perhaps the best part of the experience is how personal the project becomes. A set made from garden clippings feels different from one built with store-bought pressed flowers. A coaster that includes petals from a bouquet means something. A color palette chosen for a friend turns the finished piece into more than décor. It becomes a little story with edges. That is why people keep coming back to dried flower resin crafts. They are pretty, yes, but they are also memory-rich, display-worthy, and surprisingly emotional for something designed to sit under a mug.
Final Thoughts
If you want a DIY project that looks polished, feels personal, and gives your dried flowers a second life, colorful resin coasters are hard to beat. The key is not using more flowers, more color, or more sparkle. It is using the right flowers, the right layout, and the right amount of patience. Keep the design balanced, respect the safety rules, and let the botanicals do the talking.
In the end, that is what makes dried flower coasters so charming. They are practical enough for everyday life, pretty enough for gifting, and sentimental enough to keep. Not bad for something that starts with a few pressed petals and a very ambitious craft mood.