Table of Contents >> Show >> Hide
- Why Vertical Metal Siding Is Worth the Effort
- Before You Start: Know What Kind of Vertical Metal Siding You Have
- Tools and Materials You’ll Need
- Step 1: Make the Wall Flat, Solid, and Boring
- Step 2: Install the Water-Resistive Barrier and Flashing First
- Step 3: Plan the Layout Before You Touch the First Panel
- Step 4: Install Base Trim, Starter Trim, and Corner Trim
- Step 5: Cut Panels the Smart Way
- Step 6: Set the First Panel Perfectly
- Step 7: Continue Across the Wall Without Losing the Plot
- Step 8: Detail Windows, Doors, Corners, and Top Edges Carefully
- Common Mistakes to Avoid
- How Long Does It Take to Install Vertical Metal Siding?
- Experience and Lessons From Real Vertical Metal Siding Jobs
- Conclusion
Vertical metal siding has a way of making an ordinary wall look like it suddenly got promoted. It is crisp, modern, durable, and surprisingly good at turning a basic shed, garage, shop, or house into something that looks intentional instead of accidental. But good looks only happen when installation is done correctly. If the first panel is out of plumb, the flashing is sloppy, or the screws are driven like they owe somebody money, the finished wall will happily display every mistake in high definition.
This guide walks through how to install vertical metal siding the right way, from wall prep to the last trim piece. It covers general best practices that apply to many common steel siding and aluminum siding systems in the United States, including exposed-fastener panels and some concealed-fastener wall panels. The exact fastener pattern, overlap details, trim sequence, and clearance requirements will vary by manufacturer, so always compare this guide with the panel-specific instructions for the product you purchased. Think of this article as the smart friend on the jobsite, not the bossy foreman with your warranty paperwork.
Why Vertical Metal Siding Is Worth the Effort
There is a reason homeowners, builders, and barn people who take aesthetics very seriously keep choosing vertical metal siding. It sheds water efficiently, creates long clean lines, and usually requires less maintenance than wood or fiber cement. It also pairs well with modern farmhouse, Scandinavian, industrial, and agricultural styles. In plain English, it looks sharp and does not demand a yearly relationship talk about peeling paint.
That said, metal siding is unforgiving. It does not hide a wavy wall. It does not forgive lazy layout. And it definitely does not enjoy being cut with the wrong blade. The installation process matters as much as the panel itself.
Before You Start: Know What Kind of Vertical Metal Siding You Have
Exposed-fastener panels
These are common on shops, garages, utility buildings, accent walls, and many residential exteriors. You can see the screws after installation. They tend to be faster and more budget-friendly to install, but screw placement and washer compression have to be correct.
Concealed-fastener panels
These systems hide the fasteners behind interlocks, clips, or seams. They offer a cleaner, more architectural look, but they are more detail-sensitive. One wrong move can turn a sleek install into an expensive lesson in humility.
Before installing anything, confirm the panel width, coverage width, maximum span, substrate requirements, trim package, and approved fasteners. Do not assume one product installs just like another because they both look tall and metal. That is how jobsites become comedy, and not the fun kind.
Tools and Materials You’ll Need
- Vertical metal siding panels
- Manufacturer-approved screws, clips, or fasteners
- Color-matched trim pieces, closures, and flashing
- Water-resistive barrier or approved wall moisture barrier
- Flashing tape or flexible flashing for windows and doors
- Tape measure, chalk line, level, and framing square
- Screw gun with adjustable clutch or depth control
- Snips, electric shears, nibblers, or other cool-cutting tools
- Hand seamer for trim work
- Gloves, eye protection, and hearing protection
- Sealant approved by the panel manufacturer
- Brush or soft broom for cleanup of metal filings
One important note: do not use abrasive blades or any cutting method that overheats the panel coating. That shortcut often leads to damaged finishes and corrosion at the cut edge. In other words, the “faster” tool can become the slower problem.
Step 1: Make the Wall Flat, Solid, and Boring
The wall behind vertical metal siding should be plumb, square, and in plane. That sounds dull, but boring is beautiful here. If the framing bows, the sheathing swells, or the substrate waves in and out, the finished siding will advertise every flaw. Vertical panels are basically giant reflective rulers.
Check the wall with a long level or straightedge. Shim or correct any problem spots before you begin. Replace rotten sheathing, tighten loose framing, and make sure the substrate meets the siding manufacturer’s requirements. Some systems go over solid sheathing, while others may be installed over framing, furring, or subgirts in specific applications.
If you are retrofitting over an old wall, be especially careful. Old buildings have a magical ability to be square in theory and absolutely not square in real life.
Step 2: Install the Water-Resistive Barrier and Flashing First
Metal siding is an exterior cladding, not a submarine hatch. Water management still matters. Install a continuous water-resistive barrier behind the siding according to code and manufacturer requirements. The barrier should be lapped shingle-style so water drains downward and outward, not inward toward your sheathing.
At windows, doors, and penetrations, flashing comes before the pretty panels. Install sill flashing so any water that gets behind the cladding is directed back out. Then integrate jamb flashing and head flashing with the weather barrier. The goal is simple: every upper layer should overlap the layer below it so gravity can do its job instead of starting a mold internship inside your wall.
If your assembly includes a rainscreen gap, furring strips, or drainage mat, install those components before the siding. These details can improve drying and provide a flatter installation plane on some projects.
Step 3: Plan the Layout Before You Touch the First Panel
Measure the wall height and width carefully. Then measure again, because metal siding is one of those materials that punishes optimism. Determine where full panels will land, how the layout will terminate at corners, and whether you will need ripped panels at one side.
Snap a plumb control line for the first panel. This is the line that matters most. If the first panel starts crooked, every panel after it joins the parade. The wall may look fine from ten feet away, but from the driveway it will whisper, “Something is off,” for the next twenty years.
Also plan trim locations before panel installation. Base trim, starter trim, corner trim, jamb trim, sill trim, head trim, top trim, and transition flashing often need to go in place before the field panels. With many systems, trim is not a decorative afterthought. It is part of the water-shedding strategy.
Step 4: Install Base Trim, Starter Trim, and Corner Trim
Most vertical metal siding jobs begin at the bottom edge with base trim or starter trim, then move to corners and opening trims. These accessories help establish the panel position and close off edges against water and debris.
Install the base trim level. If the base is off, the panels will telegraph that mistake all the way to the top. At outside and inside corners, install the appropriate trim pieces per the manufacturer’s detail drawings. Around windows and doors, install sill and jamb trim first, then head trim where required by the system.
Take your time with trim overlaps, miters, and sealant locations. Many leaks blamed on “bad siding” are actually bad trim details wearing a clever disguise.
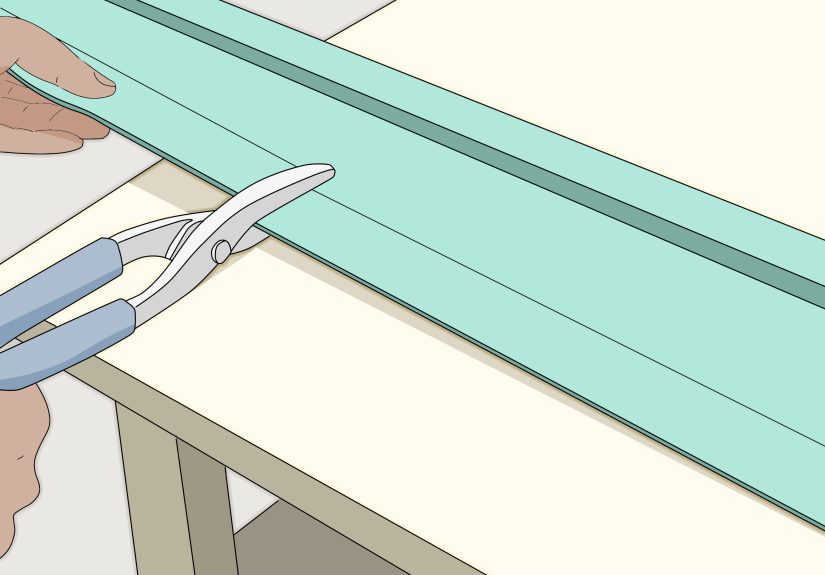
Step 5: Cut Panels the Smart Way
When a panel needs trimming, use tools that cut cool and clean, such as snips, shears, or nibblers. If you use a saw, it should be one approved for metal panels that does not generate damaging heat. Avoid abrasive blades. They can burn the protective coating, roughen the edge, and scatter hot filings onto the finished surface.
After every cut, remove metal shavings and debris from the panel face, laps, and work area. Tiny filings may look harmless, but left in place they can rust and stain painted metal. Metal swarf is the glitter of the construction world: once it gets everywhere, you will be finding it long after the party should have ended.
Step 6: Set the First Panel Perfectly
Place the first panel against your plumb line and seat it into the starter or base trim as required. Confirm that it is fully engaged at any interlock or edge detail. Then check it for plumb again before fastening. Not mostly plumb. Not emotionally plumb. Actually plumb.
On exposed-fastener systems, drive the screws where the manufacturer specifies. Use the correct screw type and length for wood or metal framing. Fasteners with sealing washers should be seated snugly, but not crushed. Overdriving can distort the panel and damage the washer seal. Underdriving leaves gaps. Both are bad. The screw should be tight enough to seal without dimpling the metal into a tiny regret crater.
On concealed-fastener systems, fasten clips or concealed flanges exactly where indicated. This is not the time for creative interpretation.
Step 7: Continue Across the Wall Without Losing the Plot
Install each new vertical panel so it fully engages with the previous one. Keep checking for plumb, alignment, and consistent reveal. Do not assume the wall is behaving just because the first few panels were cooperative. Buildings love plot twists.
If the panel system has side laps, align them according to the manufacturer’s detail. In some exposed-fastener systems, panels should be lapped away from the prevailing weather. Fastening patterns, lap screws, and trim attachments vary by profile, so follow the specific panel guide rather than guessing from a YouTube video filmed on a windy Tuesday in 2018.
Pause regularly and step back. Looking at the wall from a distance helps you catch cumulative drift, uneven reveals, and trim alignment issues before they become permanent features.
Step 8: Detail Windows, Doors, Corners, and Top Edges Carefully
Openings are where craftsmanship shows up and either earns applause or quietly leaves the room. At windows and doors, make sure the siding terminates cleanly into the appropriate jamb and head trim. Cut panels neatly, account for expansion and fit tolerances required by the system, and maintain the drainage path established by the flashing.
At corners, the goal is both appearance and weather resistance. Corner trim should fit tightly, cover cut panel edges, and remain aligned from bottom to top. At the top of the wall, use the proper top trim, soffit receiver, parapet cap, or transition flashing for the assembly. Metal siding should end with intention, not just run out of wall and hope for the best.
Also maintain proper clearance from grade, concrete, and splash zones. Panels installed too close to the ground are more vulnerable to moisture, dirt, impact, and corrosion over time.
Common Mistakes to Avoid
- Starting with a wall that is not flat or plumb
- Skipping or poorly integrating the water-resistive barrier
- Improper flashing around windows and doors
- Installing the first panel slightly out of plumb
- Overdriving fasteners and crushing sealing washers
- Using the wrong screws for the substrate
- Cutting panels with abrasive blades that damage the finish
- Leaving metal filings on the panel surface
- Treating trim as decoration instead of part of the weatherproofing system
- Ignoring the manufacturer’s panel-specific instructions
How Long Does It Take to Install Vertical Metal Siding?
That depends on the wall complexity, the number of openings, the panel system, and whether the installer planned ahead or showed up with confidence and one dull pair of snips. A simple shed wall may move quickly. A house with multiple windows, corners, gables, and detailed trim takes much longer.
In general, the prep and layout take more time than first-timers expect, and that is a good thing. Rushing the visible panel installation while skipping the invisible details is how people end up with a beautiful wall that leaks like a guilty conscience.
Experience and Lessons From Real Vertical Metal Siding Jobs
One of the biggest surprises people have when installing vertical metal siding is how much of the job is won before the panels even come out of the stack. On paper, the fun part seems to be the moment when long clean panels start climbing the wall. In reality, the quality of the finished project is usually decided during prep, layout, and trim work. That may not be glamorous, but it is true. The best-looking installs often come from crews who spend an almost suspicious amount of time measuring, snapping lines, and checking the substrate.
A common real-world lesson is that the first panel can feel strangely dramatic. It is just one panel, but it sets the tone for the entire wall. Installers who rush the first piece often spend the next several hours trying to “correct” the wall with tiny adjustments that never fully fix the problem. Installers who obsess over the first panel usually move faster later because the rest of the system has a reliable reference point. It is one of those rare moments in construction where being picky early actually saves time.
Another field lesson is that trim work separates decent jobs from impressive ones. Corners, windows, door openings, and top-of-wall terminations are where a project starts looking custom instead of basic. When the trims line up, overlaps are clean, and cuts are crisp, the whole building feels more finished. When those details are sloppy, even expensive panels look cheap. That is frustrating, because the panels usually get the credit, while trim quietly does half the heavy lifting.
People also learn quickly that metal siding does not respond well to impatience. Overdriven screws are a classic example. New installers often think tighter must be better, then end up dimpling the panel or crushing the washer seal. The result is a wall full of fasteners that look stressed out. A screw gun with clutch control makes a huge difference, and so does slowing down long enough to watch the washer seat properly.
Cutting is another area where experience teaches humility. Many first-time installers assume any saw that cuts metal is automatically good enough. Then they discover overheated cut edges, coating damage, metal filings everywhere, and a cleanup job that feels personal. The crews that know better use cool-cutting tools, protect the finish, and clean swarf immediately. It is not flashy, but it keeps the wall looking good long after the jobsite coffee has gone cold.
Perhaps the most useful lesson of all is that vertical metal siding rewards consistency. The best projects are rarely the result of a single heroic move. They come from repeating small good habits: check plumb, confirm trim fit, drive screws correctly, brush off filings, step back and inspect, then repeat. By the end, the wall looks sharp because nothing was left to chance. That is the beauty of a well-installed metal siding job. It feels clean, deliberate, and durable, like the building finally got its act together.
Conclusion
Installing vertical metal siding is not mysterious, but it is detail-driven. A successful job starts with a flat wall, a continuous drainage strategy, and carefully integrated flashing. From there, it is all about control: accurate layout, correct trim sequence, clean cuts, proper fastener installation, and constant checks for plumb and alignment. Get those fundamentals right, and vertical metal siding can deliver a durable, low-maintenance exterior that looks sharp for years.
In other words, do not try to charm the wall into cooperating. Measure it, prep it, flash it, trim it, and fasten it correctly. Metal siding respects discipline more than swagger.