Table of Contents >> Show >> Hide
- What “Gel Nails with Tips” Means (And Which Method You Should Use)
- What You’ll Need (Your No-Drama Shopping Checklist)
- Step-by-Step: Gel Nails with Tips (Full-Cover Soft Gel Tip Method)
- 1) Prep your natural nails like your retention depends on it (because it does)
- 2) Size your tips correctly (this step saves you from 87% of heartbreak)
- 3) Prep the inside of each tip (unless your tips are pre-etched)
- 4) Dehydrate + prime (thin layers, no puddles)
- 5) Apply gel adhesive strategically
- 6) Seat the tip at a 45-degree angle (goodbye bubbles)
- 7) Flash cure, then full cure
- 8) Refine the shape and seal the edges
- 9) Base coat (if needed), color, and top coat
- Alternative Method: Classic Tips + Builder Gel Overlay (Extra Durable)
- Common Mistakes (And How to Fix Them Without Crying)
- Safety & Nail Health: The Part Everyone Skips (Until They Wish They Didn’t)
- How to Remove Gel Nails with Tips (Without Wrecking Your Natural Nails)
- Make Your Gel Tips Last Longer (Because Life Is Too Short for Day-Three Lifting)
- FAQ: Quick Answers to Common “Wait, Can I…?” Questions
- Conclusion
- Real-World Experiences: What I Learned the Hard Way (So You Don’t Have To)
Want long, glossy gel nails with tipswithout donating your entire paycheck to the salon chair? Same. The good news: you can absolutely do gel extensions at home that look legit, feel comfy, and survive your keyboard, your dishes, and that one stubborn soda tab that always fights back. The less-good news: gel nails are like bakingmeasurements matter, timing matters, and if you “wing it,” something will probably lift, bubble, or slide into your cuticles like it pays rent.
This guide walks you through how to do gel nails with tips step-by-step (with the why behind each step), plus troubleshooting, safe removal, and real-world lessons so you can skip the “why do my nails look like tiny speed bumps?” era.
What “Gel Nails with Tips” Means (And Which Method You Should Use)
Option A: Full-Cover Soft Gel Tips (Gel-X style)
These are pre-shaped tips that cover your entire nail and are bonded on using a gel adhesive (often called extend gel, tip gel, or soft gel adhesive). You “flash cure” to lock placement, then “full cure” under an LED/UV lamp. This is the easiest route for most beginners because the shape is already built into the tip.
Option B: Traditional Tips + Builder Gel Overlay
This is the classic: a partial plastic tip is glued to the free edge, blended, then strengthened with builder gel and finished with gel polish. It takes more filing and shaping, but it’s great if you want extra structure (hello, apex) or you already have regular tips and nail glue.
Which should you pick?
- Beginner + fastest results: Full-cover soft gel tips.
- You love sculpting/structure or need extra strength: Tips + builder gel overlay.
- You want easy soak-off removal (usually): Soft gel tip systems designed for soak-off.
What You’ll Need (Your No-Drama Shopping Checklist)
Core tools
- Nail file (180/240 grit) + buffer
- Cuticle pusher (and optional nippers for dead skin only)
- Lint-free wipes
- Isopropyl alcohol or nail cleanser
- LED/UV lamp that matches your gel system
- Tip cutter (optional) and a dust brush
Core products
- Soft gel tips (full-cover) or classic tips
- Gel tip adhesive (for soft gel tips) or nail glue (for classic tips)
- Nail dehydrator + primer/bonder (brand-specific is best)
- Base coat (if required), gel color, and top coat
- Cuticle oil + hand cream (your post-mani peace treaty)
Nice-to-have upgrades
- Small “flash cure” light (handheld mini lamp)
- E-file (not required, but helpful for refining and removal)
- Builder gel (for overlays, strength, and shaping)
- Fingerless UV gloves or SPF for hands (more on this below)
Step-by-Step: Gel Nails with Tips (Full-Cover Soft Gel Tip Method)
This is the most popular at-home technique right now. Read through once before you startgel moves fast when you’re trying not to glue your fingers to your confidence.
1) Prep your natural nails like your retention depends on it (because it does)
- Wash hands, dry thoroughly, then sanitize tools.
- Push back cuticles gently. Remove only loose/dead cuticle tissuedon’t go to war with live skin.
- Lightly buff the nail surface to remove shine (think “softly scuff,” not “sand a table”).
- Remove dust and wipe nails with alcohol/cleanser until they squeak clean.
Pro tip: If gel lifts, it’s usually because something invisible was left behindoil, dust, or that sneaky “invisible cuticle” stuck to the nail plate.
2) Size your tips correctly (this step saves you from 87% of heartbreak)
Pick a tip that fits sidewall to sidewall without squeezing your nail. If you’re between sizes, choose the slightly larger one and file the edges to fit. A too-small tip causes pressure and lifting; a too-big tip floods product into places it shouldn’t be.
3) Prep the inside of each tip (unless your tips are pre-etched)
Many systems use tips that are already etched on the inside for better adhesion. If yours aren’t, lightly buff the inside where it will contact your natural nail. Then wipe away dust. This gives the adhesive gel a grippy surfacelike Velcro, but prettier.
4) Dehydrate + prime (thin layers, no puddles)
Apply dehydrator to remove moisture/oil. Then apply primer/bonder if your system calls for it. Let each product air-dry as directed. This is not the time for impatience… says the person who has absolutely done this too fast and paid the lifting tax.
5) Apply gel adhesive strategically
Most soft gel tip systems use adhesive gel on the natural nail, the tip, or both (follow your brand’s steps). Use a small beadenough to cover the contact zone once pressed, not enough to ooze out like frosting on a cupcake you didn’t ask for.
6) Seat the tip at a 45-degree angle (goodbye bubbles)
Hold the tip at about a 45-degree angle, touch down near the cuticle area (without touching skin), and slowly press forward toward the free edge. This pushes air out so you don’t trap bubbles underneath. Keep steady pressure.
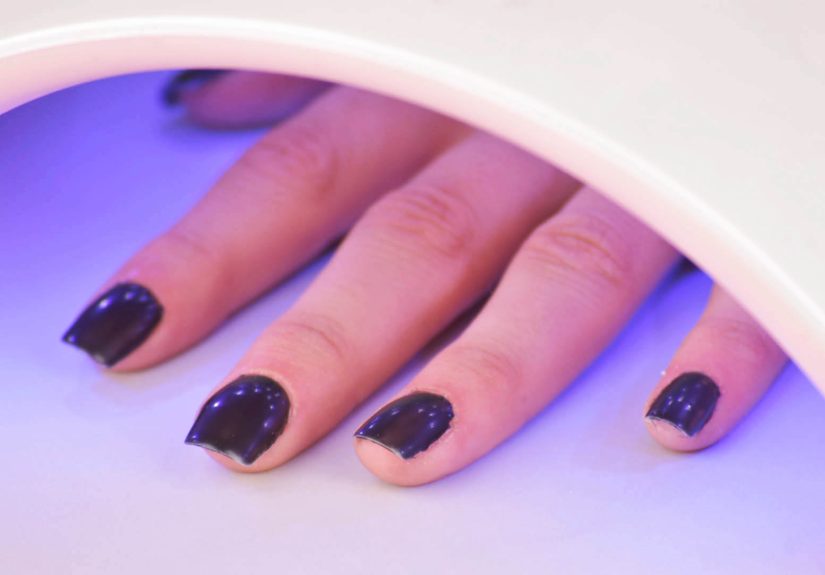
7) Flash cure, then full cure
While holding the tip in place, flash cure under a small light for a few seconds to lock it. After all tips are on, full cure under your main LED/UV lamp for the full recommended time. Thin coats often cure in roughly 30–60 seconds under many LED lamps, while UV lamps can take longer but always follow your product instructions because under-curing is a shortcut to lifting and irritation.
8) Refine the shape and seal the edges
- File the sidewalls and free edge to your preferred shape (almond, square, coffin, etc.).
- If there’s overflow gel, carefully remove it (don’t leave cured bumps near the cuticle line).
- Optional: add a thin builder gel overlay for extra strength, then cure and refine.
9) Base coat (if needed), color, and top coat
Apply gel products in thin, even coats. Cap the free edge to reduce chipping. Cure each layer for the recommended time. Finish with top coat and cure. If your top coat leaves a sticky inhibition layer, wipe it off with cleanser on a lint-free pad. Then apply cuticle oil, because hydration is the difference between “luxury” and “crispy.”
Alternative Method: Classic Tips + Builder Gel Overlay (Extra Durable)
1) Apply classic tips with nail glue
- Choose correct tip sizes.
- Apply a small amount of glue to the well of the tip.
- Place at an angle, press down, and hold until secure.
- Cut length if needed, then shape the free edge.
2) Blend the seam (optional, but it looks smoother)
Lightly file where the tip meets the natural nail to smooth the transition. Keep it gentleover-filing your natural nail is a one-way ticket to thin, bendy nails.
3) Build structure with builder gel
Apply a thin “slip layer,” then add a slightly thicker bead to build an apex (the high point) for strengthusually around the stress area of the nail. Let it self-level for a moment, then cure. After curing, refine with a file, remove dust, and proceed with gel color and top coat.
Common Mistakes (And How to Fix Them Without Crying)
Lifting near the cuticle
- Cause: Cuticle tissue left on nail, oil/dust, product touching skin, or under-curing.
- Fix: Improve prep, leave a tiny margin around the cuticle, cure fully, keep layers thin.
Air bubbles under tips
- Cause: Pressing straight down instead of rolling tip on, or using too little/much adhesive.
- Fix: Use the 45-degree “roll-on” technique and steady pressure; right-size the tip.
Gel flooding the cuticles
- Cause: Too much product or placing the tip too close to skin.
- Fix: Use less adhesive; keep a clean perimeter; clean overflow before curing.
Heat spikes during curing
That sudden “spicy” heat can happen with thicker gel layers. Use thinner layers, try a low-heat mode if your lamp has one, and briefly pull your hand out for a second if neededthen continue curing.
Safety & Nail Health: The Part Everyone Skips (Until They Wish They Didn’t)
Gel nails are generally fine when applied and removed correctly, but most problems come from user error: over-buffing, cutting cuticles, getting gel on skin, or curing incorrectly.
Protect your skin from UV exposure
- Apply broad-spectrum sunscreen (commonly SPF 30+) to hands before curing.
- Or wear dark, opaque fingerless gloves (fingertips cut off) during curing.
Avoid skin contact with gel
Repeated skin exposure to uncured gel can increase the risk of developing sensitivity/allergic reactions to acrylates used in many nail products. Keep gel off skin, cure fully, and don’t “test” sticky gel with your finger. (Yes, I’m calling out all of us.)
Know when to stop and get help
If you develop persistent itching, swelling, blistering, or burning around the nails, remove the product and consult a medical professional. Also: never work on broken skin.
How to Remove Gel Nails with Tips (Without Wrecking Your Natural Nails)
Removal depends on what you used. Some soft gel tip systems are designed to soak off; others (and many builder/hard gels) require filing down. When in doubt, follow the manufacturer’s instructions.
For soak-off soft gel tips (common Gel-X style systems)
- File off the top coat and remove bulk (don’t file into your natural nail).
- Soak with acetone using cotton + foil wraps (or a soaking tray) until product softens.
- Gently push off softened gel with a wooden stickno scraping like you’re digging for treasure.
- Lightly buff, then hydrate with cuticle oil and hand cream.
For builder gel/hard gel overlays
These are often not fully soak-off. File down most of the product and leave a thin layer if needed to protect the nail, especially if your nails are fragile. If you’re not confident, a professional removal is the safest play.
Make Your Gel Tips Last Longer (Because Life Is Too Short for Day-Three Lifting)
- Oil daily: Cuticle oil helps flexibility and keeps skin happy.
- Gloves for chores: Water + cleaners can weaken adhesion over time.
- Don’t use nails as tools: Your nail is not a screwdriver, a box cutter, or a tiny pry bar.
- Keep length realistic: Longer tips = more leverage = more lifting risk.
- Re-seal chips fast: File the snag and top coat to prevent peeling.
FAQ: Quick Answers to Common “Wait, Can I…?” Questions
How long do gel nails with tips last?
With good prep and proper curing, many people get around 2–3 weeks, sometimes longer, depending on growth, lifestyle, and length.
Do I need a UV lamp or LED lamp?
You need the lamp type your gel system is formulated for. Many modern gels cure under LED, but not all gels cure the same under every lamp. Mismatching products can lead to under-curing.
Can I use regular nail glue with full-cover tips and then paint gel over it?
Some people do, but gel tip systems are typically designed for gel adhesive + curing for the most reliable bond. If you mix methods, you may get shorter wear or tricky removal.
Why are my tips popping off?
Usually one of these: wrong tip size, poor prep (oil/dust/cuticle tissue), not enough curing, or product touching skin. Fix the prep and sizing firstthose two are the usual culprits.
Conclusion
If you remember only three things, make them these: prep like a pro, fit the tip correctly, and cure thoroughly. Do that, and gel nails with tips go from “mysterious salon magic” to “I did this myself and yes, I will be staring at my hands all day.”
Real-World Experiences: What I Learned the Hard Way (So You Don’t Have To)
The first time I tried gel tips at home, I approached it with the confidence of someone who had watched exactly two videos and owned exactly one nail file. Naturally, I thought, “How complicated can it be?” That’s the same sentence people say right before assembling a couch without reading the instructions.
Lesson one: tip sizing is everything. I picked tips that were a hair too small because I wanted them to look “snatched.” What I got instead was a slow-motion pop-off situation. Too-small tips pinch the sidewalls, and your nails will fight back usually while you’re doing something public, like paying for coffee or waving hello to someone you definitely want to impress. Now I size sidewall-to-sidewall, and if I’m between sizes, I go up and file down. It’s less “perfect out of the box,” more “perfect because you bothered.”
Lesson two: dust is the enemy. I used to buff, admire the matte finish, and then immediately apply product like a raccoon with a deadline. That invisible dust layer? It’s basically a tiny slip-n-slide between your nail and the gel. Once I started brushing off dust, cleansing with alcohol, and letting nails fully dry, my retention improved dramatically. Boring? Yes. Effective? Also yes.
Lesson three: less adhesive is more. Early on, I used a giant blob of gel adhesive because I assumed more product meant a stronger bond. Wrong. It meant overflow into the cuticle area, which then cured into a crunchy ridge that caught on hair, sweaters, and my last nerve. The fix was using a smaller bead and placing the tip with that slow 45-degree roll. The first time you do it right and see zero bubbles, it’s weirdly satisfyinglike peeling a sticker off cleanly.
Lesson four: flash curing is not a substitute for full curing. Flash cure is the “hold still, don’t blink” moment. Full cure is the “okay, now it’s actually set” moment. When I rushed and under-cured, my nails felt fine… until they didn’t. I also learned to keep fingers positioned properly under the lamp, especially thumbs, because thumbs love to hover just outside the light like they’re too cool for rules. They are not.
Lesson five: removal is part of the manicure. I used to pick at lifting edges (because chaos is apparently my hobby). That’s how you take off layers of your natural nail along with the gel. Now I file the top coat, soak if it’s soak-off, and gently nudge softened product away. Then I oil my cuticles like it’s my job. My nails are stronger, my skin is happier, and my future self doesn’t hate my past self. A true win.
Finally, my favorite “grown-up” tip: keep your first sets simple. The goal is not to start with 3D charms, chrome powder, and a French fade that requires advanced geometry. The goal is a clean application that lasts. Once your base technique is solid, you can add the fun stuff. Because a perfect glitter top coat means nothing if the whole nail pops off while you’re opening a mailbox. Ask me how I know.


