Table of Contents >> Show >> Hide
- Why Caulking Baseboards Makes Such a Big Difference
- Choose the Right Caulk for Baseboards
- Tools and Materials You Will Need
- Step 1: Clean and Inspect the Baseboards
- Step 2: Remove Old Caulk and Loose Paint
- Step 3: Tape for Razor-Clean Lines
- Step 4: Cut the Caulk Tube the Right Way
- Step 5: Apply a Smooth, Consistent Bead
- Step 6: Smooth the Caulk Before It Skins Over
- Step 7: Remove the Tape at the Right Time
- Step 8: Let the Caulk Dry Before Painting
- Common Baseboard Caulking Mistakes to Avoid
- How to Caulk Different Baseboard Situations
- Pro Tips for the Cleanest Lines Ever
- Real-World Experience: What Actually Helps When Caulking Baseboards
- Conclusion
- SEO Tags
Caulking baseboards is one of those small home projects that can make a room look suddenly expensive, as if a professional painter quietly visited while you were making coffee. The magic is not dramatic. There are no sledgehammers, no clouds of drywall dust, and no dramatic reveal music. It is just a thin, smooth line of paintable caulk sealing the tiny gap where your baseboard meets the wall. But when it is done well, the whole room looks sharper, cleaner, and more finished.
The tricky part? Caulk has personality. It can smear, glob, string, shrink, and somehow end up on your pants, your socks, and the dog. The good news is that clean caulk lines are not about luck. They come from choosing the right product, preparing the baseboards properly, cutting the tube correctly, applying a small bead, and smoothing it before it begins to dry. Once you understand the rhythm, caulking baseboards becomes less like fighting a sticky tube of toothpaste and more like drawing a neat finishing line around your room.
This guide walks through how to caulk baseboards for the cleanest lines ever, including what tools to use, which caulk works best, how to avoid common mistakes, and how to get a crisp, paint-ready finish even if you have never touched a caulk gun before.
Why Caulking Baseboards Makes Such a Big Difference
Baseboards are supposed to create a smooth visual transition between the wall and the floor. In reality, walls are rarely perfectly flat, floors may slope slightly, and trim can pull away over time. That leaves shadow lines, tiny cracks, and uneven gaps that make a freshly painted room look unfinished.
Caulk solves those small imperfections. It fills the narrow space between the top of the baseboard and the wall, hides minor seams at corners, and creates a continuous line that paint can glide over. The result is subtle but powerful. Your walls look straighter, your trim looks professionally installed, and the room feels cleaner.
Caulking baseboards also helps keep dust from collecting in gaps. In some cases, sealing small openings can reduce drafts or discourage insects from sneaking through tiny cracks. But for most interior rooms, the biggest benefit is visual. It is the difference between “we painted this room” and “we finished this room.”
Choose the Right Caulk for Baseboards
The best caulk for baseboards is usually a paintable acrylic latex caulk or a siliconized acrylic latex caulk. These formulas are flexible enough for small trim movement, easy to smooth, easy to clean with water while wet, and designed to accept paint. That last part matters. If you use pure silicone caulk on paint-grade baseboards, paint may bead up or refuse to stick, which is a fun little disaster no one invited.
Best caulk types for interior baseboards
For most living rooms, bedrooms, hallways, and offices, choose a white paintable acrylic latex caulk labeled for trim, molding, doors, windows, or baseboards. If the room has extra humidity, such as a bathroom, laundry room, or kitchen, consider a paintable caulk with mold- and mildew-resistant properties.
For high-movement areas, such as older homes where seasonal expansion is noticeable, a flexible trim sealant may be worth the upgrade. Look for terms like “elastomeric,” “flexible,” “molding and trim,” or “crack resistant.” These products tend to stretch better than bargain caulk and are less likely to split when the wall and trim shift slightly.
What to avoid
Avoid non-paintable silicone for standard painted baseboards. Silicone is excellent in wet areas like tubs and showers, but it is not the friendly choice when you need a crisp painted trim line. Also avoid using wood filler for the long wall-to-baseboard gap. Wood filler is better for nail holes, dents, and small wood repairs. Caulk is better for flexible seams where two surfaces meet.
Tools and Materials You Will Need
You do not need a contractor’s truck full of equipment. For clean baseboard caulking, gather these basics before starting:
- Paintable acrylic latex caulk or siliconized acrylic latex caulk
- Caulk gun with a smooth trigger and pressure release
- Painter’s tape
- Utility knife or caulk tube cutter
- Caulk finishing tool or gloved finger
- Damp microfiber cloth or sponge
- Putty knife or scraper
- Vacuum or tack cloth
- Wood filler for nail holes, if needed
- Knee pads or a folded towel
- Primer and trim paint
Do not skip the knee pads unless you enjoy learning exactly how hard your floor is. Caulking baseboards means spending time close to the ground, and comfort helps you work slowly enough to get neat results.
Step 1: Clean and Inspect the Baseboards
Great caulk lines start before the tube is even opened. Caulk sticks best to clean, dry, sound surfaces. Dusty baseboards, greasy kitchen trim, loose paint, or old crumbly caulk can prevent a smooth bond.
Start by vacuuming along the top edge of the baseboard. Then wipe the trim and lower wall with a damp cloth. For dirty baseboards, use mild soapy water, rinse with a clean damp cloth, and let everything dry completely. If the surface still feels slick or grimy, clean again. Caulk is not a magic blanket. It will not bond well to mystery kitchen film from 2017.
Inspect the gap. A narrow, consistent gap is perfect for caulk. If the gap is large, deep, or uneven, you may need a different repair first. Very wide gaps can swallow caulk, crack later, or look bulky. For larger spaces, consider using backer rod, shoe molding, quarter round, or correcting the trim installation before caulking.
Step 2: Remove Old Caulk and Loose Paint
If there is old caulk that is cracked, dirty, peeling, or lumpy, remove it instead of caulking over it. New caulk needs a clean surface to grip. Layering fresh caulk over failed caulk usually creates a thick ridge that looks worse and fails faster.
Use a utility knife, caulk removal tool, or putty knife to carefully cut and lift the old bead. Work gently so you do not gouge the wall or trim. Once the old caulk is removed, scrape away residue, wipe the area clean, and let it dry.
If you see nail holes or dents in the baseboard face, fill them with wood filler rather than caulk. Let the filler dry, sand smooth, and wipe away dust. Caulk belongs in seams. Wood filler belongs in holes. They are cousins, not twins.
Step 3: Tape for Razor-Clean Lines
Professional painters often caulk freehand, but painter’s tape is a fantastic helper if you want the cleanest lines ever. Tape controls where the caulk goes and gives you a crisp edge when removed at the right time.
Apply painter’s tape along the wall just above the gap, leaving only the narrow seam exposed. If needed, add a second strip on the top edge of the baseboard, especially if you are working with stained wood or a finished surface you do not plan to paint. Press the tape firmly so caulk cannot sneak underneath.
The exposed gap should be narrow. Do not create a huge runway for the caulk. A clean baseboard line usually needs a small bead, not a frosting layer. Think “fine detail brush,” not “cupcake decoration.”
Step 4: Cut the Caulk Tube the Right Way
The size of the hole in the nozzle controls the size of the bead. For baseboards, smaller is better. Cut the nozzle close to the tip at a 45-degree angle. A small opening gives you more control and reduces smearing.
After cutting the tip, puncture the inner seal with the rod on your caulk gun or a long nail. Load the tube into the caulk gun, press the trigger until caulk reaches the tip, and wipe away the first bit if it looks uneven.
Before touching the wall, practice on cardboard. Squeeze the trigger gently and move the gun at a steady speed. Your goal is a narrow, continuous bead. If it looks like a tiny rope, good. If it looks like a marshmallow trying to escape, cut less next time and slow down.
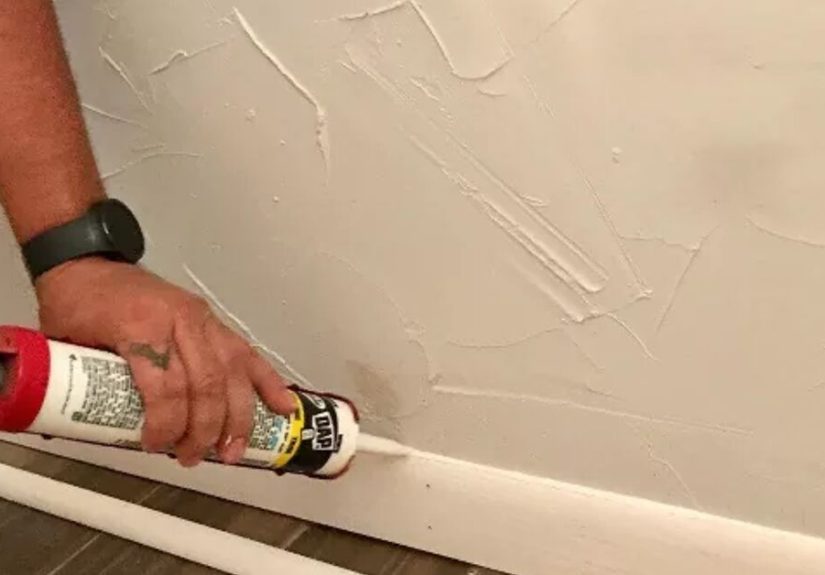
Step 5: Apply a Smooth, Consistent Bead
Hold the caulk gun at about a 45-degree angle with the angled nozzle seated lightly in the gap. Start in a corner or another less noticeable spot. Squeeze the trigger with steady pressure while moving the gun along the seam.
Work in short sections of about two to three feet. This gives you time to smooth the bead before it starts to skin over. Long, heroic passes may look impressive until the first half dries before you can tool it. Caulk rewards patience, not speed-running.
Try pulling the gun toward you rather than pushing it away. Pulling often gives better control because the nozzle glides along the joint and leaves caulk behind evenly. Keep the bead small. You can always add a little more, but removing a giant smear from a textured wall is the DIY version of regret.
Step 6: Smooth the Caulk Before It Skins Over
Smoothing, also called tooling, is what turns a bead of caulk into a clean professional line. Use a caulk finishing tool or a gloved finger lightly dampened with water. Glide along the bead with gentle pressure, pushing the caulk into the gap and removing the excess.
Do not press so hard that you scoop the joint empty. The goal is a smooth concave line that bridges the wall and baseboard. Wipe your finger or tool frequently with a damp cloth. A dirty smoothing tool drags extra caulk across the wall and creates ridges.
If you notice a skip, bubble, or thin spot, add a tiny amount of caulk and smooth again. Fix problems while the caulk is wet. Once it dries, the repair becomes scraping, sanding, and muttering under your breath.
Step 7: Remove the Tape at the Right Time
If you used painter’s tape, remove it while the caulk is still wet and freshly tooled. Pull the tape slowly at an angle away from the caulk line. This helps create a sharp edge without lifting the bead.
Do not wait until the caulk fully dries. Dried caulk can bridge onto the tape, and removing the tape later may tear the edge. If a tiny ridge remains after tape removal, lightly smooth it with a damp finger before the caulk sets.
Keep a small trash bag nearby for used tape. Caulk-covered tape has a mysterious talent for sticking to everything except the trash can.
Step 8: Let the Caulk Dry Before Painting
Always read the product label for dry time and paint-ready time. Some fast-dry caulks can be painted in as little as 30 minutes, while others need several hours or longer depending on temperature, humidity, bead size, and product formula.
Do not rush paint over wet caulk. Paint can crack, wrinkle, or stay tacky if the caulk underneath has not dried properly. Cooler rooms and humid conditions slow drying, so give the bead extra time if the air feels damp.
Once the caulk is dry, paint the baseboards and caulk line together for the most seamless finish. A fresh coat of trim paint helps the caulk disappear and gives the baseboards a clean, intentional look.
Common Baseboard Caulking Mistakes to Avoid
Using too much caulk
This is the most common mistake. A fat bead is harder to smooth, more likely to crack, and more obvious after painting. Start small. A neat little bead beats a bulky one every time.
Skipping surface prep
Dust, old caulk, peeling paint, and grease can ruin adhesion. Clean first, caulk second. It is not glamorous, but neither is redoing the job next weekend.
Cutting the nozzle too large
A giant nozzle opening turns a controlled trim project into a messy paste parade. Cut near the tip for a narrow bead. You can always cut more if needed.
Waiting too long to smooth
Caulk begins forming a skin as it sits. Tool it right after applying each short section. Smooth, tape removal, cleanup, then move on.
Using non-paintable caulk
If the baseboards will be painted, the caulk must be paintable. Check the label before buying. Future you, holding a paintbrush, will be grateful.
How to Caulk Different Baseboard Situations
Freshly installed baseboards
For new trim, fill nail holes with wood filler, sand smooth, vacuum dust, prime if needed, and caulk the top seam before final painting. Caulk corners and small joints, but do not rely on caulk to hide poor cuts. Tight trim work still matters.
Old baseboards with uneven walls
Older homes often have wavy plaster or drywall. Use flexible paintable caulk and work in short sections. Taping can help create a visually straight line even when the wall itself is not perfect.
Stained wood baseboards
Be careful with stained trim because white caulk may stand out. Use tape on both sides and consider a color-matched paintable sealant if the caulk will remain visible. For valuable woodwork, test in a hidden area first.
Bathrooms and laundry rooms
Choose a paintable caulk with moisture, mold, and mildew resistance. Keep the bead neat, let it dry fully, and make sure the area is well ventilated. Around tubs or showers, use products designed for wet applications, but for painted baseboard-to-wall seams, paintable trim caulk is usually still the better finish choice.
Pro Tips for the Cleanest Lines Ever
Keep a damp cloth in one hand and the caulk gun in the other. Cleanup is easiest while caulk is wet. Once it dries, removal takes scraping and patience.
Start behind a door, in a closet, or along a less visible wall. By the time you reach the main sightline of the room, your hand will be steadier.
Move furniture away from the walls before starting. Trying to caulk behind a bookcase at a weird angle is how nice lines go to retire.
Use good lighting. A portable work light placed low along the wall can reveal gaps, ridges, and missed spots before they become permanent little surprises.
Do not caulk every shadow you see. Some gaps at the bottom of baseboards may be better handled with shoe molding or quarter round, especially when flooring is uneven. Caulk is best for narrow seams, not structural cover-ups.
Real-World Experience: What Actually Helps When Caulking Baseboards
After you have caulked a few rooms, you start to notice that the project is less about raw skill and more about setup. The rooms that turn out best are the ones where you slow down before applying the first bead. Move the furniture. Vacuum the edges. Wipe the baseboards. Put on knee pads. Open the caulk and practice on cardboard. These small steps sound boring, but they are the difference between a clean line and a sticky crime scene.
One practical lesson is that the first five minutes are usually the messiest. Even experienced DIYers need a moment to feel the flow of the caulk gun. That is why starting in a hidden area is so helpful. A section behind a door or beside a closet gives you room to adjust your pressure, angle, and speed. By the time you reach the wall everyone sees when they walk into the room, your bead will look much more controlled.
Another real-world tip: do not trust your eyes from standing height. A baseboard line can look fine while you are crouched down, then look wavy once you stand across the room. After finishing one wall, step back and look at it from normal viewing distance before the caulk dries. If something looks too thick or uneven, fix it while it is still workable.
Humidity also matters more than people expect. In a cool, damp room, caulk may stay soft longer and paint may not behave well if applied too soon. In a warm, dry room, the surface may skin over faster, which means shorter working sections are smarter. The label is your best guide, but the room conditions decide how patient you need to be.
Painter’s tape is another place where experience changes your approach. Beginners often tape too far away from the gap, leaving a wide caulk line. A better method is to tape close to the seam so only the gap and a tiny margin are exposed. Remove the tape right after tooling, not after lunch, not after answering three messages, and definitely not the next day. Wet removal gives you the crispest edge.
Finally, accept that caulking is forgiving while wet and stubborn when dry. Keep cleaning as you go. Wipe tools often. Do not leave blobs in corners. If a section looks awful, scrape it out immediately and redo it. There is no shame in restarting a two-foot section. There is, however, mild emotional damage in staring at a lumpy caulk line for the next six years.
Conclusion
Learning how to caulk baseboards for the cleanest lines ever is mostly about control. Choose paintable acrylic latex caulk, clean the surface, remove old material, cut a small angled opening, apply a narrow bead, smooth it promptly, and pull tape while the caulk is still wet. The process is simple, but the details matter.
Done correctly, baseboard caulking makes walls look straighter, trim look sharper, and paint look more professional. It is one of the most affordable finishing touches you can add to a room, and once you get the hang of it, you may start noticing every uncaulked baseboard in your house. Sorry about that. But at least now you know exactly how to fix them.
Note: This article is written in original standard American English for web publication and intentionally omits source links inside the HTML content as requested.


