Table of Contents >> Show >> Hide
- First, a Quick Reality Check: Which “Amazon Downloads” Can You Burn?
- What You’ll Need (So You Don’t Get Stuck Mid-Burn)
- Step 1: Download Your Purchased Amazon Music to Your Computer
- Step 2: Choose the Right Disc Type (Audio CD vs MP3/Data CD)
- Step 3 (Windows): Burn an Audio CD Using Windows Media Player (Legacy)
- Step 4 (Windows): Burn a CD Using iTunes for Windows
- Step 3 (Mac): Burn a CD Using the Music App
- Pro Tips for a CD That Actually Plays Everywhere
- Troubleshooting: Fix the Most Common Problems
- Quick FAQ
- Real-Life Experiences: 5 Lessons I Learned Burning Amazon Downloads to CD (Yes, This Is Still a Thing)
- Conclusion
Yes, it’s 2026 and we’re talking about CDsthose shiny little coasters that somehow still live in every glovebox, old stereo,
and “misc cables” drawer on Earth. But burning a CD from your Amazon music downloads can still be genuinely useful:
maybe your car stereo has a CD slot but thinks Bluetooth is a myth, you’re making a gift for someone who proudly owns
a boombox, or you just want a physical backup that doesn’t depend on Wi-Fi behaving.
This guide walks you through the right way to burn a CD from Amazon-purchased downloads
with clear steps for Windows and Mac, plus the most common “why is this not working?”
fixes (because disc burning is basically a hobby in problem-solving).
First, a Quick Reality Check: Which “Amazon Downloads” Can You Burn?
The biggest confusion is that “Amazon Music” can mean different things:
-
Purchased MP3s (yours to download): These are songs/albums you bought (often called “Purchased” in your Amazon Music Library).
You can download them to your computer as standard audio files (commonly MP3) and burn them to a CD. -
Streaming/offline downloads (not regular files): Music from subscription streaming (like “Unlimited” or “All-Access” playlists)
is typically stored as protected offline content inside the app. Those tracks generally can’t be copied to a CD.
Translation: If you can locate the songs on your computer as normal music files (like .mp3),
you’re good. If they only exist as “offline” inside the Amazon Music app, you’ll need to purchase the tracks first
(or use another legitimate source you own).
What You’ll Need (So You Don’t Get Stuck Mid-Burn)
Hardware
- A computer with a CD/DVD burner (internal or an external USB drive).
- Blank discs: CD-R is the safest choice for compatibility; CD-RW is reusable but can be pickier in older stereos.
Software
- Windows: Windows Media Player (Legacy) or iTunes for Windows (still used for burning playlists).
- Mac: The Music app can burn playlists if your Mac has a compatible disc drive connected.
- Optional: Third-party burning apps (helpful if you want more control, but not required).
Music Files
- Your Amazon-purchased downloads saved locally on your computer (ideally MP3).
Step 1: Download Your Purchased Amazon Music to Your Computer
Before you burn anything, you need the songs as actual files on your computer.
The simplest approach is to download from the “Purchased” section of your Amazon Music Library.
Option A: Download with the Amazon Music desktop app (Windows/Mac)
- Open the Amazon Music desktop app.
- Go to Library and choose Songs or Albums.
- Select Purchased to show the music you own.
- Use the menu next to a song/album and choose Download.
Tip: After downloading, locate the files. Many systems save purchased downloads inside an Amazon Music folder
(often within your Music directory), but the exact location can vary depending on settings.
If you’re not sure where they landed, use your computer’s search and look for the song title or “.mp3”.
Option B: Download from a web browser
- Sign in to your Amazon account on the web.
- Go to your purchased music and choose the Download option for the track/album.
- Save the files somewhere you can easily find (like a folder named CD Burn on your desktop).
Once you’ve got the files locally, you’re ready for the fun part: turning invisible digital music into a physical disc
that can survive your car’s summer dashboard heat (mostly).
Step 2: Choose the Right Disc Type (Audio CD vs MP3/Data CD)
This choice decides whether your CD works everywhereor only on devices that “speak MP3.”
Audio CD (best for compatibility)
- Plays in most car stereos, boom boxes, and standard CD players.
- Limited by time, not file size: typically around 74–80 minutes of music per disc.
- Your MP3s get converted into CD audio format during the burn process.
MP3 CD or Data CD (best for “lots of songs”)
- Stores MP3 files as files (like a USB drive, but round).
- Can hold hundreds of songs depending on bitrate and disc capacity.
- Only plays in devices that explicitly support MP3/data playback.
Rule of thumb: If this disc is meant for a car stereo or a gift for someone who still owns a CD tower,
choose Audio CD. If you’re burning for a modern-ish device that supports MP3 discs, MP3/Data is fine.
Step 3 (Windows): Burn an Audio CD Using Windows Media Player (Legacy)
Windows has two “Media Player” worlds: the newer app experience and the older “Windows Media Player” interface.
Disc burning is typically found in Windows Media Player (Legacy).
Burn an Audio CD
- Open Windows Media Player (Legacy).
- Click the Burn tab (usually top-right).
- Click Burn options and select Audio CD.
- Insert a blank CD-R into your disc burner.
- Find your Amazon MP3 files in the library (or drag them from File Explorer into Windows Media Player first).
- Drag songs into the burn list (the panel on the right).
- Reorder tracks by dragging them up or down (track order mattersespecially for that “one perfect road-trip transition”).
- Click Start burn.
If you don’t see the Burn tab
- Make sure you’re not using the newer Media Player app interface.
- Try searching your Start menu for Windows Media Player Legacy.
- Confirm your PC actually detects the disc drive (it should appear in File Explorer).
Step 4 (Windows): Burn a CD Using iTunes for Windows
iTunes is still a solid “press play, press burn” optionespecially if you like playlist-based burning.
Burn an Audio CD from a Playlist
- Install and open iTunes on Windows.
- Go to File > Add Folder to Library (or Add File) and select your Amazon MP3 folder.
- Create a playlist: File > New > Playlist.
- Drag the songs into your playlist in the order you want.
- Insert a blank disc.
- Right-click the playlist and choose Burn Playlist to Disc.
- Select Audio CD and choose options like gap between songs and burn speed.
- Click Burn.
Speed tip: Slower burn speeds can reduce errors, especially with older players.
If you’ve ever had a CD skip on track 7 every single time like it’s cursed, speed is one of the first things to adjust.
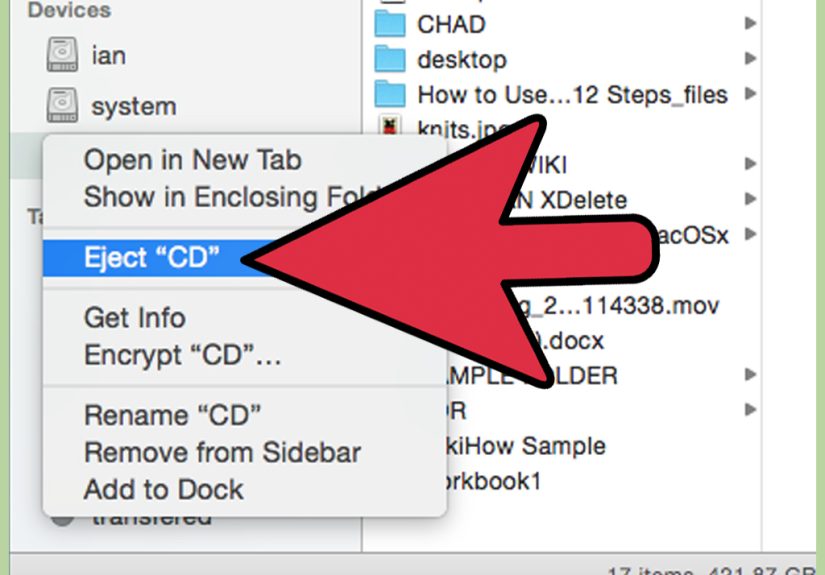
Step 3 (Mac): Burn a CD Using the Music App
On macOS, the Music app can burn a playlist to discassuming you have a compatible disc drive connected.
Create a Playlist and Burn It
- Open the Music app.
- Import your Amazon MP3s: File > Import (or drag the files into Music).
- Create a playlist: File > New > Playlist.
- Add songs to the playlist and arrange them in order.
- Insert a blank disc into your connected CD/DVD burner.
- Select the playlist, then choose File > Burn Playlist to Disc.
- Choose a format (Audio CD, MP3 CD, or Data CD), adjust burn settings if needed, and start burning.
If the “Burn Playlist to Disc” option is unavailable, it usually means the playlist contains items that can’t be burned
due to restrictions or authorization issuesso stick with local MP3 files you own and can play normally.
Pro Tips for a CD That Actually Plays Everywhere
1) Use CD-R for maximum compatibility
CD-RW is convenient, but some older players (especially car stereos) can be picky. If you’re gifting the disc or using it
in older hardware, CD-R is usually the safer bet.
2) Keep an eye on minutes, not megabytes (for Audio CDs)
For audio CDs, you’re constrained by total runtimeoften around 74–80 minutes. If your burn list goes over,
your software may refuse to burn or will force you to remove tracks.
3) Avoid “mystery formats”
Purchased Amazon tracks are commonly MP3, which is ideal. If you’re mixing in other formats (AAC, WAV, FLAC),
most burning apps can convert them for an audio CD, but conversions can add time and sometimes cause hiccups.
4) Burn slower if you get errors
If your burns fail, skip, or won’t play in a stereo, try reducing the burn speed. It’s like toasting bread:
too fast looks fine until you bite into it and realize the middle is basically still dough.
5) Finalize the disc (most apps do this automatically)
A disc that isn’t finalized can behave like a “works on my computer” situationfine on the machine that burned it,
confusing everywhere else.
Troubleshooting: Fix the Most Common Problems
Problem: “I can’t burn Amazon Music Unlimited/offline downloads.”
That’s expected. Subscription/offline content is generally not stored as standard MP3 files you can copy externally.
The solution is to burn purchased downloads (or other music you own as normal files).
Problem: “Windows Media Player doesn’t show burning options.”
- Make sure you opened Windows Media Player (Legacy), not the newer Media Player app.
- Confirm your disc drive appears in File Explorer.
- Try restarting the app after inserting the disc.
Problem: “The CD burns, but my car stereo won’t play it.”
- You may have burned a Data/MP3 CD. Try burning as an Audio CD instead.
- Try a CD-R instead of CD-RW.
- Burn at a slower speed and try a new blank disc.
- Some players dislike certain brands of discs (yes, really). If it fails consistently, try a different brand.
Problem: “My burn fails halfway through.”
- Use a new disc (even new discs can be defective).
- Close other apps (burning is a surprisingly dramatic activity for your drive).
- Try a slower burn speed.
- If your external drive is acting weird, unplug/replug it and try again.
Quick FAQ
Can I burn music directly from the Amazon Music streaming app?
Typically no. You’ll want to download purchased tracks as local files first.
Should I burn an Audio CD or an MP3 CD?
If you need broad compatibility (car, stereo, older players), burn an Audio CD.
If you’re sure your target player supports MP3 discs and you want more songs per disc, choose MP3/Data CD.
What’s the easiest way to find my downloaded Amazon files?
Put them in one obvious folder before burning (like Desktop > CD Burn). If you can’t find them, search your computer
for the song title or “.mp3”.
Real-Life Experiences: 5 Lessons I Learned Burning Amazon Downloads to CD (Yes, This Is Still a Thing)
The first time I burned a CD from Amazon downloads, I was feeling extremely confident for someone who was about to
be humbled by a plastic circle. The plan was simple: make a road-trip mix for a friend whose car stereo had exactly two
featuresFM radio and a CD slot. Bluetooth? Never heard of her. AUX cable? “Is that a vitamin?” So I grabbed a stack
of blank discs, downloaded a bunch of purchased MP3s from Amazon, and assumed the rest would be as easy as clicking
“Burn” and walking away like a movie hacker.
Lesson #1: “Amazon Music” is not one single thing. I originally tried to use songs that were available in streaming,
because they showed up in my Library and I could play them offline. But “offline” inside an app doesn’t automatically mean
“real files you can drag onto a disc.” Once I switched to music I had actually purchased (and downloaded as MP3 files),
the process got dramatically smoother. The weird part is that everything looks similar until you try to export it. That’s when
you learn which tracks are truly yours to handle like normal audio files.
Lesson #2: Track order is a personality test. I spent an unreasonable amount of time arranging songs for “vibes,”
then remembered audio CDs don’t care about your vibesthey care about minutes. I had to cut three tracks not because of
file size, but because the total runtime was too long. The final list was still great, but I definitely mourned the one song that
would have made the ending perfect. If you’re doing an audio CD, check the total minutes early so you’re not making
emotional edits at the last second.
Lesson #3: MP3 CDs are amazing… until you put them in the wrong player. At one point I burned a data/MP3 CD by accident.
On my computer, it played fine. In the car stereo, it behaved like I’d inserted a slice of cheddar cheese. That’s when I learned
the difference between an audio CD (universal) and a data/MP3 disc (selectively tolerated). After reburning as an Audio CD,
it played instantly. If your goal is compatibility, Audio CD is the “don’t make me think” choice.
Lesson #4: Burn speed is like cookingslow can be better. I burned the first disc at a higher speed because I was impatient.
It played… mostly. Then it skipped during the one chorus everyone knows, which is basically the CD equivalent of tripping in
public and pretending you meant to do that. I reburned the same playlist at a slower speed and the skipping disappeared.
If you’re burning for older stereos (or you’re using a budget external drive), slower is often safer.
Lesson #5: Labeling matters more than you think. I labeled the disc with a marker that turned out to be a little too “wet,”
and the ink smudged so badly the title looked like a haunted prophecy. After that, I used a soft-tip marker and wrote lightly.
I also added a simple tracklist on paper and tucked it into the casebecause the moment someone likes your mix,
they’ll ask “What’s track 4?” and you’ll want to look prepared instead of scrolling through your memory like it’s buffering.
The best part? The CD worked exactly as intendedno accounts to sign into, no app updates, no “this track is unavailable
in your region,” and no surprise buffering when you hit a dead zone on the highway. Sometimes old tech wins because it’s
stubbornly simple. And if you’re burning a CD from Amazon downloads today, you’re not being outdatedyou’re being
strategically compatible.
Conclusion
Burning a CD from Amazon downloads is straightforward once you start with the right kind of files: purchased tracks you can download
as normal audio files. From there, choose Audio CD for maximum compatibility, use Windows Media Player (Legacy),
iTunes for Windows, or the Music app on Mac, and lean on the practical fixes if something goes sideways.
The result is a physical disc that plays without Wi-Fi, doesn’t depend on app logins, and still feels oddly satisfying
like you just crafted a tiny time capsule of music.