Table of Contents >> Show >> Hide
- Why Old Bush Rows Start Looking So Wrong
- Should You Dig Them Up, Prune Them Back, or Move Them?
- Before You Dig: Prep Like a Sane Person
- How to Dig Up a Dated Row of Bushes
- What If You Want to Save a Shrub Instead?
- How to Redesign the Bed So It Does Not Look Dated Again
- Common Mistakes to Avoid
- The Real Payoff of Removing an Old Bush Row
- Experience: What Digging Up a Dated Row of Bushes Actually Feels Like
- Conclusion
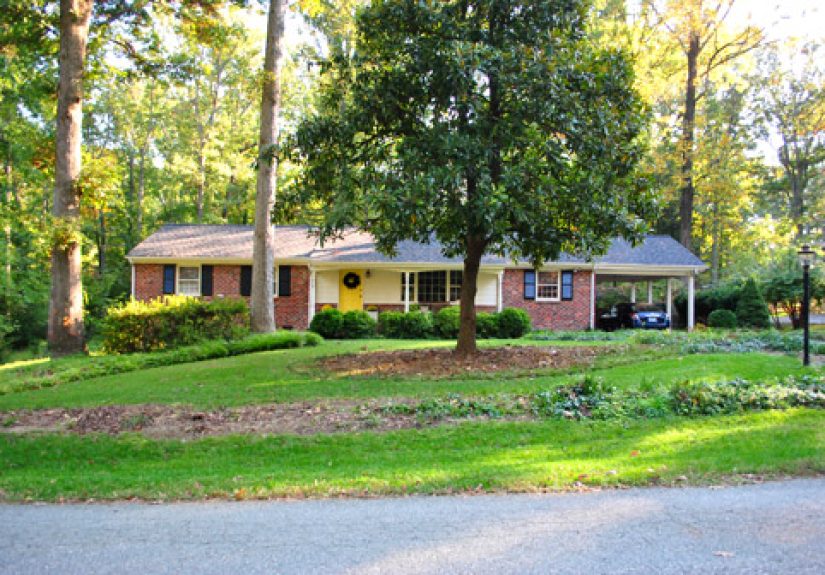
If your front yard still looks like it was landscaped during the era of shoulder pads, fax machines, and aggressively sheared hedges, you are not alone. A long row of old bushes across the front of a house was once the default move. The problem is that many of those shrubs are now too big, too woody, too close to the foundation, and too committed to blocking every window in sight. What once looked neat and formal can now make a home feel dark, crowded, and older than it really is.
That is why digging up a dated row of bushes can be one of the most satisfying landscape updates you can make. It is part demolition, part design reset, and part therapy. You are not just removing plants. You are removing a common landscaping mistake and giving your home a chance to breathe again. Done right, this project can improve curb appeal, open up sightlines, reduce maintenance, and create space for a more modern planting plan.
Before you go full shovel-warrior, though, it helps to know whether those old shrubs should be pruned, transplanted, or removed altogether. It also helps to know how to get them out without wrecking your back, your foundation bed, or your weekend mood. Let’s dig in. Literally.
Why Old Bush Rows Start Looking So Wrong
A row of foundation shrubs usually becomes “dated” for the same reasons a basement rec room becomes dated: it was built for a different era and then never adjusted. Many older landscapes relied on evenly spaced evergreen shrubs planted in a straight line along the front of the house. At first, that looked tidy. Then time happened.
Shrubs matured. Roots expanded. Branches pushed against siding. Windows disappeared behind foliage. Airflow dropped. Pruning got more aggressive, and the plants responded by getting even denser on the outside and woodier on the inside. Eventually you are left with a row of green meatballs or a hedge wall that looks like it resents you personally.
This is also why repeated pruning is not always the answer. Some shrubs respond well to renewal pruning. Others become bare, awkward, or permanently misshapen after years of shearing. If the plants are too large for the space, pruning may keep them temporarily smaller, but it will not magically make them the right plants for that location. At some point, removal becomes the smarter move.
Should You Dig Them Up, Prune Them Back, or Move Them?
Not every old row of bushes needs to be removed. Some just need a hard reset. Before you start swinging loppers like you are in a landscaping action movie, evaluate the shrubs one by one.
Keep and Rejuvenate Them If…
The shrubs are healthy, multi-stemmed, and simply overgrown. Deciduous shrubs like some spireas, forsythias, dogwoods, and privets can often be renewed by removing the oldest stems over a few years or by cutting them back hard at the right time. This works best when the root system is strong and the plant still has the ability to push fresh growth from the base.
If your shrub has good bones but bad manners, pruning may be enough. That is especially true if you like the species, the location is workable, and the problem is mainly shape rather than size.
Transplant Them If…
The shrubs are healthy, valuable, sentimental, or still appropriate for another part of the yard. Some shrubs can be moved successfully, especially when they are transplanted during dormancy and the root ball is handled carefully. Smaller shrubs are much easier to move than mature monsters with roots that could qualify for their own ZIP code.
Azaleas and similar shallow-rooted shrubs are often better transplant candidates than large, deep-rooted evergreens. If the plant matters to you and you have a suitable new location ready, moving it may be worth the effort.
Remove Them If…
The shrubs are jammed against the house, covering windows, constantly need shearing, have dead interiors, show poor form, or are simply wrong for the site. Removal is often the best option for old, woody evergreens that do not regenerate well from hard pruning. It is also the right call when the row creates a flat, outdated look that drags down the whole façade.
There is no shame in replacing a tired planting. Landscapes are not museum exhibits. They are supposed to evolve.
Before You Dig: Prep Like a Sane Person
The fastest way to turn a landscape update into a regrettable life lesson is to start digging without preparation. A little setup can save hours of frustration.
Call 811 First
Yes, even for shrubs. Utility lines do not care that your project is “small.” Buried lines can run through foundation beds, side yards, and random places that seem unfair. Call 811 before you dig so underground utilities can be marked. This is not optional if you enjoy electricity, gas service, and avoiding spectacularly bad afternoons.
Water the Area a Day or Two Ahead
Moist soil is easier to dig than bone-dry ground. You do not want mud soup, but you also do not want concrete disguised as dirt. Watering ahead of time softens the soil and makes root removal less brutal.
Gather the Right Tools
- Bypass pruners for small stems
- Loppers for thicker branches
- A pruning saw for woody stems and roots
- A sharp spade or pointed shovel
- A mattock or digging bar for stubborn roots
- Gloves, eye protection, long pants, and sturdy shoes
- A tarp or yard bags for debris
If the shrubs are huge, ancient, or planted in rock-hard clay, renting better tools or hiring help may be smarter than pretending your lower back is still twenty-three.
How to Dig Up a Dated Row of Bushes
1. Cut the Top Growth Back First
Start by reducing the shrub to a manageable size. Cut out outer branches and bulky top growth so you can see the structure and reach the base. This step makes the plant lighter, improves access, and prevents the branches from slapping you in the face every thirty seconds.
For very large shrubs, take them down in stages. Cut the branches into smaller sections and pile them on a tarp. You are not trying to win a speed record here. You are trying to stay in one piece.
2. Expose the Base of Each Shrub
Once the top is cleared, you should be able to see the main stems and crown. Dig around the base in a circle or trench to expose the root flare and major roots. This is where the project shifts from pruning job to archaeology dig. Expect surprises.
Foundation shrubs often have roots that extend farther than you think. In older beds, the roots of neighboring shrubs may also be tangled together, which means removing one can feel like pulling a thread from a very stubborn sweater.
3. Cut the Roots Methodically
Use your spade, pruning saw, or mattock to sever the larger roots around the shrub. Work in a full circle. The goal is not to hack wildly and hope for the best. The goal is to disconnect the plant from the surrounding soil as cleanly as possible.
If the shrub is small, you may be able to pry it out once several major roots are cut. If it is older and woody, expect resistance. Old shrubs rarely leave quietly.
4. Pry and Lift the Root Ball
After enough roots are severed, use the shovel or mattock to pry the stump and root mass upward. Rock it back and forth. Cut any roots still holding on. Then lift or drag the shrub out of the hole. Repeat along the row, one plant at a time.
Do not be surprised if the second or third bush feels harder than the first. Landscaping has a sneaky way of rewarding optimism with fatigue.
5. Deal With Stumps and Leftover Roots
If you are replanting in the same bed, remove as much of the old root mass as you reasonably can. Small leftover roots will break down over time, but giant woody chunks can interfere with new planting and make the bed uneven. Flush-cutting the stump may be enough if you are changing the layout and not planting directly in that exact spot. If you want a clean slate, keep digging.
What If You Want to Save a Shrub Instead?
If one or two shrubs deserve a second chance, transplant them during the dormant season, ideally in early spring or in fall when conditions are cooler and less stressful. For larger shrubs, root pruning in advance can improve success. That means cutting a trench around the future root ball ahead of the actual move so the plant produces more fibrous roots closer to the center.
When digging a shrub to move, keep as much of the root ball intact as possible. Tie branches up if needed, lift carefully, and get it replanted quickly. Water thoroughly after transplanting. If the shrub is shallow-rooted and leafy, reducing some top growth can help balance the lost roots and lower stress. Translation: the plant may survive the move better if you do not ask its damaged roots to support a full-size leafy drama queen.
How to Redesign the Bed So It Does Not Look Dated Again
This is the fun part. Once the old row is gone, resist the temptation to install a slightly newer row of the exact same mistake. A better foundation bed usually looks looser, layered, and more intentional.
Stop Thinking “One Long Hedge”
Modern curb appeal tends to come from variety and structure, not from a single green wall. Instead of planting a continuous line of shrubs across the whole house, consider a mix of lower shrubs, perennials, ornamental grasses, and perhaps one or two anchor plants placed strategically near corners or entry points.
This gives the house more breathing room and keeps the landscaping from looking flat. It also allows you to frame features instead of hiding them.
Choose Plants for Mature Size, Not Baby Size
This is where many foundation plantings go wrong. That cute little shrub in a nursery pot is not making a promise to stay cute. Read the plant tag. Check mature height and width. Plan for what the plant will become, not what it looks like on shopping day.
If a shrub will mature at six feet wide, do not plant it in a three-foot space and then act shocked later. That is not gardening. That is scheduling future resentment.
Leave Space Between Plants and the House
Good airflow matters. Easy maintenance access matters. Being able to see out your windows also matters. Keep shrubs far enough from the foundation that they can mature without pressing into siding or blocking every inch of light. Crowding the house invites pruning problems, moisture issues, and that overplanted look you are trying to escape.
Prep the Soil Without Overcomplicating It
Once the old shrubs are out, remove debris and loosen compacted areas. If the bed is depleted, topdress with compost and improve the surface over time instead of turning the whole area into a hyper-amended planting pit. For new shrubs, dig wide planting holes, avoid planting too deep, and mulch properly while keeping mulch away from stems and trunks.
In other words, skip the urge to create a luxury spa hole filled with magic ingredients. New shrubs mainly need proper depth, decent soil structure, water, and room.
Common Mistakes to Avoid
- Starting without utility marking: do not turn your curb appeal project into a utility repair project.
- Removing shrubs in extreme heat: cooler weather makes the work easier and transplanting more successful.
- Planting replacements too close together: today’s tidy spacing can become tomorrow’s hedge monster.
- Choosing only based on appearance: mature size, site conditions, and maintenance needs matter just as much.
- Assuming every shrub will recover from hard pruning: some will, some absolutely will not.
- Ignoring root leftovers: buried woody chunks can make replanting annoying later.
The Real Payoff of Removing an Old Bush Row
Digging up a dated row of bushes is sweaty work, but the payoff is immediate. The house looks taller. Windows reappear. The front walk feels more welcoming. Maintenance gets easier. Even before you install new plants, the yard often looks better simply because it no longer looks cramped and overgrown.
That is the sneaky truth about landscape renovation: sometimes subtraction does more for curb appeal than addition. A front yard does not need more stuff. It needs the right plants in the right places, with enough space to look like they belong there.
If your old shrubs have become a woody green blockade, removing them is not a failure. It is a design correction. And a very satisfying one.
Experience: What Digging Up a Dated Row of Bushes Actually Feels Like
The first thing most people notice when they start this project is that the bushes looked smaller from the driveway. Somehow, from a polite distance, they seemed manageable. Then you step into the bed with loppers and a shovel, and suddenly each shrub reveals itself as an underground conspiracy. The branches snag your sleeves, the roots head off in six directions, and the “quick weekend project” begins laughing at you.
There is usually a moment, about twenty minutes in, when you cut away enough top growth to see the true shape of the plant. It is rarely elegant. More often it resembles a wooden octopus with commitment issues. That is also the moment when people realize why the bed has looked so tired for so long. The shrubs are not just big. They are structurally old, hollow in places, and clinging to their original purpose with the stubbornness of a retired mall fountain.
Then comes the first real victory. One root gives way. Then another. You rock the base back and forth, pull upward, and the whole thing lifts out with a tearing sound that is oddly satisfying. Suddenly the wall of foliage is gone, and there is actual visible space between your house and the outdoors. It feels like opening curtains in a room you forgot had windows.
There is also a surprisingly emotional side to it. Many of these old shrub rows were planted years ago by previous homeowners, parents, or grandparents. They may be tied to memories, even if they no longer suit the space. Removing them can feel a little guilty at first. But once the row is gone and the architecture of the house becomes visible again, that guilt usually fades fast. What replaces it is relief. The home starts to look cared for, current, and intentional instead of crowded and overdue.
Another common experience is discovering just how much easier everything becomes afterward. You can wash windows without wrestling branches. You can see the front porch from the street. The siding dries faster after rain. Suddenly the house is not hiding behind a hedge haircut that needed redoing every six weeks. It feels less like maintenance and more like design.
And then there is the final stage, when the bed sits empty for a day or two. Some people panic at that point because the space looks bare. But bare is not bad. Bare is potential. Bare is the pause between “What on earth were they thinking?” and “Okay, now this is going to look good.” That empty strip becomes a chance to build a better plan with layered plantings, more interesting textures, and shrubs that will not try to eat the front windows by their fifth birthday.
So yes, digging up a dated row of bushes is hard work. It is dirty, physical, and occasionally humbling. But it is also one of the most rewarding yard projects you can do because the results feel bigger than the task. You are not just removing old plants. You are giving your home a clearer face, a cleaner frame, and a much better first impression.
Conclusion
If your foundation planting has turned into a tired green barricade, it may be time to stop trimming around the problem and solve it properly. Digging up a dated row of bushes is a practical way to refresh your landscape, improve airflow, uncover hidden architectural features, and make future maintenance easier. Whether you choose to remove, rejuvenate, or transplant, the key is to work safely, plan for mature plant size, and design a bed that complements the house instead of swallowing it whole.
In other words: fewer shrub regrets, more curb appeal.


