Table of Contents >> Show >> Hide
- What Are Cinnamon-Walnut Cracker Bars?
- Why This Recipe Works (The Crunchy, Buttery Science)
- Ingredients (Plus Smart Swaps)
- Equipment You’ll Need
- Cinnamon-Walnut Cracker Bars Recipe
- Flavor Variations (Because You Deserve Options)
- Troubleshooting: Fix the Usual Drama
- Storage, Freezing, and Make-Ahead Tips
- Serving Ideas
- FAQ
- Conclusion
- Real-Life Kitchen Experiences With Cinnamon-Walnut Cracker Bars (The Extra Crunchy Stories)
If you’ve ever wished a cookie bar could be crisp like candy, buttery like toffee, and spiced like your favorite latte, welcome to your new obsession: cinnamon-walnut cracker bars. They’re the kind of treat that disappears “mysteriously” from the counter, one shard at a time, until you’re left holding an empty pan and a very innocent expression.
These bars start with a humble cracker base (yes, crackersstay with me), get drenched in a bubbling brown sugar–butter caramel, then showered with cinnamon and walnuts until the whole thing bakes into a glossy, crunchy slab you can slice into bars. Think: sweet-salty crunch, warm spice, nutty depth, and the easiest “I totally bake all the time” energy you can bring to a party.
What Are Cinnamon-Walnut Cracker Bars?
Cinnamon-walnut cracker bars are part cookie bar, part candy bark, part holiday snack-tray legend. They’re in the same family as cracker toffee (sometimes nicknamed “Christmas crack,” because it’s wildly addictive), but this version leans hard into cinnamon and walnuts for a cozy, bakery-style flavor.
The magic is the contrast: a crisp cracker foundation + a thin layer of caramelized butter and brown sugar + crunchy nuts. You don’t need a candy thermometer, you don’t need fancy ingredients, and you definitely don’t need a pep talkjust a saucepan and a baking sheet.
Why This Recipe Works (The Crunchy, Buttery Science)
1) Crackers = instant structure
Crackers are dry, crisp, and already baked, which makes them a ridiculously good scaffold for caramel. They don’t “melt” into mush the way some crusts can. Instead, they hold their shape while the topping bubbles and sets, giving you clean slices (or delightfully jagged pieces, if you’re feeling chaotic).
2) Brown sugar + butter turns into a fast caramel
When you boil butter and brown sugar briefly, you’re concentrating moisture and creating a thicker syrup that firms up as it cools. Baking it on top of crackers finishes the job: it bubbles, spreads, and transforms into a toffee-like layer with a snap. The goal isn’t “hard candy shatter,” but a crisp bite that still feels butterynot tooth-threatening.
3) Cinnamon and walnuts add depth (and grown-up vibes)
Cinnamon brings warmth and aroma, while walnuts add a slightly bitter, roasty edge that keeps the sweetness in check. If you toast the walnuts first, you’ll boost their flavor dramaticallymore “bakery” and less “bag of nuts from the pantry.”
Ingredients (Plus Smart Swaps)
- Crackers: Cinnamon graham crackers are the coziest option. Regular graham crackers work too. Saltines make it more sweet-salty and “toffee bark” style.
- Butter: Unsalted gives you control; salted adds instant balance. Either worksjust adjust added salt.
- Brown sugar: Light brown sugar = classic caramel sweetness. Dark brown sugar = deeper molasses notes (my pick for cinnamon-heavy flavor).
- Walnuts: Chopped walnuts for crunch. Substitute pecans, almonds, or a mix if you like.
- Cinnamon: Use fresh-ish ground cinnamon for the best aroma. (Old cinnamon won’t “spoil,” but it can taste like cardboard’s shy cousin.)
- Salt + vanilla: Salt keeps everything from tasting one-note sweet; vanilla rounds it out.
- Optional topping: Chocolate chips, white chocolate, or a simple powdered sugar glaze.
Quick note on cinnamon types
In most American grocery stores, “cinnamon” is usually cassia: bold, spicy, and classic for baking. Ceylon cinnamon is lighter and more delicate. Use what you havejust know cassia tends to punch through caramel better.
Equipment You’ll Need
- Rimmed baking sheet (jelly roll pan)
- Foil or parchment (foil makes cleanup hilariously easy)
- Medium saucepan
- Heatproof spatula or wooden spoon
- Measuring cups/spoons
- Knife for slicing bars
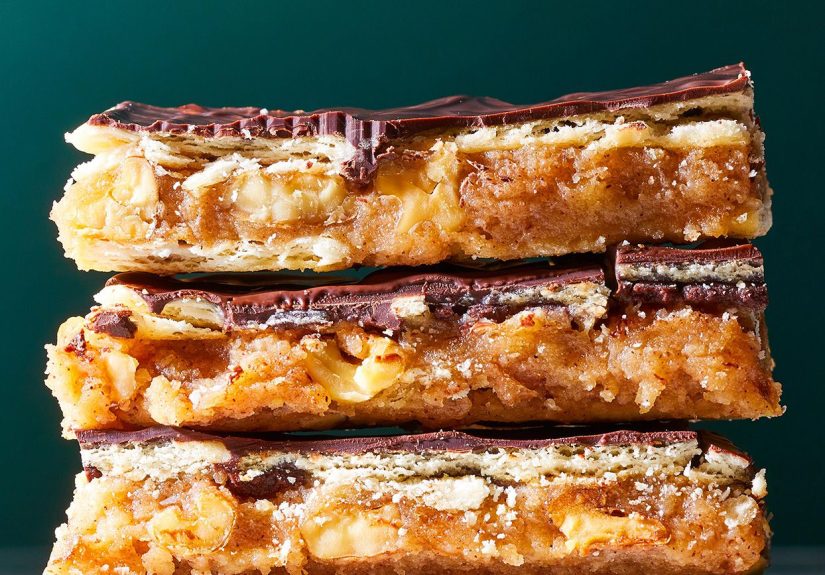
Cinnamon-Walnut Cracker Bars Recipe
Yield: About 24 small bars (or 12 “I mean business” bars)
Time: ~15 minutes prep, ~10 minutes bake, ~45–60 minutes cool
Ingredients
- 12–14 full sheets cinnamon graham crackers (or enough to tightly cover a rimmed baking sheet)
- 1 cup (2 sticks) butter
- 1 cup packed brown sugar (dark preferred)
- 1/2 to 1 teaspoon ground cinnamon (start with 1/2 tsp if your cinnamon is strong)
- 1/4 teaspoon fine salt (use 1/8 tsp if using salted butter)
- 1 teaspoon vanilla extract
- 1 1/2 to 2 cups walnuts, finely chopped (toasted is best)
- Optional: 1 cup chocolate chips (semi-sweet or dark), or 3/4 cup white chocolate chips
Step 1: Prep the pan
Preheat your oven to 350°F. Line a rimmed baking sheet with foil or parchment. (Foil tip: lightly butter it or use nonstick foil so the bars lift out easily.)
Arrange crackers in a single, tight layer. Break pieces to fill gapsthink “cracker Tetris.” You want full coverage so caramel doesn’t drip straight onto the pan and turn into a burnt sugar situation.
Step 2: Toast the walnuts (recommended, not required)
Spread chopped walnuts on a dry baking sheet and toast for about 8–10 minutes, stirring once, until fragrant. Cool slightly. This step makes the walnut flavor louder, richer, and more “wow.”
Step 3: Make the quick caramel
In a saucepan over medium heat, melt the butter. Add brown sugar, cinnamon, and salt. Stir until the sugar dissolves and the mixture looks smooth.
Bring it to a gentle boil and let it boil for 1–3 minutes, stirring constantly. (One minute = slightly softer set. Three minutes = firmer, snappier bite.) Remove from heat and stir in vanilla.
Step 4: Pour, spread, and top
Immediately pour the hot caramel over the crackers. Use a spatula to spread it evenlywork quickly, because caramel waits for no one.
Sprinkle walnuts evenly over the top and gently press them in so they “bond” with the caramel layer.
Step 5: Bake
Bake for 6–9 minutes, until the topping is bubbling vigorously across the surface. Watch closely near the endcaramel goes from “perfect” to “burnt” faster than you can say “I’ll just check one email.”
Step 6 (Optional): Add chocolate
If using chocolate chips, sprinkle them over the hot bars right out of the oven. Let sit for 2–3 minutes to soften, then spread into a thin layer. For a lighter vibe, drizzle melted chocolate instead of fully coating.
Step 7: Cool and slice
Cool completely at room temperature until set, about 45–60 minutes. For extra clean cuts, chill for 15 minutes, then lift out and slice into bars.
Flavor Variations (Because You Deserve Options)
Maple-Cinnamon Walnut Bars
Add 1 tablespoon maple syrup to the caramel after boiling (off heat). Reduce vanilla slightly so flavors stay balanced.
Chai-Spiced Crunch
Replace half the cinnamon with a pinch each of ginger, cardamom, and nutmeg. Suddenly your kitchen smells like a café with excellent life choices.
Orange Zest + Dark Chocolate
Stir 1 teaspoon finely grated orange zest into the caramel after it comes off heat, then top with dark chocolate. It tastes fancy with almost no extra effortmy favorite kind of fancy.
Gluten-Free
Use a sturdy gluten-free graham-style cracker. The method stays the same; just line the pan well and pack crackers tightly.
Nut-Free (Allergy-Friendly-ish)
Swap walnuts for toasted pumpkin seeds or sunflower seeds. You’ll still get crunch, and nobody feels left out.
Troubleshooting: Fix the Usual Drama
“My caramel separated and looks greasy.”
This usually happens when heat is too high or boiling is uneven. Keep the boil gentle and stir constantly. If it starts to separate, lower the heat and keep stirring until it comes back together.
“The bars are too sticky and soft.”
They likely needed a slightly longer boil (or a minute more in the oven). Next time boil closer to 3 minutes and bake until bubbling across the whole pan. For this batch, chill the bars and serve cold for cleaner bites.
“They’re too hard!”
You probably boiled the caramel longer than needed. Slice thinner and serve with coffee, tea, or ice creamhard crunch becomes “intentional texture.”
“My crackers floated around.”
Crackers should be tightly packed; gaps let caramel pool and lift sections. Next time, fill every space like you’re building a cracker mosaic worthy of a museum.
“Everything stuck to the pan.”
Use foil or parchment, and lightly grease it (unless it’s nonstick foil). Also: let the bars cool fully before lifting. Warm caramel is basically edible glue.
Storage, Freezing, and Make-Ahead Tips
Store cinnamon-walnut cracker bars in an airtight container. If your kitchen is cool and dry, they keep well at room temperature for a couple of days. For longer storage (especially in humid climates), refrigerate to protect the crunch.
- Room temperature: Best for short-term snacking, keeping texture crisp.
- Refrigerator: Helps maintain freshness longer, especially if topped with chocolate.
- Freezer: Freeze for longer keepingwrap tightly and store in a freezer-safe container. Thaw at room temp.
Make-ahead win: these bars are excellent for gifting because they travel well and don’t need frosting, piping, or any other “why did I do this to myself” effort.
Serving Ideas
- Pair with coffee or chai for maximum cinnamon vibes.
- Serve alongside vanilla ice cream and call it “deconstructed cinnamon walnut crunch.”
- Cut tiny squares for dessert boardspeople love “one-bite” treats that somehow become twelve bites.
- Wrap a few bars in wax paper for lunchbox treats that feel special (and slightly smug).
FAQ
Can I use saltines instead of graham crackers?
Absolutely. Saltines make the bars more sweet-salty and toffee-like. If you go that route, add a tiny pinch of cinnamon to the caramel and maybe an extra sprinkle on top for the same warm-spice payoff.
Do I have to toast the walnuts?
Nobut toasting is the difference between “pretty good” and “why is this so addictive?” Toasting intensifies flavor and makes the nuts taste richer and more aromatic.
How do I cut them neatly without cracking everything into chaos?
Chill the slab for 10–15 minutes, then use a sharp knife. If you want super clean edges, score lightly first, then slice with confident, steady pressure. (Caramel respects confidence. It senses fear.)
Conclusion
Cinnamon-walnut cracker bars are proof that the best desserts don’t always start with a mixer and a life plan. With a handful of pantry staples, you get a treat that’s crisp, buttery, warmly spiced, and flexible enough to riff on all year long. Make them once, and you’ll understand why people “accidentally” keep extra crackers and walnuts around.
Real-Life Kitchen Experiences With Cinnamon-Walnut Cracker Bars (The Extra Crunchy Stories)
Here’s what people tend to discover the first time they make cinnamon-walnut cracker bars: the recipe is easy, but it feels oddly thrillinglike you’re getting away with something. You start with crackers that look like they belong next to soup, and ten minutes later you’re holding a sheet of glossy caramel crunch that smells like a holiday candle (the good kind, not the “mystery pine” kind). The transformation is dramatic enough that someone will wander into the kitchen and ask, “What is that?” as if you’re running a secret bakery.
The most common “aha” moment happens right when the caramel hits a full bubble in the oven. At first it looks like melted butter and sugar doing nothing special, then suddenly it’s boiling across the pan like it has a meeting to get to. That bubbling stage is where confidence builds. People who swear they “can’t make candy” realize they’re basically making a cheat-code version of toffeeno thermometer, no scary temperatures, just a quick boil and a short bake. It’s the kind of win that makes you stand a little taller while holding a spatula.
Another classic experience: the smell. Cinnamon doesn’t whisperit announces itself. When it’s warm and blooming in butter and brown sugar, it turns your kitchen into a cozy zone that makes everyone suddenly “need a snack.” Add toasted walnuts and the aroma gets deeper and more roasty, which is why people often end up snacking on the toasted nuts while the bars cool. (If you lose a handful of walnuts to “quality control,” you’re not alone.)
Cooling is where patience gets tested. The bars look ready long before they actually are. Many first-timers poke the surface, decide it’s “probably fine,” and then discover caramel is still in its sticky era. The good news: even if you cut too early and things look messy, the flavor is still fantastic. Most “ugly” batches mysteriously vanish even fasterbecause nobody judges a treat once they’re chewing it. The less-good news: if you do cut early, expect a little cracking and some rogue crumbs. Consider it rustic charm.
When gifting, people often learn that packaging matters. If you stack warm bars, they’ll cling together like best friends. The fix is simple: layer pieces with wax paper or parchment so they stay neat, especially if you added chocolate. A lot of folks also discover these bars travel surprisingly wellno frosting to smear, no delicate cookies to crumble into dust. They’re sturdy, snackable, and they make you look like someone who has their life together (even if your kitchen says otherwise).
Finally, there’s the personalization phase. After the first batch, almost everyone starts riffing: a pinch of espresso powder for “coffeehouse crunch,” a drizzle of dark chocolate for drama, orange zest for a bright twist, or chopped dried cranberries for a sweet-tart pop. That’s the real charm of cinnamon-walnut cracker barsthey’re simple enough to become a repeat recipe, but flexible enough to feel new every time. And once you realize how fast they come together, you may start making “just a half batch” that somehow turns into a full pan because, well… you were already there.


