Table of Contents >> Show >> Hide
- Why This Cherry Pie Recipe Works
- Ingredients for Cherry Pie with a Lattice Crust
- Best Cherries to Use for Pie
- How to Make the Pie Dough
- How to Make the Cherry Pie Filling
- Assembling the Lattice Crust Cherry Pie
- How Long to Bake Cherry Pie with a Lattice Crust
- The Hardest Step: Cooling the Pie
- Serving Ideas
- Common Cherry Pie Problems and How to Avoid Them
- Make-Ahead and Storage Tips
- Cherry Pie with a Lattice Crust Recipe Card
- Experience: What Baking Cherry Pie Really Feels Like
- Conclusion
- SEO Tags
Some desserts whisper. Cherry pie walks into the room wearing red lipstick and a golden lattice crown. It is classic, a little dramatic, and completely worth the cherry-stained fingertips. If you have ever wanted to make a homemade cherry pie with a lattice crust that looks impressive but still feels doable, this recipe is your new best friend.
This version is built for real kitchens, not fantasy baking shows where nobody drops a strip of dough or forgets where they put the pastry brush. The crust is buttery and flaky, the filling is bright and jammy instead of runny, and the lattice top gives the whole pie that unmistakable old-school bakery charm. Better yet, you do not need professional pastry skills. You just need cold dough, a little patience, and the confidence to tell your pie, “You and I are about to become iconic.”
If you are searching for the best cherry pie with lattice crust recipe, this one checks all the boxes: fresh flavor, clear instructions, make-ahead options, and plenty of practical tips so your pie comes out gorgeous instead of soggy, exploded, or suspiciously soup-like in the middle.
Why This Cherry Pie Recipe Works
A great cherry pie is all about balance. Cherries bring sweetness, tartness, and a lot of juice. The crust brings texture and structure. The lattice crust is not just pretty; it also lets steam escape, which helps the filling thicken as it bakes. That means more slices that hold their shape and fewer sad puddles on the dessert plate.
This recipe uses a mix of sugar, cornstarch, lemon juice, and a touch of almond extract to make the cherries taste bigger, brighter, and more “wow, did you really make this?” The cornstarch helps create a glossy filling, the lemon wakes up the fruit, and the almond extract gives that subtle bakery-style flavor people often cannot identify but always love.
The crust is an all-butter dough because butter delivers flavor and those beautiful flaky layers. Keeping the ingredients cold is the secret handshake of pie baking. Cold butter creates steam in the oven, and steam creates flakes. Science is delicious.
Ingredients for Cherry Pie with a Lattice Crust
For the Pie Crust
- 2 1/2 cups all-purpose flour
- 1 tablespoon granulated sugar
- 1 teaspoon fine salt
- 1 cup unsalted butter, very cold and cut into cubes
- 6 to 8 tablespoons ice water
For the Cherry Filling
- 6 cups cherries, pitted and halved if large
- 3/4 to 1 cup granulated sugar, depending on how tart your cherries are
- 1/4 cup cornstarch
- 1 tablespoon fresh lemon juice
- 1/4 teaspoon fine salt
- 1/4 teaspoon almond extract
- 1 tablespoon unsalted butter, cut into small pieces
For the Finish
- 1 egg, beaten with 1 tablespoon water
- Coarse sugar for sprinkling
Best Cherries to Use for Pie
You can make a wonderful homemade cherry pie with either sweet cherries or sour cherries. Sour cherries give you that classic sweet-tart pie-shop flavor, but they can be harder to find fresh. Sweet cherries are more common and still make a fantastic pie, especially when balanced with lemon juice.
Fresh cherries are ideal when they are in season, but frozen cherries work beautifully too. Just thaw and drain them well before using. If your cherries seem extra juicy, you can toss the filling together, let it sit for 10 to 15 minutes, and cook off a small portion of the juices on the stove before returning it to the fruit. That little move can make a big difference in getting a sliceable filling.
How to Make the Pie Dough
In a large bowl, whisk together the flour, sugar, and salt. Add the cold butter and cut it into the flour with a pastry cutter or your fingertips until the mixture looks shaggy with pea-sized and almond-sized bits of butter throughout. Those uneven butter pieces are not a problem. They are future flakiness.
Drizzle in the ice water, one tablespoon at a time, mixing gently until the dough just starts to come together. Divide it into two disks, one slightly larger for the bottom crust. Wrap both disks and refrigerate them for at least 1 hour. If you rush this part, the dough will remind you who is boss.
Once chilled, roll the larger disk into a circle about 12 to 13 inches wide and fit it into a 9-inch pie plate. Leave about 1 inch of overhang. Roll the second disk into a rectangle or circle and cut it into strips for the lattice. You can make them thin, thick, or alternating for extra style points. Transfer the cut strips to a parchment-lined tray and chill them while you prepare the filling.
How to Make the Cherry Pie Filling
In a large bowl, combine the cherries, sugar, cornstarch, lemon juice, salt, and almond extract. Toss until everything is evenly coated. The mixture will look like a lot. That is correct. Fruit pies always seem overconfident before baking, and somehow it all works out.
Let the filling sit for 10 minutes. This helps the sugar draw out some juices from the cherries. If the bowl gets very liquidy, spoon a few tablespoons of the juice into a small saucepan and simmer it briefly until slightly thickened, then stir it back into the fruit. This step is optional, but it helps create a richer, thicker filling with less risk of a soggy bottom crust.
Assembling the Lattice Crust Cherry Pie
Preheat your oven to 400°F. If you have a metal baking sheet or pizza stone, place it in the oven while it preheats. Starting the pie on a hot surface helps the bottom crust bake more effectively.
Spoon the cherry filling into the chilled bottom crust and dot the top with the tablespoon of butter. Now comes the fun part: the lattice. Lay half the dough strips across the pie in one direction, spacing them evenly. Fold back every other strip halfway, place one strip across the center in the opposite direction, then unfold the folded strips back over it. Repeat with the remaining strips, alternating which ones get folded back each time. It sounds fancy, but after the second strip you will feel like a pastry architect.
Trim the ends of the strips so they line up with the edge of the pie. Fold the overhanging bottom crust up and over the strip ends, then crimp the edge with your fingers or a fork. Brush the lattice and edges with egg wash and sprinkle with coarse sugar for sparkle and crunch.
How Long to Bake Cherry Pie with a Lattice Crust
Place the pie on the hot baking sheet and bake at 400°F for 20 minutes. Then reduce the oven temperature to 375°F and continue baking for 35 to 45 minutes more, or until the crust is deeply golden and the filling is bubbling in the center, not just around the edges.
If the edges brown too quickly, tent them loosely with foil. The most important visual cue is the bubbling filling. That is not just dessert theater. It tells you the thickener has activated and the filling has had enough heat to set properly.
The Hardest Step: Cooling the Pie
Once baked, transfer the pie to a wire rack and let it cool completely, ideally for at least 4 hours. Yes, that is a long time. Yes, the pie will smell like a bakery is living in your house. And yes, slicing too early is how you end up with cherry lava instead of neat wedges.
Cooling allows the filling to thicken and settle. If you want clean, beautiful slices, patience is the price of admission.
Serving Ideas
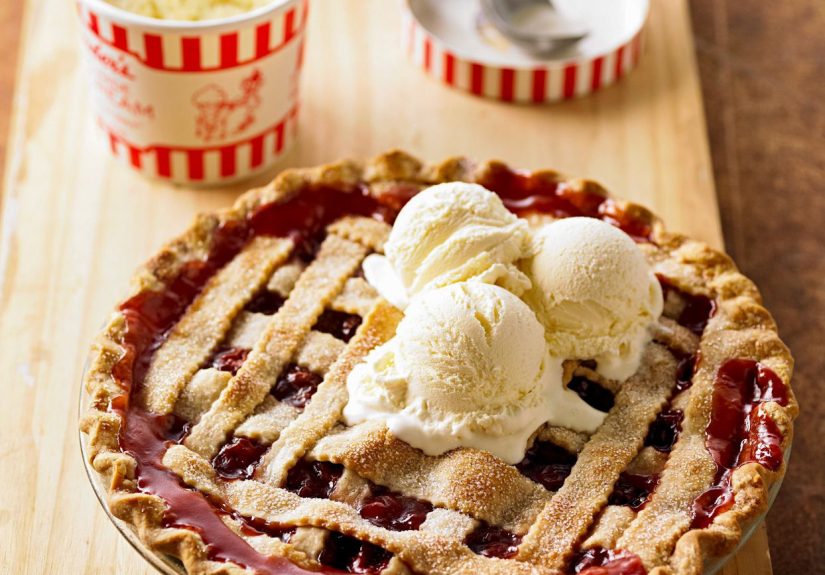
This cherry pie with a lattice crust is excellent all by itself, but it is also spectacular with vanilla ice cream, lightly sweetened whipped cream, or even a spoonful of crème fraîche if you want a grown-up contrast to the sweet fruit. Serve it slightly warm, room temperature, or chilled from the refrigerator. There is no wrong answer here, only personal pie philosophy.
Common Cherry Pie Problems and How to Avoid Them
Runny Filling
This usually happens when there is not enough thickener, the pie is underbaked, or it is sliced too soon. Make sure the filling bubbles in the center and give the pie time to cool fully.
Soggy Bottom Crust
Use a fully chilled crust, bake on a preheated baking sheet, and avoid excess liquid in the filling. Glass pie plates can also help you monitor browning on the bottom.
Tough Crust
Overworking the dough is usually the culprit. Mix just until the dough comes together and keep everything cold.
Lattice Strips Tearing
If the dough becomes too soft, chill the strips before weaving. Wider strips are also easier to manage if you are new to lattice crust pie recipes.
Make-Ahead and Storage Tips
You can make the pie dough up to 2 days in advance and keep it refrigerated. You can also freeze the dough for longer storage. The fully baked pie keeps well at room temperature for the day it is made, then can be refrigerated for a couple more days. Leftover slices are excellent cold, especially at midnight while standing in front of the refrigerator making choices you do not regret.
Cherry Pie with a Lattice Crust Recipe Card
Ingredients
- 2 1/2 cups all-purpose flour
- 1 tablespoon sugar
- 1 teaspoon salt
- 1 cup cold unsalted butter
- 6 to 8 tablespoons ice water
- 6 cups pitted cherries
- 3/4 to 1 cup sugar
- 1/4 cup cornstarch
- 1 tablespoon lemon juice
- 1/4 teaspoon salt
- 1/4 teaspoon almond extract
- 1 tablespoon butter
- 1 egg + 1 tablespoon water
- Coarse sugar
Instructions
- Make the dough by combining flour, sugar, and salt. Cut in cold butter, then add ice water until the dough just comes together. Divide into two disks and chill for 1 hour.
- Roll out the larger disk and fit it into a 9-inch pie plate. Roll out the second disk and cut it into strips for the lattice. Chill the strips.
- Mix cherries, sugar, cornstarch, lemon juice, salt, and almond extract. Let stand 10 minutes.
- Preheat oven to 400°F with a baking sheet inside.
- Fill the pie shell with cherry filling and dot with butter.
- Weave the lattice top, trim the strips, fold the bottom crust over them, and crimp.
- Brush with egg wash and sprinkle with coarse sugar.
- Bake 20 minutes at 400°F, then reduce to 375°F and bake 35 to 45 minutes more until deeply golden and bubbling in the center.
- Cool completely before slicing.
Experience: What Baking Cherry Pie Really Feels Like
There is something wonderfully old-fashioned about making a cherry pie with a lattice crust from scratch. It is not just a dessert recipe; it is a whole mood. The process begins with a mountain of cherries and the slightly alarming realization that pitting them is both satisfying and messy. There will be juice on your fingers, maybe on your cutting board, and possibly on a shirt you genuinely liked. That is part of the ceremony. Cherry pie does not happen quietly.
The first time many people make lattice crust, they assume it requires advanced pastry magic. Then they start laying down the strips and realize it is more like edible basket weaving. There is a rhythm to it. Fold back, place one strip, unfold, repeat. Somewhere in the middle, the pie starts looking less like ingredients and more like a real centerpiece. It is one of those rare baking projects that rewards effort in a very visible way.
The smell is another unforgettable part of the experience. As the pie bakes, butter, sugar, and fruit fill the kitchen in waves. It smells warm, nostalgic, and a little smug, as if the oven knows it is producing greatness. Anyone nearby will suddenly become extremely interested in whatever is happening in your kitchen. Expect casual drop-ins, suspicious hovering, and at least one person asking whether it is cool yet about 45 minutes too early.
Then comes the hardest lesson: waiting. A cherry pie fresh from the oven looks ready. It sounds ready. It smells more than ready. But if you cut into it too soon, the filling will remind you that beauty requires boundaries. Letting the pie cool completely can feel like a personal test of character. Still, when you finally slice into it and get that clean wedge with glossy cherries tucked beneath a golden lattice, the wait feels justified.
Homemade cherry pie also has a way of becoming part of family memory. It shows up at summer cookouts, holiday tables, birthdays, and random weekends when someone needs cheering up. People remember the pie with the sparkling crust, the slice served with vanilla ice cream, the bright red filling that tasted better than anything from a can. Even imperfect pies become stories. The lattice might slide a little. The juices might bubble over. The edge might brown more than planned. None of that stops the pie from being lovable.
That is the real charm of this recipe. It is impressive enough for guests, but personal enough to feel homemade in the best possible way. Every baker ends up putting a little of themselves into it: thicker strips, more lemon, extra almond, tighter crimping, a slightly rustic finish. Two people can follow the same cherry pie recipe and still produce pies with completely different personalities. Frankly, that is delightful.
If you are new to pie baking, this recipe is a confidence builder. If you already love baking, it is the kind of classic you return to again and again because it never stops being satisfying. Cherry pie with a lattice crust has that rare combination of beauty, flavor, and tradition. It feels celebratory without being fussy. It tastes bright and buttery and deeply comforting all at once.
And when the last slice disappears, usually faster than expected, you will understand why cherry pie remains a timeless favorite. It is not just about fruit and crust. It is about the ritual, the aroma, the anticipation, the shared table, and the tiny moment of triumph when someone takes a bite and immediately asks for the recipe.
Conclusion
This cherry pie with a lattice crust recipe proves that a truly memorable dessert does not need trendy tricks or complicated ingredients. It just needs a flaky butter crust, a well-balanced cherry filling, and enough patience to let the pie cool before slicing. Whether you bake it for a summer gathering, a holiday table, or a weekend when you simply feel like being the kind of person who makes pie from scratch, this recipe delivers beauty and flavor in equal measure.
The lattice top gives it classic charm, the cherries bring that sweet-tart punch everyone loves, and the simple techniques help you avoid the usual pie pitfalls. In other words, this is the kind of dessert that looks like it took all day, tastes like it came from a beloved bakery, and makes you feel like a kitchen legend. Not bad for flour, butter, and fruit.