Table of Contents >> Show >> Hide
- What Are Cherry Kuchen Bars, Exactly?
- Why This Recipe Works (A Little Baking Science, No Lab Coat Required)
- Ingredients You’ll Need
- Cherry Kuchen Bars Recipe (Step-by-Step)
- Pro Tips for Picture-Perfect (and Sanity-Preserving) Bars
- Variations (Because Cherry Deserves Options)
- Serving Ideas
- Storage and Freezing
- FAQ
- of Cherry Kuchen Bar “Real Life” Experiences
- Conclusion
If cherry pie and a sugar-cookie bar had a charming German pen pal, you’d get Cherry Kuchen Bars.
They’re the kind of dessert that shows up at potlucks looking suspiciously fancythen you realize it’s basically
“mix, spread, plop, glaze,” and suddenly you feel like a baking wizard.
Also: the name. “Kuchen” is German for “cake,” and these bars are a classic
sheet-pan style treatsoft, buttery, and topped with cherry filling that peeks through like it’s playing hide-and-seek.
Call them cherry pie bars, cherry bars, or cherry kuchen. They’ll taste delicious under any title.
What Are Cherry Kuchen Bars, Exactly?
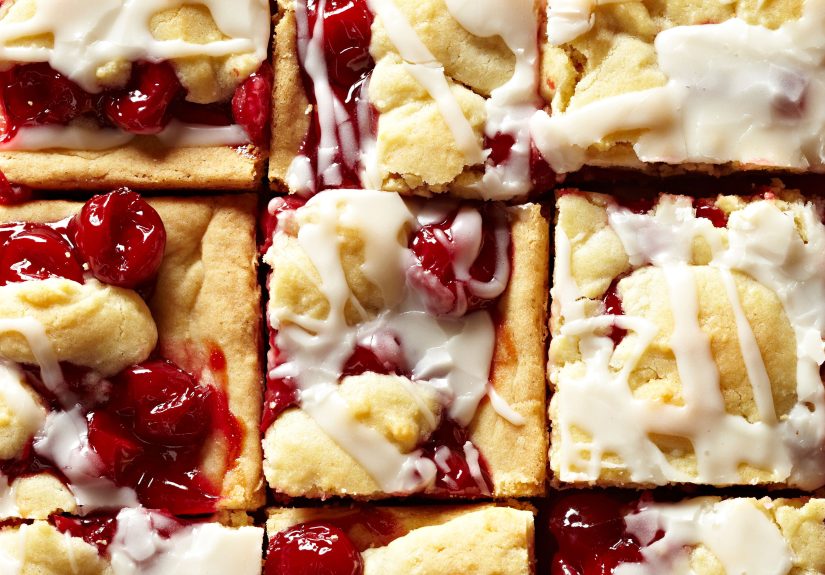
Think of them as a buttery cookie-cake base with a layer of cherry pie filling,
topped with spoonfuls of the same dough (or a crumb-style topping) and finished with a simple glaze.
The result is part bar cookie, part slab pie, part bakery display case temptation.
The “kuchen” vibe comes from the easy sheet-pan format and the cozy, coffee-hour feelthese are made for slicing,
sharing, and pretending you only want “a tiny piece.” (Narrator voice: it was not a tiny piece.)
Why This Recipe Works (A Little Baking Science, No Lab Coat Required)
1) A sturdy base that doesn’t get soggy
Many versions briefly bake the bottom layer before adding cherries. That quick head start helps the crust set,
so the filling stays jammy on top instead of soaking into the dough like a sponge at a juice bar.
2) Butter + (optional) shortening for texture
Butter brings flavor; a small amount of shortening can make the bars a bit more tender and help the dough spread easily.
Don’t want shortening? Use all butteryour bars will still be excellent (and your butter will feel very appreciated).
3) Almond + cherry is a power couple
Almond extract is optional, but it’s the secret handshake between cherry desserts and “wow, what is that amazing flavor?”
Use a light handalmond extract is tiny but mighty.
Ingredients You’ll Need
These are pantry-friendly, crowd-pleasing, and forgivingaka the holy trinity of dessert bars.
This Cherry Kuchen Bars Recipe is written for a classic jelly roll pan (sheet-pan style).
For the dough
- 1/2 cup (1 stick) unsalted butter, softened
- 1/2 cup shortening (or use another 1/2 cup butter)
- 2 cups granulated sugar
- 1 teaspoon baking powder
- 1/2 teaspoon fine salt
- 4 large eggs
- 1 teaspoon vanilla extract
- 1/4 teaspoon almond extract (optional but delightful)
- 3 cups all-purpose flour
For the cherry layer
-
1 to 2 cans (21 oz each) cherry pie filling
Use 1 can for a thinner, less-sweet cherry layer (more “bar cookie”).
Use 2 cans for a bolder, cherry-forward vibe (more “pie bar”).
For the glaze (choose one)
-
Classic vanilla-almond glaze: 1 to 1 1/4 cups powdered sugar, 2–3 tablespoons milk,
1/2 teaspoon vanilla, and (optional) 1/4 teaspoon almond extract -
Cream cheese glaze (extra dreamy): 2 oz cream cheese (softened), 1 1/2 cups powdered sugar,
1/4 teaspoon vanilla, 3–4 teaspoons milk (to thin)
Cherry Kuchen Bars Recipe (Step-by-Step)
Equipment
- 15×10-inch jelly roll pan (about 1 inch deep)
- Parchment paper or foil (optional, but makes lifting/cutting easier)
- Hand mixer or stand mixer
- Spatula + teaspoon or small cookie scoop
1) Prep your pan and oven
Preheat oven to 350°F. Line a 15×10-inch pan with parchment (or foil) with some overhang,
then lightly grease the lining. If you skip lining, grease the pan well so the bars don’t cling like a needy ex.
2) Make the dough
Cream butter and shortening (or butter) with sugar until lighter and fluffyabout 1–2 minutes.
Beat in baking powder and salt. Add eggs one at a time, mixing after each. Stir in vanilla and (if using) almond extract.
Add flour gradually and mix just until the dough comes together. It will be thicksomewhere between cookie dough and
“why is my mixer sweating?” That’s normal.
3) Build the base (and reserve topping dough)
Scoop out about 1 1/2 cups of dough and set aside. Press the remaining dough into the pan.
Pro tip: slightly damp hands or a greased spatula helps spread sticky dough without starting a wrestling match.
4) Quick bake the crust
Bake the crust for 10–12 minutes, just until it looks set and slightly matte on top.
This step helps the bottom stay tender but not soggy.
5) Add cherries + top
Spread cherry pie filling evenly over the warm crust, leaving a small border around the edges if you’re using 2 cans
(it bubbles!). Drop reserved dough by teaspoonfuls over the filling. Don’t try to fully cover the cherries
those ruby spots are part of the charm.
6) Bake again
Return pan to oven and bake 28–35 minutes, until the top is light golden and the edges look set.
If your pan is deeper or you used a 9×13-inch pan (see below), you may need a little longer.
7) Cool completely (yes, really)
Let the bars cool in the pan on a rack. Cherry filling needs time to settle; cutting too early can turn neat bars into
“abstract cherry art.” Delicious, but messy.
8) Glaze and slice
Whisk glaze ingredients until smooth and drizzle over cooled bars. Let glaze set 10–15 minutes, then slice into squares.
For clean cuts: wipe your knife between slices.
Pro Tips for Picture-Perfect (and Sanity-Preserving) Bars
How to spread thick dough without losing your will to live
- Use damp fingertips or a lightly greased offset spatula.
- Press dough into “islands,” then connect them like dessert tectonic plates.
- If the dough is very stiff, let it sit 5 minutes at room temp before pressing.
How to avoid runny filling
- Cool completely before slicing.
- If making homemade filling, thicken with cornstarch (or a pie thickener) and let it cool before using.
- Don’t overload the pan edgesbubbling cherry lava is real.
Pan size swaps
No jelly roll pan? You can use a 9×13-inch pan. The bars will be thicker and may need
5–10 extra minutes of baking time. Start checking at the 35-minute mark and look for a golden top.
Variations (Because Cherry Deserves Options)
Cream cheese layer
Want cheesecake energy without committing to cheesecake time? Spread a quick layer of softened cream cheese mixed with
sugar and an egg over the base before adding cherries. It turns the bars rich and slightly tangylike the dessert version
of upgrading to first class.
Crumb-topped “streusel” style
Instead of spooning dough on top, crumble reserved dough (or mix some with a little extra flour/sugar) for a streusel-like finish.
This leans more German bakery and pairs beautifully with coffee.
Homemade cherry filling (tart-cherry fan club)
If you love a less-sweet, more cherry-forward bite, make filling from tart cherries and thicken it on the stovetop.
A splash of lemon juice brightens flavor, and a tiny bit of almond extract makes it taste “bakery.”
You can use frozen cherries, toono need to thaw, just allow time for the filling to sit and thicken.
Swap the fruit
This dough is incredibly flexible. Try blueberry, peach, apple, or strawberry filling. The formula stays the same
the fan club just changes jerseys.
Serving Ideas
- Classic: room temp with coffee or tea
- Extra: warm bar + vanilla ice cream = instant “restaurant dessert”
- Holiday-friendly: add red sprinkles after glazing for festive flair
- Brunch move: serve smaller squares on a pastry board (people will think you catered)
Storage and Freezing
Store bars in an airtight container at room temperature for 3–4 days.
If your kitchen runs warm or you used a cream cheese glaze, refrigerate for up to 1 week.
To freeze: cool completely, slice, and layer with parchment between pieces. Freeze up to 3 months.
Thaw at room temperature. (The glaze may soften slightly, but the flavor stays strong.)
FAQ
Can I skip the first bake?
You can, and some recipes doespecially crumb-style bar versions. But that quick pre-bake makes the base more stable
and helps prevent sogginess, especially with a juicy cherry layer.
Do I have to use almond extract?
Nope. Vanilla-only bars are still delicious. If you’re almond-curious, start with 1/8 teaspoon and see how you feel.
Almond extract is powerfulrespect it like a tiny flavor wizard.
Why are my bars pale?
They may need a few more minutes. Look for light golden edges and a top that’s set, not wet. Ovens vary,
and sheet pans conduct heat differently.
Why did my cherry filling overflow?
Usually: too much filling near the edges, or the pan wasn’t deep enough. Next time, leave a small border and consider
using 1 can (or 1 1/2 cans) instead of 2.
of Cherry Kuchen Bar “Real Life” Experiences
Cherry kuchen bars have a reputation for being the dessert that disappears before the host finishes explaining what it is.
You set the tray down, turn around to grab napkins, and when you turn back it’s already down by a suspicious amount.
Nobody saw anything. Everyone looks innocent. There is powdered sugar glaze on someone’s sleeve.
The case remains unsolved.
They’re also a classic “I need something for tomorrow” bake. Because the ingredients are basic, you can usually pull them off
without a grocery-store marathon. The only true make-or-break item is the cherry fillingand even then, it’s flexible:
use canned pie filling for convenience, or go homemade if you’re feeling ambitious and have a cherry pitter that hasn’t gone missing
into the same dimension as single socks and matching Tupperware lids.
One of the most common kitchen moments with this recipe is the dough-spreading dilemma. The dough is thick.
It’s not trying to ruin your day; it’s trying to become a tender bar that can support a cherry layer without collapsing into mush.
Still, the first time you press it into a pan, you might think, “Is this dough… judging me?” The trick is to treat it like a project:
plop little mounds across the pan, then press them together. Suddenly it’s cooperative. (Or at least less dramatic.)
Then comes the cherry reveal: when the filling goes on, the whole thing starts looking like a dessert you’d see
in a bakery case. That’s the sneaky charm of cherry kuchen bars: they’re not complicated, but they look like you made an effort.
This makes them perfect for office parties, bake sales, holiday cookie swaps, and any gathering where you’d like to receive compliments
while casually saying, “Oh, it was nothing.” (It was not nothing. There was pressing involved.)
If you’ve ever served them at a holiday table, you know the red-and-white contrast is basically a decorative centerpiece that you can eat.
Add almond extract and suddenly people will ask if there’s amaretto in them. Add a cream cheese layer and they start getting compared to
cheesecake. Add a crumb topping and they lean into cozy German bakery energythe kind of dessert that wants to be served with coffee and
a long chat.
Finally, there’s the cooling lesson. Cherry filling is hot lava when it comes out of the oven, and it needs time to set.
Many bakers learn this the same way: by cutting too soon, watching the cherries ooze, and deciding to call it “rustic.”
Here’s the thingrustic is delicious. But if you want clean slices, let the bars cool completely, then drizzle glaze like you’re signing
your masterpiece. Because honestly? You are.
Conclusion
This Cherry Kuchen Bars Recipe delivers everything you want from a crowd-pleasing dessert: buttery base,
vibrant cherry filling, and a sweet glaze that makes the whole pan look bakery-ready.
Whether you keep it classic, add a cream cheese layer, or lean into almond-cherry magic, these bars are built for sharing
and for quietly going back for “just one more sliver.”


