Table of Contents >> Show >> Hide
- Why a Plywood Ceiling Works (When It Works)
- Choosing Plywood That’s Actually Ceiling-Worthy
- Design Moves: Turning Flat Sheets Into Architectural Detail
- Installation Details That Separate “DIY” From “Designed”
- Performance: Fire, Acoustics, Moisture, and Maintenance
- Room-by-Room Ideas That Don’t Feel Like a Gimmick
- Common Mistakes (So You Can Skip the Regret)
- Field Notes: Real-World Experiences With Plywood Ceilings (The Extra You’ll Actually Use)
- Final Thoughts
Ceilings are the most underappreciated surface in a room. They’re basically the “default settings” of architecture:
white, flat, and doing their best impression of a blank Word document. A plywood ceiling is the opposite of that.
It’s warm, graphic, surprisingly modern, andwhen detailed wellcan make a basic box of a room feel like it got
a design degree.
This guide gets into the real architectural detail behind a plywood ceiling: which plywood actually belongs overhead,
how to lay it out so seams look intentional (not accidental), what to do about lighting and vents, and the performance
realities nobody wants to talk about until the first humid day arrives.
Why a Plywood Ceiling Works (When It Works)
Plywood isn’t just “cheap wood.” It’s a stable, layered panel product that can read as refined when you choose the right
face veneer and handle the details like you meant to do it all along. Done well, a plywood ceiling adds warmth without
the visual busyness of tongue-and-groove planks, and it can be cleaner and more contemporary than beadboard.
The design upsides
- Big-surface warmth: Wood overhead changes how a room feels, even if the walls are simple.
- Graphic layout potential: A 4×8 grid, staggered seams, or a reveal pattern can become the “ceiling architecture.”
- Budget-friendly impact: You can get a high-end look with a mid-range materialif you spend the care on detailing.
- Fast coverage: Panels cover area quickly, which is great for studios, ADUs, offices, and remodels on a timeline.
The reality checks
- Seams are honest: If you don’t plan them, they’ll plan themselves… loudly.
- Movement happens: Wood-based panels expand and contract with humidity. Your ceiling is not exempt.
- Acoustics can suffer: A hard, flat panel overhead can reflect sound like a polite echo chamber.
- Code & safety still matter: Especially in multi-family, commercial, and egress areas.
Choosing Plywood That’s Actually Ceiling-Worthy
The plywood aisle can feel like a personality test. “Rated Sheathing” wants to live in a roof. “Cabinet-grade birch”
wants to be admired. Your ceiling needs something that can look good up close and stay flat long-term.
Structural panel vs. decorative panel: know what you’re buying
For many interiors, the best look comes from hardwood plywood (birch, oak, maple, walnut faces) rather than
construction sheathing. Hardwood plywood is designed to be seen; sheathing is designed to be hidden under something else
(and it acts like it knows it).
Face grades: the “pretty side” is not all the same
If the ceiling will be a feature, prioritize a cleaner face grade with fewer patches and football-shaped plugs. When you’re
lying on the couch staring upward, you’ll notice everythingespecially that one patch that looks like a tiny continent.
| Plywood Type | Best For | Watch Outs |
|---|---|---|
| Hardwood plywood (e.g., birch/maple) | Feature ceilings, clean modern interiors | Cost varies; check veneer consistency across sheets |
| Sanded plywood (paint-grade) | Painted ceilings, subtle wood grain | Edges still need love; paint highlights seam mistakes |
| Shop-grade / utility hardwood plywood | Studios, garages, secondary spaces | More patches/voids; sort sheets carefully |
| Sheathing / “rated” structural panels | Workshops, utility ceilings, rustic looks | Rough faces, telegraphed grain, inconsistent appearance |
Bond classifications: “Interior,” “Exposure 1,” and “Exterior” aren’t vibes
Panel stamps and product descriptions often mention bond classifications. In plain terms:
Interior is meant to stay dry;
Exposure 1 can handle short-term moisture during construction or limited exposure;
Exterior is designed for long-term weather/moisture conditions. If your ceiling is in a porch,
a humid bathroom, or any “sometimes outdoor-ish” situation, choose accordingly.
Indoor air quality: low-emitting options are real (and worth it)
If this is a bedroom, nursery, or tight modern home where fresh air is a precious resource, look for panels that meet current
composite-wood formaldehyde emission standards and consider products made with no-added-formaldehyde adhesives. It’s not
just a “green” flexit can be a comfort issue.
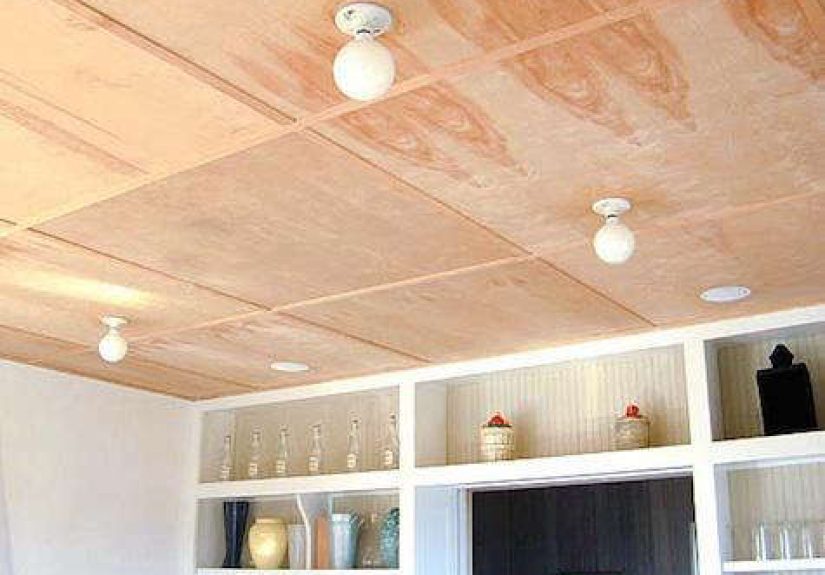
Design Moves: Turning Flat Sheets Into Architectural Detail
A plywood ceiling lives or dies on intent. If it looks like you covered drywall because you ran out of drywall money, that’s a mood.
If it looks like you designed a ceiling system, that’s architecture. The difference is usually layout and edge detail.
1) Make seams part of the design
- Clean grid: Align panels to form a crisp 4×8 rhythm. Works well in modern and Japandi interiors.
- Staggered (running bond): Less “office ceiling grid,” more relaxed, hides slight framing irregularities.
- Expressed reveals: Leave a consistent shadow line between panels. It looks intentional and helps accommodate movement.
- Battons / cover strips: Add thin wood strips over seams for a crafted look (and seam forgiveness).
2) Control direction and proportion
Want a room to feel longer? Run the panel grain (or long dimension) the direction you want the eye to travel. Want calm?
Keep the layout symmetrical. Want energy? Go diagonal (but only if you enjoy measuring twice and cutting thrice).
3) Edges: the “ceiling meets wall” moment matters
The perimeter is where plywood ceilings often get awkward. Pick one strategy and execute it cleanly:
- Shadow gap: A small, consistent reveal at the wall line. Modern, crisp, and forgiving.
- Trim perimeter: A simple molding to cover expansion gaps and slight out-of-square rooms.
- Flush edge + drywall return: A more advanced detail that can look seamless, but demands straight framing and patience.
4) Coordinate lighting, sprinklers, and vents early
Recessed lights, linear LEDs, speakers, smoke alarms, sprinklers, and HVAC grilles don’t care about your beautiful panel layout.
They will land wherever they land unless you plan a reflected ceiling layout first. A good rule: design your panel grid (or reveal
rhythm) and then “float” fixtures so they land centered within a panel or aligned to a seam strategy.
Installation Details That Separate “DIY” From “Designed”
Start with a flat, honest substrate
Plywood doesn’t magically flatten a wavy ceilingsometimes it highlights it. If your framing is uneven, add furring strips or a
leveling grid. The goal is consistent support and predictable fastening points, especially at panel edges.
Plan movement: leave breathing room
Wood panels expand and contract. If you jam sheets tight, the ceiling can telegraph buckles, squeaks, or seam ridges.
Leave a small, consistent gap between sheets and at the perimeter. If you hate the idea of gaps, use a reveal detail,
battens, or trim to make the spacing look intentional.
Fasteners: don’t let gravity win
Ceilings are brutal because everything is upside down and gravity is feeling smug. Use screws suited for wood, not flimsy fasteners
that strip when you’re on the last sheet and your arms are filing a formal complaint. Thickness matters, too: thin panels can sag
between framing membersespecially with wider spacing or humidity swings.
- Support edges: Every panel edge should land on framing or blocking.
- Add blocking at seams: It reduces sag and gives you clean fastening lines.
- Mind screw pattern: Tighter fastening at edges, consistent fastening in the field, and avoid overdriving (craters are forever).
Pre-finish for sanity (and cleaner seams)
Finishing overhead after installation is doable, but it’s also a great way to accidentally varnish your eyebrows. Pre-finishing panels
on sawhorses often gives a more even coat and protects faces before install. If you’re staining, do a full mock-up: plywood can vary
from sheet to sheet, and stain is not here to make everyone feel included.
Finish options that look intentional
- Clear coat (matte/satin): Keeps the natural tone and grain visible; great for birch and maple faces.
- Whitewash or pickled finish: Brightens a room while keeping wood character.
- Paint: Works well with sanded panels and a reveal patternmodern, clean, and surprisingly architectural.
- Charred / dark stain: Dramatic, but test for blotching and be mindful of how it affects light levels.
Performance: Fire, Acoustics, Moisture, and Maintenance
Fire & code basics (the short, useful version)
Interior wall and ceiling finishes are often classified using standardized surface-burning tests (commonly referenced by building codes).
Different occupancies and locations (especially egress paths) may require more stringent classifications. If you’re in commercial work,
multi-family, or anything requiring permits beyond “my neighbor said it’s fine,” talk to your code consultant or local building official.
Fire-retardant-treated plywood and tested assemblies can be part of the solution when stricter ratings are required.
Acoustics: wood can be warm, but it can also be loud
A flat plywood ceiling reflects sound. In open-plan kitchens, restaurants, or offices, that can mean clatter, echo, and the delightful
experience of hearing every spoon drop like it’s a cymbal solo. If you need better acoustics, consider:
- Perforated or slotted wood panels with acoustic backing
- Insulation above the ceiling (when appropriate) to reduce reverberation
- Soft elements in the room (rugs, upholstery, curtains) to balance reflections
Moisture: the ceiling is part of the building envelope story
In bathrooms, porches, and top-floor ceilings under vented attics, moisture management matters. Use the right panel for the exposure
conditions, seal faces/edges appropriately, and ensure the assembly can dry as intended. A plywood ceiling can be durable, but it
doesn’t enjoy surprise condensation parties.
Maintenance & repair
The good news: plywood ceilings are generally easy to keep clean. Dust with a microfiber mop, spot-clean gently, and avoid soaking the
surface. The better news: if a panel gets damaged, a thoughtfully planned seam layout makes replacement easieranother reason to love
reveals and battens.
Room-by-Room Ideas That Don’t Feel Like a Gimmick
Kitchen + dining: warmth without clutter
Pair a plywood ceiling with simple painted cabinets and let the ceiling do the cozy work. A matte clear coat keeps the look modern.
If you’re using pendants, align them to panel centers or seam lines so it looks intentional from every angle.
Home office or studio: “focus mode” architecture
Plywood interiors have shown up in small offices and backyard studios for years because they’re efficient, warm, and forgiving.
A plywood ceiling in a compact workspace can make the room feel designed instead of temporaryespecially with a clean reveal pattern
and good lighting.
Porch ceiling: classic move, modern material choices
Exterior or semi-exterior ceilings benefit from panels designed for moisture exposure and a finish system that’s meant for outdoor conditions.
Keep seams consistent, protect edges, and detail the perimeter so seasonal movement doesn’t turn into seasonal cracking.
Retail and hospitality: the “ceiling as brand” play
In cafes and boutiques, plywood ceilings can create a crafted, approachable atmosphere. The smartest projects pair wood overhead with acoustic
strategyperforations, backing, and soft furnishingsso the space feels good as well as looks good.
Common Mistakes (So You Can Skip the Regret)
- Buying random sheets without sorting: Veneer color and grain can vary. Mix sheets intentionally or you’ll get a “patchwork ceiling.”
- Ignoring edge support: Unsupported seams sag, crack, and haunt you during dinner parties.
- Skipping a ceiling layout: Fixtures will land in the worst places possible if you let them.
- No plan for movement: Tight joints plus humidity equals surprise ridges.
- Finishing after install without protection: Drips happen. Gravity is undefeated.
Field Notes: Real-World Experiences With Plywood Ceilings (The Extra You’ll Actually Use)
Imagine you’re standing on a ladder with a 4×8 sheet above your head, trying to look calm while your shoulders quietly negotiate a new
labor contract. This is where plywood ceilings stop being a pretty idea and start being a real assembly. And here’s the funny part:
most “problems” people blame on plywood are actually layout and detailing problems wearing a plywood costume.
One of the most common experiences is the seam surprise. On paper, a simple grid looks clean. In real life, framing isn’t always
perfectly square, and rooms love to be just slightly off like it’s their personality. If you start installing from one wall without checking
squareness, your seams may slowly drift until the last row becomes a custom trapezoid you didn’t order. The fix is boring but powerful:
snap lines, measure diagonals, and choose a starting point that keeps cut pieces balanced. The moment you treat the ceiling like finish
carpentry instead of “big drywall,” everything gets easier.
Another jobsite classic is the hunt for flatness. A plywood ceiling can be unforgiving because its crisp edges create long sightlines.
A slight belly in old drywall or a crowned joist can show up as a shadow that makes your ceiling look like it’s trying to wave hello.
People who love their plywood ceiling long-term almost always did one of two things: they installed over a leveled furring grid, or they
embraced a reveal/batten detail that visually organizes the surface and hides tiny variations. Flatness is great. Strategic shadow lines are
sometimes even better.
Then there’s humidity season. In many parts of the U.S., the year includes at least one month where the air feels like soup.
That’s when tight joints can telegraph ridges, and unsealed edges can take on moisture like they’ve been waiting for the opportunity.
The ceiling systems that age gracefully usually have three traits: (1) a small, consistent expansion gap, (2) sealed faces and edges
appropriate to the room, and (3) enough fastening and blocking that panels stay supported even when conditions change.
And finally, a positive experience worth chasing: the “everything feels warmer” moment. People are often surprised that a plywood ceiling
changes the perception of lighting. Warm wood overhead can reduce glare and make a space feel softer, even with the same fixtures.
But it’s also a reminder to plan lighting temperature and brightness: wood can absorb some light, and a darker stain can make a room feel
moodier than intended. The happy medium tends to be a light veneer (birch/maple) with a matte or satin clear finish, paired with layered lighting
(ambient + task). The result feels intentional, comfortable, andbest of alllike you didn’t just “finish a ceiling,” you designed one.
Final Thoughts
A plywood ceiling is one of those details that can look effortlessly architectural… after a very deliberate amount of planning.
Choose a panel that matches the space (and the exposure conditions), design the seams like they belong, handle edges with care,
and coordinate fixtures like the ceiling mattersbecause it does.
Do that, and your ceiling stops being the part of the room nobody talks about. It becomes the part people notice firstusually while saying,
“Wait… what is that up there?” in a way that sounds suspiciously like admiration.


