Table of Contents >> Show >> Hide
- Why Upcycling Boxes for Christmas Decor Is So Smart
- Best Types of Boxes for Holiday Crafts
- Basic Supplies You’ll Want on Hand
- 7 Creative Ways to Turn Old Boxes Into Christmas Decor
- 1. Faux Gift Box Towers for an Instant Holiday Statement
- 2. A Cardboard Box Christmas Tree That Never Drops Needles
- 3. Hymnal- or Book-Page Covered Keepsake Boxes
- 4. A Mini Winter Village in a Shoebox
- 5. A Faux Cardboard Fireplace for a Cozy Focal Point
- 6. Advent Calendar Made from Tiny Boxes
- 7. Ornaments, Garlands, and Hanging Decor
- Styling Tips to Make Cardboard Decor Look Chic, Not Cheap
- How to Store and Reuse Your Box Decor After the Holidays
- Real-Life Experiences: What You Learn When You Upcycle Boxes for Christmas
- Conclusion: Turn Your Recycling Pile into Holiday Magic
Raise your hand if you currently have at least three random cardboard boxes lurking in a closet,
the garage, or next to the trash can “just in case you need them later.” Good news: later
has officially arrived. Instead of tossing those shipping boxes and cereal cartons, you can turn
them into budget-friendly, eco-conscious Christmas decorations that look like they came straight
from a designer holiday catalog.
In true Hometalk spirit, this guide walks you through how to upcycle old boxes into Christmas
decor you’ll actually be proud to put on display. From faux gift towers and cardboard Christmas
trees to cozy fireplaces and advent calendars, these ideas are easy to customize, gentle on your
wallet, and kind to the planet. Grab your glue gun, a roll of ribbon, and that pile of boxes
we’re about to turn recycling into decorating.
Why Upcycling Boxes for Christmas Decor Is So Smart
Before we break out the craft supplies, let’s talk about why cardboard boxes are secretly
holiday MVPs:
- They’re basically free. Shipping boxes, shoe boxes, tissue boxes, and cereal cartons are already in your home. You’re just giving them a second life.
- They’re incredibly versatile. Cardboard can be cut, folded, layered, painted, or wrapped to mimic wood, gingerbread, faux presents, or even architectural features like fireplaces.
- They’re lightweight and easy to store. Many cardboard decorations can be flattened or nested inside each other once the tree comes down.
- They’re eco-friendly. Instead of tossing boxes or buying more plastic decor, you’re reusing what you already have and sending less to the landfill.
Plus, cardboard is forgiving. If you make a mistake, you’re not ruining expensive materials
you’re just trimming another box.
Best Types of Boxes for Holiday Crafts
Not all cardboard is created equal. Pairing the right type of box with the right project makes
crafting smoother and your finished decor sturdier.
Cereal and Food Boxes
These thinner cardboard boxes are ideal for projects that need flexibility and finer shapes:
- Ornaments
- Garlands and bunting
- Flat Christmas trees and stars
- Gift tags and mini houses
Shipping and Moving Boxes
Corrugated shipping boxes (hello, online orders) are perfect when you need strength and structure:
- Stacked “gift box” towers
- Cardboard Christmas trees
- Fireplace surrounds and faux mantels
- Outdoor porch decor under a covered area
Shoe Boxes and Sturdy Lids
Shoe boxes strike a balance between flexible and strong. They’re ideal for:
- Advent calendars
- Mini winter villages
- Centerpiece “present” boxes
- Decorative storage for ornaments and lights
Basic Supplies You’ll Want on Hand
You don’t need a craft room to get started. A small basket of essentials will take you through
most of these projects:
- Scissors and a craft knife or box cutter
- Ruler, pencil, and maybe a simple stencil or two
- Hot glue gun and glue sticks (or strong craft glue)
- Acrylic paint or spray paint (white, gold, red, green, black are workhorses)
- Wrapping paper, scrapbook paper, or brown kraft paper
- Ribbons, twine, and bows
- Holiday stickers, washi tape, or vinyl decals
- Battery-operated string lights or tea lights for safe illumination
Always work on a protected surface, keep fingers clear of the craft knife, and stick to
battery-operated candles or LEDs around cardboard. Your decor should light up your room, not your smoke alarm.
7 Creative Ways to Turn Old Boxes Into Christmas Decor
You can mix and match these ideas throughout your home entryway, mantel, stairs, under the
tree, or even on the porch if it’s dry and covered.
1. Faux Gift Box Towers for an Instant Holiday Statement
This is one of the easiest ways to get that “magazine-cover Christmas” vibe with almost no
effort. Stack empty boxes wrapped like presents into a tower, and suddenly you have a dramatic
display that doesn’t involve real gifts being poked, shaken, and guessed at all December.
How to make it:
- Gather 4–10 boxes in various sizes. Lightweight shipping boxes work best.
- Wrap each box individually with coordinating paper. Use a mix of solids and subtle patterns for a cohesive look.
- Add ribbon, bows, or layered twine around some boxes for texture.
- Stack boxes from largest to smallest in a corner, by the tree, or near the front door.
- Secure each layer with double-sided tape or a few dots of hot glue to keep kids and pets from toppling your masterpiece.
Choose a single color palette like plaid and gold, or kraft paper with red accents so the
tower looks intentional, not like a wrapping paper clearance bin exploded in your living room.
2. A Cardboard Box Christmas Tree That Never Drops Needles
No room for a full-size tree? Allergic to real pine? Or just love the idea of a quirky,
modern, DIY twist? Try building a Christmas tree from cardboard boxes.
Simple stacking tree:
- Find 5–8 boxes that gradually get smaller.
- Wrap them in coordinating green paper or paint them evergreen green.
- Stack them in a pyramid, staggering the boxes slightly for a more organic look.
- Glue or tape small ornaments, bows, or faux snow onto the “tree.”
- Top it off with a cardboard star wrapped in gold foil or painted metallic.
Flat, Scandinavian-style tree:
- Cut long triangles from corrugated cardboard to form stylized tree shapes.
- Paint them a warm brown and use a white paint pen to draw patterns lines, dots, and branches to mimic gingerbread or Nordic designs.
- Attach a simple stand at the back (a folded piece of cardboard works) so they stand on their own on a mantel or shelf.
These cardboard trees are light, easy to move, and perfect for apartments, dorms, kids’ rooms,
or offices.
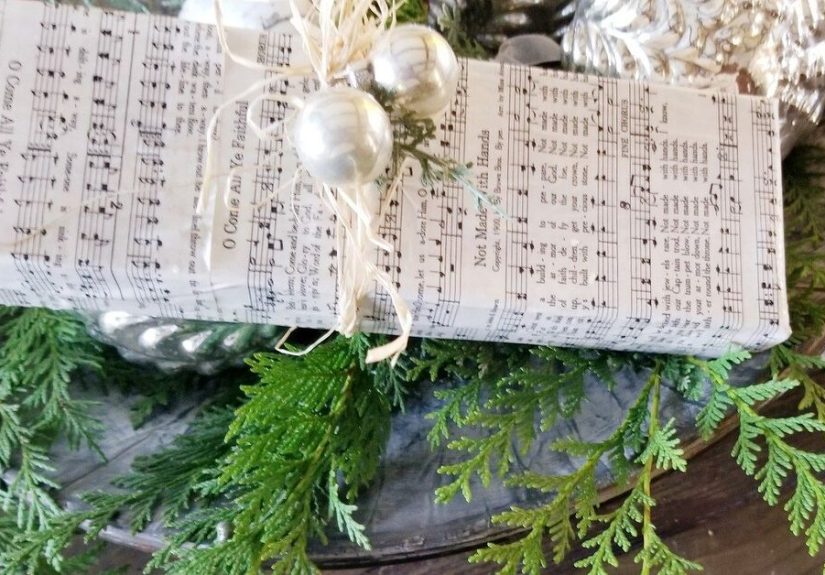
3. Hymnal- or Book-Page Covered Keepsake Boxes
Inspired by popular Hometalk-style projects, you can transform a basic box into a meaningful,
vintage-looking piece using music or book pages. It’s a gorgeous way to display old hymnals,
carol sheets, or even pages from a beloved but falling-apart Christmas book.
Try this:
- Choose a sturdy box with a lid shoe boxes are perfect.
- Tear or cut pages from a thrifted hymnal, music book, or holiday novel.
- Brush a thin layer of decoupage glue (or watered-down white glue) onto the box.
- Lay the pages over the glue, slightly overlapping, and smooth out bubbles.
- Seal with another light coat of glue and let dry completely.
Use your finished box as a display piece on the mantel, as a base for a mini tree, or as a
special container for treasured ornaments. It looks like boutique decor, but it started as
recycling and a quarter from the rummage-sale book table.
4. A Mini Winter Village in a Shoebox
Turn a shoebox or shallow shipping box into a tiny snowy world no power tools required.
Here’s how:
- Paint the inside of the box a deep green, navy, or black to act as a night sky.
- Cut small house shapes from thinner cardboard (like cereal boxes) and paint them white, cream, or pastel colors.
- Use a black pen or fine brush to add doors, windows, and roof details.
- Glue the houses into the box along with bottle-brush trees, tiny figures, or paper trees.
- Add “snow” using cotton batting, shredded white paper, or biodegradable fake snow.
- Slip a battery-operated fairy light strand behind the houses for a warm glow.
Display your little village on a console table, bookshelf, or kids’ dresser. You can even make
one village per child and let them add to it every year.
5. A Faux Cardboard Fireplace for a Cozy Focal Point
No fireplace? No problem. With a few big boxes, you can build one at least visually and
create the perfect spot for stockings and garlands.
Basic cardboard fireplace:
- Use a large flat shipping box as the “wall” and a second box cut into an archway for the opening.
- Glue or tape the arch shape to the wall panel so it stands upright.
- Add a long, narrow box on top as the mantel shelf.
- Cover the whole structure with faux brick-print paper, peel-and-stick wallpaper, or paint it white for a minimalist look.
- Inside the opening, stack cut “logs” made from rolled-up cardboard and tuck in string lights for a faux fire.
This project is especially great for renters, small apartments, or kids who’ve always wanted a
fireplace for Santa’s grand entrance.
6. Advent Calendar Made from Tiny Boxes
Instead of buying a new advent calendar every year, create a reusable one from small boxes
(think jewelry boxes, small mailers, or folded pieces of cardboard).
Steps:
- Collect or craft 24 small boxes of roughly similar size.
- Cover them with wrapping paper, paint, or kraft paper.
- Number each box 1–24 with stickers, stamps, or hand lettering.
- Fill with small treats, notes, or activities (like “watch a Christmas movie” or “bake cookies”).
- Arrange in the shape of a tree on a piece of foam board, or stack them in a rectangle and tie with ribbon.
When the holiday is over, store the empty boxes inside a larger lidded box and bring them out
year after year.
7. Ornaments, Garlands, and Hanging Decor
When in doubt, cut it out. Flat cardboard is perfect for ornaments, bunting, and hanging
decorations that look handcrafted in the best way.
Easy ornament & garland ideas:
- Cut stars, snowflakes, and tree shapes from cereal boxes; paint or cover with glitter.
- Use a white paint pen on plain brown cardboard for a “gingerbread cookie” look.
- Punch holes and string shapes onto twine for a rustic garland.
- Layer two shapes together with foam tape between them for a 3D effect.
Hang these on the tree, across windows, over doorways, or along the stair railing. They’re
light, durable, and easy for kids to help decorate.
Styling Tips to Make Cardboard Decor Look Chic, Not Cheap
Upcycled doesn’t have to mean “you obviously made this from a delivery box.” A few styling
tricks can make your cardboard creations look thoughtful and elevated.
- Stick to a color palette. Choose 2–3 main colors (for example, white, gold, and forest green or kraft brown, red, and black buffalo check) and repeat them.
- Mix matte and shiny. Pair plain brown cardboard or kraft paper with metallic ribbon, glossy ornaments, or velvet bows for contrast.
- Repeat motifs. Use the same star shape, tree silhouette, or snowflake pattern across several projects to pull the look together.
- Hide the raw edges. Wrap exposed corrugated edges with ribbon or washi tape, or run a thin line of paint around them for a finished look.
- Keep lighting safe and soft. Always use battery-operated lights or LED candles with cardboard, and tuck them inside boxes or behind decor for a warm, indirect glow.
How to Store and Reuse Your Box Decor After the Holidays
One of the huge perks of cardboard decor is how simple it is to take down and store.
- Flatten when possible. Garlands, flat trees, and faux fireplace panels can be slid behind a dresser or under a bed.
- Nest boxes inside each other. Gift towers and advent calendars can often be collapsed by packing smaller boxes into larger ones.
- Label everything. Use a marker on the underside of boxes so you know what goes where next year.
- Watch moisture. Store cardboard decor in a dry, pest-free area not directly on a basement floor or garage concrete. Use a plastic bin if your climate is humid.
When a piece finally gets too worn out, you can recycle it and make a fresh version next
season. It’s decor with built-in do-overs.
Real-Life Experiences: What You Learn When You Upcycle Boxes for Christmas
After one season of turning old boxes into Christmas decor, most people have the same reaction:
“Why didn’t I start doing this years ago?” Beyond the cute finished projects, there are some
very real, very practical benefits that show up the moment you dive in.
First, upcycling boxes changes how you see “trash.” Those piles of shipping boxes that used to
feel like clutter suddenly look like raw materials. Instead of dreading the recycling run, you
start thinking, “That long, skinny box would make a great faux mantel” or “Those small boxes are
perfect for an advent calendar.” It’s a mindset shift that can spread beyond the holidays, too
you become more creative and resourceful with what you already have.
Second, these projects are surprisingly social. Because cardboard is inexpensive and easy to
work with, you don’t feel nervous about letting kids, teens, or less-experienced crafters join
in. You can hand a child a cereal box, some paint, and a handful of stickers and let them design
their own ornament or mini tree without hovering. Families often end up creating traditions:
“cardboard craft night” where everyone builds a new piece for the village or decorates another
faux gift for the hallway display.
Third, upcycled decor takes the pressure off “perfect” decorating. When you spend a lot of
money on ornate store-bought decor, it’s easy to feel anxious about chips, scratches, or broken
pieces. With cardboard crafts, there’s built-in flexibility. If a tower of boxes gets bumped and
a corner crumples, you can trim it, rewrap it, or just laugh and call it “artfully distressed.”
If a project doesn’t turn out how you imagined, you’re out a little time and a cardboard box
not your holiday budget.
Many people also notice that guests react differently to handmade decor. A wrapped-box tree in
the entryway or a DIY cardboard fireplace becomes a conversation starter. Friends ask, “Wait,
you made that from boxes?” and suddenly you’re swapping tips, sharing ideas, and maybe even
planning a craft night together. It feels personal and welcoming in a way mass-produced decor
usually doesn’t.
Finally, there’s the quiet satisfaction of knowing your decor is greener. The holiday season
can generate a lot of waste packaging, single-use items, and impulse buys. By upcycling boxes
into decorations, you’re nudging your home in a more sustainable direction without sacrificing
beauty or fun. Kids see that creativity can be just as magical as consumption, and that lesson
might be the most lasting decoration of all.
So the next time a delivery lands on your doorstep or you empty a cereal box, don’t rush to
break it down for recycling. Set it aside, grab your glue gun, and let it audition for a role in
your holiday decor. With a little imagination and a few simple supplies, those plain brown
rectangles can become some of your favorite Christmas pieces and your recycling bin will get a
much-needed holiday break.
Conclusion: Turn Your Recycling Pile into Holiday Magic
Upcycling old boxes into Christmas decor is one of those rare projects that checks every box:
budget-friendly, customizable, family-friendly, and planet-friendly. Whether you’re stacking
faux gift towers, building a cardboard Christmas tree, crafting a tiny winter village, or
creating a cozy faux fireplace, you’re turning everyday materials into something warm, festive,
and full of personality.
The next time you’re tempted to toss a box into the recycling bin, pause and picture it as part
of your holiday home wrapped in ribbon, glowing with fairy lights, or holding tiny surprises
for an advent countdown. With a little creativity, those “just old boxes” become the secret
stars of your Christmas decor.


