Table of Contents >> Show >> Hide
- Why Thrifted Glass Bird Feeders Are So Popular
- What to Look for at the Thrift Store
- Tools and Materials You’ll Need
- How to Assemble a Thrifted Glass Bird Feeder
- Keeping Your Thrifted Glass Bird Feeder Safe and Clean
- Creative Design Ideas for Thrifted Glass Bird Feeders
- Extra : Real-Life Experiences with Thrifted Glass Bird Feeders
- Conclusion
If you’ve ever wandered through a thrift store and thought, “Wow, that glass candy dish is adorable, but what on earth would I do with it?” congratulations, you’re one step away from becoming your neighborhood’s favorite bird landlord. Thrifted glass bird feeders turn orphaned dishes, vases, and dessert cups into sparkling little buffets for your backyard birds. They’re budget-friendly, eco-conscious, and, honestly, a lot more fun than buying another generic feeder off the shelf.
In true Hometalk fashion, this project is part DIY, part treasure hunt, and part “I can’t believe this actually worked.” Let’s talk about how to find the best glass pieces, how to assemble them into sturdy feeders, and how to keep your feathered guests safe, happy, and well-fed.
Why Thrifted Glass Bird Feeders Are So Popular
Upcycled bird feeders have exploded in popularity because they hit all the right notes: sustainable, creative, and unique. Instead of sending glassware to the landfill, you give it a glamorous new life in the garden. Vintage dessert plates, pressed-glass bowls, glass candlesticks, and quirky vases can all become part of your next bird feeder “totem.”
Plus, glass has a few distinct advantages when you’re designing bird feeders:
- Easy to clean: Glass surfaces don’t absorb moisture, and you can scrub or soak them to remove seed hulls and droppings.
- Weather-resistant: Unlike untreated wood or cardboard, glass won’t rot or warp in the rain.
- Beautiful in the sunlight: Cut glass and colored glass shimmer in the sun, adding instant garden art even when the birds are off doing bird things.
Best of all, every feeder is one of a kind. If you love a “shabby chic” or cottage garden look, thrifted glass bird feeders feel like they were custom-designed just for you.
What to Look for at the Thrift Store
Before you grab a cart and go full “DIY goblin mode,” it helps to know what kinds of glass pieces work best. Think simple, sturdy shapes and surfaces that will actually hold seed and give birds space to perch.
1. Bowls and Plates
For most thrifted glass bird feeders, you’ll want one or two main “seed platforms” made from bowls or plates. Look for:
- Shallow bowls (about 7–8 inches wide and up to 3 inches deep) for holding seed.
- Salad or dessert plates with a raised rim so seed doesn’t slide off in the breeze.
- Textured or pressed-glass designs that add visual interest without creating crevices too deep to clean.
The goal is a wide surface that can hold seed and leave room for birds to stand comfortably around the edges.
2. Candlesticks, Vases, and Glass Stems
These pieces become the “neck” or pedestal that connects your base to your seed dish. A glass candlestick, a sturdy bud vase, or even an upside-down sundae dish can add height and drama to your design. Just make sure it has:
- A flat, solid contact area for gluing.
- Thick, durable glass (thin glass is more likely to crack outdoors).
- Enough weight that the finished feeder won’t tip easily.
3. Hanging Hardware and Extras
If you want a hanging bird feeder instead of a staked or pedestal one, keep an eye out for:
- Metal hanging baskets (you can set a plate inside to hold seed).
- Small glass bowls with a sturdy rim you can drill or attach hooks to.
- Decorative chains, hooks, or even old chandelier crystals for a little sparkle.
When in doubt, pick pieces that feel solid in your hand and have at least one broad, flat surface for adhesive. If you feel like it might shatter if you look at it sideways, leave it on the shelf.
Tools and Materials You’ll Need
Once you’ve rescued your glass treasures from the thrift-store shelf, gather a few basic supplies:
- Strong, outdoor-safe adhesive (such as a clear, industrial-strength glue formulated for glass and ceramics).
- Rubbing alcohol and a cloth to clean glass surfaces before gluing.
- Optional: glass drill bit and drill (for drainage holes or hanging hardware).
- Optional: metal stake or rebar if you want a staked bird feeder for the garden.
- Bird seed blend appropriate for your local species (black oil sunflower seed is a reliable classic).
- Protective gloves and eye protection if you’re drilling glass.
Safety note: Drilling glass requires patience, a proper bit, and a gentle touch. If that feels intimidating, stick to designs that rely on glue and existing shapes instead of drilling holes.
How to Assemble a Thrifted Glass Bird Feeder
There are lots of ways to design your feeder, but this simple “glass totem” style works beautifully and shows off your thrifted finds.
Step 1: Clean and Dry All Pieces
Wash your glassware with warm, soapy water to remove dirt and stickers. Rinse well and let everything dry completely. For the areas where you’ll apply adhesive, wipe with rubbing alcohol to remove any leftover residue. Glue sticks best to clean, dry glass.
Step 2: Create the Base
Decide whether your feeder will be:
- Staked (attached to a pole that you push into the ground), or
- Freestanding (a pedestal that sits on a flat surface), or
- Hanging (suspended from a hook or tree branch).
For a staked feeder, you can glue a sturdy vase or candlestick upside down to the underside of a plate. Later, you’ll slip that over a metal stake driven into the ground. For a freestanding feeder, use a wide-bottom bowl or plate as your lowest layer to keep the structure stable.
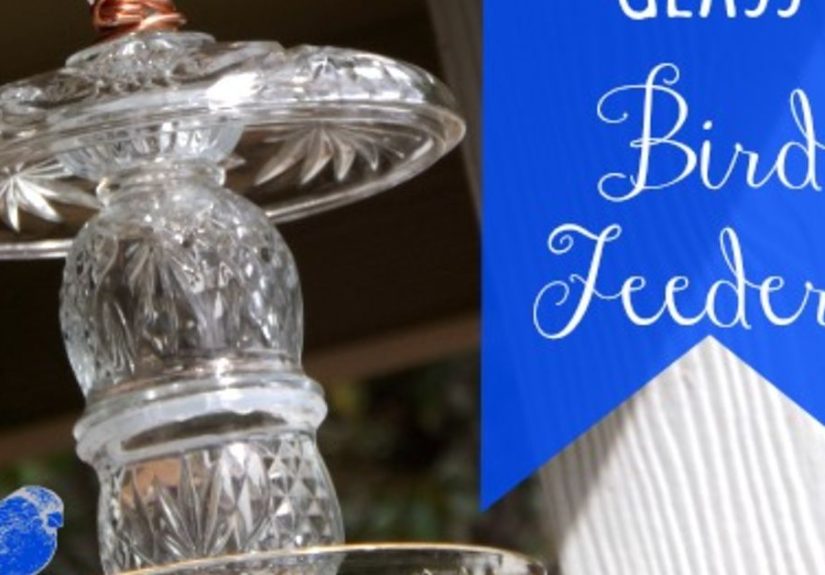
Step 3: Stack and Glue the Glass “Totem”
On a flat surface, start dry-stacking your pieces to see how they look together. Try:
- A wide plate at the bottom.
- A candlestick or short vase in the middle as the neck.
- A shallow bowl or smaller plate at the top to hold bird seed.
Once you like the arrangement, disassemble it and begin gluing one joint at a time:
- Apply a thin, even bead of adhesive to the contact area.
- Press the glass pieces together and gently twist to spread the glue.
- Wipe away any excess that squeezes out.
- Use painter’s tape or props to hold pieces steady while they cure.
Most outdoor glues need 24 hours or more to fully cure. Follow the product instructions carefullythis isn’t the time to get impatient and start feeding birds on semi-glued glass.
Step 4: Add Drainage and Final Touches
Standing water plus bird seed equals a moldy, clumpy mess. If your top dish doesn’t already have a way for water to escape, you have two options:
- Drill a few small drainage holes in the bottom of the bowl using a glass drill bit and plenty of water for lubrication.
- Use less seed at a time and bring the feeder in or dump leftover seed after heavy rain.
You can also paint non-food-contact areas of the glass with outdoor-safe glass paint, attach little glass beads, or decorate the base for extra personality. Just keep surfaces that birds stand on or eat from smooth and easy to clean.
Step 5: Place Your Feeder in the Yard
When the glue is fully cured and everything feels solid, it’s time for the big move. Choose a location that is:
- Visible from a window so you can enjoy bird watching.
- Safe from predators like cats (avoid low, hidden corners where cats can ambush).
- Somewhat sheltered from extreme wind to keep seed from blowing away.
Fill the top dish with a modest layer of bird seed. Birds usually take a few days to discover a new feeding spot, so don’t panic if they don’t show up instantly. Once they find it, word travels quickly through the bird gossip network.
Keeping Your Thrifted Glass Bird Feeder Safe and Clean
A stylish feeder is great, but a safe feeder is non-negotiable. Birds can spread disease when feeders are dirty or seed is spoiled, so maintenance is part of the deal.
Clean Regularly
Aim to wash your glass bird feeder every one to two weeks, and more often during wet weather or heavy use. Take the feeder down, dump out old seed, and wash with warm, soapy water. Rinse thoroughly and let it dry before refilling.
Use the Right Seed
Cheap seed mixes packed with filler (like milo and wheat) often end up scattered on the ground. Instead, choose high-quality options like:
- Black oil sunflower seed.
- Sunflower hearts or chips.
- Nyjer seed (in a separate, specialized feeder).
- Suet cakes in cooler weather, using a different feeder style.
For open glass dishes, a simple sunflower blend is usually your best betit’s popular with many backyard species and less likely to be wasted.
Watch for Mold and Pests
If you notice clumped, discolored seed or a funky smell, toss it, clean the feeder, and start fresh. Don’t overfill the dish; it’s better to refill more often than to let seed sit for weeks. If squirrels become a problem, place your feeder farther from jump-off points like fences and low branches, or pair your design with a baffle on the pole.
Creative Design Ideas for Thrifted Glass Bird Feeders
Once you’ve made one thrifted glass bird feeder, it’s hard to stop. Here are a few fun twists to try:
“Tea Party” Bird Feeder
Use a glass teacup and saucer glued together, then attach them to a candlestick base. The saucer becomes a seed tray, and the teacup makes a whimsical accentperfect for a cottage-style garden bed.
Tiered Dessert Stand Feeder
Stack two or three plates of different sizes with glass stems between them. The top tier becomes the main feeding area, while the lower tiers act as “landing zones” or simply garden decor. This style works well as a staked feeder near a patio or seating area.
Hanging Basket and Plate Feeder
Set a thrifted glass plate inside a metal hanging basket. The basket supports the plate, and the plate holds the seed. Add a chain and hook, and hang it from a sturdy branch or pergola beam. This combo blends rustic metal and sparkling glass in a single design.
Extra : Real-Life Experiences with Thrifted Glass Bird Feeders
The first time many people make a thrifted glass bird feeder, they’re really just hoping it doesn’t crash to the ground in a dramatic glitter shower. But once that first feeder survives a few rainstorms and starts drawing in chickadees, finches, and nuthatches, it quickly becomes more than just a craft projectit turns into a small daily joy.
One common experience DIYers share is that the feeder becomes a kind of seasonal ritual. In early spring, you might wander back into the thrift store looking for pastel glass or floral patterns to match the fresh green in the yard. By summer, you’re scanning the shelves for bold colors or mid-century pieces that pop against lush foliage. The feeder you made in March may still be going strong, but that doesn’t stop you from making a second one “just to see how it looks on the other side of the garden.”
Another thing people notice is how quickly birds learn to trust the new setup. At first, they might circle warily, landing on nearby branches and chattering about your strange glass sculpture. Within days, a brave chickadee or titmouse will swoop in, grab a seed, and dart away. Soon, you’ll look outside and see a full lineup of birds taking turns like they’re at a tiny, feathery buffet. If you work from home or spend time in a kitchen or office with a window view, that feeder becomes a moving, chirping screensaver you never get tired of watching.
There’s also a sense of satisfaction that comes from knowing your project is made from leftovers and castoffs. Those mismatched glass bowls and candlesticks might have sat on a thrift store shelf for months. Instead, they get to be part of something beautiful and useful. For many people, that upcycling element becomes addictive. You start looking at everything differently: that chipped punch bowl suddenly looks like the base of a birdbath, and the lonely glass compote starts to resemble the perfect suet feeder.
Of course, there are lessons learned along the way. Almost everyone has a story about using a glue that wasn’t quite strong enough, or placing a feeder in a spot where a sudden windstorm tested its limits. You learn quickly to give adhesives plenty of time to cure and to check every joint before setting the feeder outside. You might discover that a particular plate design holds water too easily and decide to swap it out for one with a shallower center or add drainage holes the next time around.
Maintenance becomes part of the rhythm. On cool mornings, you might head out with a bucket of warm soapy water and a scrub brush, tidy up the glass, rinse it clean, and refill the seed. It’s a small chore, but it’s oddly relaxingalmost like resetting a tiny outdoor dining room. You start recognizing the regulars: the cardinal that always stands on the same corner, the sparrow that loves to kick seed over the edge, the goldfinch that insists on visiting right when you’re on a video call.
Many people also find that their thrifted glass bird feeders spark conversations. Guests notice the sparkling dishes in the yard and ask where you bought them, which is the perfect opening to say, “Actually…I made that from thrift store glass!” It’s a great gateway into sharing upcycling ideas, bird-watching tips, or even planning a crafting afternoon with friends. A couple of hours at the thrift store followed by an afternoon with glue, snacks, and good music can easily turn into a mini workshop where everyone goes home with their own unique feeder.
Most importantly, these feeders remind you that creativity doesn’t have to be complicated. You don’t need a workshop full of power tools or a huge budget. A few carefully chosen thrifted pieces, some strong glue, and a bit of patience are enough to build something that brightens your garden and brings life to your outdoor space. The birds don’t care whether your pieces match or whether your color palette follows the latest design trend. They’re just happy to have a safe, reliable spot to grab a snack.
And once you’ve made one thrifted glass bird feeder, you’ll probably catch yourself saying, “Okay, but what if I used that weird vintage dessert cup next time?” That curiosity is the heart of DIY: always looking at ordinary objects and seeing what they could become instead.
Conclusion
Thrifted glass bird feeders are proof that a little imagination can turn secondhand dishes into first-class garden decor. They’re simple to make, inexpensive, and endlessly customizable, whether your style is vintage, modern, or delightfully eclectic. With a few smart design choices and regular cleaning, you can create feeders that both you and your backyard birds will love.
So next time you’re browsing a thrift store and see a lonely glass bowl or a quirky candlestick, picture it in your garden, filled with seed and surrounded by fluttering wings. That’s the magic of upcycling: turning forgotten glass into a daily, living display right outside your window.


