Table of Contents >> Show >> Hide
- Why These Raspberry Cheesecake Bars Work
- Ingredients You’ll Need
- How to Make Raspberry Cheesecake Bars
- Tips for Perfect Cheesecake Bars
- Flavor Variations and Smart Swaps
- How to Serve Raspberry Cheesecake Bars
- Storage, Make-Ahead, and Freezing
- Common Mistakes to Avoid
- Conclusion
- Kitchen Notes and Real-Life Experience With Raspberry Cheesecake Bars
- SEO Metadata
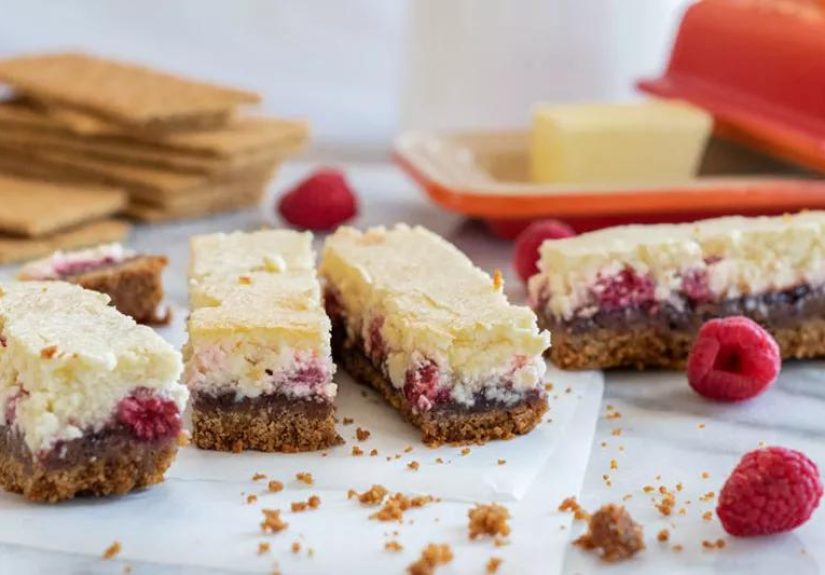
Some desserts walk into the room politely. Raspberry cheesecake bars kick the door open, set down a tray, and immediately become the reason everyone is suddenly “just having a tiny piece.” They have the tangy richness of classic cheesecake, the bright pop of raspberry, and the practical brilliance of being sliced into neat little squares instead of requiring a ceremonial springform-pan moment. In other words, they are the overachievers of the dessert table.
If you love creamy cheesecake but do not love babysitting a water bath like it is a moody aquarium, these bars are your dessert soulmate. They bake in a simple pan, chill beautifully, slice cleanly when handled right, and taste like something from a bakery case that charges extra for “seasonal berry elegance.” The best part is that they are easy enough for a regular weekend but pretty enough for birthdays, baby showers, brunches, and those family dinners where everybody pretends they are too full until dessert appears.
This recipe leans into what makes raspberry cheesecake bars so irresistible: a buttery graham cracker crust, a smooth vanilla-lemon cheesecake filling, and a vivid raspberry swirl that cuts through the richness with just enough tartness to keep every bite from feeling heavy. The flavor balance matters here. Cheesecake without brightness can get sleepy. Raspberries bring the wake-up call.
Why These Raspberry Cheesecake Bars Work
There is a reason cheesecake bars keep winning people over. They deliver all the creamy, velvety charm of a full cheesecake, but in a format that is easier to bake, chill, transport, and serve. They also make portion control seem possible, at least in theory. In practice, most people eat one bar, then “trim” another while cutting the tray. Science probably supports this.
These bars work because every layer pulls its weight. The graham cracker crust adds crunch and buttery sweetness. The cheesecake filling is rich but not dense enough to require a nap. Lemon juice and zest sharpen the cream cheese flavor without hijacking it. The raspberry swirl adds fruit, color, and a little dramatic flair on top. You end up with a dessert that feels balanced instead of overwhelmingly sweet.
Ingredients You’ll Need
For the Graham Cracker Crust
- 2 cups graham cracker crumbs
- 6 tablespoons unsalted butter, melted
- 2 tablespoons granulated sugar
- Pinch of fine salt
For the Raspberry Swirl
- 2 cups raspberries, fresh or frozen
- 3 tablespoons granulated sugar
- 2 teaspoons lemon juice
- 1 teaspoon cornstarch
- 1 tablespoon water
For the Cheesecake Filling
- 24 ounces full-fat cream cheese, softened
- 3/4 cup granulated sugar
- 1/3 cup sour cream
- 2 large eggs
- 1 large egg yolk
- 1 teaspoon vanilla extract
- 1 tablespoon fresh lemon juice
- 1 teaspoon lemon zest
- Pinch of fine salt
Optional for Serving
- Fresh raspberries
- Whipped cream
- White chocolate drizzle
- Extra raspberry sauce
How to Make Raspberry Cheesecake Bars
1) Prepare the Pan
Line a 9-by-9-inch baking pan with parchment paper, leaving enough overhang on two sides to lift the bars out later. This step is not glamorous, but it is the difference between “beautiful bakery squares” and “why am I excavating dessert with a spoon?” Lightly grease the parchment.
2) Bake the Crust
Preheat the oven to 350°F. In a bowl, mix the graham cracker crumbs, melted butter, sugar, and salt until the texture resembles wet sand. Press the mixture firmly into the bottom of the pan. Use the bottom of a measuring cup to compact it evenly. Bake for 10 minutes, then let it cool slightly while you make the filling.
3) Make the Raspberry Swirl
In a small saucepan, combine the raspberries, sugar, and lemon juice over medium heat. Stir occasionally until the berries break down and become saucy, about 5 to 7 minutes. Mix the cornstarch with the water, then stir it into the raspberry mixture. Cook for another minute or two until slightly thickened. Strain the sauce through a fine-mesh sieve if you want a smoother swirl with fewer seeds. Let it cool.
4) Mix the Cheesecake Filling
In a large bowl, beat the softened cream cheese and sugar until smooth. Add the sour cream, vanilla, lemon juice, lemon zest, and salt, then mix again until combined. Add the eggs and egg yolk last, mixing on low speed just until incorporated. This is not the time to whip enthusiasm into the batter. Too much air can lead to puffing, sinking, and surface cracks. Cheesecake likes calm energy.
5) Assemble the Bars
Pour the cheesecake filling over the partially cooled crust and spread it evenly. Drop spoonfuls of the raspberry sauce over the top. Use a skewer or butter knife to swirl the sauce gently through the top layer. Do not overdo it. You are aiming for elegant ribbons, not an abstract painting created during a sugar rush.
6) Bake Low and Gentle
Reduce the oven temperature to 325°F if your oven runs hot, or keep it at 350°F if it bakes gently and evenly. Bake for 36 to 42 minutes, until the edges look set but the center still has a slight jiggle when nudged. That soft wobble is your friend. Pulling cheesecake at the right moment is how you get a creamy interior instead of a dry, overbaked one.
7) Cool, Then Chill
Let the bars cool at room temperature for about 1 hour. Then refrigerate them for at least 6 hours, preferably overnight. Yes, this requires patience. No, warm cheesecake bars are not the same thing. Chilling is what gives them that sliceable, creamy texture that makes people think you secretly own a pastry torch and a very tiny apron.
Tips for Perfect Cheesecake Bars
Use room-temperature cream cheese. Cold cream cheese is stubborn, lumpy, and emotionally unavailable. Softened cream cheese blends smoothly and gives you a silky batter.
Do not overmix. Once the eggs go in, mix gently. Overmixing adds excess air, and excess air leads to puffed-up bars that collapse like they just got disappointing news.
Pre-bake the crust. This keeps the bottom layer crisp and buttery instead of soft and soggy. Nobody dreams about a soggy crust.
Swirl lightly. A few dramatic loops on the surface create a prettier pattern than stirring the raspberry sauce deep into the filling.
Chill before slicing. Clean cuts come from cold bars and a warm knife. Run a sharp knife under hot water, wipe it dry, and clean it between cuts.
Flavor Variations and Smart Swaps
One reason this easy raspberry cheesecake bars recipe earns repeat status is that it is flexible. You can change the mood without changing the basic method.
- Cookie crust version: Swap the graham crackers for vanilla wafers, Biscoff cookies, or even chocolate sandwich cookies for a richer base.
- Jam shortcut: In a rush, use seedless raspberry jam loosened with a little lemon juice instead of homemade raspberry sauce.
- White chocolate touch: Add melted white chocolate to the filling for a more decadent, bakery-style bar.
- Lemon-forward version: Increase the lemon zest and top with fresh berries for a brighter spring or summer dessert.
- Mixed berry option: Use part raspberry and part blackberry for a deeper, slightly earthier fruit swirl.
How to Serve Raspberry Cheesecake Bars
These bars are best served chilled, straight from the refrigerator or after resting for 10 minutes at room temperature. They pair beautifully with coffee, iced tea, or a glass of milk if you are keeping things classic. For a party tray, top each bar with a fresh raspberry and a tiny dollop of whipped cream. For a dinner-party version, drizzle a little extra raspberry sauce over the plate and pretend you do this sort of thing all the time.
Because they are portable and easy to portion, baked raspberry cheesecake bars are especially good for potlucks, showers, holiday dessert spreads, and make-ahead entertaining. They travel better than a full cheesecake and cause less serving drama. No one has to stand there with a cake server negotiating the geometry of a clean wedge.
Storage, Make-Ahead, and Freezing
Store the bars in an airtight container in the refrigerator for up to 4 days. They actually taste even better after a full night in the fridge, which makes them an ideal make-ahead dessert.
To freeze, chill them completely, slice them, and place the bars on a tray until firm. Then wrap each bar individually and store them in a freezer-safe container for up to 2 months. Thaw overnight in the refrigerator. This is dangerously convenient knowledge.
Common Mistakes to Avoid
- Using cold dairy: Lumpy filling usually starts here.
- Skipping parchment: Lifting the bars out cleanly becomes much harder.
- Overbaking: Dry, cracked cheesecake is usually cheesecake that stayed in the oven too long.
- Cutting too soon: If the bars are not fully chilled, they will slice like a soft promise.
- Too much swirl sauce in one spot: Heavy puddles can sink and affect the surface texture.
Conclusion
Raspberry cheesecake bars are one of those rare desserts that feel both impressive and practical. They have the creamy luxury of cheesecake, the brightness of fresh berries, and the convenience of a bar cookie. That combination is hard to beat. Whether you make them for a holiday tray, a birthday dessert table, or a random Tuesday that felt like it needed better decisions, they show up beautifully every time.
If your goal is a dessert that tastes polished without requiring professional-level fuss, this is the one. The buttery crust, tangy cream cheese filling, and ruby raspberry swirl do all the heavy lifting. You just need a pan, a little patience, and enough self-control not to cut into them after hour one of chilling. Frankly, that last part is the hardest step in the whole recipe.
Kitchen Notes and Real-Life Experience With Raspberry Cheesecake Bars
The first time I made raspberry cheesecake bars, I treated them like regular bars and cheesecake at the same time, which is exactly how you end up learning dessert humility. I rushed the softening step, beat the filling like I was trying to qualify for a meringue championship, and then acted shocked when the top looked a little dramatic. The bars still tasted fantastic, because raspberry and cream cheese are the kind of duo that can survive a little chaos, but they taught me something valuable: cheesecake rewards patience more than talent. That is good news for normal people and mildly offensive news for anyone who likes to win on pure confidence.
Since then, I have made versions of these bars for summer picnics, holiday dessert platters, neighborhood dinners, and one extremely competitive brunch where everyone showed up with suspiciously polished baked goods. These bars held their own every time. They are especially useful when you want something prettier than brownies but less fussy than a layer cake. A tray of raspberry cheesecake bars looks thoughtful. It says, “I planned dessert,” even if the truth is closer to, “I needed something reliable that would not make me wash three cake pans.”
One of my favorite things about this recipe is how adaptable it feels to the season. In early summer, I use fresh raspberries and go heavy on the lemon zest so the bars taste bright and almost cheerful. In colder months, I happily use frozen berries for the swirl and lean into the cozy side of cheesecake. The bars still come out rich, creamy, and sharply fruity, which is exactly what you want when the weather is gray and daylight seems to leave work early.
I have also learned that people react differently to cheesecake bars than they do to a whole cheesecake. A full cheesecake makes guests pause. They take a careful slice, maybe apologize for the size, and act like dessert is a formal decision. Bars remove that formality. People grab one, then circle back for another under the noble excuse of “trying a smaller second piece.” It is a loophole dessert. I respect that.
Another real-world advantage is transport. A whole cheesecake, while glorious, can feel like traveling with a fragile moon. Raspberry cheesecake bars are much more forgiving. Chill the pan, cover it well, and bring a knife. Done. They stack better in a cooler, they serve faster, and they do not require anyone to discuss springform-pan engineering over coffee. For potlucks and parties, that is a major win.
The texture is where these bars truly earn their keep. When they are baked just until the center barely jiggles, then chilled long enough, the filling turns smooth and dense in the best way, not heavy or stiff. The raspberry swirl breaks up the richness with bright tartness, and the crust gives each bite a little contrast. It is the kind of dessert that feels carefully balanced, even though the ingredient list is friendly and familiar.
If you are making these for the first time, my best advice is simple: trust the chill time, use room-temperature dairy, and resist the urge to over-swirl. The beauty of raspberry cheesecake bars is that they do not need fancy tricks. They just need a little respect and a refrigerator. Once you make a batch that slices cleanly into those creamy pink-streaked squares, you will understand why this recipe tends to become “the one I always bring.” It is reliable, crowd-friendly, and just dramatic enough to be memorable without becoming difficult. In the dessert world, that is basically a superpower.