Table of Contents >> Show >> Hide
- Why Built-In Cabinets Are the “Cheat Code” for Playroom Storage
- Step 1: Plan What You’re Storing (Before You Plan What You’re Building)
- Step 2: Design Built-In Cabinets Kids Will Use (Not Ignore)
- Step 3: Pick Materials and Finishes That Survive Real Life
- Step 4: Safety First (Because Kids Climb Like It’s Their Job)
- Step 5: A Practical Built-In Example (So You Can Picture It)
- Budget and Timeline: What Most People Don’t Say Out Loud
- How to Keep the Playroom Organized After the Makeover
- Conclusion: Storage That Lets the Room Be a Room
- Real-Life Experiences: What People Learn After Doing a Playroom Makeover with Built-In Cabinets
A playroom is basically a tiny theme park that lives inside your housecomplete with attractions (blocks),
concessions (goldfish crackers), and the occasional surprise “landmine” (a LEGO, obviously).
If your current setup feels like a toy tornado keeps renewing its lease, built-in cabinets can be the upgrade
that turns chaos into calm without turning your home into a museum where fun is illegal.
This guide walks through how to plan a playroom makeover centered on built-in cabinets for storagewhat to store,
how to design cabinets kids will actually use, which materials hold up to real life, and the safety details that matter.
It’s in-depth, practical, and (yes) friendly to anyone who has ever stepped on a tiny plastic dinosaur at 2 a.m.
Why Built-In Cabinets Are the “Cheat Code” for Playroom Storage
Freestanding shelves and bins can work, but they tend to multiply like gremlins. Built-insespecially a combo of base
cabinets and open shelvinggive you structure: a predictable “home” for toys, books, crafts, and the mysterious parts
that belong to something you no longer own.
- They reduce visual clutter: Closed doors hide the messy stuff fast (because cleanup time isn’t always a lifestyle).
- They create zones: Reading here, art there, “launching stuffed animals into orbit” over there.
- They can add usable surfaces: A countertop or ledge becomes a puzzle station, art table, or display shelf.
- They’re easier to maintain long-term: A built-in system can evolve as kids growtoddlers to teenswithout a complete reset.
Step 1: Plan What You’re Storing (Before You Plan What You’re Building)
The biggest reason storage fails isn’t the cabinetit’s the lack of a storage strategy. Start with a quick inventory
and decide what deserves prime real estate (easy-to-reach storage) versus “top shelf” status.
A quick inventory that actually helps
Grab a notepad (or your notes app) and list what lives in the playroom today. Then tag each item with one of these:
Daily, Weekly, Seasonal, or Sentimental.
- Daily: blocks, dolls/action figures, cars, coloring supplies, favorite books
- Weekly: board games, puzzles, STEM kits, dress-up accessories
- Seasonal: holiday crafts, special sets, “rainy day” toys
- Sentimental: keepsakes, artwork archives, baby books (store higher and safer)
Design around zones, not vibes
A playroom that “looks cute” but doesn’t function will slowly become the island from Lord of the Flies, except
with plushies. Try to map your room into zones:
- Quiet zone: books, reading nook, puzzles
- Build zone: blocks, LEGO, train sets, magnetic tiles
- Make zone: paper, markers, glue, scissors (stored safely), paints
- Active zone: open floor space for movement, pretend play, mini trampoline (if that’s your thing)
Step 2: Design Built-In Cabinets Kids Will Use (Not Ignore)
The secret sauce: storage has to match behavior. If kids can’t open it, reach it, or understand it, they won’t use it.
And then you’re just paying for fancy boxes that you, personally, will be cleaning forever.
The best layout for most playrooms: closed base + open upper
A common, proven approach is base cabinets for bulk storage (toys, crafts, games) with open shelves above for books,
display items, and “grab-and-go” baskets. It balances hidden storage with easy access and keeps the room from looking
like a storage unit with snacks.
Built-ins often work best when they’re part of a wall system: base cabinets along the bottom, a durable
counter/ledge at “kid height,” and shelving above for lighter items. This also gives you an obvious “return zone”
during cleanup: everything goes back behind a door or into a labeled bin.
Choose doors and drawers based on what’s inside
- Drawers: best for small items (LEGO, dolls, art supplies) because you can see everything at once.
- Doors with shelves inside: best for larger bins, stacked games, and bulky toys.
- Open cubbies (limited): great for frequently used baskets, but too many open cubbies = visual clutter returns.
Kid-height rules (so the system works without you as the “butler”)
Put daily-use items in the “easy zone”: roughly from knee height to chest height for your child. Top shelves should
be for adult-managed items: craft refills, messy kits, sentimental storage, and anything you don’t want becoming a
“science experiment.”
Consider the countertop: it’s more powerful than it looks
Adding a countertop over base cabinets creates a flexible work surface: puzzles, coloring, building sets, even a laptop
spot for homework later. If you have the space, this is one of the highest-value upgrades because it increases function
without increasing clutter.
Don’t forget the “awkward” spaces
Built-ins shine in the areas that are hard to furnish: under a window, around a TV niche, or along a wall with
off-center doors. A window seat with cabinets below can store big toys while creating cozy seating. A shallow upper
cabinet run can hold books and art supplies without swallowing the room.
Step 3: Pick Materials and Finishes That Survive Real Life
Playrooms aren’t gentle. They’re sticky, occasionally sandy, and subject to surprise percussion concerts.
Choosing durable materials isn’t about being fancyit’s about being able to wipe something off without crying.
Cabinet boxes: what matters most
- Plywood boxes: sturdy and resistant to sagging; often preferred for built-ins that carry weight.
- Engineered wood (like MDF/particle board): common in stock cabinets; can work well if kept dry and properly supported.
- Solid wood doors (paint-grade): durable and classic; great if you want a long lifespan.
Hardware upgrades that pay you back daily
- Soft-close hinges and slides: fewer slammed doors, fewer pinched fingers, less noise.
- Simple pulls/knobs: easy for small hands; avoid sharp edges or overly pointy designs.
- Magnetic catches (when appropriate): can help keep doors closed and the look tidy.
Paint and indoor air: “low odor” isn’t just a nice-to-have
Many homeowners choose low-VOC or zero-VOC paints/primers for kids’ spaces, especially when painting cabinetry in a room
that gets daily use. Also consider cure time: “dry to the touch” is not the same as “fully cured,” which matters when
small hands immediately test durability with a toy truck.
Countertop options for playrooms
- Laminate: budget-friendly and easy to clean; great for crafts and snacks.
- Butcher block: warm look; needs sealing and occasional maintenance.
- Quartz: durable and wipeable; pricier, but extremely resilient.
Pro tip: choose a slightly rounded edge profile on counters and shelves. It looks polished and is kinder to foreheads
during enthusiastic play.
Step 4: Safety First (Because Kids Climb Like It’s Their Job)
Built-ins can be safer than tall, freestanding furnitureif they’re installed correctly and thoughtfully.
Safety isn’t a “bonus feature.” It’s part of the build.
Non-negotiable safety checklist
- Secure cabinets properly: Built-ins should be firmly attached to wall framing, following manufacturer instructions or professional installation standards.
- Anchor anything that could tip: If you have freestanding pieces in the room (bookshelves, dressers, TV stands), anchor them.
- Keep heavy items low: Store big toys, board games, and heavy bins in lower cabinets/drawers.
- Avoid glass in kid zones: Use durable, shatter-resistant options for doors (or skip glass entirely).
- Mind cords and outlets: Route cords out of reach and use child-safe outlet covers where needed.
- Plan for pinched fingers: Soft-close hardware helps; also avoid gaps where small fingers can get caught.
If you’re doing any DIY work, keep it age-appropriate and supervised: design and organizing can be great family projects,
but cutting, fastening, and installation should be handled by a qualified adult or professional for safety.
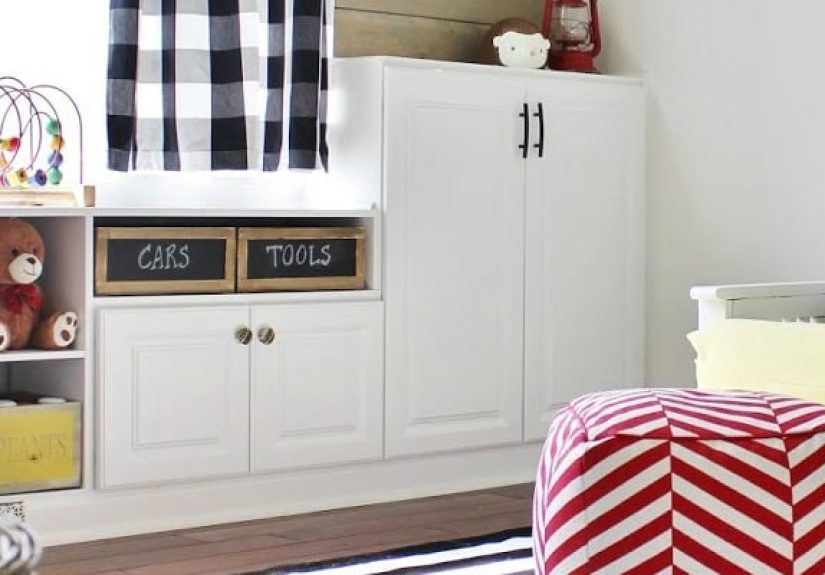
Step 5: A Practical Built-In Example (So You Can Picture It)
Here’s an example layout for a typical wallsay, a 10-foot run in a medium playroomdesigned for both storage and daily use:
Example: The “Clean-Up In 5 Minutes” wall
- Base cabinets: three to four stock base cabinets (mix of drawers + doors) spanning the wall
- Countertop: a continuous surface across the base cabinets for puzzles, crafts, or display
- Upper shelves: open shelving for books and a few baskets (not 47 basketslet’s stay realistic)
- One tall cabinet (optional): a pantry-style unit for games, art paper, and “grown-up managed” supplies
Why it works: kids can grab what they need from drawers/baskets, you can hide bulk clutter behind doors, and the counter
acts like a “landing strip” for active projects instead of spreading across the floor.
Budget and Timeline: What Most People Don’t Say Out Loud
Costs vary wildly based on cabinet type (stock vs. semi-custom vs. custom), countertop choice, and whether you hire out
installation/finish work. A realistic way to think about it is to pick your “splurge” and “save.”
Where to save
- Use stock cabinets for the base run (they can look custom once trimmed out).
- Choose durable, midrange hardware rather than designer pulls.
- Go laminate for the countertop if the space will see lots of crafts and glue.
Where to splurge (if you can)
- Soft-close drawers (daily quality-of-life upgrade).
- A great paint finish (professional spraying or high-quality paint systems can look dramatically better).
- Lighting (a well-lit playroom feels bigger, cleaner, and more inviting).
Timeline tip: if you’re ordering cabinets, build in extra time for shipping, out-of-stock surprises, and the reality
that everyone decides to remodel at the same time (especially around holidays).
How to Keep the Playroom Organized After the Makeover
A playroom makeover is excitinguntil three days later when the floor becomes a toy sea again. Built-ins help, but you
still need a system that matches daily life.
Use “category containers,” not perfection
Instead of organizing every tiny piece, organize by category: “blocks,” “cars,” “art,” “dolls,” “games.”
Inside drawers, use small bins to separate the truly chaotic stuff (like mini-fig accessories and puzzle pieces).
Label for kids, not for Instagram
Use simple words, pictures, or even numbers. The goal is independent cleanup. If your labels require a design degree
to interpret, congratulationsyou built a museum exhibit.
Rotate toys like a tiny library
Store some toys in upper cabinets and rotate weekly or monthly. Kids stay interested, the room stays calmer, and you
reduce the number of “everything is out at once” disasters.
Make cleanup automatic
- Set a 5–10 minute timer before dinner or bedtime.
- Use a “catch-all” drawer for the random pieces you can sort later.
- Keep donation bin space in a top cabinet for outgrown items.
Conclusion: Storage That Lets the Room Be a Room
A playroom should feel like an invitationcome build, imagine, create, and crash on a rug with a book. Built-in cabinets
make that possible because they give the chaos a container. When toys have a home, the room becomes easier to reset,
easier to enjoy, and easier to share with adults who would like to sit down without impaling themselves on a plastic brick.
If you plan your storage around real habits, use a mix of open and closed space, prioritize kid-friendly access, and
take safety seriously, you’ll end up with a playroom that functions todayand still works when your “toys” become
homework, hobbies, and a suspicious number of charging cords.
Real-Life Experiences: What People Learn After Doing a Playroom Makeover with Built-In Cabinets
If you’ve ever watched a playroom makeover video, it always ends the same way: sunlight beams through the window,
baskets are lined up like obedient little soldiers, and not a single crayon is missing its cap. Real life is… less
cinematic. But the good news is that the most common “after” experiences are still very positiveespecially when
built-in cabinets are involved. Here are the lessons and patterns that show up again and again in households that
actually use their playrooms every day.
First, people almost always say the same thing: they wish they had added more closed storage. Open shelves
look great for a week, and then reality moves in with a suitcase full of mismatched toys. Closed cabinets are the
difference between “styled” and “livable.” Many families start with a plan to keep most toys visible and accessible,
then quickly realize that kids do better with limited choices. Too many options out at once can lead to
overwhelm, messier play, and faster boredom. Closed cabinets make it easier to put some toys “away” without losing them,
which supports toy rotation and calmer play.
Another common experience: drawers change everything. People are often tempted to do all doors because
doors feel simpler. But once they live with the system, drawers usually become the MVPespecially for small parts, craft
supplies, action figures, and building toys. Drawers let kids see what’s inside without dumping everything onto the floor
like they’re panning for gold. Families who include at least one wide drawer stack often report faster cleanup and fewer
“I can’t find it!” meltdowns.
Many parents also discover that the countertop becomes a behavioral cue. Before built-ins, projects tend to
migrate: puzzle on the floor, coloring at the dining table, LEGO in the hallway (why? nobody knows). After built-ins,
that countertop becomes “the project place.” Kids naturally set things there. Parents naturally keep the rest of the room
clearer. Some families even set a simple rule: anything left on the counter at the end of the day goes into the “catch-all”
drawer, which acts like a reset button for busy weeks.
Then there’s the surprise lesson: labels are less about aesthetics and more about psychology. People who
initially skip labeling often circle back later. Why? Because labels turn storage into a game kids can win.
“Put the dinosaurs in the dinosaur bin” is easy. “Put these… somewhere” is not. A lot of families end up using picture
labels for younger kids and switching to words later. Some even number bins (1–10) and keep a matching “map” on the inside
of a cabinet doorsimple, fast, and strangely satisfying.
Probably the most relatable experience: the playroom gets used more when it’s easier to reset. When a room
stays messy, families avoid it. When cleanup is fast, kids play longer and parents feel less stressed. Built-in cabinets
don’t magically remove mess, but they reduce the friction of living with it. Families often describe the makeover as a
shift from “we clean the playroom on weekends” to “we reset it in minutes each night.”
Finally, homeowners frequently say that a successful makeover required one mindset change: design for the life you
have, not the life you post. If your kids love messy crafts, plan for wipeable surfaces and a cabinet dedicated
to art. If they love building sets, plan for drawers and bins that keep parts contained. If you have limited time, plan
for a huge “bulk” cabinet where toys can be tossed behind a door in a hurry. The playroom doesn’t need to be perfectit
needs to be functional, safe, and welcoming. That’s the real win.