Table of Contents >> Show >> Hide
- Why You’ll Love This Pickled Plums Recipe
- What Kind of Plums Work Best?
- Quick Refrigerator Pickled Plums Recipe
- Flavor Notes: What These Pickled Plums Taste Like
- How to Serve Pickled Plums
- Pickled Plums vs. Umeboshi
- Tips for the Best Pickled Plums
- Common Mistakes to Avoid
- FAQ
- Experience Notes: What Pickled Plums Teach You in a Real Kitchen
- Conclusion
- SEO Tags
If your kitchen has ever looked at a bowl of plums and thought, “We could be doing something more dramatic,” pickled plums are the answer. They are sweet, tangy, lightly spiced, a little sassy, and wildly better than the phrase pickled fruit makes them sound. This is the kind of recipe that turns a humble stone fruit into a cheese-board star, a salad hero, and the one thing on the table that makes people ask, “Wait… what is that?”
This pickled plums recipe uses a quick refrigerator method, which means no pressure to become a weekend canning legend before lunch. You make a hot sweet-sour brine, pour it over fresh plums, let everything mellow in the fridge, and then start putting them on absolutely everything. Pork? Great. Sharp cheddar? Excellent. Ice cream? Weirdly delightful. These plums bring the kind of bright, punchy contrast that makes rich foods taste smarter.
There is also a more traditional Japanese version of pickled plums called umeboshi, which is salt-cured, often colored with red shiso, and usually dried in the sun. Umeboshi is intensely tart and salty, while this recipe is more of a Western-style quick pickle with vinegar, sugar, and warm spices. Same family tree, very different personality. Think cousins: one shows up in a crisp linen shirt, the other arrives on a motorcycle with a cooler full of sparkling water and snack ideas.
Why You’ll Love This Pickled Plums Recipe
Pickled plums hit several flavor notes at once: juicy fruit, gentle acidity, mild heat, and cozy spice. They are easy to make, versatile, and a brilliant way to stretch plum season a little longer. They also look gorgeous in a jar, which is not a requirement for deliciousness, but it certainly does not hurt.
Another win: the recipe is flexible without becoming chaotic. You can use red, purple, or green plums. You can keep the flavor classic with cinnamon and cloves, or nudge it in a bolder direction with ginger, black pepper, or a dried chile. The result stays balanced as long as the fruit is firm and the brine stays confidently tangy.
What Kind of Plums Work Best?
The best plums for pickling are firm-ripe. That phrase deserves a slow clap, because it solves most texture problems before they start. If the fruit is rock-hard, it will not absorb flavor very well. If it is so soft that it sighs when you touch it, the finished pickles may slump into jammy sadness. Aim for plums that yield slightly when pressed but still hold their shape.
Red plums, black plums, and even tart green plums all work nicely. Smaller plums tend to pickle evenly, while larger plums are easier to cut into wedges. If you want a prettier jar, mix colors. If you want a bolder tartness, lean toward firmer fruit. If you want the easiest grocery trip of your life, buy whichever plums look fresh and unbruised. The pickle jar is forgiving, but it cannot perform miracles on tired fruit.
Quick Refrigerator Pickled Plums Recipe
Ingredients
- 2 pounds firm-ripe plums
- 1 small red onion, thinly sliced (optional, but excellent)
- 2 cups red wine vinegar or apple cider vinegar with 5% acidity
- 1 cup water
- 3/4 cup granulated sugar
- 1 1/2 teaspoons kosher salt
- 1 cinnamon stick
- 4 whole cloves
- 1 star anise
- 1 teaspoon black peppercorns
- 4 thin slices fresh ginger
- 1 small dried chile, optional
Equipment
- 2 clean pint jars or 1 large heat-safe jar
- A nonreactive saucepan
- A sharp knife
- A ladle or heat-safe measuring cup
Method
- Prep the fruit. Wash the plums well. Cut them in half and remove the pits, or cut them into thick wedges if the plums are large. If you want the brine to soak in faster, lightly score the skins or use wedges instead of halves.
- Pack the jars. Divide the plums between the jars. Tuck in the sliced red onion if using. The onion adds sweetness, color, and savory depth, which sounds like a lot for one vegetable, but onions are overachievers.
- Make the brine. In a nonreactive saucepan, combine the vinegar, water, sugar, salt, cinnamon stick, cloves, star anise, peppercorns, ginger, and dried chile if using. Bring to a gentle boil, then lower the heat and simmer for about 5 minutes, stirring until the sugar and salt dissolve.
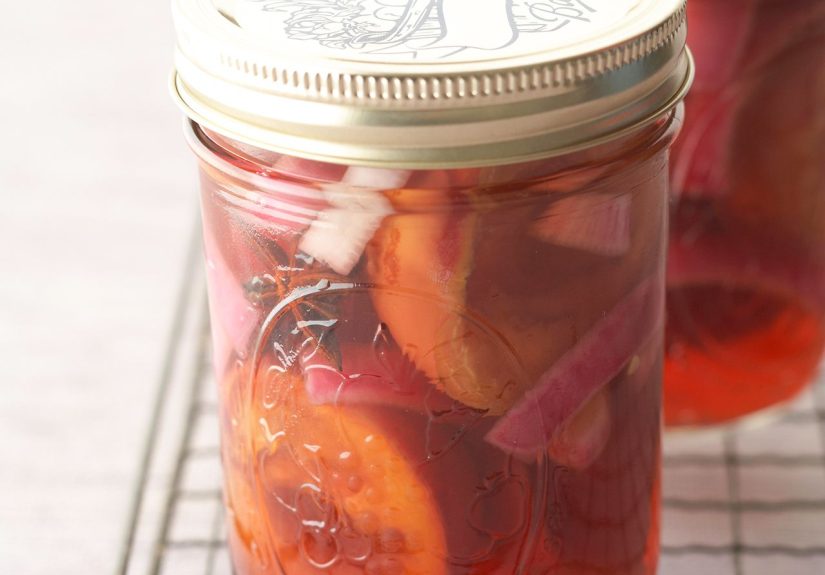
- Pour and cool. Carefully pour the hot brine over the plums, making sure the fruit is mostly submerged. Let the jars cool uncovered at room temperature.
- Refrigerate. Once cool, seal the jars and refrigerate. The plums will taste pretty good after 24 hours, but they are noticeably better after 48 hours, when the fruit relaxes and the brine stops tasting like it just finished a sprint.
Storage
Keep these pickled plums refrigerated and use them within 2 to 3 weeks for the best texture and flavor. Always use a clean utensil when fishing them out of the jar. Pantry storage is a different project and requires a separately tested canning recipe with exact proportions and processing directions. In other words, refrigerator pickles are carefree; shelf-stable canning is not the time to freestyle.
Flavor Notes: What These Pickled Plums Taste Like
The first thing you notice is brightness. The vinegar wakes up the fruit without erasing it. Then the sugar rounds out the sharpness, so you get sweet and sour rather than just a mouthful of edible side-eye. The spices arrive a second later: cinnamon for warmth, clove for depth, star anise for a whisper of licorice, ginger for freshness, and black pepper for a subtle edge.
The plums themselves stay juicy but not raw. Their skins hold the shape, while the flesh softens enough to absorb flavor. This makes them ideal for pairing with salty cheeses, fatty meats, toasted nuts, or creamy dishes that need contrast. They are also fantastic chopped into relishes and vinaigrettes, which is handy if you suddenly become a person who has “homemade pickled plum vinaigrette” in the fridge.
How to Serve Pickled Plums
This is where pickled plums really show off. Here are some of the best ways to use them:
1. With Cheese and Charcuterie
Serve pickled plums with aged cheddar, goat cheese, brie, blue cheese, or manchego. Add toasted almonds, cured meats, crackers, and maybe a little honey. The plums bring acidity and fruitiness without feeling as expected as grapes or fig jam.
2. On Salads
Slice the plums and toss them into salads with arugula, radicchio, fennel, cucumbers, or bitter greens. They are especially good with toasted walnuts and soft cheese. A spoonful of the brine whisked into olive oil also makes an excellent quick dressing.
3. Next to Rich Meats
Pickled plums are superb with pork chops, roast chicken, duck, grilled sausages, or lamb. That sweet-tart edge cuts through richness and makes the whole plate feel more balanced. Basically, they do for fatty meat what lemon does for fried fish, only with better jewelry.
4. In Grain Bowls and Rice Dishes
Chop them into rice bowls, couscous salads, quinoa lunches, or farro pilafs. Their punchy flavor wakes up mild grains instantly. If you enjoy Japanese-inspired flavors, try them with rice, sesame seeds, and shiso or basil.
5. In Drinks and Desserts
Yes, really. A slice of pickled plum in a sparkling water or shrub-style drink is wildly refreshing. You can also spoon a few over vanilla ice cream, yogurt, or panna cotta if you like desserts that flirt with savory ingredients and then walk away laughing.
Pickled Plums vs. Umeboshi
People often use the phrase pickled plums to describe two different things. The first is the Western-style vinegar pickle in this recipe. The second is umeboshi, the classic Japanese salted plum, which is usually made from ume fruit, preserved with salt, often colored with red shiso, and sometimes dried in the sun. Umeboshi is more intense, more savory, and much saltier than a sweet-sour plum pickle.
If you want that traditional umeboshi experience, think of it as a separate category rather than a simple variation. It involves a longer process, salt curing, and careful timing. The payoff is a deeply concentrated condiment often eaten with rice, tucked into rice balls, or used in dressings and sauces. This quick pickled plums recipe is easier, friendlier to beginners, and much more at home on a cheese board or next to roast pork.
Tips for the Best Pickled Plums
- Use a nonreactive pan. Stainless steel, enamel-coated, or nonstick pans are best for acidic brines.
- Do not use overripe fruit. Soft plums can turn mushy fast.
- Let the jars rest. A day is good. Two days is better.
- Keep spices whole. Whole spices flavor the brine without making it muddy.
- Check the vinegar label. For safe pickling, use vinegar with known acidity, typically 5%.
- Do not improvise canning instructions. Refrigerator pickles are flexible; shelf-stable canning requires tested formulas.
Common Mistakes to Avoid
Using Fruit That Is Too Soft
This is the fastest route to a jar of plum confetti. Firm-ripe fruit keeps its shape and texture far better.
Skipping the Cooling Step
Putting a lid on steaming-hot jars and shoving them into the fridge can create excess condensation and a slightly messy texture. Let them cool first.
Expecting Instant Magic
Freshly brined plums can taste harsh. Give them time. Pickles are a patience game, even the quick ones.
Overloading the Jar
Pack the fruit snugly, but leave enough room for the brine to move around. You want plums in flavorful liquid, not a plum traffic jam.
FAQ
Can I use less sugar?
Yes, a little. But sugar is not just for sweetness; it also balances the acidity and spice. Cut it too far and the brine can taste harsh. Start by reducing it slightly, not dramatically.
Can I skip the onion?
Absolutely. The onion adds savory depth, but the recipe still works beautifully without it.
Can I make these spicy?
Yes. Add a dried chile, red pepper flakes, or fresh sliced jalapeño. Just do not let the heat bulldoze the plum flavor.
Can I can this recipe for shelf storage?
Not this exact refrigerator version. For shelf-stable jars, follow a tested canning recipe exactly, including jar size, acidity, and processing time.
What do I do with the leftover brine?
Use it in salad dressings, shrubs, cocktails, marinades, or to wake up a pan sauce. It is too flavorful to pour down the drain. That would be a tiny kitchen tragedy.
Experience Notes: What Pickled Plums Teach You in a Real Kitchen
The first time you make pickled plums, you learn very quickly that they are not a background recipe. They announce themselves. From the moment the vinegar hits the saucepan and the spices wake up, the kitchen smells like a cross between a jam shop and a spice market. It is the sort of aroma that makes people wander in and ask whether you are making dessert, dinner, or one of those suspiciously elegant things that lands in a small dish next to cheese.
What makes the experience memorable is how little work is required for something that tastes this layered. You wash fruit, pit it, simmer a brine, pour, cool, and wait. That is it. No elaborate pastry technique. No candy thermometer panic. No complicated choreography. And yet two days later, you open the jar and suddenly have a condiment that tastes like you know exactly what you are doing. It is one of those rare recipes that feels both humble and impressive at the same time.
There is also something oddly satisfying about watching the plums change. Fresh plums can be sweet, floral, tart, or mellow depending on the variety. In the jar, they become more focused. Their flavor sharpens. Their color deepens. The onions, if you use them, turn jewel-like and gorgeous. Even the brine starts to look like it belongs in a fancy bottle with a price tag that makes you blink twice.
Another thing people discover through this recipe is how useful pickled fruit can be. Most of us understand pickled cucumbers. They are obvious. They know their job. Pickled plums, on the other hand, feel more playful. You can serve them with roasted meat one night, chop them into a grain bowl the next day, then throw one onto a cheese plate for friends and watch everyone suddenly become very interested in your refrigerator. They are conversation food. Not in a stressful dinner-party way, but in a relaxed “you have to try this” way.
There is usually a moment, somewhere around the second or third time you make them, when you realize pickled plums are less about preserving fruit and more about building possibilities. You start thinking about switching the vinegar, changing the spices, adding ginger, using green plums, leaving the fruit in halves for a prettier presentation, or cutting wedges for faster flavor. You begin to understand why so many preserving traditions around the world treat sour, salty, sweet fruit like treasure. It is not just about shelf life. It is about giving ordinary ingredients a second identity.
And finally, pickled plums teach patience in a very manageable way. They are not a month-long project unless you are making traditional umeboshi. They just ask for a day or two. Long enough to remind you that flavor improves with rest, but short enough that you still get your reward this week. In modern life, that qualifies as a beautifully reasonable request. The jar waits in the fridge, getting better while you do other things, and then one meal later you understand why this recipe deserves a permanent place in your seasonal rotation.
Conclusion
If you want a recipe that is easy enough for a weekday, interesting enough for guests, and useful enough to earn fridge real estate more than once, this pickled plums recipe is a winner. It captures the juicy brightness of fresh plums, adds a sweet-sour spiced backbone, and turns a short-lived summer fruit into a condiment you will reach for again and again. Make a jar, give it two days, and prepare to become the kind of person who casually says, “Oh, those? Just my homemade pickled plums.”