Table of Contents >> Show >> Hide
- Why Skillet Focaccia Is the Easiest “Fancy Bread”
- What “No-Knead” Really Means (And Why It Works)
- Ingredients for No-Knead Skillet Focaccia
- Equipment
- Step-by-Step No-Knead Skillet Focaccia
- 1) Mix the dough (5 minutes)
- 2) Rest, then fold (optional but recommended)
- 3) First rise: overnight (best flavor) or same-day (best impatience)
- 4) Oil the skillet like you mean it
- 5) Move dough to the skillet and let it rise again
- 6) Preheat the oven (hot oven = good bubbles)
- 7) Dimple like a tiny bread massage therapist
- 8) Bake until deeply golden
- 9) Optional crisp-level: legendary
- Two Easy Timelines (Pick Your Bread Personality)
- Focaccia Toppings That Actually Work in a Skillet
- How to Get Big Bubbles and Crispy Edges Every Time
- Troubleshooting No-Knead Skillet Focaccia
- How to Serve and Store Skillet Focaccia
- FAQ
- Conclusion
- My Skillet Focaccia Era: of Real-Life Experiences
If you’ve ever wanted homemade bread without the emotional commitment of kneading (or, you know, upper-body strength),
skillet focaccia is your new best friend. This is the no-knead skillet focaccia recipe that delivers
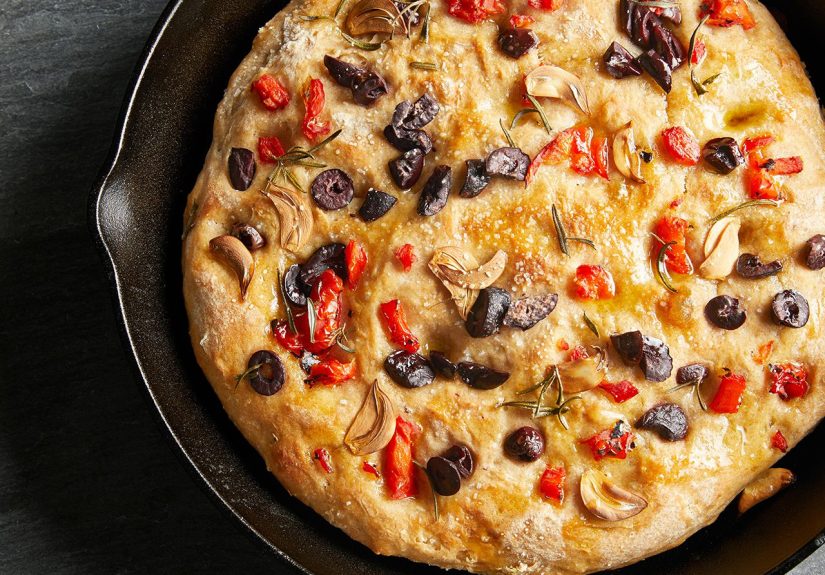
an airy, bubbly crumb, a golden top, and those ridiculously crisp, olive-oil-fried edgesall from one pan.
Your cast iron skillet is about to become the main character.
The magic trick is time. Instead of wrestling dough until it behaves, we mix, rest, fold a little (optional but helpful),
and let fermentation do the heavy lifting. The result tastes like you know what you’re doing, even if you’re currently
googling “what is yeast” in another tab. No judgment. Bread is bread.
Why Skillet Focaccia Is the Easiest “Fancy Bread”
Focaccia is basically pizza’s fluffier, more sophisticated cousin who wears linen and owns a tiny olive oil bottle.
Baking it in a skillet makes it even better because:
- Crispy edges happen naturally thanks to generous olive oil and a hot pan.
- The shape is forgivingrustic is the vibe, not geometry.
- It’s a one-bowl, one-pan situation, so cleanup won’t ruin your victory lap.
- Toppings are endless: rosemary, tomatoes, onions, olives, cheese, everything bagel seasoning… live your truth.
What “No-Knead” Really Means (And Why It Works)
Kneading builds glutenthe stretchy structure that traps gas and makes bread airy. In no-knead dough, gluten develops
mostly through hydration + time. A wetter dough (often called a high-hydration dough)
encourages an open, bubbly interior. The long rise also builds flavor, so your bread tastes less like “flour pillow”
and more like “Italian bakery dreams.”
We’ll still do a few quick folds to strengthen the dough (think: gentle encouragement, not a gym session).
But if you skip them, you’ll still get great breadjust a bit less dramatic in the bubble department.
Ingredients for No-Knead Skillet Focaccia
This recipe is sized for a 10-inch cast iron skillet (or similarly sized oven-safe skillet). If you only have a 12-inch,
see the notes in the steps to scale up.
Dough
- Bread flour: 300g (about 2 1/2 cups), plus a little for handling (all-purpose works, too)
- Water (lukewarm): 240g (about 1 cup) for ~80% hydration
- Instant yeast: 2g (about 1/2 teaspoon) for overnight; up to 4g (1 teaspoon) for same-day
- Kosher salt: 7g (about 1 1/4 teaspoons)
- Extra-virgin olive oil: 20g (about 1 1/2 tablespoons) in the dough
For the Pan + Top
- Extra-virgin olive oil: 3–5 tablespoons (yes, really)
- Flaky salt: for finishing
- Rosemary (fresh preferred): 1–2 teaspoons chopped, or sprigs for drama
- Optional: cherry tomatoes, thin-sliced onions, olives, roasted garlic, parmesan, everything seasoning
Ingredient Notes (So You Don’t Get Betrayed by Salt)
Flour: Bread flour gives a chewier bite and often bigger bubbles, but all-purpose flour still makes a fabulous
cast iron focaccia. If your kitchen is humid or your flour is thirsty, keep a spoon nearby and trust the dough more than the measuring cup.
Yeast: Instant yeast is easiest. If using active dry yeast, dissolve it in the water first and give it 5 minutes to wake up.
If your yeast is older than your favorite hoodie, consider replacing it.
Olive oil: Use the good stuff if you can. This bread tastes like olive oil because focaccia is basically
an olive oil delivery system with excellent PR.
Equipment
- 10-inch cast iron skillet (or oven-safe skillet; heavier = better heat retention)
- Mixing bowl
- Dough scraper or sturdy spatula (helpful, not required)
- Measuring cups/spoons or a kitchen scale (scale = more consistent results)
- Plastic wrap, lid, or a damp towel
- Optional: instant-read thermometer (for the “I’m a bread scientist” era)
Step-by-Step No-Knead Skillet Focaccia
1) Mix the dough (5 minutes)
In a large bowl, whisk together the flour, salt, and yeast. Add the water and olive oil. Mix with a spoon or your hand until
no dry flour remains. The dough will look shaggy, sticky, and slightly chaotic. That’s correct.
2) Rest, then fold (optional but recommended)
Cover the bowl and let the dough rest for 15 minutes. Then, wet your hand and perform a quick fold:
grab one edge of dough, stretch it up, and fold it over itself. Rotate the bowl and repeat 4 times.
Do this 2–4 rounds of folds over the next hour, resting 15 minutes between rounds.
If you’re busy (or dramatic), you can do just one round of folds and move on. Bread is forgiving. People? Less so.
3) First rise: overnight (best flavor) or same-day (best impatience)
Overnight method: Cover and refrigerate for 8–24 hours. This slow ferment builds flavor and helps big bubbles form.
Same-day method: Cover and let rise at room temperature for 2–3 hours, until doubled and puffy.
Use the higher yeast amount for this route.
4) Oil the skillet like you mean it
Pour 2 tablespoons olive oil into your skillet. Tilt and swirl to coat bottom and sides.
This is not the time to be shyoil is your nonstick insurance and your crisp-edge generator.
5) Move dough to the skillet and let it rise again
Scrape the dough into the oiled skillet. Flip it once so both sides get glossy. Gently nudge the dough outward.
If it springs back, cover it and let it relax for 15 minutes, then try again.
Cover and let rise until noticeably puffy:
1 1/2 to 2 1/2 hours if cold from the fridge, or 45–75 minutes if same-day.
6) Preheat the oven (hot oven = good bubbles)
Place a rack in the middle of the oven and preheat to 450°F. If your oven runs cool, give it an extra 10 minutes.
Focaccia loves commitment.
7) Dimple like a tiny bread massage therapist
Drizzle 1–2 tablespoons olive oil over the dough. With oiled fingertips, press straight down to create deep dimples
across the surface. Don’t be gentledimples are where oil pools and flavor collects.
Sprinkle with flaky salt and rosemary. Add any toppings now (see topping tips below).
8) Bake until deeply golden
Bake for 20–28 minutes, until the top is golden-brown and the edges look audibly crunchy.
If you have a thermometer, the center should be around 200–205°F.
9) Optional crisp-level: legendary
Carefully lift the focaccia out of the skillet and place it directly on the oven rack for 2–4 minutes
to crisp the bottom and edges even more. Then cool on a rack for at least 10 minutes before slicing.
(Yes, it smells amazing. Yes, you should still wait. We all have scars.)
Two Easy Timelines (Pick Your Bread Personality)
Overnight Focaccia Timeline (recommended)
- Day 1 evening: Mix dough + folds (optional), refrigerate
- Day 2: Oil skillet, proof 1.5–2.5 hours, dimple + top, bake
Same-Day Focaccia Timeline (still delicious)
- Morning: Mix dough, folds (optional), rise 2–3 hours
- Midday: Proof in skillet 45–75 minutes, dimple + top, bake
Focaccia Toppings That Actually Work in a Skillet
Toppings are where skillet focaccia becomes your personal edible billboard. A few guidelines: heavier toppings can sink,
and very wet toppings can make the surface soggy. Use a light hand and pat things dry when needed.
Classic Rosemary + Flaky Salt
The gold standard. Add rosemary and flaky salt after dimpling. Finish with a post-bake drizzle of olive oil if you’re feeling poetic.
Cherry Tomato + Garlic
Halve cherry tomatoes and gently press them into dimples. Thin-sliced garlic is great, but it can burn at high heattuck slices into dimples
and consider mixing garlic into the oil instead of scattering raw slices everywhere like confetti.
Olive + Onion (sandwich energy)
Thin-sliced red onion + olives + rosemary is a classic combo. The onion edges caramelize and make your kitchen smell like you
definitely have your life together.
Cheese Moment
Parmesan and pecorino are reliable. For melty cheeses (mozzarella, provolone), add halfway through baking to avoid scorching.
How to Get Big Bubbles and Crispy Edges Every Time
- Use a wet dough: Higher hydration encourages an open crumb and those signature air pockets.
- Don’t rush the proof: Under-proofed focaccia bakes up dense. Look for a jiggly, puffy dough.
- Handle gently after the final rise: You’re protecting trapped gas, not punching a time clock.
- Oil is not optional: It prevents sticking and creates that fried, crunchy bottom.
- Hot oven: 450°F helps with lift, color, and crispness.
- Finish on a rack: Cooling on a rack keeps the bottom crisp instead of steaming in the pan.
Troubleshooting No-Knead Skillet Focaccia
“My dough is unbelievably sticky.”
That’s normal. Wet hands, a dough scraper, and patience are your tools. Resist the urge to add lots of flour;
it can turn your airy focaccia into polite dinner rolls.
“It didn’t rise much.”
Common causes: dead yeast, water that was too hot, a cold kitchen, or not enough time.
Give it longer, move it to a slightly warmer spot, and remember: dough works on its own schedule.
“My top browned too fast but the middle seems underdone.”
Tent loosely with foil for the last 8–10 minutes. Also confirm your oven temperature (some ovens lie with confidence).
“The bottom isn’t crisp.”
Use enough oil, bake fully golden, and try the 2–4 minute “directly on the rack” finish.
Also: cast iron usually wins this contest.
How to Serve and Store Skillet Focaccia
Serve warm with soup, slice for sandwiches, or tear into pieces and dunk in olive oil + balsamic like the classy carb goblin you are.
Focaccia is best the day it’s baked, but leftovers reheat beautifully.
- Storage: Keep at room temperature for up to 2 days, wrapped or in a bag.
- Reheat: 300°F for 8–12 minutes, directly on a rack or on a sheet pan.
- Freeze: Slice, wrap well, freeze up to 2 months. Reheat from frozen at 325°F until warm.
FAQ
Can I use a 12-inch skillet?
Yes. You’ll get a thinner focaccia unless you scale the dough up by about 25–35%. Watch bake time; thinner focaccia browns faster.
Can I make it gluten-free?
Gluten-free focaccia exists and can be excellent, but it requires a different formula (often with binders like psyllium husk).
If gluten-free is your goal, follow a recipe designed specifically for it rather than swapping flours 1:1.
Do I have to use rosemary?
Not at all. Try thyme, oregano, za’atar, everything seasoning, or leave it plain and let olive oil and salt do the talking.
Plain focaccia makes elite sandwich bread.
Conclusion
A good no-knead skillet focaccia recipe should feel like a cheat code: mix, rest, oil, dimple, bake, and suddenly you have
bakery-level bread with a crispy bottom and an airy crumb. Once you nail the timing, you’ll start making it for “special occasions”
like Tuesday.
My Skillet Focaccia Era: of Real-Life Experiences
The first time I made skillet focaccia, I treated the dough like a fragile newborn. I whispered encouragement. I checked on it every
ten minutes like it was going to file a formal complaint with the Department of Yeast. Spoiler: bread does not respond to micromanagement.
It responds to time, warmth, and you not poking it repeatedly “just to see.”
Here’s the most useful lesson I learned: the dough tells you when it’s ready. Not the clock, not the recipe, not your
optimistic plans for dinner at exactly 6:00 p.m. If the dough is still tight and springy in the skillet, it needs more rest.
If it’s jiggly and puffy like a waterbed from the early 2000s, you’re in business. Once I started waiting for that “puffy and relaxed”
look, my focaccia went from “fine” to “please stop bringing bread because we can’t stop eating it.”
The second lesson: olive oil is not a garnish. Early on, I tried to be restrainedjust a “healthy drizzle.”
That was adorable. Restrained oil gave me a bread that tasted good but stuck a little and didn’t have that signature crunch.
The day I finally oiled the pan properly, the edges fried into this golden, crisp halo and I understood why focaccia is
basically a love letter to olive oil. It’s not greasy when it’s done right; it’s flavorful, crisp, and deeply satisfying.
Third: toppings have personalities. Thin onions? Great. Olives? Great. Cherry tomatoes? Fantastic, but they must be pressed in gently
or they’ll roll around like toddlers in a bounce house. Raw garlic slices? Delicious but riskyone minute they’re fragrant,
the next minute they’re tiny charcoal chips. Now I either tuck garlic into dimples, use roasted garlic, or infuse the oil first.
Less drama, same flavor.
And finally: skillet focaccia is the most social bread I know. Bring it to a potluck and people hover. Serve it with soup and suddenly
it’s “a cozy meal.” Slice it for sandwiches and it becomes “lunch, but elevated.” I’ve even used leftovers for a breakfast situation:
toast thick slices, add eggs, and pretend you’re at a cafe that charges $18 for vibes. The best part is how little active work it takes.
It’s the rare recipe that makes you look impressive while you mostly… waited.
If you’re nervous, start simple: rosemary and flaky salt, nothing fancy. Once you see how forgiving it is, you’ll be dimpling dough
like a pro and casually saying things like, “Oh, this? Just a quick skillet focaccia.” That’s when you’ll know: you’re in your focaccia era.


