Table of Contents >> Show >> Hide
- Why Mini Yarn Hats Are the MVP of Upcycled Crafts
- Supplies and Quick Prep
- How to Make Mini Yarn Hats from an Upcycled Toilet Paper Roll
- Step 1: Cut the cardboard ring (the “hat brim”)
- Step 2: Cut your yarn strands (this is where speed tricks matter)
- Step 3: Attach yarn to the ring using a simple loop knot
- Step 4: Flip the “cuff” so it looks like a real beanie
- Step 5: Shape the hat and tie it off
- Step 6: Add the finishing touches (optional, but fun)
- Pro Tips for Better-Looking Mini Yarn Hats
- Style Ideas: 10 Ways to Make Your Mini Hats Look Like They Have a Personality
- Where Mini Yarn Hats Shine (Beyond the Christmas Tree)
- Troubleshooting (Because Tiny Hats Can Still Be Dramatic)
- Conclusion
- Extra: of Real-World Crafting “Experience” (a.k.a. What You’ll Learn After Making a Bunch)
There are two types of people in this world: the ones who throw away empty toilet paper rolls immediately, and the ones
who whisper, “I can turn you into something cute,” and tuck them into a drawer like a crafty raccoon.
If you’re reading this, congratulationsyou are the raccoon. And today’s treasure? Mini yarn hats.
These tiny beanies are the ultimate “how is this so adorable?” project: no knitting, no crocheting, no existential dread
just scrap yarn, a cardboard tube, and a few minutes of mildly satisfying looping.
They’re perfect for Christmas ornaments, gift toppers, winter garlands,
doll accessories, or that one corner of your home that needs a little cozy energy.
Consider this the craft equivalent of a Jersey Girl tip: practical, cute, and just a tiny bit chaotic in the best way.
Why Mini Yarn Hats Are the MVP of Upcycled Crafts
1) They’re budget-friendly (aka: practically free)
The supply list is refreshingly short: an upcycled toilet paper roll and yarn you probably already own.
This is the rare DIY where “use what you have” isn’t a lie told by people with fully stocked craft rooms.
2) They’re beginner-proof
If you can tie your shoes (or at least you’ve seen someone do it on the internet), you can make a mini hat.
The main technique is a simple looped knot around a cardboard ring. No fancy tools required.
3) They’re insanely customizable
Chunky yarn makes a plush beanie. Thin yarn makes a neat little cap. Add a pom-pom, a bead, a bell, or a tiny tag.
Make them classic, modern, rustic, glittery, minimalist, or “my child decorated this and now it’s emotionally priceless.”
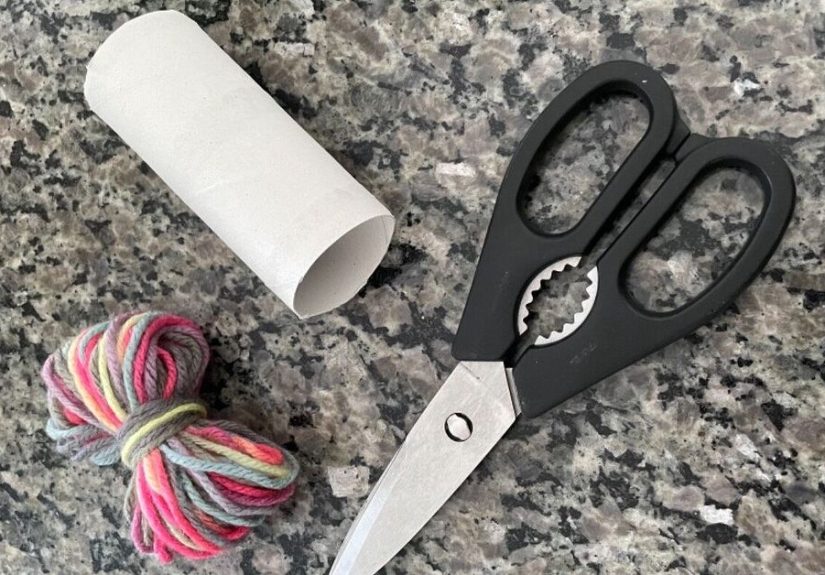
Supplies and Quick Prep
What you’ll need
- Empty toilet paper roll (or paper towel roll for sturdier rings)
- Yarn (scrap yarn works great; medium-weight is a sweet spot)
- Scissors (sharp enough to cut yarn cleanly)
- Ruler (optional, for consistent sizes)
- Stuffing (optional: cotton ball, tissue, polyfill)
- Hot glue (optional: for pom-poms, hanging loops, or extra security)
A quick (non-dramatic) note about using toilet paper rolls
If the roll has been living its best life on the bathroom counter, just be smart about it.
Use clean, dry tubes. If you want extra peace of mind, set the tubes aside in a dry place for a bit,
use craft-only tubes, or choose a paper towel roll from the kitchen.
How to Make Mini Yarn Hats from an Upcycled Toilet Paper Roll
This is the classic method that gives you that “tiny beanie with a cuff” lookno knitting needles required.
Once you make one, you will make five. This is not a warning. This is prophecy.
Step 1: Cut the cardboard ring (the “hat brim”)
-
Cut a ring from the end of the toilet paper roll. Aim for about 1/2 to 3/4 inch tall.
Thinner rings look daintier; thicker rings look chunkier and more “beanie.” - If your tube is flimsy, lightly pinch it flat before cutting, then pop it back into a ring shape.
Step 2: Cut your yarn strands (this is where speed tricks matter)
- Cut yarn into strands roughly 11–12 inches long. If you want taller hats, go longer.
- Time-saver: wrap yarn around a book or a piece of cardboard the right length, then cut along one edge to make a stack of matching strands.
-
How many strands? It depends on yarn thickness and how dense you want the hat. For many medium-weight yarns, expect somewhere in the
30–50 strand neighborhood. Add more for a fuller, “knit-like” look.
Step 3: Attach yarn to the ring using a simple loop knot
- Fold one yarn strand in half.
- Push the folded loop through the cardboard ring.
- Pull the two loose ends through that loop and snug it up against the ring.
- Repeat until the entire ring is coveredno cardboard peeking through.
Step 4: Flip the “cuff” so it looks like a real beanie
- Gather all yarn ends and push them through the center of the ring to the other side.
-
As you push through, the knots sit neatly at the edge and the yarn “body” of the hat stands up.
This is the moment it starts looking ridiculously cute.
Step 5: Shape the hat and tie it off
- Optional (but helpful): tuck a small piece of tissue or a cotton ball into the hat to give it a rounded shape.
-
Use a separate piece of yarn to tie tightly around the yarn bundle about 1–1.5 inches above the ring.
Double-knot it like you mean it. - Trim the yarn above the tie into a neat “puff.” That puff becomes your built-in pom-pom… or the base for a fancier one.
Step 6: Add the finishing touches (optional, but fun)
- Pom-pom upgrade: glue on a mini pom-pom (store-bought or handmade) for extra fluff.
- Ornament loop: tie a short piece of yarn under the pom-pom and knot the ends together to hang it.
- Gift topper: skip the loop and attach the hat to ribbon with a dot of hot glue.
- Mini tag: add a tiny paper tag that says “Warm wishes” because you’re charming like that.
Pro Tips for Better-Looking Mini Yarn Hats
Make them fuller without wasting yarn
Instead of going longer, go denser. More strands (especially around the circumference) creates a cleaner, knit-like texture.
If you see gaps, slide knots closer together and add a few more strands right where the cardboard shows.
Get crisp trims (no frizzy chaos)
Use sharp scissors and trim slowly. For a super-round pom look, rotate the hat as you trim so you’re shaping evenly.
If you over-trim, don’t panicadd a mini pom-pom on top and pretend it was your plan.
Choose yarn like a stylist, not like a goblin
Texture matters. Smooth yarn gives a tidy look. Tweedy yarn looks cozy. Variegated yarn does the “colorwork” for you,
which is the kind of lazy brilliance we love.
Style Ideas: 10 Ways to Make Your Mini Hats Look Like They Have a Personality
1) Classic winter beanie
Solid color, fluffy top, simple hanging loop. Clean. Cozy. Unproblematic.
2) Santa hat vibe
Red yarn + white “cuff” yarn. Add a white pom-pom. Suddenly your tree is ho-ho-honestly adorable.
3) Team colors or school spirit
Two stripes and a tiny letter tag. Perfect for winter parties, teacher gifts, or sports fans who decorate aggressively.
4) Neutral farmhouse chic
Cream, taupe, gray. Add jute twine for the hanging loop. Your hat just started selling real estate.
5) Candy-cane twist
Alternate red and white strands as you knot them on. It looks fancy, but it’s basically “repeat, repeat, repeat.”
6) Ombre hat
Start with one color and slowly swap in another every few knots. It’s surprisingly forgiving.
7) Sparkle top
Add metallic thread yarn for a few strands near the top. You get shine without turning the whole craft into a glitter incident.
8) Mini gnome accessory
Stick your hat on top of a small felt gnome. Your decor just got a tiny roommate.
9) Advent calendar surprise
Make 24 hats, hide a candy in each, and let chaos (the festive kind) reign.
10) Place-card hats
Put each guest’s name on a tiny tag and attach it to the hat. It’s whimsical and makes you look like you have your life together.
Where Mini Yarn Hats Shine (Beyond the Christmas Tree)
- Holiday ornaments: lightweight, durable, and kid-friendly with supervision.
- Gift wrapping: a mini hat topper makes a plain package feel boutique.
- Garlands: string several hats onto twine for a cozy winter banner.
- Party favors: tie a hat around a candy jar or mini cocoa packet.
- Classroom crafts: a great winter activity that teaches reuse and creativity.
Troubleshooting (Because Tiny Hats Can Still Be Dramatic)
“My hat looks bald.”
Add more strands. Slide the knots together. Use thicker yarn. The goal is “cozy knit beanie,” not “cardboard tube with a few thoughts.”
“The cuff won’t flip neatly.”
Your ring might be too tall or too flimsy. Try a slightly shorter ring, or use a sturdier tube (paper towel rolls are usually thicker).
“My pom-pom looks like it lost a fight.”
Trim slowly and evenly, rotating the hat. If it’s still scraggly, glue on a small pom-pom and call it a glow-up.
“The tie slips.”
Double-knot tightly. For extra security, add a tiny dab of glue on the knot (optional, especially if kids are handling the craft).
Conclusion
Mini yarn hats made from an upcycled toilet paper roll are the kind of craft that checks every box:
cute, affordable, low-waste, and genuinely fun. They’re fast enough for a last-minute holiday project, but customizable enough
to become your signature winter decor move. Make one for the tree, one for a gift, and theninevitablytwelve more because you found
“the perfect yarn scrap” and you’re not emotionally prepared to throw it away.
Extra: of Real-World Crafting “Experience” (a.k.a. What You’ll Learn After Making a Bunch)
Here’s what tends to happen the first time you make mini yarn hats: you start out calm. Responsible. Minimalist, even.
You cut one neat little ring, snip a handful of yarn strands, and think, “Aww, this will be a quick project.”
That is an adorable lie you tell yourself right before you enter Hat Mode.
Hat Mode is when you realize the knotting part is weirdly soothing. It’s repetitive in the best waylike bubble wrap,
but socially acceptable at a holiday party. You tell yourself you’ll make “just one more,” because the second hat is always better than the first.
Your knots sit straighter, your yarn looks fuller, and the cuff flip finally does that satisfying “oh hello, I’m a beanie” moment.
Then you discover the yarn-scrap rabbit hole. You find a six-inch piece of yarn you kept for absolutely no reason and suddenly declare,
“This could be a stripe!” You start color-combining like you’re styling tiny celebrities. A neutral hat? Elegant. A red-and-white twist?
Iconic. That weird variegated yarn you hated in full skeins? Suddenly it’s the star of the show because it does all the visual work for you.
You’ll also learn that density is everything. A hat with too few strands can look a little… spiritually unfinished.
But a well-packed hat looks like a miniature knit cap you’d buy at a craft fair for $12 and happily pay because it’s “so cute.”
Your best trick is adding strands where the cardboard shows through and sliding knots together until the ring disappears.
It’s like giving the hat a better skincare routinecoverage, but tasteful.
Another classic lesson: trimming is where confidence goes to get tested. At first, you’ll trim timidly, like you’re negotiating with the yarn.
Then you’ll get brave and accidentally over-trim one hat into a tiny buzz cut. This is normal. The fix is easy:
glue on a pom-pom, add a bead, or tie a slightly bigger puff and pretend you were going for “modern silhouette.”
Mini crafts are forgiving because they’re small, and because everyone is distracted by how cute they are.
Finally, you’ll learn that mini hats are social. People can’t resist them. Guests pick them up. Kids name them.
Someone will ask, “Where did you buy these?” and you get to say, with a straight face, “My bathroom… but in a sustainable way.”
And that’s the magic: you made something joyful out of something ordinary, with a little yarn and a lot of personality.


