Table of Contents >> Show >> Hide
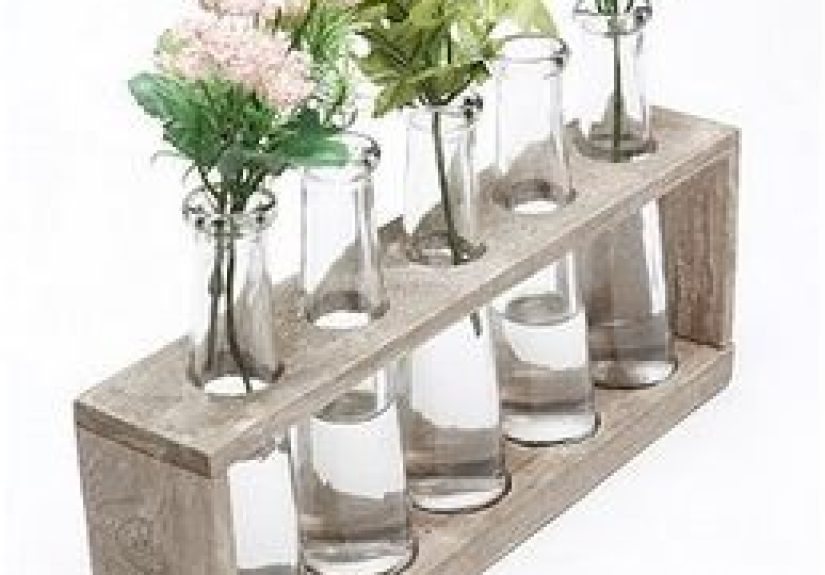
- What Are Laboratory Flower Vases, Exactly?
- Why Laboratory Glass Works So Well with Flowers
- Choosing the Right Laboratory Flower Vases
- Flower Longevity: The Science That Actually Works
- Design Frameworks for Laboratory Flower Vases
- Best Flower Types for Laboratory Vases
- Color Strategy for a “Scientific but Warm” Look
- Common Mistakes to Avoid
- Budget-Friendly Ways to Start
- 500-Word Experience Journal: Living with Laboratory Flower Vases for 30 Days
- Conclusion
Some people buy flowers for romance. Some buy them because the kitchen feels empty without something alive in it.
And some of us look at a chemistry flask and think, “You know what this needs? Ranunculus.”
If that sounds like you, welcome to the wonderfully nerdy, surprisingly elegant world of laboratory flower vases.
Laboratory-inspired vesselsbeakers, Erlenmeyer flasks, test tubes, graduated cylinders, and reagent-style bottleshave quietly become one of the most versatile decor moves in modern homes.
They sit at the sweet spot between minimal and expressive, scientific and organic, industrial and cozy.
In other words: they make your flowers look like they got accepted into grad school.
This guide breaks down everything you need to know: why lab glass works so well for floral styling, how to choose the right pieces, how to keep flowers alive longer, what to avoid, and how to style laboratory flower vases in ways that look intentionalnot like you accidentally raided a school supply closet.
What Are Laboratory Flower Vases, Exactly?
A laboratory flower vase is any floral vessel inspired by scientific glassware. Think:
- Beaker vase for casual, loose bunches
- Erlenmeyer flask vase for sculptural stems
- Test tube vase for single stems or propagation displays
- Graduated cylinder vase for modern, vertical arrangements
- Round-bottom or Florence-style forms for dramatic centerpieces
The aesthetic is clean, transparent, and architectural. The floral styling is usually lighter and more intentional than a traditional “full bouquet” look.
It’s less wedding banquet, more editorial home tour.
Why Laboratory Glass Works So Well with Flowers
1) The transparency flatters stems
In regular opaque vases, stems disappear. In lab glass, stems become part of the composition.
You can see curves, nodes, branching, and water lines. Suddenly, tulips and cosmos look like living line art.
2) Narrow openings make arranging easier
Many lab vessels naturally support stems. A narrow neck can keep blooms upright without heavy floral foam.
This is especially useful for beginners who want shape and structure without advanced florist techniques.
3) Shapes force better editing
A beaker or flask rarely begs for 40 stems. It invites restraint.
You select fewer flowers, but each one matters more. The result is cleaner, calmer, and often more expensive-looking than a giant mixed bunch.
4) It mixes with many decor styles
Laboratory flower vases play nicely with industrial lofts, Scandinavian minimalism, cottagecore, modern farmhouse, and contemporary interiors.
Pair clear glass with wood for warmth, matte black for contrast, brass for polish, or linen for softness.
Choosing the Right Laboratory Flower Vases
Material: prioritize borosilicate when possible
If you can choose, go with borosilicate-style lab glass. It’s valued for durability and thermal stability, which helps with everyday handling and temperature changes.
For floral use, that translates to confidence: less stress when rinsing, refilling, or moving arrangements between cooler and warmer zones.
Scale: match vessel width to stem personality
- Thin stems (anemone, cosmos, waxflower): test tubes and narrow cylinders
- Medium stems (tulips, carnations, lisianthus): beakers and narrow flasks
- Thick stems (sunflowers, hydrangeas, dahlias): wider beakers or broad-neck flasks
Height: use proportion, not guesswork
A reliable rule: flowers typically look balanced at around 1.5x to 2.5x vase height depending on style.
For low modern arrangements, stay near 1.5x. For dramatic vertical pieces, go taller.
When in doubt, start longeryou can always trim.
Safety note for vintage finds
Vintage “lab-look” glass can be beautiful, but avoid using unknown pieces that may have held chemicals.
For everyday floral design, choose new decorative lab-style vessels or clearly unused laboratory glassware intended for safe display.
Beauty is nice; mystery residue is not.
Flower Longevity: The Science That Actually Works
Want your arrangement to survive longer than your weekend? Focus on fundamentals.
Across extension horticulture guidance and florist best practices, the same habits show up again and again:
Start with a clean vessel
Bacteria is the fast lane to murky water and drooping stems.
Wash your vase before use, rinse thoroughly, and keep tools clean. If needed, sanitize, then rinse again.
Re-cut stems before arranging
Trim about 0.5 to 1 inch from stem ends with a sharp tool.
Angled cuts can increase exposure for water uptake and help prevent stems from sealing against the vase bottom.
Remove leaves below the water line
Submerged foliage decomposes quickly and feeds bacterial growth.
Strip anything that would sit underwater. Clean stems, clean water, better vase life.
Change water regularly
Replace water every 2–3 daysor sooner if cloudy.
Re-trim stems lightly when refreshing, especially if flowers look thirsty or the cuts have sealed.
Keep arrangements cool and bright
Flowers prefer bright indirect light and stable, cooler conditions.
Skip hot windowsills, heater vents, and fruit bowls.
(Yes, fruit emits ethylene gas. Yes, your bouquet notices.)
Use floral preservative wisely
Commercial flower food is usually the most consistent option.
Some DIY formulas can help in specific cases, but results vary by species and concentration.
If a preservative packet came with your flowers, use it first and follow directions.
Design Frameworks for Laboratory Flower Vases
1) Single-stem rhythm
Use 5–9 small vessels in a line (test tubes, mini flasks, bud vases), one stem per vessel.
Alternate heights and bloom sizes for movement.
This is perfect for dining tables because guests can see across the arrangement.
2) Trio formula (small/medium/tall)
Group three vessels with intentional contrast:
- One low beaker with clustered focal blooms
- One mid flask with airy fillers
- One tall cylinder with linear stems
Visually balanced, beginner-friendly, and always looks curated.
3) The “mini lab” shelf story
Style a shelf with 4–6 vessels: two with flowers, one with a cutting in water, one empty sculptural flask, plus books or ceramics.
Not every vessel must hold blooms. Negative space is part of the design.
4) Propagation-meets-arrangement
Mix cut flowers and rooted cuttings in the same display family.
You get both immediate beauty and long-game plant growthdecor that evolves week by week.
Best Flower Types for Laboratory Vases
Not all flowers perform equally in narrow-neck glass. These tend to shine:
- Tulips: graceful movement, ideal for cylinders and flasks
- Ranunculus: delicate focal blooms for beakers
- Carnations and mums: often longer vase life, good for weekly displays
- Lisianthus: elegant shape, great in trios
- Waxflower and statice: textural fillers for micro-arrangements
- Scabiosa pods, grasses, branches: sculptural accents for modern style
Color Strategy for a “Scientific but Warm” Look
Monochrome + one accent
Choose one main color family (all creams, all mauves, all yellows) and add a single contrast stem.
It keeps things clean while preventing the arrangement from feeling flat.
Use foliage as the “bridge”
If blooms clash, foliage fixes it.
Eucalyptus, olive branches, or fern textures can connect colors and calm visual noise.
Repeat color in the room
Echo one flower color in nearby objectsbook spine, cushion, candle, art print.
That tiny repetition makes your arrangement look intentional rather than accidental.
Common Mistakes to Avoid
- Overstuffing narrow-neck vessels (crowding reduces airflow and water access)
- Ignoring water levels in test tubes (small vessels dry quickly)
- Skipping re-cuts when flowers fade early
- Putting arrangements in direct afternoon sun
- Leaving decaying petals in water “because I’ll deal with it tomorrow”
- Using too many vessel shapes at once (curated beats chaotic)
Budget-Friendly Ways to Start
You don’t need a full designer set on day one.
Start with:
- Two beakers (small + medium)
- Three test tubes in stands
- One narrow flask for vertical stems
Then build slowly. Buy fewer vessels, better quality. Rotate stems from one grocery bouquet across multiple lab vases to create a high-end look for less.
One bouquet, six mini arrangements, zero regret.
500-Word Experience Journal: Living with Laboratory Flower Vases for 30 Days
On Day 1, I placed a single clear beaker with grocery-store tulips on my kitchen counter and expected exactly two things:
mild prettiness and eventual droop. What I didn’t expect was how quickly a lab-style vase would change the way I saw flowers.
The stems were visible, curved like handwriting, and the water line looked oddly intentionallike part of the art rather than a maintenance detail.
By dinner, I had moved the beaker three times just to see how light hit it.
Day 4 was the “test tube wall moment.” I lined seven tubes on a narrow shelf and placed one stem in each: two carnations, one spray rose, a sprig of eucalyptus, some waxflower, and a tiny branch clipping from outside.
It looked bigger than a normal bouquet even though I used fewer flowers.
My friend walked in, stared for five seconds, and said, “Did you hire a florist or a scientist?”
I took that as a compliment and absolutely did not correct her.
Week 2 taught me discipline. Small vessels force you to pay attention.
You can’t ignore water levels in test tubes for two days and expect heroics.
I started a two-minute morning routine: top off water, remove anything mushy, trim one or two stems.
It felt less like chore energy and more like coffee ritual energy.
Surprisingly calming.
Mid-month, I tried a dramatic Erlenmeyer flask with three long lisianthus stems and one bending branch.
At first I thought, “This looks empty.”
Then I waited.
By evening, the negative space became the point. The arrangement looked architectural, almost gallery-like.
That was the biggest design lesson of the month: laboratory flower vases reward restraint.
They ask for confidence, not volume.
In Week 3, I tested placement around the house.
Kitchen counter: cheerful but warm.
Desk: beautiful, but I knocked a stem over while answering email.
Entry table near indirect light: perfect.
The flowers lasted longer, guests noticed immediately, and the display set a calm tone right at the door.
I also learned to keep flowers away from the fruit bowl after one sad, speedy wilt episode.
The bouquet basically rage-quit overnight.
Week 4 was about mixing textures.
I combined one cheap bouquet with backyard greenery and split everything across five lab vessels.
Total cost stayed low, but the home looked styled.
The transparent glass made even ordinary stems feel intentional.
That was the surprise win: laboratory flower vases don’t require expensive flowers to look sophisticated.
They require thoughtful editing.
By Day 30, I stopped thinking of these vessels as “just vases.”
They became tiny frameworks for observationhow flowers age, how color shifts over days, how a room changes with one stem at eye level.
The whole setup made me slower in a good way.
I noticed details more: the way tulips stretch overnight, how carnations hold shape, how a single branch can anchor an entire shelf.
If traditional bouquets feel like a shout, laboratory flower vases feel like a conversation.
Quiet, curious, and unexpectedly addictive.
Conclusion
Laboratory flower vases are more than a trendthey’re a practical, beautiful way to style flowers with intention.
They help beginners make cleaner arrangements, let stems become part of the design, and pair effortlessly with modern interiors.
Add real flower-care basicsclean vessels, fresh cuts, cool placement, regular water changesand your displays won’t just look better, they’ll last longer.
If you want a decor move that feels creative, affordable, and just a little bit clever, this is it.
Start with one beaker, one stem, and one corner of your home.
Then watch how quickly “just trying it out” turns into “why do I now own twelve tiny flasks?”


