Table of Contents >> Show >> Hide
- What a 3D Jelly Cake Really Is (And Why It Looks Like Magic)
- How Intricate Designs Get Inside the Cake
- The “Jelly Science” I Learned the Hard Way
- Flavor Profiles That Actually Taste as Good as They Look
- Running Jelly Alchemy Like a Real Business (Not a Hobby That Got Out of Hand)
- 35 New Pics: Jelly Alchemy Gallery (Image Slots + Captions)
- Behind the Scenes: of Real Jelly Alchemy Experiences
- Conclusion
If you’ve ever looked at a dessert and thought, “That’s too pretty to eat,” welcome to my daily problem. I run a 3D jelly cake business called
Jelly Alchemy, where I hand-craft crystal-clear jelly cakes with flowers, oceans, galaxies, and tiny edible miracles suspended inside like
a delicious snow globe. People say “Is that real?” and I say, “Yes, and it jiggles.”
This post is part behind-the-scenes story, part practical guide, and part “please don’t poke your dessert with a fork until you’ve taken a photo.”
I’ll show you what 3D jelly cakes are, how the designs actually get inside, what I’ve learned the hard (wobbly) way, and how I run the business side
without turning into a human stress pudding. And yesthere’s a gallery with 35 new picture slots (with captions + alt text) ready for
you to drop your images into.
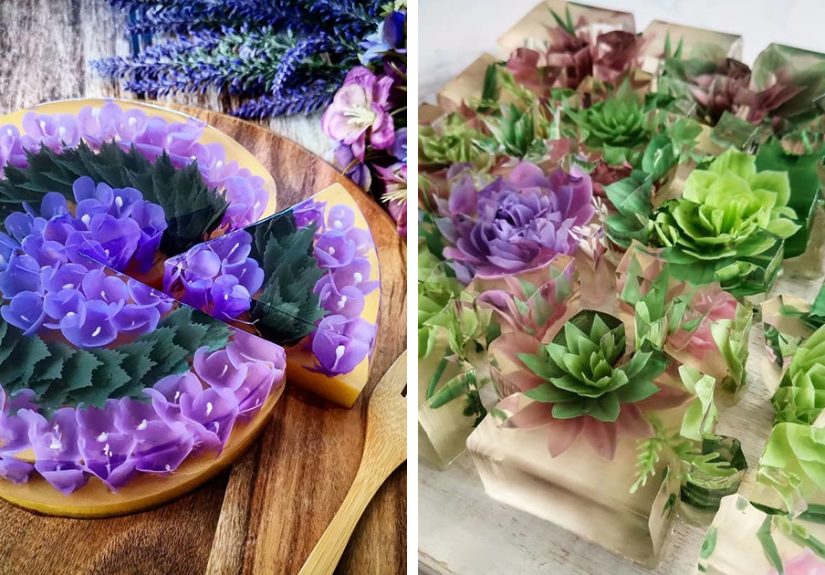
What a 3D Jelly Cake Really Is (And Why It Looks Like Magic)
A 3D jelly cake (also called 3D gelatin art or a jelly art cake) is a clear, set baseusually gelatin
or agarwhere the “decorations” are injected into the jelly, not piped on top. That’s the plot twist. The cake stays transparent, so the design
appears to float in the middle. When it’s done right, it looks like you captured a bouquet inside a clear pond.
My favorite comparison is: a regular cake is a painting on a canvas; a 3D jelly cake is a painting inside a block of glass… except the “glass” is dessert
and the “museum security” is your refrigerator.
Gelatin vs. Agar: Picking Your “Jiggle Personality”
At Jelly Alchemy, I choose gelling agents like a casting director. Gelatin gives you a softer, melt-in-your-mouth wobble. It’s
fantastic for delicate textures and that classic “jello” vibe. Agar (plant-based) sets firmer and holds up better at warmer room temps,
which can be a lifesaver if your customer’s party venue runs hotor if their aunt insists on leaving the dessert table next to a sunny window like it’s a
science experiment.
The tradeoff: agar can feel a bit more “snappy” or brittle if you push it too far, while gelatin is more forgiving on the tongue. I’ll often decide based
on the event, the travel distance, the weather, and whether I want the bite to whisper “silky” or announce “I am a firm, respectable gel.”
How Intricate Designs Get Inside the Cake
The secret is injection. I build a clear base, chill it until it’s perfectly set, then inject colored “paint” (usually a creamy mixture
like coconut milk + coloring, or another compatible filling) through specialized tips. By controlling depth, angle, and pressure, I create petals, leaves,
gradients, and layers. It’s like tattoo artistryif tattoos were edible and your client was a dessert that refuses to sit still.
The Tools I Rely On (Besides Patience)
- Syringes with measured markings for consistent pressure and volume.
- Injection tips/needles shaped like petals, crescents, leaves, and fine lines for detail work.
- Thin palette knives or micro-spatulas for some techniques (depending on the style).
- Thermometer because temperature is the difference between “art” and “sad soup.”
- Bright light source to check clarity and placementmy cakes are basically edible stained glass.
Design Planning: I Sketch Like I’m Planning a Heist
People assume I freestyle every flower. Sometimes I do. Sometimes I also stare at a sketch for 20 minutes like I’m trying to solve a mystery:
“If the peony goes here, will the leaf collide with the hydrangea? Will it look lush… or like a botanical traffic jam?”
I plan in layers:
- Center focal point (big bloom, koi fish, seashell cluster, galaxy swirl).
- Supporting shapes (secondary flowers, bubbles, soft gradients).
- Framing (leaves, stems, ribbons of color that guide the eye).
- Negative space (the clear jelly is part of the artdon’t clutter it).
The “Jelly Science” I Learned the Hard Way
3D jelly cakes are not hard because they’re mysteriousthey’re hard because they’re honest. Jelly will reveal every shortcut you tried to take. Here are
the biggest science lessons behind my best results.
1) Clarity Is a Skill (Not a Vibe)
A clear base is the stage. If your base is cloudy, the design loses that floating, jewel-like depth. I focus on:
- Gentle dissolving to avoid foam and trapped bubbles.
- Skimming surface foam instead of stirring it back in (tempting, but no).
- Letting it rest so micro-bubbles can rise before pouring.
- Straining when neededbecause “tiny invisible lump” becomes “giant visible regret.”
2) Bloom Strength, Set Time, and Texture
Gelatin isn’t one-size-fits-all. Different gelatins can set differently depending on strength and formulation. When I test a new brand, I run a small
“mini cake” first. It saves me from producing a full-size masterpiece that sets like a trampoline or, worse, like a nap.
3) Acid, Enzymes, and Other Party Crashers
Some ingredients are basically jelly saboteurs. Highly acidic mixtures can interfere with setting, and certain fresh fruits contain enzymes that can break
down gelatin. If I want pineapple, kiwi, papaya, or fresh figs flavors, I’m careful about how I use themoften choosing cooked, canned, or properly
handled versions for stability. My rule is simple: if the ingredient is famous for “tenderizing,” it might also tenderize your gel right into a puddle.
4) Temperature Control = Business Control
Jelly is a temperature-sensitive diva. Too warm and your injection details can blur. Too cold and you risk cracking or forcing channels that don’t look
natural. I work in a rhythm: set, inject, chill, evaluate under light, and adjust. It’s part craft, part choreography.
5) Storage and Food Safety Basics
Because these cakes often include dairy-based fillings (like coconut milk mixtures) and are served chilled, I treat them like a refrigerated dessert:
clean tools, sanitized workspace, rapid chilling, and clear guidance to customers on storage and serving time. The goal is simple: stunning dessert,
zero drama.
Flavor Profiles That Actually Taste as Good as They Look
A gorgeous cake that tastes like plain water is… a crystal with commitment issues. I build flavor into both the base and the injected design.
My crowd-pleasers balance aroma, sweetness, and clean finish.
Clear Base Ideas
- White grape + jasmine (floral, light, elegant)
- Lychee + rose (romantic without tasting like perfume)
- Yuzu-style citrus (bright, refreshing, great with floral designs)
- Honey chamomile (soft, soothing, surprisingly fancy)
Injection “Paint” Ideas
- Coconut milk + vanilla (classic for flowers, smooth and rich)
- Condensed milk blend (for bolder sweetness and brighter color pop)
- Matcha cream (for leaves that taste as green as they look)
- Berry cream (soft pinks that actually deliver berry flavor)
Running Jelly Alchemy Like a Real Business (Not a Hobby That Got Out of Hand)
Let’s talk about the unglamorous part: pricing, orders, and legal basics. Because at some point, your
friends stop saying “Wow!” and start saying “Can you make 60 mini jellies by Saturday?” and you realize you need a system.
Pricing: The Formula That Saved My Sanity
I price based on ingredients + labor + overhead, then apply a profit margin that respects the fact that my hands are not robots and my
time is not optional. With 3D jelly cakes, labor is the headlinedetail work takes real hours.
- Ingredients: gelatin/agar, juices/tea, dairy or coconut milk, sugar, coloring, packaging.
- Labor: prep, setting time, injection time, unmolding, finishing, cleaning (yes, cleaning counts).
- Overhead: utilities, tools, licensing/permits (where required), marketing, delivery materials.
The moment I started tracking time per design style (simple floral vs. multi-bloom bouquet vs. koi pond), pricing got easierand customers understood the
value when I could explain what goes into the process.
Cottage Food and Labeling: The Boring Stuff That Protects You
If you sell food in the U.S., rules can vary a lot by state (and sometimes by county). Many places have “cottage food” pathways for certain home-produced
foods, but the allowed products, sales limits, permit requirements, and labeling rules differ. I treat compliance as part of professionalism, not a
buzzkill.
Labeling is especially important when products are packaged. Depending on your local rules, labels often include basics like the product name, ingredients
(in order), allergen statements, and a notice that it was made in a home kitchen or under a cottage food registration. Even when I’m selling in-person,
I keep product information clearbecause trust is part of the brand.
Packaging: If It Slides, It Dies
Jelly cakes are delicate. My packaging goals are: stability, temperature control, and presentation.
I use snug containers, support bases that prevent shifting, and clear “keep refrigerated” guidance. The cake should arrive looking like art, not like it
survived a minor earthquake.
Marketing: People Buy the Story (and the Wiggle)
My best marketing has been consistent photography and short videos that show the process. People love the “reveal”the moment you unmold the cake and the
design appears inside, like a secret you finally get to tell. I keep captions fun and human, because nobody wants to read an essay about gelatin. (I say,
while writing an essay about gelatin.)
35 New Pics: Jelly Alchemy Gallery (Image Slots + Captions)
Below are 35 ready-to-use image placeholders. Swap the src with your real file paths, keep the alt text (or customize it),
and you’ve got an SEO-friendly photo gallery that doesn’t rely on “IMG_4839_FINAL_FINAL2.jpg” to explain anything to Google.


Behind the Scenes: of Real Jelly Alchemy Experiences
When I first started Jelly Alchemy, I thought the hard part would be the art. Plot twist: the hard part is everything around the artthe timing,
the temperature, the customer communication, and the tiny decisions that determine whether your cake looks like a floating garden or a slightly haunted
aquarium.
The earliest lesson I learned was that 3D jelly cakes don’t like chaos. If I’m rushing, the cake knows. If my kitchen is too warm, the cake knows. If I
decide to “wing it” with a new flavor during a big order week, the cake knowsand it will absolutely file a complaint by refusing to set on schedule.
These days, I plan production like a calm person (even if my brain is doing jazz hands). I block time for the base to cool properly, time for injections,
and time for the cake to rest after the design goes in. Resting sounds lazy until you realize it’s what makes the details look crisp and intentional.
I’ve also learned that the best-looking designs are often the ones that respect negative space. Early on, I packed too much into the center because I was
excitedlike someone who discovers stickers and immediately covers their laptop in 400 of them. Now I treat the clear jelly like part of the composition.
A little breathing room makes the flower pop, makes the gradients glow, and makes the whole cake look expensive (which is great, because it is
expensive in time).
Customer reactions are the fuel. I’ve had people pick up a cake and hold it at eye level like they’re inspecting a diamond. I’ve watched kids press their
faces close to the dome to “see inside.” I’ve heard “Wait, how is it IN there?” more times than I can count. The funniest moment is always the pause
right before they cut itbecause the cake is pretty, but it’s still dessert, and dessert is meant to be enjoyed. I remind people: take your photos, then
eat it. Art that tastes good is allowed to be eaten. (In fact, it’s kind of the point.)
The business side taught me confidence. At first, I underpriced because I compared myself to regular cakes. But 3D jelly art is specialized: it’s
technique-heavy, tool-heavy, and time-heavy. Once I started tracking my hours honestly, my prices made sense, my stress dropped, and my quality improved.
Saying “no” also became part of the craft. If someone wants a design that requires a level of detail that doesn’t fit their budget or timeline, I offer a
simpler alternative that still looks stunning. Boundaries, it turns out, are very on-brand for someone who works with gelatin.
Finally: failure is feedback. I’ve made bases that weren’t clear enough, petals that looked a little too “blobcore,” and color mixes that turned out more
“mystery beige” than “soft champagne.” Every mistake taught me something practicalabout temperature, about timing, about how light changes color inside a
clear dessert. That’s the real alchemy: you don’t just craft jelly cakes. You craft a process that gets better every time you do it.


