Table of Contents >> Show >> Hide
- What “Needle Painting” Actually Means (And Why It Looks Like a Photo)
- Why Real Leaves Make an Unfairly Good Canvas
- How Lifelike Leaf Embroidery Gets Made (Without the Leaf Falling Apart)
- Tools & Materials I Reach For (Leaf Edition)
- Common “Leaf Problems” (And How I Keep My Sanity)
- 6 Pics: Lifelike Needle Paintings On Real Leaves
- If You Want to Try Leaf Embroidery, Start Tiny
- Why This Art Form Feels So Weirdly Calming
- Experience Section: From My Leaf-Stitching Life
- Conclusion
Some people paint on canvas. Some paint on walls. Me? I paint with a needle… on a leaf. Yes, an actual leafthe kind you step on, hear crunch, and immediately regret if you’re wearing brand-new white sneakers.
Leaf embroidery (often done with needle painting, aka thread painting) is one of those art forms that makes you squint and whisper, “Hold on… is that stitched?” The trick is using tiny, blended stitches to build realistic color shiftslike watercolor, but with floss while the leaf’s veins and texture do half the storytelling for you.
What “Needle Painting” Actually Means (And Why It Looks Like a Photo)
Needle painting is a style of hand embroidery that uses short, overlapping stitchesmost famously long-and-short stitch shadingto blend colors smoothly. Instead of bold outlines and flat fills, you build gradual transitions: highlight to midtone to shadow. That’s how feathers look fluffy, petals look soft, and tiny birds look like they might blink if you stare too hard.
The realism comes from three things working together:
- Color layering: multiple close shades stitched in the right order (not random “green is green” energy).
- Stitch direction: stitches follow the form (feathers radiate, leaves flow, fur curves).
- Thread control: finer strands and consistent tension keep blends smooth instead of chunky.
On fabric, needle painting already looks impressive. On a leafsomething fragile, textured, and naturally patternedit looks borderline magical.
Why Real Leaves Make an Unfairly Good Canvas
1) The leaf does free “background design”
Leaves come with built-in veins, gradients, tiny speckles, and edges that look hand-torn by nature (because… they are). That texture reads like intentional artistry even before the first stitch goes in.
2) It’s sustainable and delightfully low-maintenance
You’re not buying a fancy surface. You’re rescuing a fallen leaf from becoming sidewalk confetti. It’s art that starts with noticing: the perfect curve, the intact edge, the leaf that’s sturdy enough to survive your ambition.
3) The symbolism basically writes your artist statement for you
Stitching wildlife onto a leaf feels poetic without trying too hard. Nature becomes both the subject and the stagelike a tiny ecosystem you can hold in your hand.
How Lifelike Leaf Embroidery Gets Made (Without the Leaf Falling Apart)
Step 1: Pick the “right kind” of leaf
Not all leaves are built for embroidery. The best candidates are thicker, more leathery leavesthink magnolia-style toughness with minimal holes, splits, or brittle edges. If a leaf crumbles when you look at it, it’s not ready for your creative dreams.
Step 2: Dry or press it so it stays flat
Artists often dry or press leaves the way botanical collections do: flat layers, gentle pressure, and time. Pressing helps reduce curl and makes stitching easier because the surface won’t fight your needle like a tiny green trampoline.
Step 3: Stabilize the leaf (the secret handshake)
Because leaves can tear, many artists stabilize them in one of a few ways:
- Gentle sealing: a clear art medium can help strengthen the surface and reduce cracking.
- Backing support: mounting the leaf on paper, thin fabric, or felt for extra strength.
- Pre-punched holes: marking the design and piercing holes first so the needle doesn’t rip the leaf mid-stitch.
The goal is simple: keep the leaf intact while you build detailbecause realism requires patience, and patience requires a surface that won’t quit on you.
Step 4: Sketch, stitch, and shade like you’re painting
Needle painting is where the “lifelike” part happens. Instead of one flat color, you’ll use a small palette: a light highlight thread, a midtone, a shadow, and sometimes a weird “in-between” shade that looks wrong on the spool but perfect in the blend.
For feathers, you’ll stitch in the direction they grow, layering short stitches like tiny brushstrokes. For eyes, you’ll keep stitches tight and controlledbecause nothing breaks realism faster than an eye that looks like a melted jellybean.
Step 5: Keep tension gentle (you’re stitching, not towing a truck)
Tight tension can slice a leaf the way a cheese wire slices cheddar. Lighter tension helps the thread sit neatly without tearing holes wider. If you want clean detail, you treat the leaf like a fragile collaborator, not an opponent.
Tools & Materials I Reach For (Leaf Edition)
- Fine needles: sharp embroidery needles or thin beading needles for tight detail.
- Embroidery floss or silk thread: floss can be split into fewer strands for smoother shading.
- Small scissors: sharp tips for precise trimming.
- Water-soluble pen or pencil: for sketching lightly (test firstsome leaves stain).
- Awl or pin: for pre-punching holes along the design line.
- Backing material: thin cardstock, fabric scrap, or felt for support and display.
- Sealant (optional): a clear medium to strengthen the surface.
Pro tip: the more realistic you want the final piece, the more you’ll appreciate using fewer thread strands for cleaner blends. It takes longer, yes. But so does literally everything worth looking at twice.
Common “Leaf Problems” (And How I Keep My Sanity)
The leaf cracks while stitching
That usually means it’s too brittle or not stabilized enough. Thicker leaves help, as does gentle sealing and backing support. Also: slow down. Leaves can sense fear.
My stitches look chunky instead of painted
Use fewer strands, shorten stitch length, and blend with an extra midtone shade. In needle painting, “one more shade” often fixes what “one more hour of frustration” won’t.
The design looks flat
Add contrast. Realism loves shadow. A tiny darker edge under a wing or along a feather line makes the whole bird pop.
Holes are getting too big
Pre-punch carefully, keep tension gentle, and avoid repeatedly re-stitching the same spot. Leaf fibers don’t forgive the way fabric does.
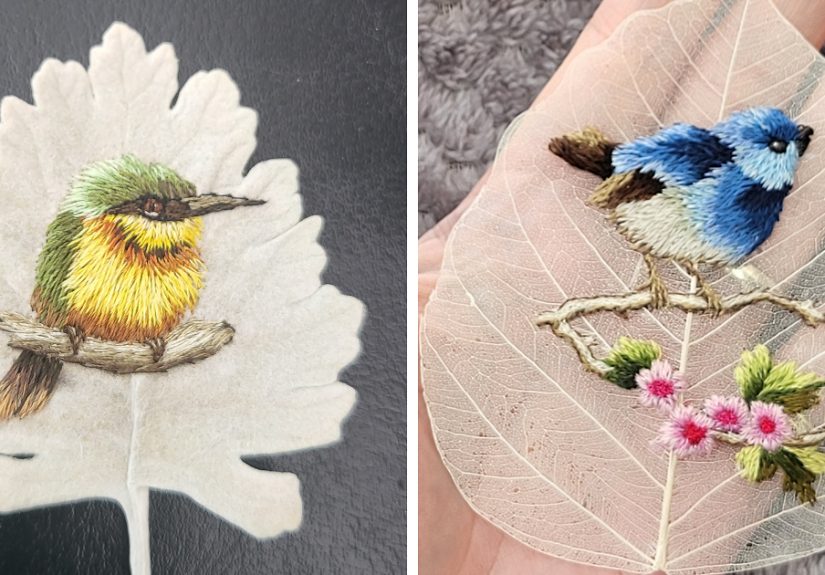
6 Pics: Lifelike Needle Paintings On Real Leaves
Below are six examples of the kind of “wait… that’s thread?” realism I aim for. Each piece uses the leaf’s texture as a natural frame, then builds lifelike detail through shading, stitch direction, and tiny, deliberate color changes.


If You Want to Try Leaf Embroidery, Start Tiny
Leaf needle painting looks advanced (because it kind of is), but beginners can absolutely dip a toe inwithout sacrificing a whole afternoon to the craft gods. Start with a simple motif: a small leaf-on-leaf design, a single feather, or a mini mushroom cap.
A beginner-friendly approach
- Choose a sturdy leaf and make sure it’s flat and dry.
- Sketch a small design lightly near the center (avoid fragile edges).
- Pre-punch holes along any outlines so stitching is smoother.
- Use fewer thread strands (for cleaner blends and less tearing).
- Keep tension gentle and stitches short.
- Mount your finished leaf on a backing so it’s protected and display-ready.
The best part? Even a “practice” piece looks charming, because leaves are already pretty. You’re basically collaborating with nature’s design team.
Why This Art Form Feels So Weirdly Calming
Needle painting on leaves forces you into slow mode. The scale is tiny. The surface is delicate. The details demand focus. It’s the opposite of doomscrolling: instead of burning time, you’re building something one small stitch at a time.
And when you finish? You’re left with a little moment of wondersomething that used to be “just a leaf” and is now a tiny, stitched world.
Experience Section: From My Leaf-Stitching Life
The first time I decided to stitch on a real leaf, I had the confidence of someone who had watched exactly two videos and thought, “Yeah, I basically have a doctorate in this now.” I picked up a leaf that looked perfectbig, flat, dramatic veins, the whole “museum specimen” vibeand I immediately learned Lesson #1: a leaf can look sturdy and still behave like a potato chip the second your needle shows up.
So I started slower. I began treating leaves the way you treat a moody cat: gently, respectfully, and without sudden movements. I’d press them flat, let them dry properly, and test how they handled a tiny poke in an inconspicuous spot. If the leaf cracked, I didn’t argue. I thanked it for its service and promoted it to “background decoration.”
The biggest shift came when I stopped trying to stitch “fast.” On fabric, you can get away with a little hustle. On a leaf, hustle is just another word for “ripped hole.” When I began pre-punching holes along outlines, the whole process felt calmerlike I’d laid down a trail of stepping stones instead of trying to leap a creek in flip-flops.
Then there’s the thread. If you want that lifelike needle painting look, you start thinking in shades the way painters do. Not “green,” but “green with a whisper of yellow,” and “green but make it shadow,” and “green that looks suspiciously brown until it saves your depth.” I learned to split floss into fewer strands so blends looked smoother. Yes, it took longer. But the result stopped looking like embroidery and started looking like tiny brushwork.
The most satisfying moment is always the halfway pointwhen the piece still looks messy up close, but suddenly reads correctly from arm’s length. A bird’s chest starts to round out. A wing gains depth. A highlight makes the feathers look like they’re catching light instead of just sitting there like flat colored thread. That’s when I know I’m not just stitching; I’m sculpting with color.
Of course, not every piece is a triumph. Sometimes a leaf edge curls while I’m working, like it’s trying to escape my artistic decisions. Sometimes I misjudge tension and hear that tiny, heartbreaking “split.” But even the imperfect ones teach me something: stitch direction matters more than I thought, shadows matter more than I wanted, and patience is basically the whole point.
And when it all comes togetherwhen the leaf holds, the shading blends, and the subject looks aliveI get the same feeling every time: that quiet, slightly ridiculous joy of turning something temporary into something worth keeping. A fallen leaf becomes a frame. Thread becomes paint. And my favorite kind of art shows up in the smallest, most unexpected place.


