Table of Contents >> Show >> Hide
- Why This Necklace Idea Worked So Well
- Why I Chose Polymer Clay for This Necklace
- Materials and Tools I Used
- How I Designed the Mother Of Dragons Pendant
- How I Made the Necklace Step by Step
- What Made the Necklace Look More Professional
- Common Mistakes I Tried to Avoid
- How I Styled the Finished Necklace
- My Experience Creating This Mother Of Dragons Necklace From Polymer Clay
- Final Thoughts
I did not wake up one morning and think, “Today feels like a normal day for a normal necklace.” No. I wanted drama. I wanted texture. I wanted something that looked like it had flown out of a fantasy world, landed on my worktable, and politely demanded a chain. That is how my Mother Of Dragons necklace from polymer clay was born.
This project started as a simple jewelry idea and quickly turned into a full-blown creative adventure. I wanted a handmade necklace that felt powerful, detailed, and a little mythical without becoming so heavy it could double as medieval armor. Polymer clay turned out to be the perfect material for that mission. It is flexible before baking, lightweight after curing, easy to texture, and ideal for sculptural jewelry that needs bold personality without weighing down your neck.
In this article, I’m sharing how I designed and made my dragon-inspired pendant, why polymer clay was the right choice, what techniques helped the piece look more polished, and what I learned from the process. If you love fantasy jewelry, polymer clay art, DIY statement necklaces, or just enjoy turning tiny lumps of clay into wearable glory, welcome to the dragon cave.
Why This Necklace Idea Worked So Well
The magic of a dragon necklace is that it gives you instant storytelling. Even before someone asks about it, the pendant says something. It suggests strength, mystery, fire, movement, and a slightly unhealthy willingness to hoard pretty things. In other words, excellent necklace material.
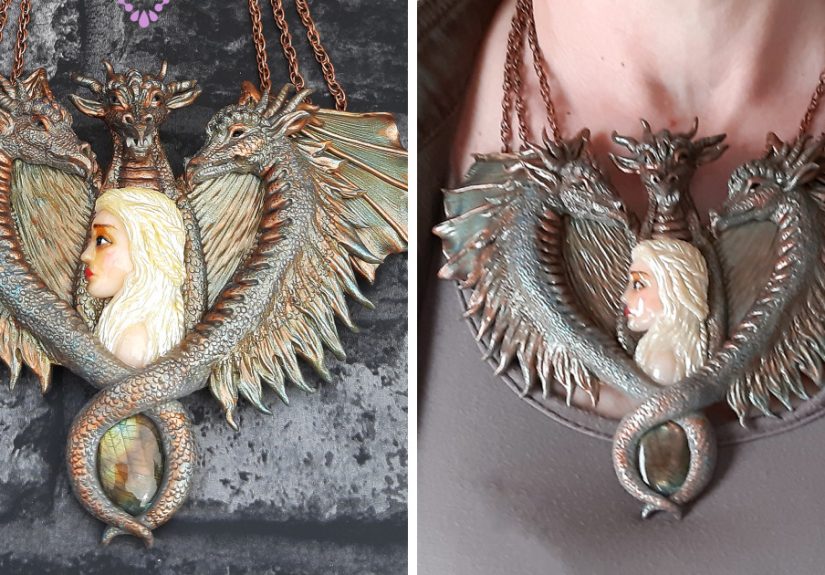
When I began sketching the design, I looked for details that would make the pendant feel rich without making it look cluttered. Dragons in art are often associated with clouds, swirling movement, claws, scales, and glowing focal points like a pearl or orb. That gave me a strong visual direction. Instead of trying to sculpt an entire complicated creature with every possible detail, I focused on a dramatic dragon head, curved neck, layered scales, wing-like contours, and a central “flaming pearl” effect to create a fantasy centerpiece.
That choice mattered. A successful polymer clay pendant is not just about sculpting skill. It is about editing. A necklace needs visual impact, yes, but it also needs balance, clean lines, and enough durability to survive real life. You want people to say, “Wow, where did you get that?” not, “Did your necklace get into a fight with a hot glue gun?”
Why I Chose Polymer Clay for This Necklace
Polymer clay is one of the best materials for handmade jewelry because it gives you creative freedom without demanding a giant studio, a kiln, or a dramatic speech about “the purity of the medium.” You can shape it by hand, roll it flat, carve into it, add texture, layer colors, and cure it in a regular oven according to the clay brand’s instructions.
For a dragon necklace, that flexibility is a huge advantage. I could build the pendant in layers instead of trying to form everything from one solid chunk. I could make the scales shallow and refined, the horns thin but expressive, and the body curved enough to feel alive. Polymer clay also made it easier to keep the piece relatively lightweight. That matters more than people think. A necklace can be beautiful, but if it feels like a kettlebell, it’s going to spend most of its life in a drawer.
Another reason polymer clay worked beautifully here was the finish. After baking, I could sand rough areas, sharpen selected details, buff surfaces, and add controlled shine only where I wanted it. That let me create contrast between matte dragon scales and glossier focal details, which made the pendant look more sophisticated and less flat.
Materials and Tools I Used
I kept my setup pretty practical. You do not need a royal treasury of tools to make a fantasy necklace like this. My materials included polymer clay in black, deep red, metallic bronze, and a little translucent clay for depth; a roller; a needle tool; a craft blade; a detail tool for scales and lines; parchment paper; sandpaper or nail files for finishing; jump rings; a pendant cord or chain; and strong jewelry adhesive for assembly if needed.
I also used a texture source from around the house because polymer clay artists know a delightful secret: expensive tools are nice, but random objects are chaos with potential. A toothbrush, foil, textured fabric, and the tip of a pen can all create interesting surface patterns when used thoughtfully.
How I Designed the Mother Of Dragons Pendant
1. I started with the silhouette
Before I worried about scales, color blending, or dramatic flair, I focused on the outer shape. The silhouette is what gives a pendant instant character from a distance. I wanted mine to feel elegant and fierce, so I chose a slightly curved dragon form instead of a stiff, front-facing one. That curve made the necklace feel more organic, like the dragon was coiling around its own energy.
2. I added a focal center
Every statement necklace needs a visual anchor. Mine was a pearl-like orb set into the design, inspired by the classic dragon-and-pearl motif. It made the pendant feel symbolic and gave the eye a place to land before wandering across the smaller details. It also helped the necklace feel finished rather than just “dragon-shaped.”
3. I limited the color palette
This part saved the whole piece. I was tempted to use every moody fantasy shade known to humankind, but restraint won. I chose dark base colors and brought in metallic highlights strategically. Black and oxblood gave the necklace drama, while bronze and gold touches made the raised details pop. The result felt more grown-up, more wearable, and a lot less like a toy dragon escaped from a cereal box.
How I Made the Necklace Step by Step
Conditioning the clay
I conditioned the clay thoroughly before sculpting. This is one of those unglamorous steps that absolutely pays off. Well-conditioned clay is easier to roll, blend, and shape, and it is less likely to crack or behave like a grumpy brick. I worked in smaller portions so the clay stayed manageable and smooth.
Creating the base pendant
I rolled out a base slab to an even thickness and cut the overall pendant shape first. That base acted like the skeleton of the piece. Keeping the thickness consistent was important because uneven areas can bake differently, which is a fancy way of saying one section can turn out sturdy while another acts like a potato chip.
Building the dragon in layers
Once the base was ready, I added thin layers for the dragon head, crest, curved neck, and raised details. Layering gave the pendant a sculpted look without making it too bulky. I pressed the pieces together carefully, blending seams where needed so the dragon looked integrated rather than assembled in a panic five minutes before the oven timer beeped.
Adding scales and texture
This was the most satisfying part. I used a detail tool to create scale impressions and fine lines along the neck and facial contours. Instead of covering every inch with texture, I varied the density. The head and upper body got more attention, while surrounding areas stayed simpler. That contrast helped the design breathe and made the details feel intentional.
Making the necklace connection points
For the hanging mechanism, I planned the hole placement before baking. That matters because the pendant should hang straight when worn. I placed the top holes where they would support the balance of the piece rather than pulling it sideways. If a design calls for a glued-in finding or peg, I always think about stress points early. A dragon may symbolize power, but a weak attachment point symbolizes regret.
Baking and cooling
I baked the pendant according to the instructions for the clay I used, checked the oven temperature carefully, and let the piece cool completely before touching it like an impatient goblin. Cooling matters. Polymer clay firms up as it cools, and rushing that stage is a great way to sabotage your own hard work.
Sanding, highlighting, and assembling
After baking, I lightly sanded rough edges and refined a few transitions. Then I dry-brushed metallic accents onto the raised scales and features. That single step transformed the necklace from “nice handmade pendant” into “tiny dragon royalty.” Finally, I attached jump rings and added the pendant to a dark corded necklace with metal hardware that matched the mood of the piece.
What Made the Necklace Look More Professional
A lot of handmade jewelry lives or dies in the finishing stage. The sculpting can be imaginative, but if the surface is rough, the edges are messy, or the attachment looks flimsy, the final piece loses impact. Here are the choices that helped mine look cleaner and more polished.
Consistent thickness
Keeping the clay fairly even made the baking more reliable and the overall pendant look more intentional. It also improved comfort when worn.
Selective shine
I did not make the entire necklace glossy. Instead, I used shine where it served the design. The orb, eyes, and some highlighted ridges benefited from a little luster, while the rest remained more matte. That contrast created depth and made the details easier to read.
Strong contrast in texture
I paired smooth sections with heavily detailed ones. This gave the eye movement and prevented the pendant from looking visually noisy.
Thoughtful hardware
The necklace cord and metal findings mattered just as much as the pendant itself. Cheap-looking hardware can drag down a beautiful focal piece fast. I chose darker metal tones and a simple chain style so the dragon remained the star.
Common Mistakes I Tried to Avoid
I learned quickly that fantasy jewelry still obeys earthly rules. First, I avoided making the pendant too thick. A dramatic shape is great, but extra bulk can make a necklace uncomfortable and harder to cure evenly. Second, I avoided over-texturing every surface. Too much detail can flatten the design visually because nothing stands out anymore.
I also stayed away from random finishing products. Not every shiny product belongs on polymer clay. If you use the wrong sealer, your glorious dragon can end up tacky, cloudy, or weirdly sticky, which is not the legendary vibe most people are going for. Testing finishes and using clay-compatible options is worth the effort.
Finally, I resisted the urge to fix everything with more clay at the last second. Sometimes the smartest move is to sand, buff, and refine after baking instead of piling on emergency details that make the piece heavier and messier.
How I Styled the Finished Necklace
Once the pendant was finished, I realized this necklace works best when the outfit gives it room to speak. I like it with simple black tops, deep jewel tones, or anything with a clean neckline that lets the pendant sit front and center. It also works beautifully with boho layers, dark romantic looks, or fantasy-inspired outfits that stop just short of full castle cosplay.
The best part is that it feels personal. This is not mass-produced jewelry with a vaguely mythical label slapped on it. It carries the small irregularities, choices, and tiny triumphs of being handmade. That gives it warmth, character, and a story people can feel when they see it.
My Experience Creating This Mother Of Dragons Necklace From Polymer Clay
Making this necklace was one of those projects that started with a cool idea and ended up teaching me far more than I expected. At first, I was mostly excited about the visual side. I wanted horns, scales, a dramatic color palette, and a pendant that looked like it had a backstory. What surprised me was how much patience the process demanded. A dragon necklace sounds bold and fiery, but the actual making of it involved a lot of quiet decisions: how thick the clay should be, where the pendant would hang, how much detail was enough, and when to stop adding more.
The first emotional shift happened during the sketch phase. My original design was honestly too complicated. It had too many spikes, too many curves, and enough tiny details to make future me miserable. Once I simplified the shape, everything improved. That was a good reminder that creative work is not always about adding more. Sometimes the strongest design comes from removing what does not help.
I also had one of those classic maker moments where the piece looked a little awkward halfway through and I briefly lost faith in the entire project. You know the phase: the dragon does not look majestic yet, the colors are muddy, and you start wondering if you have actually made a lizard pancake. But I kept going. After texture, baking, sanding, and metallic highlights, the pendant finally came alive. That transformation was deeply satisfying and reminded me why handmade art is so rewarding. The ugly middle stage is real, but it is not the final stage.
Another memorable part of the experience was how physical the process felt. Polymer clay jewelry is small, but it is incredibly hands-on. I could feel the clay softening as I worked it, see the scales forming one row at a time, and watch the dragon gain personality with every little cut and impression. That tactile part made the project calming, almost meditative. It was detailed enough to keep my brain busy and repetitive enough to feel soothing.
I learned a lot about restraint too. I love dramatic details, but this necklace taught me that not every area needs the same level of attention. The most powerful sections were the ones I emphasized on purpose. Once I let the focal point stay dominant and allowed the surrounding elements to support it, the whole necklace looked more elegant.
By the time I finished the piece, I felt proud in a very specific handmade way. Not just “I made a thing,” but “I solved a dozen tiny design problems and ended up with something wearable, personal, and genuinely cool.” That feeling is hard to beat. Every time I pick up the necklace now, I remember the trial version, the improvements, the texture experiments, and the moment the metallic accents finally made the dragon look awake. It no longer feels like just an accessory. It feels like a small sculpture I happened to turn into jewelry, and that is exactly what I hoped it would become.
Final Thoughts
Creating my Mother Of Dragons necklace from polymer clay was equal parts design challenge, craft experiment, and fantasy-fueled fun. It let me combine sculpture, jewelry making, texture work, and storytelling in one project. More importantly, it proved that a handmade statement necklace does not need expensive materials to feel dramatic and special. With thoughtful design, careful finishing, and a little courage, polymer clay can become something stunning.
If you are thinking about making your own dragon-inspired polymer clay necklace, my biggest advice is this: keep the silhouette strong, let the details serve the design, and do not panic during the awkward middle stage. Every dragon deserves a chance to become magnificent.


