Table of Contents >> Show >> Hide
- Step 1: Start With a High-Quality Image and Duplicate the Original
- Step 2: Correct Exposure, White Balance, and Overall Tone First
- Step 3: Remove Temporary Blemishes With the Spot Healing Brush
- Step 4: Use the Healing Brush and Clone Stamp for Controlled Cleanup
- Step 5: Smooth Skin Without Making It Look Fake
- Step 6: Dodge and Burn to Shape the Face Naturally
- Step 7: Enhance Eyes, Lips, Teeth, and HairGently
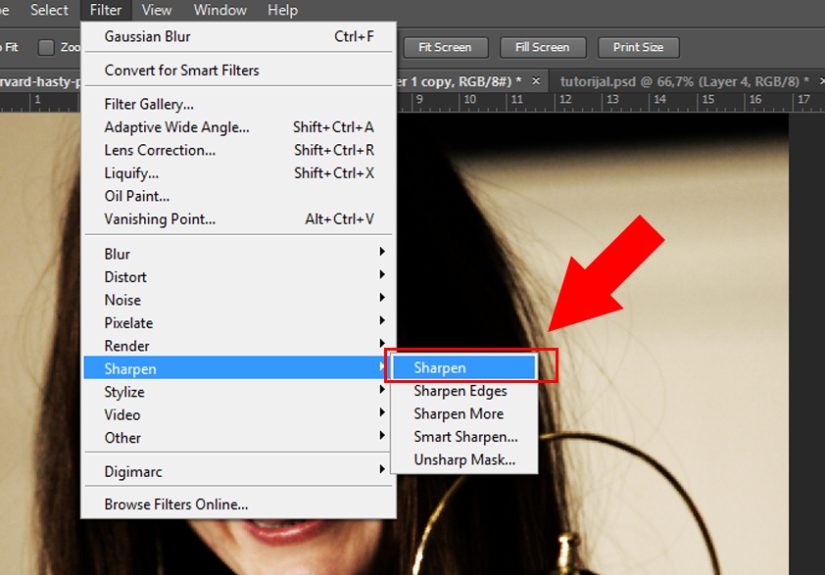
- Step 8: Make Final Color, Sharpening, and Export Adjustments
- Common Photoshop Face Retouching Mistakes to Avoid
- When to Use Face-Aware Liquify
- of Real-World Experience: What Actually Makes a Retouch Look Professional
- Conclusion
- SEO Tags
Editor’s note: Great facial retouching should make people look like their best selvesnot like they were polished by a kitchen appliance. The goal is natural skin, flattering light, honest texture, and a final portrait that still looks human.
Learning how to use Photoshop to retouch facial photos is less about “fixing” a face and more about guiding attention. A good retouch removes distractions, balances tone, softens harsh shadows, brightens tired eyes, and keeps real skin texture intact. A bad retouch makes everyone look like a wax figure who just discovered ring lights. We are aiming for the first one.
Photoshop gives you serious power: Spot Healing Brush, Healing Brush, Clone Stamp, Camera Raw Filter, adjustment layers, masks, Neural Filters, dodge and burn, and Face-Aware Liquify. The trick is using them gently. Think of retouching like seasoning soup. A pinch helps. A shovel ruins dinner.
This guide breaks the portrait retouching workflow into eight practical steps. Whether you are editing a headshot, social media profile photo, beauty portrait, family picture, or professional facial photo, these steps will help you create clean, realistic results without destroying the personality of the original image.
Step 1: Start With a High-Quality Image and Duplicate the Original
Before touching a single blemish, start with the best file you have. RAW files are ideal because they preserve more tonal and color information, but a high-resolution JPEG can still work if it is sharp, well-lit, and not heavily compressed. If the image is blurry, badly exposed, or tiny enough to fit on a postage stamp, Photoshop can helpbut it cannot perform miracles without leaving fingerprints.
Open the image in Photoshop and immediately duplicate the background layer. Name the new layer something simple, like “Retouch Base.” This keeps your original photo safe. Even better, right-click the layer and convert it to a Smart Object before applying filters. Smart Objects allow you to return later and adjust settings without permanently changing the pixels.
Why nondestructive editing matters
Nondestructive editing is the backbone of professional Photoshop retouching. Use duplicate layers, Smart Objects, adjustment layers, and layer masks whenever possible. This gives you freedom to experiment, lower opacity, hide edits, or correct mistakes without starting over. Facial retouching often requires small changes that add up. If every change is permanent, one overcooked edit can send the whole portrait into “plastic mannequin at the mall” territory.
A simple layer setup might include: original background, retouching layer, color correction layers, dodge and burn layers, eye enhancement layer, and final sharpening/export layer. Keep your layers named clearly. Future you will be grateful. Future you has enough problems.
Step 2: Correct Exposure, White Balance, and Overall Tone First
Do not start by removing pimples. Start by correcting the overall image. Open Camera Raw Filter or use adjustment layers such as Curves, Levels, Exposure, Vibrance, and Color Balance. Your goal is to create a clean foundation before detailed facial retouching begins.
Look at the skin tone. Is it too orange? Too green? Too washed out? Are the highlights blown out on the forehead or nose? Are shadows under the eyes too heavy? Small global corrections can reduce the amount of retouching needed later. For example, a slight exposure lift may make under-eye shadows less dramatic. A mild white balance correction can make skin look healthier without touching the face directly.
Useful adjustments for portraits
Use Curves to add gentle contrast, but avoid crushing shadows around the eyes or mouth. Use Vibrance instead of Saturation when possible because it tends to protect skin tones better. Use Color Balance or Selective Color to correct red, yellow, or magenta casts in the skin. If the image is for the web, keep color consistency in mind and prepare to export in sRGB later.
At this stage, zoom out often. A portrait is not a spreadsheet. View the whole face and ask: Does the person look naturally lit? Does the photo feel balanced? Are the eyes drawing attention? If yes, you are ready for detailed cleanup.
Step 3: Remove Temporary Blemishes With the Spot Healing Brush
The Spot Healing Brush is one of the fastest tools for facial photo retouching in Photoshop. It is perfect for temporary distractions like pimples, small scars, stray makeup dots, lint, dust, and tiny skin flakes. Create a new blank layer above your image and name it “Blemish Cleanup.” In the tool options, choose Content-Aware and enable Sample All Layers.
Use a brush just slightly larger than the blemish. Click once, then move on. Avoid painting long strokes across textured skin because Photoshop may smear nearby pixels and create strange patches. If a spot needs more control, switch to the Healing Brush or Clone Stamp.
What should you remove?
A good rule: remove temporary distractions, not permanent identity. Acne, dust, and makeup smudges are usually fair game. Moles, freckles, scars, and birthmarks should be handled carefully, especially if the photo is for someone else. When in doubt, ask. Retouching should respect the subject, not quietly redesign them like a video game character slider.
Zoom in to work, but zoom out to judge. At 300%, every pore looks like a geological event. At normal viewing size, many “problems” disappear. Retouch for the final display size, not for microscope mode.
Step 4: Use the Healing Brush and Clone Stamp for Controlled Cleanup
The Healing Brush samples texture from one area and blends it into another. The Clone Stamp copies pixels more directly. Both are powerful, but they require restraint. Use the Healing Brush for uneven skin texture, small wrinkles, and areas where the Spot Healing Brush guesses badly. Use the Clone Stamp for edges, hairlines, eyebrows, lips, and places where Photoshop’s automatic blending gets confused.
Create another blank layer, set the tool to sample Current and Below, and work slowly. Sample from nearby skin with similar lighting and texture. Do not sample cheek texture and stamp it onto the forehead unless you enjoy creating skin that looks suspiciously copy-pasted.
Keep natural skin texture
Skin is not supposed to be perfectly smooth. It has pores, tiny lines, subtle color shifts, and texture. The best Photoshop face retouching preserves those details. Instead of wiping texture away, clean only the distractions that pull attention from the expression. If an edit starts looking too smooth, lower the layer opacity or mask it back.
For smile lines, forehead lines, and under-eye lines, reduce rather than remove. Completely deleting every line can make a face look unnatural. Softening is usually more flattering than erasing.
Step 5: Smooth Skin Without Making It Look Fake
Skin smoothing is where many beginners go rogue. One minute the portrait looks nice; the next minute the subject looks like they were rendered in a budget animation studio. Photoshop offers several ways to smooth skin, including Neural Filters, Surface Blur, frequency separation, and dodge and burn. The safest approach is to use subtle settings and apply them selectively with masks.
Photoshop’s Skin Smoothing Neural Filter can be useful for quick portrait edits. Apply it to a duplicated layer or Smart Object, then reduce the opacity. Do not accept the default result blindly. Mask the effect away from eyes, eyebrows, nostrils, lips, hair, jewelry, and clothing. Those areas need crisp detail.
Frequency separation: useful but easy to abuse
Frequency separation separates color and tone from fine texture. It allows you to even out blotchy skin while preserving pores. However, it can also create muddy, artificial results if pushed too far. Use it lightly. Blend uneven redness, harsh transitions, and patchy tones, but avoid smearing the face into one uniform beige pancake.
For high-end results, many retouchers prefer dodge and burn because it corrects uneven light and shadow without destroying texture. It takes longer, but the result often looks more natural.
Step 6: Dodge and Burn to Shape the Face Naturally
Dodge and burn means lightening and darkening specific areas. In facial retouching, it is used to smooth uneven skin, reduce harsh shadows, shape cheekbones, brighten eyes, define lips, and guide attention. Create a Curves adjustment layer for brightening and another for darkening. Invert both masks to black, then paint with a soft white brush at low flowusually between 1% and 5%.
Use dodge to gently brighten dark under-eye areas, soften shadows beside the nose, and lift dull patches. Use burn to add depth under cheekbones, define the jawline, and recover areas that look too flat. This is not contour makeup with a paint roller. Tiny strokes win.
Micro dodge and burn vs. contour dodge and burn
Micro dodge and burn corrects small skin irregularities. You zoom in and even out tiny dark and light patches while keeping texture. Contour dodge and burn shapes the overall face. You zoom out and enhance natural structure. Both are useful, but they serve different purposes.
A practical example: if a cheek has blotchy shadows, micro dodge and burn can smooth the patchiness. If the whole portrait feels flat, contour dodge and burn can add dimension to cheekbones and jawline. Always paint on masks so you can reduce the effect later.
Step 7: Enhance Eyes, Lips, Teeth, and HairGently
Facial retouching is not only about skin. Eyes, lips, teeth, and hair often need small refinements. The key word is small. Brighten the whites of the eyes slightly, but do not make them glow like headlights. Add a little contrast to the iris, but avoid turning eye color radioactive. Sharpen lashes and brows carefully. Clean stray hairs only when they distract from the face.
For teeth, use a Hue/Saturation adjustment layer. Target yellows, reduce saturation, and slightly increase lightness. Mask the adjustment so it affects only the teeth. Natural teeth are not pure white. If they look like bathroom tile, pull back.
How to brighten eyes naturally
Create a Curves adjustment layer and lift the midtones slightly. Fill the mask with black, then paint softly over the whites of the eyes and catchlights. Use another subtle Curves or Levels adjustment to add contrast to the iris. Keep opacity low. The viewer should think, “Nice portrait,” not “Those eyes have their own power supply.”
For lips, clean dry flakes with the Healing Brush, add a little contrast with Curves, and gently enhance color if needed. Avoid reshaping lips unless requested and appropriate. For hair, remove flyaways around the face with a small Clone Stamp or Healing Brush, sampling carefully from nearby background or hair texture.
Step 8: Make Final Color, Sharpening, and Export Adjustments
Once the face looks clean and natural, step away from detailed retouching and review the whole image. Turn layers on and off. If the retouched version looks dramatically different, reduce opacity or mask back some edits. The best retouch often looks invisible until compared with the original.
Add final color grading with adjustment layers. A gentle Curves adjustment can improve contrast. Selective Color can refine skin tones. Color Lookup can create mood, but use it carefully for portraits. Heavy grading may look trendy today and strange tomorrow, like certain haircuts from old yearbooks.
Sharpen for the final destination
Sharpening should happen near the end and should match where the image will be displayed. A portrait for Instagram, a website bio, a LinkedIn headshot, and a print portfolio may need different sharpening. Use Smart Sharpen or High Pass on a duplicate layer, then mask sharpening away from smooth skin and keep it on eyes, lashes, brows, lips, and hair.
For web use, export the image in sRGB to help maintain more consistent color across browsers and devices. Save a layered PSD or TIFF as your master file, then export a flattened JPEG or PNG for publishing. Never keep only the final flattened file unless you enjoy redoing work for sport.
Common Photoshop Face Retouching Mistakes to Avoid
Over-smoothing skin: Skin should have texture. If the forehead looks like a boiled egg, reduce the effect.
Ignoring the whole face: Retouching one cheek perfectly while leaving the rest untouched can make the edit obvious. Balance matters.
Using one tool for everything: Spot Healing, Healing Brush, Clone Stamp, dodge and burn, masks, and adjustment layers each solve different problems.
Whitening eyes and teeth too much: Natural whites are not pure white. Keep them believable.
Changing facial structure without consent: Tools like Liquify are powerful. Use them ethically and sparingly, especially in professional portraits.
When to Use Face-Aware Liquify
Face-Aware Liquify can adjust facial features such as eyes, mouth, nose, and face shape. It can be helpful for correcting lens distortion, evening out a slight expression imbalance, or making tiny refinements. But it should not become a personality replacement machine.
Use Liquify on a Smart Object so you can revise the effect. Keep changes subtle. A tiny lift to a smile or minor correction to distortion may look natural. Large changes can quickly become obvious, especially if the subject knows what they actually look likewhich, inconveniently, they usually do.
of Real-World Experience: What Actually Makes a Retouch Look Professional
After spending time with facial photo retouching, one lesson becomes clear: beginners usually edit too much, while professionals usually edit just enough. The first instinct is to remove every pore, line, shadow, freckle, and uneven patch. It feels productive because the face gets smoother quickly. But after a few minutes, the portrait loses its spark. The person still has eyes, nose, and mouth, technically, but the life has gone missing. Natural retouching is not about perfection; it is about believability.
One helpful habit is to create a “pause layer” in your workflow. After cleaning blemishes and smoothing tone, stop and turn the retouching layers off and on. Do this from a normal viewing distance, not while zoomed into someone’s left cheek like a detective solving a pore-related crime. If the difference looks clean but believable, continue. If the edited version looks like a different person, lower opacity. Photoshop gives you power, but opacity gives you taste.
Another experience-based tip: retouch in passes. Do not try to finish the skin, eyes, lips, teeth, hair, color, and sharpening all at once. First pass: global exposure and color. Second pass: blemish cleanup. Third pass: skin tone and texture. Fourth pass: dodge and burn. Fifth pass: feature enhancement. Final pass: color grade and export. This keeps the edit organized and prevents tunnel vision.
It also helps to understand the purpose of the photo. A corporate headshot needs clean, confident, realistic retouching. A beauty campaign may allow more polish. A dating profile should look attractive but honest. A family portrait should preserve warmth and personality. A dramatic editorial image can handle stronger color and contrast. The “best” retouch depends on context.
One of the most overlooked skills is knowing what not to retouch. Laugh lines may be part of a person’s charm. Freckles may be a signature feature. A small scar may matter to the subject. Before removing anything permanent, consider whether it is truly a distraction or part of identity. Ethical retouching builds trust. Heavy-handed editing can quietly send the message that real faces are not acceptable, and nobody needs that nonsense with their morning coffee.
Finally, save versions. Keep the layered file, export a high-quality copy, and create a web-ready version. Label files clearly: “portrait-retouched-master.psd,” “portrait-web-srgb.jpg,” and “portrait-print.tif” are much better than “final_FINAL_reallyfinal_pleasework.jpg.” A professional workflow is not glamorous, but it saves time, protects quality, and keeps your edits flexible.
The best Photoshop facial retouching is invisible craftsmanship. Viewers notice the person, not the editing. The skin looks real. The eyes have life. The color feels balanced. Nothing screams, “I spent two hours wrestling pixels.” That is the sweet spot: polished, natural, respectful, and ready to publish.
Conclusion
Photoshop facial retouching works best when you follow a clean, nondestructive workflow: prepare the file, correct exposure, remove temporary blemishes, refine texture, smooth carefully, dodge and burn, enhance key features, and export properly. Each step should support the portrait instead of overpowering it.
Use Photoshop tools like Spot Healing Brush, Healing Brush, Clone Stamp, adjustment layers, Neural Filters, Camera Raw Filter, and Face-Aware Liquify with restraint. Retouching is not about creating flawless plastic skin. It is about removing distractions while preserving expression, identity, and natural detail.
If you remember one thing, remember this: real faces are interesting. Keep the texture, keep the character, and use Photoshop like a skilled assistantnot a digital bulldozer.


