Table of Contents >> Show >> Hide
- Why Sealing Windows Matters for Energy Efficiency
- How to Tell If Your Windows Are Leaking Air
- The Best Materials for Sealing Windows
- How to Seal Windows Step by Step
- Best Window-Sealing Fixes for Different Problems
- Common Mistakes to Avoid
- When Sealing Windows Is Not Enough
- Extra Ways to Lower Energy Bills After Sealing Windows
- Conclusion
- Real-World Experiences With Sealing Windows to Save on Energy Bills
If your house feels like it has a secret relationship with the outdoors, your windows may be the reason. In winter, they let in chilly drafts like uninvited houseguests. In summer, they welcome hot air with the enthusiasm of a broken screen door. The result is simple: your HVAC system works harder, your rooms feel less comfortable, and your energy bill starts acting like it has big dreams.
The good news is that sealing windows is one of the most practical, affordable ways to improve home comfort and reduce wasted energy. You do not need to leap straight to a full window replacement or sell a kidney to finance “luxury thermal glass.” In many homes, a careful combination of caulk, weatherstripping, window film, and a little detective work can make a noticeable difference.
This guide breaks down how to seal windows the smart way, what materials actually help, which mistakes to avoid, and when it makes sense to stop patching and start upgrading. Whether you live in a drafty older home, a builder-grade box with “personality,” or a newer house with a few annoying leaks, these steps can help you save on your energy bill without turning the project into a three-week emotional journey.
Why Sealing Windows Matters for Energy Efficiency
Windows affect comfort in two big ways: air leakage and heat transfer. Air leakage is the obvious troublemaker. That is the draft you feel around the sash, frame, or trim. Heat transfer is sneakier. Even if air is not rushing in, poorly insulated glass and frames can still let indoor heat escape in winter and let outdoor heat push in during summer.
When windows are not sealed properly, your heating and cooling equipment has to compensate. That means longer runtimes, more energy use, and rooms that never quite feel right. One corner of the bedroom is freezing, the living room is oddly stuffy, and you begin blaming the thermostat when the real villain is a gap the width of a shoelace.
Sealing windows helps by reducing uncontrolled air movement. That improves comfort, supports more even indoor temperatures, and can trim energy waste. It also helps with noise, dust, and sometimes even moisture issues around older window assemblies.
How to Tell If Your Windows Are Leaking Air
Before you start buying tubes of caulk like you are preparing for an arts-and-crafts emergency, figure out where the leaks actually are.
Common signs of drafty windows
- You feel cold air near the window even when it is closed.
- Light curtains move when the HVAC is off.
- Your room feels hotter or colder than the rest of the house.
- You notice cracked, missing, or peeling caulk outside.
- The window rattles, shifts, or does not close tightly.
- You see condensation or moisture issues around the frame.
Easy ways to check for leaks
Start with a visual inspection inside and outside. Look around the window frame, trim, and sill for visible gaps, cracks, or worn weatherstripping. On a windy day, hold your hand near the edges of the sash and frame. If you want a slightly more dramatic method, use a smoke pencil or even the smoke from a recently blown-out candle and watch for movement. No fireworks, please. We are sealing windows, not auditioning for a disaster reel.
If your house has several comfort problems, a professional home energy audit can be worth it. An auditor can use tools like a blower door and infrared camera to find hidden leaks and show you where sealing work will have the biggest payoff.
The Best Materials for Sealing Windows
The trick is choosing the right material for the right job. This is not a one-product-fixes-everything situation.
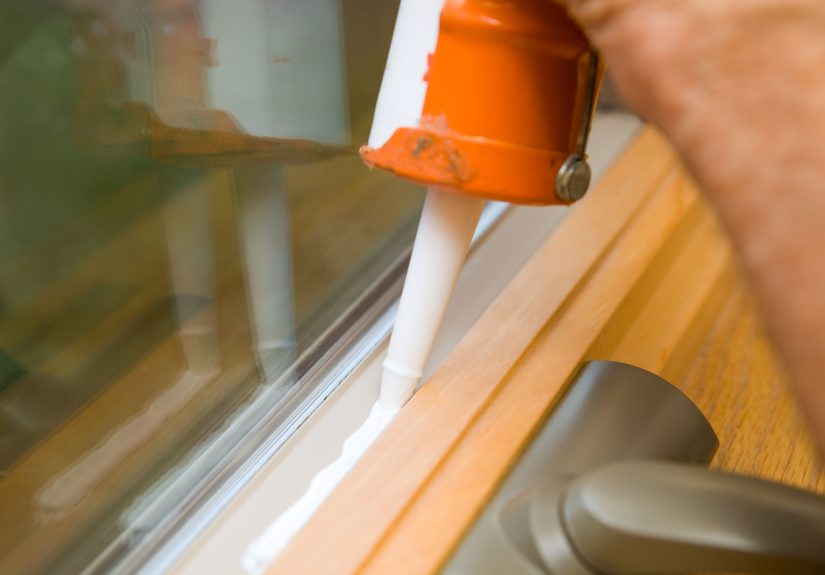
Caulk
Caulk is best for stationary parts of a window, such as the exterior frame, trim joints, and fixed cracks where two materials meet. It creates an airtight and often watertight seal. If the gap is small, caulk is usually your first stop.
For many homeowners, paintable acrylic latex or siliconized acrylic caulk works well indoors. Exterior jobs often call for a durable exterior-grade product that can handle weather and temperature swings. The goal is flexibility, adhesion, and long-term durability.
Weatherstripping
Weatherstripping is for moving parts, especially operable windows. If a window opens and closes, you need something compressible that seals the gap without gluing the whole thing shut forever. Foam tape, V-strip, felt, and other products can work depending on the window style and the size of the gap.
Good weatherstripping should press tightly when the sash closes, but it should not make the window impossible to operate. If closing the window becomes a full-body workout, you probably chose material that is too thick.
Expanding foam for window and door use
If the gap behind interior trim is too large for caulk, low-expansion foam made specifically for windows and doors can help fill the cavity. The phrase “for windows and doors” matters. Standard high-expansion foam can bow frames and create more problems than it solves. That is a rough way to save $8.
Plastic window insulation film
Plastic shrink film kits are a temporary seasonal fix, but they can be surprisingly effective on older windows. They create an additional air barrier across the glass and frame area and are especially handy if replacement is not in the budget right now.
Draft stoppers and window treatments
Draft stoppers, thermal curtains, and cellular shades are not a substitute for sealing leaks, but they can add another layer of comfort. Think of them as backup singers, not the lead vocalist.
How to Seal Windows Step by Step
1. Inspect and clean the area
Remove dust, loose paint, failing caulk, and debris. New sealants do not bond well to dirty or flaky surfaces. Use a putty knife or scraper where needed, then wipe the area dry. A clean surface gives you a much better seal and a better-looking finish.
2. Caulk the nonmoving gaps
Apply caulk around the exterior window frame where it meets siding, brick, or trim. Indoors, check trim joints and fixed cracks. Run a smooth, continuous bead and tool it lightly so it fully fills the gap. The prettiest caulk job is the one that looks boring and airtight.
Do not caulk weep holes, drainage paths, or parts of the window designed to release moisture. Windows need to shed water properly, and sealing the wrong area can trap moisture and invite rot.
3. Add or replace weatherstripping
Open the window and inspect the sash contact points. Remove worn or flattened weatherstripping. Cut the new material to size, press it firmly into place, and close the window to test the seal. On double-hung windows, pay special attention to the meeting rail, the top sash, and the lower sash edges.
4. Seal behind the trim if needed
Sometimes the visible frame looks fine, but the real leak is hidden behind interior casing. If you suspect a larger cavity, carefully remove the trim, seal gaps with low-expansion foam or caulk as appropriate, then reinstall the trim. This is one of those projects that sounds slightly annoying and then turns out to be weirdly satisfying.
5. Use window film for seasonal extra protection
If the windows are still drafty or you need a low-cost winter solution, install shrink film according to the kit directions. Apply the double-stick tape, place the plastic, and shrink it with a hair dryer until taut. Leave at least one operable emergency exit window available in sleeping spaces.
6. Lock your windows
This step gets overlooked all the time. Locking the window pulls the sashes together more tightly and can reduce air leakage on its own. It is not glamorous, but it is free, which is a gorgeous price point.
Best Window-Sealing Fixes for Different Problems
For small cracks around the frame
Use exterior or interior caulk, depending on location. This is usually the easiest and most affordable improvement.
For leaks around moving sashes
Use weatherstripping. Foam tape is simple, but V-strip or more durable products may last longer on high-use windows.
For hidden gaps behind casing
Remove trim and use low-expansion foam for windows and doors.
For single-pane or very old windows in winter
Use shrink film kits, heavy curtains, and draft stoppers while planning better long-term upgrades.
For homes where replacement is too expensive right now
Consider low-e storm windows. They can improve comfort and energy performance at a much lower cost than full replacement, especially if your existing windows are structurally sound but leaky or underperforming.
Common Mistakes to Avoid
- Using caulk on moving parts: That turns a window into a decorative wall feature.
- Skipping surface prep: Dirt and old sealant reduce adhesion.
- Choosing the wrong foam: High-expansion products can warp window frames.
- Ignoring exterior leaks: Indoor sealing helps, but outside gaps often cause the real problem.
- Sealing without thinking about moisture: Windows need drainage and homes need healthy ventilation.
- Treating windows as the only issue: Leaks around outlets, baseboards, attic hatches, and ductwork can also drive up energy bills.
When Sealing Windows Is Not Enough
Sealing is a great first move, but it is not magic. If your windows are rotted, out of square, hard to close, or single-pane and badly deteriorated, you may be at the point where repair or replacement makes more sense. Likewise, if you have persistent condensation between panes, broken locks, or obvious structural issues, sealing alone will not solve the whole problem.
If replacement is on the table, look for ENERGY STAR certified windows and review NFRC labels. Pay attention to U-factor and solar heat gain coefficient based on your climate. In colder areas, lower U-factor matters a lot. In hotter climates, lower solar heat gain can help keep indoor spaces cooler.
Extra Ways to Lower Energy Bills After Sealing Windows
Once you tighten up your windows, do not stop there. Energy bills usually improve fastest when several small upgrades work together.
- Seal doors, attic hatches, and other obvious air leaks.
- Add insulation where your home is under-insulated.
- Schedule a professional energy audit if bills are still high.
- Use blinds or curtains strategically for summer heat and winter cold.
- Check HVAC filters and keep equipment maintained.
- Make sure your home still has proper ventilation and moisture control.
Conclusion
If you want a practical answer to rising energy costs, start with the places where your house is quietly giving your money to the weather. Sealing windows is not flashy. Nobody throws a party because you replaced tired weatherstripping. But it works. It can make rooms feel more comfortable, reduce drafts, support lower heating and cooling use, and buy you time before more expensive upgrades are necessary.
The smartest approach is simple: inspect carefully, use caulk on stationary gaps, use weatherstripping on moving parts, seal larger hidden cavities properly, and consider window film or storm windows when you need extra help. In other words, do not wage war on your windows with random products and optimism alone. Match the fix to the problem, and your energy bill may finally stop acting like it is renting penthouse space in your budget.
Real-World Experiences With Sealing Windows to Save on Energy Bills
One of the most common experiences homeowners describe after sealing windows is not actually “I saved a ton of money” right away. It is, “My house finally feels normal.” That may sound underwhelming until you have lived with a dining room that feels like a walk-in refrigerator every January. Comfort is often the first payoff. Bills come later, but comfort shows up fast.
In older homes, people often discover that the draft they blamed on “bad windows” was not always coming through the glass itself. Sometimes it was leaking through cracked exterior caulk, worn sash weatherstripping, or gaps hidden behind trim. After sealing those trouble spots, many homeowners notice that the room temperature feels steadier and the thermostat does not need as much fiddling. That constant urge to bump the heat up two degrees, then down one, then back up again like a confused DJ starts to fade.
Another common experience is surprise at how inexpensive the first round of improvements can be. A few tubes of caulk, a roll of weatherstripping, and a weekend of mildly grumpy ladder work can produce a meaningful difference. People expecting a tiny improvement are often shocked that simple sealing changes the feel of a bedroom, home office, or nursery almost immediately. It is one of those rare home projects where the sentence “That actually helped” gets said without sarcasm.
Renters and budget-conscious homeowners often talk about window film kits as a lifesaver during extreme seasons. No, they are not glamorous. No, your windows will not look like the lobby of a luxury hotel. But for many people in drafty apartments or older houses, that clear film becomes the unsung hero of winter. Once installed, it can cut the icy breeze near the glass and make sitting by the window far less dramatic.
There are also lessons people learn the hard way. A classic example is using the wrong sealant in the wrong place. Someone caulks a movable sash, then realizes the window is now technically “sealed” in the sense that it will never open again. Another homeowner grabs high-expansion foam, watches it swell like bread dough in a panic, and then spends the afternoon wondering why the window frame suddenly looks annoyed. These experiences usually end with the same advice: read the label, slow down, and use products made specifically for windows and doors.
People who go one step further and schedule a professional energy audit often say the biggest benefit is clarity. Instead of guessing, they get a ranked list of problems. Sometimes the windows are part of the issue, but not the whole issue. The audit may reveal major air leakage in the attic, around ducts, or through other penetrations. That experience can save money because it helps homeowners prioritize the fixes that matter most.
In the end, the experience of sealing windows is usually less about one dramatic before-and-after moment and more about a chain reaction of better living: fewer drafts, more stable temperatures, quieter rooms, less HVAC strain, and a home that feels less leaky and more livable. That is not flashy. It is just smart home maintenance doing exactly what it should.


555
555