Table of Contents >> Show >> Hide
- Why Drywall Repairs Go Wrong
- What You Need for a Clean Drywall Repair
- First, Figure Out What Size Hole You Have
- How to Patch Tiny Holes in Drywall
- How to Repair Small Holes from Anchors, Screws, and Minor Punctures
- How to Patch Medium Drywall Holes
- How to Patch Large Holes in Drywall
- How to Fix Nail Pops
- How to Match Texture So the Patch Does Not Scream “I WAS REPAIRED”
- Common Drywall Repair Mistakes to Avoid
- How Long Does Drywall Repair Take?
- Quick FAQ: Patching Drywall Holes
- Final Thoughts
- Real-World Drywall Repair Experiences and Lessons Learned
If your wall has a tiny nail hole, a mystery ding from moving day, or a crater that looks like your doorknob lost an argument, do not panic. Drywall repair sounds intimidating until you realize it is mostly a game of clean edges, the right filler, a little patience, and resisting the deeply human urge to slap on too much mud and hope for the best.
The good news? Most drywall damage is absolutely fixable by a regular person with regular tools and a reasonably steady hand. The better news? You do not need to become a full-time contractor just to make your wall look like nothing ever happened. Whether you are dealing with pinholes, anchor damage, cracked corners, nail pops, or a hole big enough to raise questions you do not want to answer, this guide breaks down exactly how to patch holes in drywalllarge and smallso the final result looks smooth, strong, and paint-ready.
Why Drywall Repairs Go Wrong
Before we get into the how-to, let’s talk about why so many drywall patch jobs end up looking like a pancake glued to a wall. Most bad repairs happen for one of five reasons:
- The damaged area was not cleaned or trimmed first.
- The wrong product was used for the hole size.
- The patch had no support behind it.
- The compound was piled on too thick instead of built up in thin coats.
- The repair was painted without proper sanding and primer.
In other words, drywall repair is less about brute force and more about not rushing. Think of it like making pancakes: one careful layer at a time. Also like pancakes, the first one might be a little weird. That is normal.
What You Need for a Clean Drywall Repair
The exact materials depend on the size of the hole, but most drywall wall repair projects use some combination of the following:
- Putty knife or drywall knife
- Spackle or lightweight patching compound
- Joint compound
- Self-adhesive mesh patch or mesh tape
- Utility knife
- Drywall saw
- Sandpaper or sanding sponge, usually fine grit
- Primer and matching paint
- Drywall scrap for bigger repairs
- Furring strips or wood backers for large holes
- Stud finder for safer cutting
- Drywall screws and a drill/driver
If you only repair one thing this year, make it this: buy a decent putty knife. Cheap ones flex in all the wrong ways and leave ridges that look like a tiny snowplow drove across your wall.
First, Figure Out What Size Hole You Have
The easiest way to choose the right drywall patch method is to sort the damage by size:
Tiny holes
Nail holes, pinholes, small screw holes, and shallow dings.
Small holes
Usually up to about 1/2 inch, such as anchor holes or minor punctures.
Medium holes
Roughly 1/2 inch to 6 inches, where a mesh patch or California patch makes sense.
Large holes
Anything over 6 inches, broken-out sections, or damage that needs a supported drywall insert attached to wood backing or a stud.
Once you identify the category, the repair becomes much simpler.
How to Patch Tiny Holes in Drywall
Tiny holes are the easy win of drywall repair. These include old picture-hook holes, brad nail holes, and little surface dents.
Step 1: Clean the area
Wipe away dust and gently scrape off any loose paint or fuzzed drywall paper. If the hole has a raised edge, knock it down lightly with your putty knife.
Step 2: Apply spackle
Use a putty knife to press a small amount of spackle into the hole. Then scrape across the surface so the patch sits nearly flush with the wall. A slight mound is fine because patching compounds often shrink a little as they dry.
Step 3: Let it dry completely
Yes, completely. “Mostly dry” is not dry. It is a trap.
Step 4: Sand lightly
Use fine-grit sandpaper or a sanding sponge. The goal is smooth, not aggressive. You are blending, not carving a sculpture.
Step 5: Prime and paint
If you skip primer, the patch can flash through the paint and create a dull or uneven spot. One coat of primer and then touch-up paint usually does the trick.
How to Repair Small Holes from Anchors, Screws, and Minor Punctures
Small holes need a bit more support than a tiny nail hole, especially if the paper face around the drywall is torn. This is where people often reach for the wrong product and end up stuffing half a tub into the wall.
Step 1: Remove loose material
Cut away ragged paper and crumble-prone gypsum. If you removed a drywall anchor, clean out the opening so you are working with a stable edge.
Step 2: Fill in layers
For small damage, use spackle or lightweight patching compound. Push the filler firmly into the hole, then smooth it across the face of the wall.
Step 3: Repeat if needed
Deeper holes often need two applications because the filler shrinks slightly as it dries. Thin coats look better and crack less.
Step 4: Sand, prime, and paint
Same finishing rule as before: a light sand, a coat of primer, then paint.
Pro tip: If the area around the hole feels soft, broken, or flaky, do not just keep adding filler. Remove the weak material first. Filler is not magic. It is not emotional support mud.
How to Patch Medium Drywall Holes
Medium holes are where drywall repair starts to feel like a real project, but it is still completely DIY-friendly. There are two common methods here: a mesh patch and a California patch.
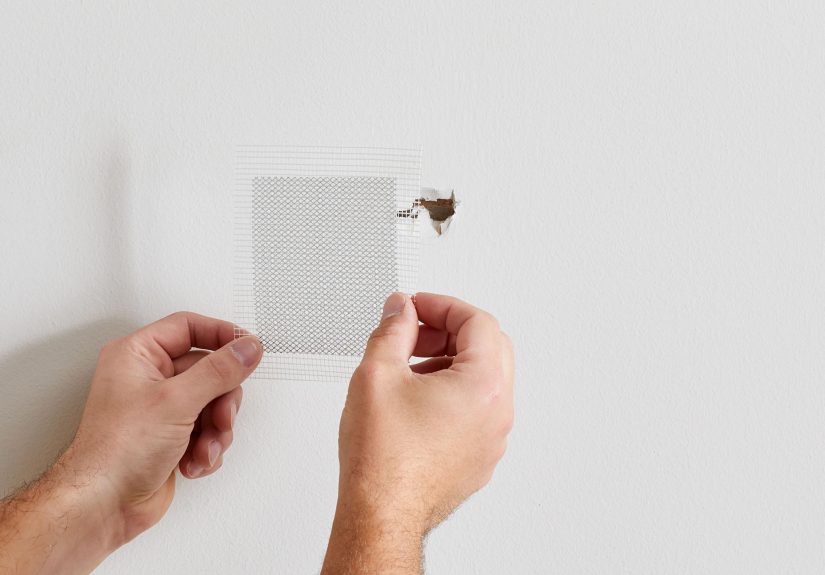
Option 1: Use a self-adhesive mesh patch
This is a good approach for clean holes that are not too large. Place the patch so it overlaps the hole on all sides. Then cover it with compound, feathering the edges well beyond the patch so the repair blends into the wall. Let it dry, sand lightly, and add another thin coat if needed.
The trick is not burying the wall under a mountain of mud. Use wider, thinner coats instead. The patch disappears because the edges feather out, not because you dumped on enough compound to tile a bathroom.
Option 2: Make a California patch
A California patch is one of the smartest drywall repair tricks for medium-size holes. You cut a drywall patch slightly larger than the damaged area, then peel back some gypsum from the edges so the front paper extends like a flap. Next, trace and cut the wall opening to fit the gypsum center, apply joint compound behind the paper flange, press the patch in, and coat over it.
This method works beautifully because the drywall itself helps the patch sit flush. It is a cleaner finish than many peel-and-stick options, especially when you want a less noticeable repair.
When to use joint compound instead of spackle
For medium repairs, joint compound is usually the better choice because it builds more smoothly over mesh, tape, or patch seams. Spackle is great for smaller cosmetic fixes, but once the repair has seams, tape, or a larger surface area, joint compound usually wins.
How to Patch Large Holes in Drywall
If your wall has a big hole, you need to stop thinking “fill” and start thinking “replace.” Large drywall hole repair works best when you install an actual piece of drywall supported by wood backing or a stud.
Step 1: Square up the damage
Use a drywall saw or utility knife to turn the broken hole into a clean square or rectangle. This feels backward because you are making the hole bigger. But neat holes are easier to patch than messy ones.
Step 2: Check for wires and obstacles
Before cutting deeper, make sure there are no electrical wires, plumbing lines, or surprises hiding in the cavity. If there is any doubt, shut off power to the area and investigate carefully.
Step 3: Add backing support
If the hole does not land on a stud, screw furring strips or other narrow wood backers inside the wall opening. Half of each strip should remain exposed so the new drywall patch has something to attach to.
Step 4: Cut a drywall patch
Cut a piece of drywall to match the opening. Test-fit it before installing. It should fit snugly, but not so tightly that you have to force it in like a couch through a tiny apartment doorway.
Step 5: Screw the patch into place
Attach the patch to the backers or studs with drywall screws. Sink the screw heads just below the surface without tearing the paper.
Step 6: Tape the seams
Apply mesh tape or paper tape over the seams around the patch.
Step 7: Apply joint compound in multiple coats
Spread the first coat over the seams and screw heads. Let it dry, sand lightly, then apply a wider second coat. A third skim coat may be needed for a truly invisible repair. Each coat should get wider and thinner.
Step 8: Sand, prime, and paint
Finish with a light final sanding, primer, and matching paint.
If you are repairing a large fire-rated wall or ceiling, specialized repair clips and code-related materials may matter. In that case, use materials appropriate to the wall assembly and consider a pro if you are unsure.
How to Fix Nail Pops
Nail pops are those annoying little circles or bumps that push through paint as the house shifts and framing moves. Tapping the nail back in might feel satisfying, but it is usually temporary.
The better fix is to drive drywall screws into the stud just above and below the popped fastener, then reset or remove the old pop, cover the area with compound, sand, prime, and paint. The screws help hold the drywall securely so the problem is less likely to come back and haunt you in six months.
How to Match Texture So the Patch Does Not Scream “I WAS REPAIRED”
Smooth walls are easier to patch than textured ones, but textured walls are still manageable.
For orange peel or light texture
After the patch is sanded and primed, use a texture spray or dab on compound with a sponge or crumpled plastic. Practice first on scrap cardboard. Really. The wall is not the place for your first experimental splatter masterpiece.
For knockdown texture
Spray or apply the texture, let it set slightly, then flatten the peaks gently with a broad knife.
For heavy hand-applied texture
You may need to mimic the pattern manually with a knife, brush, or sponge. The key is to look at the surrounding wall, not your memory of it.
Common Drywall Repair Mistakes to Avoid
- Using too much compound at once: Thick coats crack, shrink, and take forever to dry.
- Skipping the feathering: If you do not taper the edges, the patch will show.
- Not priming the repair: Paint alone rarely blends perfectly over raw patch compound.
- Ignoring torn drywall paper: Loose paper must be trimmed and sealed or the patch can bubble.
- Forgetting support on large holes: Big patches need backing, not wishful thinking.
- Oversanding: It is possible to sand so much you damage the paper face around the repair.
How Long Does Drywall Repair Take?
The hands-on work is usually quick. The waiting is what stretches the project out.
- Tiny holes: Often done in under an hour, plus drying time.
- Small holes: Usually one short repair session and one return trip for sanding and paint.
- Medium holes: Half a day of actual work spread across dry times.
- Large holes: Often a full project over one to two days depending on coats, texture, and paint.
Drywall teaches patience. It is basically a wall-based reminder that the final 10 percent is what makes the other 90 percent look professional.
Quick FAQ: Patching Drywall Holes
Can I use spackle for every drywall hole?
No. Spackle is great for small cosmetic repairs, but larger holes and seam repairs usually need a stronger patch system and joint compound.
Do I need mesh tape for a small hole?
Not for tiny nail holes. For bigger openings or cracks, mesh tape or a patch adds strength and helps prevent the repair from failing.
Should I paint directly over the patch?
You can, but you probably will not like the result. Primer helps seal the patch and keeps the finish from looking dull or flashing through the paint.
What if the hole is near a corner?
If the corner bead is damaged, patching gets more involved. You may need to cut out and replace the damaged corner bead section before applying compound.
Final Thoughts
Learning how to patch holes in drywalllarge and smallis one of those home maintenance skills that pays off forever. Once you understand the logic behind the repair, the whole process becomes much less intimidating. Tiny holes need filler. Medium holes need bridging. Large holes need structure. All of them need patience, clean edges, and a finish that is sanded, primed, and painted properly.
And that is really the secret: drywall repair is not about hiding damage under a blob of compound. It is about rebuilding the surface in a way that makes the repair disappear. Do it well, and nobody notices anything. Do it badly, and every time you walk past the wall, it will wink at you like a lumpy little ghost.
Real-World Drywall Repair Experiences and Lessons Learned
The most useful drywall lessons usually come after the second or third repair, not the first. The first time most people patch a hole, they assume the hardest part is filling it. It is not. The hardest part is getting the wall to look normal again once the filler dries, shrinks a little, and reveals every ridge you swore was not there five minutes earlier. That is why experienced DIYers get almost obsessive about feathering edges and using thin coats. It is not because they enjoy making extra work for themselves. It is because they have already learned that one thick coat turns into sanding misery later.
One common real-life scenario is the classic moving-day disaster: a chair leg, table corner, or bed frame punches a hole in the wall. The first instinct is often to push the broken drywall back in and cover it with compound. That nearly always leads to a weak patch and a visible hump. People who have done this repair more than once usually learn to cut the damage into a clean square, add proper backing, and install a real patch. It feels slower at the start, but it saves time in the finish stage because the repair is flatter and stronger from the beginning.
Another frequent lesson comes from old anchor holes. Removing wall anchors has a sneaky way of turning a small fix into a medium one. Many homeowners start with confidence, only to discover the paper face around the hole has torn loose and the gypsum is crumbly. The successful repairs happen when the damaged material gets trimmed back first. That one small step changes everything. Instead of trying to patch over instability, you are giving the compound a solid surface to grip.
Texture matching is another experience-based skill. The first attempt is usually too heavy, too light, or too obviously different from the rest of the wall. The best approach is almost always to test on scrap cardboard before touching the wall. People skip that because it sounds fussy, but after one patch dries with a texture pattern that looks like accidental cake frosting, the value of a practice round becomes extremely clear.
Then there is paint. Many people learn the hard way that a beautifully patched wall can still look wrong after painting if primer gets skipped. The patch absorbs paint differently, and suddenly the repair flashes under certain light even though the surface is smooth. Veterans of drywall repair know that primer is not the boring extra step. It is the step that keeps all your earlier work from being wasted.
Finally, there is the emotional lesson drywall teaches better than almost anything else in home repair: slow down. Rushing wet compound, sanding too aggressively, painting before full drying, or trying to make one coat do the work of three are the mistakes nearly everyone makes at least once. The people who get the best results are not always the most talented. Usually, they are just the ones who stopped trying to beat the drying time and started letting the process work.