Table of Contents >> Show >> Hide
- Why Shirt Sizing Feels Confusing (and Why You’re Not the Problem)
- What You Need Before Measuring
- How to Measure Your Shirt Size: Step-by-Step
- Method 2: Measure a Shirt You Already Love
- How to Convert Measurements into Shirt Sizes
- Height and Body Proportion Matter More Than Most People Think
- Online Shopping Checklist: 60 Seconds Before You Click “Buy”
- Common Measurement Mistakes (and Quick Fixes)
- Quick Reference Measurement Table
- Final Takeaway
- Experiences from Real Shirt-Fit Situations (500+ Words)
Buying a shirt should be simple: click, checkout, done. But somehow, half of us end up in a “great color, weird fit” situation where the collar feels like a seatbelt and the sleeves look like we borrowed them from a taller cousin. If that sounds familiar, triggering, or bothgood news. This guide shows you exactly how to measure your shirt size, step by step, so you can buy shirts that fit your body instead of your optimism.
We’ll cover both dress shirts and casual shirts, explain the difference between numeric and alpha sizing, decode terms like classic fit and slim fit, and show you how to avoid the most common mistakes people make when measuring at home. You’ll also get practical examples, a quick reference chart, and a long real-world “experience” section at the end to help you spot fit issues before they happen.
If your goal is simplelook sharper, feel more comfortable, and return fewer shirtsthis is your playbook.
Why Shirt Sizing Feels Confusing (and Why You’re Not the Problem)
Shirt sizing is messy because brands use different systems:
- Dress shirt sizing: usually neck + sleeve (example: 16 / 34-35).
- Casual shirt sizing: usually alpha sizes (S, M, L, XL).
- Fit blocks: classic, regular, trim, slim, extra slim, tailored, and so on.
- Length options: short/regular/long or tall versions.
So yes, you can be “Medium” in one brand, “Large” in another, and “16/34” in dress shirtsall on the same day, without eating a single extra burrito.
What You Need Before Measuring
1) A soft measuring tape
A tailor’s tape is ideal. If you don’t have one, use a string, then measure that string with a ruler.
2) A mirror (or helpful human)
Sleeve length is much easier with a friend. If you measure solo, do it twice for accuracy.
3) A shirt that already fits you well
This gives you a reliable backup method when body measurements feel confusing.
4) A note app
Save your numbers once, then reuse them forever. “Future You” will thank you during flash sales.
How to Measure Your Shirt Size: Step-by-Step
Neck Measurement (Collar Size)
- Stand relaxed, looking straight ahead.
- Wrap tape around the base of your neck (where your collar sits).
- Keep the tape snug, not choking.
- Use the comfort rule: you should fit one to two fingers under the tape/collar.
Pro tip: many dress-shirt guides effectively land at “true neck + comfort allowance.” Some shoppers round to the nearest half-inch and/or add a small allowance depending on brand standards.
Example: If your neck measures 15.75 inches, many dress-shirt systems will put you around a 16 or 16.5 collar depending on fit preference and brand chart.
Sleeve Length Measurement
- Bend your arm slightly and place your hand on your hip.
- Start tape at the center back of your neck.
- Run over shoulder, down elbow, to wrist bone (or where hand begins to widen).
- Record to nearest half-inch.
Fit target: Shirt cuff usually ends near the wrist break; under a jacket, about 1/4 to 1/2 inch of shirt cuff showing is a common style benchmark.
Chest Measurement
- Stand naturally with arms relaxed.
- Measure around the fullest part of chest and shoulder blades.
- Keep tape level and parallel to the floor.
- Snug, but not compressing your torso.
Your chest is crucial for casual shirts and for choosing between fit blocks (regular vs slim vs trim).
Waist Measurement
- Measure around your natural waist or the narrowest point near the navel region (follow brand definition).
- Keep tape level and relaxed.
- Don’t “suck in”this is shirt shopping, not a superhero audition.
Shoulder Measurement (Optional but Useful)
Measure from one shoulder point to the other across your back. This helps if shirts pull across the upper back or if seams drop too far over the arm.
Shirt Length (Especially for Untucked vs Tucked Styles)
Check product specs for body length, or compare with a shirt you already own. Length can change your whole look even when neck and chest are correct.
Method 2: Measure a Shirt You Already Love
If body measurements feel technical, measure a well-fitting shirt on a flat surface.
How to do it
- Collar: lay flat and measure end-to-end.
- Chest: pit-to-pit, then multiply by 2.
- Waist: across waist, then multiply by 2.
- Sleeve: from shoulder seam (or center back method, per brand guidance).
- Body length: high point shoulder to hem.
This method is excellent for online shopping because it compares garment-to-garment instead of body-to-chart.
How to Convert Measurements into Shirt Sizes
Dress Shirts (Neck/Sleeve)
Typical format: Neck / Sleeve, such as 15.5 / 34-35.
If your sleeve lands between two options, many retailers suggest choosing the longer sleeve for comfort and mobility.
Casual Shirts (S–XXL)
Alpha sizes usually map to chest (sometimes neck + sleeve ranges). Always use the specific brand chart, because “Medium” is not universal law.
Fit Types Explained
- Classic/Traditional: roomier chest/body, easier movement.
- Regular: balanced shape, not too loose, not too fitted.
- Trim/Slim: higher armholes, narrower body/sleeves, closer silhouette.
- Extra-trim/Extra-slim: very close cut; best when shoulder and torso proportions align.
If you sit between fit types, choose based on comfort priority:
mobility (go roomier) vs sharp silhouette (go trimmer).
Height and Body Proportion Matter More Than Most People Think
Some brands adjust sleeve and body length for short, regular, and long/tall options. That means two people with the same chest can need different shirt lengths.
- Tall sizes often add body and sleeve length.
- Short sizes reduce excess fabric for cleaner proportions.
- Big-and-tall ranges may pair larger necks/chests with better sleeve options.
Translation: if shirts fit your torso but look too short (or too tent-like), length optionnot sizemight be the fix.
Online Shopping Checklist: 60 Seconds Before You Click “Buy”
- Compare your measurements with the exact brand chart.
- Check fit block (classic, regular, slim, etc.).
- Read shirt length and sleeve-length notes.
- Check fabric behavior (especially cotton; some shirts can shrink slightly).
- Review return policy and alteration options.
- If between two sleeve lengths, consider sizing up in sleeve.
Common Measurement Mistakes (and Quick Fixes)
Mistake #1: Measuring over thick clothing
Fix: measure over a thin tee or close to body.
Mistake #2: Pulling tape too tight
Fix: snug, level, comfortable. You should still breathe like a normal human.
Mistake #3: Ignoring posture
Fix: stand naturally. Slumping changes neck/chest/sleeve readings.
Mistake #4: Using only one measurement
Fix: neck + sleeve for dress shirts; chest + waist + fit type for casual shirts.
Mistake #5: Assuming every “Medium” is the same
Fix: always check the brand’s chart. Always.
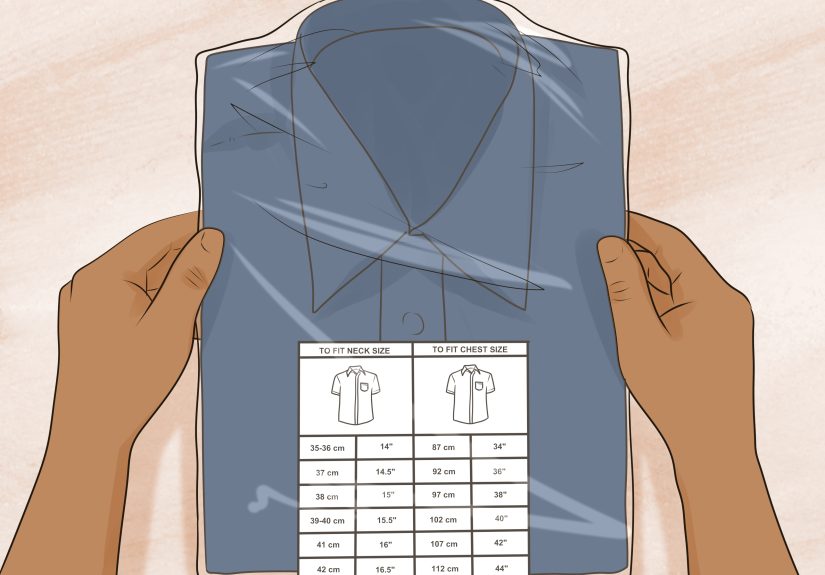
Quick Reference Measurement Table
| Measurement | How to Measure | Why It Matters |
|---|---|---|
| Neck | Around base of neck/collar line, comfort allowance | Collar comfort and dress-shirt size |
| Sleeve | Center back neck → shoulder → elbow → wrist | Cuff placement and mobility |
| Chest | Fullest chest/shoulder blades, tape level | Body fit and button strain |
| Waist | Natural waist/narrowest section per chart | Tapered fit and drape |
| Shoulder | Shoulder point to shoulder point | Seam placement and upper-body comfort |
| Body Length | High point shoulder to hem | Tucked/untucked appearance |
Final Takeaway
The best shirt size is not the number you “wish” you wereit’s the one that makes you look polished, feel comfortable, and move naturally through your day. Start with neck and sleeve for dress shirts, verify chest and waist for overall fit, then match your measurements to each brand’s chart and fit type.
Once you save your measurements, shirt shopping becomes dramatically easier. Fewer returns. Better photos. Less mirror confusion. More “Hey, that shirt fits you really well.”
Experiences from Real Shirt-Fit Situations (500+ Words)
Experience 1: The “I’m Always a Medium” Myth
A friend of minelet’s call him Mikeswore he was a Medium in every shirt category known to humanity. Then he bought three dress shirts online from three different brands. Same listed size, three totally different outcomes: one felt like a gym compression top, one fit like a tablecloth, and one was almost right except the sleeves ended halfway up his forearm whenever he reached for his coffee. We measured him properly: neck, sleeve, chest, waist. Turns out his proportions sat in a weird but common zonemedium chest, longer arms, and shoulders that preferred regular or trim instead of slim. Once he started buying by neck/sleeve for dress shirts and chest + length for casual shirts, the chaos ended. His quote was perfect: “I didn’t need new shirts. I needed accurate math.”
Experience 2: The Collar Trap
Another common case: people choose collars by comfort in the store without checking how that comfort was created. I saw someone pick a shirt that felt “great” at the neck, but the collar was actually too big, so the tie knot floated and the whole look looked loose by noon. When we re-measured at the collar line and used the one-to-two-finger comfort rule, his proper size was smaller than he expectedbut with better structure. Then we adjusted sleeve length up by one step. Result: cleaner collar, better tie shape, and sleeves that stopped shrinking up his wrists every time he typed. This is the quiet secret of good fit: your neck and sleeves need to be right together. Fixing only one creates weird side effects.
Experience 3: The Tall-Guy Illusion
Tall shoppers often blame “size” when the true problem is “length option.” One customer had the right chest and neck, but every regular-length shirt untucked itself within 20 minutes of normal life (walking, sitting, grabbing things from shelves, surviving meetings). He kept sizing up, which only made the shirt balloonier without solving the hem problem. Switching from regular to tall/long length fixed both body coverage and sleeve proportion immediately. This is why many fit guides separate body width from body length: your torso and your height don’t always scale in sync. If your shirt constantly escapes your waistband or cuffs sit too high, don’t panic-buy a bigger sizetest a longer cut first.
Experience 4: The “One Shoulder Is Different” Discovery
Here’s a detail most people never expect: bodies are asymmetrical. One person I worked with had a slightly longer right arm from years of sports. Off-the-rack shirts always looked “almost” correct until you noticed one cuff peeking out farther than the other under a blazer. His solution wasn’t a full bespoke wardrobe. We used his best average sleeve size off the rack, then had a tailor do a minor cuff adjustment on preferred shirts. Tiny alteration, huge visual upgrade. So if a shirt feels close but not perfect, don’t immediately assume wrong size. Sometimes you are one quick tailoring tweak away from “custom-level” fit.
Experience 5: The Return-Rate Glow-Up
A small team buying uniforms online had constant return headaches: wrong sizes, inconsistent fit, wasted time. We introduced a simple measurement protocol: one measuring day, one shared chart template, one approved fit reference for each role (slim, regular, or classic). We also documented each person’s “no-go” issues, like tight collar tolerance or preferred sleeve break. In two ordering cycles, return volume dropped sharply, and people reported better comfort during long shifts. The key lesson: measuring once with intention saves money and frustration repeatedly. Shirt sizing feels random only until you create a repeatable system. After that, it becomes a solved problem.
If you remember one thing from these experiences, make it this: great shirt fit is not luck. It’s a combination of accurate measurements, honest comfort preference, and smart use of each brand’s chart. Do that, and the shirt starts working for you instead of against you.