Table of Contents >> Show >> Hide
- Why Most Homemade Grilled Burgers Disappoint
- Ingredients: Keep It Simple (But Not Boring)
- Gear That Actually Helps (No, You Don’t Need a Burger Anvil)
- Step 1: Choose the Right Meat Blend
- Step 2: Form Patties Like You’re Handling a Tiny Pillow
- Step 3: Set Up the Grill for Success (Two-Zone Heat)
- Step 4: Grill the Burgers (Without Fussing Them to Death)
- Step 5: Nail the Temperature (Juicy and Safe)
- Step 6: Cheese That Melts Like a Pro
- Step 7: Toast the Buns (Because Soggy Buns Are a Crime)
- Step 8: Build a Burger That Actually Stays Together
- Troubleshooting: Burger Problems and How to Fix Them
- Make-Ahead and Party Tips (Because You Have Better Things to Do)
- Conclusion: Your New Burger Standard
- Real-World Grill Experiences (The 500-Word “I’ve Been There” Section)
- SEO Tags
A great grilled burger is a simple thinguntil it isn’t. One minute you’re dreaming of smoky, juicy perfection,
the next minute your patties have shrunk into hockey pucks and your grill is auditioning for a fireworks show.
Let’s fix that.
This guide walks you through the real-world stuff that matters: choosing the right beef, shaping patties without
overthinking them, building a two-zone grill setup, cooking to the right temp, and finishing with buns and toppings
that make people suspicious you used a restaurant cheat code.
Why Most Homemade Grilled Burgers Disappoint
Burgers fail for a few predictable reasons: lean meat (dry), overworked patties (dense), poor heat control (burnt outside, raw inside),
and skipping the bun/topping details (sad sandwich energy). The good news? Each problem has a straightforward fixand none of them require
mixing the beef with a dozen mystery ingredients like it’s a meat-based craft project.
Your new burger mantra: good beef + gentle handling + hot grill + smart zones + thermometer.
Also: leave the burger alone. It’s not a toddler; it doesn’t need constant supervision.
Ingredients: Keep It Simple (But Not Boring)
The beef
For classic, juicy grilled burgers, start with ground beef that has enough fat to stay tender. A common sweet spot is
80/20 (80% lean, 20% fat). Fat is flavor, and on a grill it’s also your insurance policy against dryness.
Seasoning
Salt and pepper go a long way. If you want to add garlic powder, onion powder, or smoked paprika, keep it light
you’re making a burger, not meatloaf. The main goal is to taste beef, smoke, and caramelization, not a spice cabinet avalanche.
Buns
A burger bun is not just “the thing you hold the burger with.” It’s a texture and moisture management device.
Choose a bun that can handle juices without collapsing: potato rolls, brioche, sesame buns, or sturdy bakery rolls.
And yes, you should toast them (we’ll get to the delicious reasons).
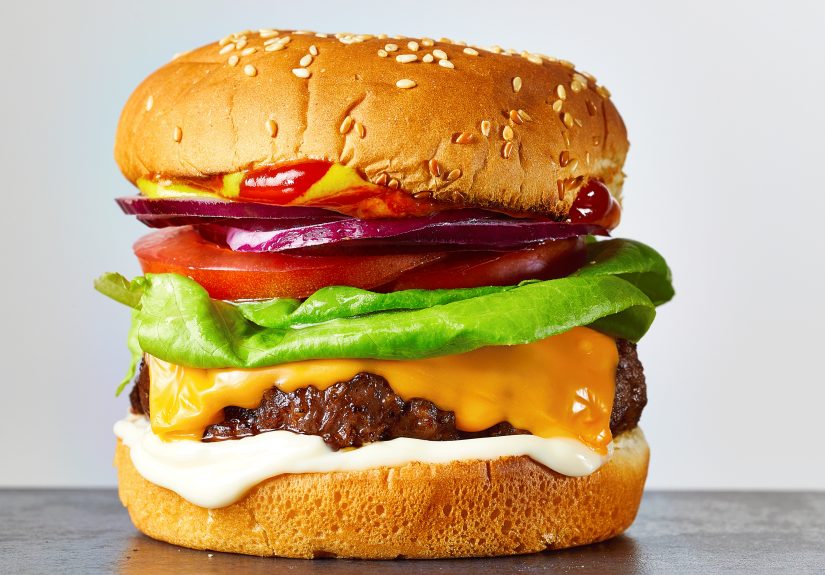
Toppings (choose your adventure)
- Classic: lettuce, tomato, onion, pickles
- Cheese: American (melts like a dream), cheddar, pepper jack, Swiss
- Flavor boosts: caramelized onions, sautéed mushrooms, bacon, jalapeños
- Crunch: shredded lettuce, pickles, thin onion slices
- Sauces: mayo, mustard, ketchup, “special sauce,” BBQ, chipotle mayo
Gear That Actually Helps (No, You Don’t Need a Burger Anvil)
- Grill: gas or charcoal both work
- Thermometer: instant-read is your best friend for consistency and safety
- Long tongs: because eyebrows are nice to keep
- Stiff grill brush: clean grates = better sear + less sticking
- Sheet pan: for patties, seasoning, and transport
One note that matters: don’t rely on burger color to judge doneness. Ground beef can brown before it’s safe, and it can
stay pink even when it’s cooked. A thermometer avoids the guesswork.
Step 1: Choose the Right Meat Blend
Why fat matters
Fat keeps burgers juicy and helps carry flavor. On a grill, some fat drips away (and may cause flare-ups), so starting
too lean often leads to dry patties. If you love a thicker, pub-style burger, a slightly higher-fat grind can be even more forgiving.
Fresh vs. store-bought grind
If you can get freshly ground beef from a butcher (or grind it yourself), you’ll often get better texture and flavor.
But most people are using store-bought ground beeftotally fine, just treat it right and cook it safely.
Step 2: Form Patties Like You’re Handling a Tiny Pillow
Don’t overwork the meat
Overmixing compresses the meat and makes the finished burger dense and bouncy (and not in a fun trampoline way).
Handle the beef as little as possible: portion, shape, done.
Size and thickness
A great all-purpose grilled burger patty is about 3/4 to 1 inch thick. Make the patty slightly wider than your bun,
because burgers shrink as they cook.
The dimple trick (it’s not just for looks)
Press a shallow indentation in the center of each patty with your thumb. This helps the burger stay flatter and cook more evenly,
instead of puffing up into a meatball disguised as a patty.
When to salt
Salt can change texture if it’s mixed into the beef too early. For a classic grilled burger texture, shape the patties first and
season the outside shortly before they hit the grill.
Step 3: Set Up the Grill for Success (Two-Zone Heat)
The easiest way to level up grilled burgers is learning one simple technique: two-zone grilling.
One side is hot for searing; the other side is cooler for finishing or escaping flare-ups.
Charcoal grill setup
- Light charcoal (a chimney starter makes life easier).
- Once coals are ashed over, pile them on one side of the grill.
- Leave the other side empty for indirect heat (your “safe zone”).
- Preheat the grates, then brush and lightly oil them.
Gas grill setup
- Preheat with the lid closed until hot.
- Set one side to high heat and the other to medium-low (or off) to create zones.
- Clean and lightly oil grates right before cooking.
Two zones give you control. Control gives you better browning, fewer flare-ups, and burgers that aren’t burnt outside and undercooked inside.
Step 4: Grill the Burgers (Without Fussing Them to Death)
Preheat and place
Put patties on the hot side. You want that first contact to sizzlethis is where you build a flavorful crust.
Once they’re down, resist the urge to slide them around like checkers.
Flip strategy
Flip once when the burger releases easily and has good browning. Flipping constantly won’t help you; it mainly feeds your anxiety.
After flipping, you can move to the cooler zone if you need gentler finishing.
Stop pressing the patties
Pressing with a spatula squeezes out flavorful juices. If your goal is “dry burger with grill marks,” pressing is fantastic.
Otherwise, let the burger be a burger.
Flare-ups: what to do
When fat drips onto flames, flare-ups happen. Don’t panic. Move burgers to the cool zone, close the lid briefly to calm things down,
and resume cooking with less drama. This is why two-zone grilling is basically burger therapy.
Step 5: Nail the Temperature (Juicy and Safe)
For consumers, official food safety guidance is straightforward: cook ground beef to 160°F.
Use a food thermometer and measure at the thickest part of the patty.
“But restaurants serve medium burgers!”
Some restaurants can serve burgers at lower temps using controlled sourcing and processes. At home, especially with store-bought ground beef,
160°F is the widely recommended safety target. If you choose to cook lower, do it only with meat you trust (ideally freshly ground) and understand
the increased riskespecially for kids, older adults, pregnant people, or anyone with a compromised immune system.
Quick temperature guide
- Target for safety (ground beef): 160°F
- Ground poultry: 165°F
One more time for the folks in the back: color is not a reliable doneness indicator for ground beef. Thermometer = confidence.
Step 6: Cheese That Melts Like a Pro
Add cheese right after you flip (or in the last couple minutes of cooking). If you want that restaurant melt, briefly close the lid.
American cheese melts smoothly and evenly; cheddar tastes great but can split or get oily if overheatedso watch your timing.
Pro move: if you’re finishing burgers on the cooler zone, the gentler heat plus a closed lid can melt cheese without scorching the outside.
Step 7: Toast the Buns (Because Soggy Buns Are a Crime)
Toasting buns does three wonderful things:
- Flavor: golden, buttery notes make everything taste more “burger joint.”
- Texture: crisp edges + soft interior = excellent bite.
- Structure: toasted surfaces resist soaking up juices and turning into burger mush.
Toast cut sides over medium heat for 30–60 seconds, or until lightly golden. If you’re feeling fancy, brush with melted butter first.
Your buns will taste like they went to finishing school.
Step 8: Build a Burger That Actually Stays Together
Layering that makes sense
A burger is basically edible architecture. Build it so sauces don’t slip, tomatoes don’t hydroplane, and lettuce doesn’t eject itself
like it’s late for an appointment.
A reliable build order
- Bottom bun + mayo (or special sauce) as a moisture barrier
- Lettuce (optional but great for traction)
- Burger patty + melted cheese
- Pickles + onions
- Tomato (salt it!)
- Top bun + ketchup/mustard (if using)
Simple “special sauce” (optional, but highly encouraged)
Mix mayo + ketchup + pickle relish + a few drops of Worcestershire. Add a pinch of garlic powder if you’re feeling dangerous.
It tastes like your backyard has a drive-thru window.
Troubleshooting: Burger Problems and How to Fix Them
My burgers are dry
- Use a higher-fat blend (like 80/20).
- Stop overworking the meat.
- Don’t overcookuse a thermometer and pull at the right temp.
- Toast the buns and use sauce to add perceived juiciness.
My burgers fall apart
- Meat might be too lean or too loosely packedform gently but with enough cohesion.
- Make patties cold and firm before grilling (10–20 minutes in the fridge helps).
- Flip only when the first side has set and releases easily.
My burgers stick to the grill
- Preheat grates fully.
- Clean and lightly oil the grates right before cooking.
- Don’t flip too earlylet a crust form.
My grill keeps flaring up
- Use two-zone heat and move burgers to the cool side when flames spike.
- Trim overly fatty drips (or choose 80/20 instead of super-fat blends).
- Keep the lid closed briefly to reduce oxygen if flames get wild.
Make-Ahead and Party Tips (Because You Have Better Things to Do)
For a crowd
Portion patties ahead of time and keep them cold on a sheet pan. Season right before grilling. Set up a topping bar so people can customize,
which also means fewer “Can you make mine without onions?” interruptions while you’re juggling tongs.
Hold burgers without ruining them
If you need to keep burgers warm for a short time, move them to the cool zone and close the lid. Avoid stacking patties directly on top of each
other unless you enjoy steamed crust.
Conclusion: Your New Burger Standard
The best homemade burgers on the grill aren’t about secret ingredientsthey’re about smart technique.
Pick flavorful beef, handle it gently, build a two-zone grill, sear with confidence, finish with a thermometer, and toast your buns like you mean it.
Do that, and your backyard burgers will start getting compliments that feel suspiciously sincere.
Real-World Grill Experiences (The 500-Word “I’ve Been There” Section)
Let’s talk about the messy, hilarious truth of grilling burgers at home: the grill is rarely “perfect,” your friends will arrive hungry
exactly when you’re at peak chaos, and the wind will choose the worst possible moment to gust directly into your charcoal setup.
The goal isn’t to become a flawless burger robotit’s to build a repeatable process that survives real life.
One of the biggest lightbulb moments for many home grillers is discovering that burgers don’t need constant flipping, poking, and rearranging.
Early on, it’s tempting to treat the patty like a science experiment you must monitor every seven seconds. But once you trust the preheat and
let the crust form, the burger practically tells you when it’s ready to flip. The first time you slide a spatula under a patty and it releases
cleanlyno tearing, no stickingyou feel like you just unlocked a level in a video game.
Another classic experience: the flare-up panic. You put beautiful 80/20 patties over hot coals, fat drips, flames leap up, and suddenly your grill
looks like it’s hosting a tiny dragon convention. The old move is to keep burgers right over the flames and “fight the fire” by flipping repeatedly.
The better move is calm: shift burgers to the cool zone, close the lid for a moment, and let the flare-up settle down. The first time you do this
successfully, it feels like you just negotiated peace in a very small, very greasy nation.
Then there’s the humbling bun lesson. You can cook a flawless patty and still end up disappointed if the bun is cold, squishy, and instantly soaked
through. Toasting changes the entire bitesuddenly your burger has structure and crunch, and it tastes more “burger joint” than “sad picnic.”
Many people swear they didn’t like brioche buns until they toasted them. Turns out, the bun wasn’t the problem; it just needed a little heat and respect.
Finally, the thermometer story: almost everyone resists it at first. It feels fussy. But once you cook burgers for a groupsome people want well-done,
some want “juicy,” and one person says “medium-rare” like they’re ordering a steakyou realize guessing is stressful. A quick temp check removes the drama.
When you can consistently hit your target temp, you cook with more confidence, and your burgers improve fast. Plus, you stop cutting into patties to “check,”
which means you stop bleeding out the juices you worked so hard to keep inside.
The best part of all these experiences is that they stack. After a few burger nights, you’ll have your rhythm: patties shaped and chilled, grill hot and zoned,
buns ready, cheese timed, toppings prepped. And at some point, someone will say, “Wait… you made these?” in a tone that suggests you’ve been hiding a professional
kitchen in your garage. Smile politely. Accept your praise. Pretend it was effortless.