Table of Contents >> Show >> Hide
- Why DIY Tin Can Flowers Are Worth Making
- What You Need
- Step 1: Clean and Prep the Tin Cans
- Step 2: Plan Your Flower Shape
- Step 3: Cut the Petals
- Step 4: Add Layers and a Center
- Step 5: Paint and Decorate
- Step 6: Display Your DIY Tin Can Flowers
- Common Mistakes to Avoid
- Creative Variations to Try
- Final Thoughts
- Extra Experiences and Lessons From Making DIY Tin Can Flowers
If your recycling bin is starting to look like a reunion tour for soup cans, tomato cans, and that one mystery bean can nobody remembers buying, good news: you are only a few simple steps away from turning kitchen leftovers into cheerful yard art. DIY tin can flowers are one of those rare crafts that check every box. They are affordable, creative, surprisingly sturdy, and just quirky enough to make visitors say, “Wait… you made that from a can?”
These upcycled metal flowers can brighten a porch planter, add character to a garden fence, fill an indoor vase, or become a handmade gift that looks far more expensive than it has any right to. Best of all, you do not need a giant workshop or a professional art degree. You need a few basic tools, a little patience, and the willingness to let a humble tin can live its best second life.
In this guide, you will learn exactly how to make DIY tin can flowers, how to paint and shape them, how to avoid the most common mistakes, and how to turn a simple recycled craft into decor that actually looks display-worthy. Let’s get those cans blooming.
Why DIY Tin Can Flowers Are Worth Making
There is something deeply satisfying about transforming scrap into something pretty. Tin can flowers are a perfect example of upcycled home decor that feels fun instead of fussy. They cost very little, can be customized in endless colors and sizes, and hold up better outdoors than many paper or fabric crafts.
They also fit nicely into several popular DIY trends at once: recycled crafts, garden art, handmade gifts, farmhouse-style accents, and budget-friendly outdoor decor. In other words, this project is not just cute. It is SEO gold for your home, your garden, and your “look what I made” confidence.
Another bonus? Every flower comes out a little different. Slight bends in the petals, uneven layers, or visible brush texture often make the finished piece more charming. This is not a craft that demands sterile perfection. A little personality is part of the appeal.
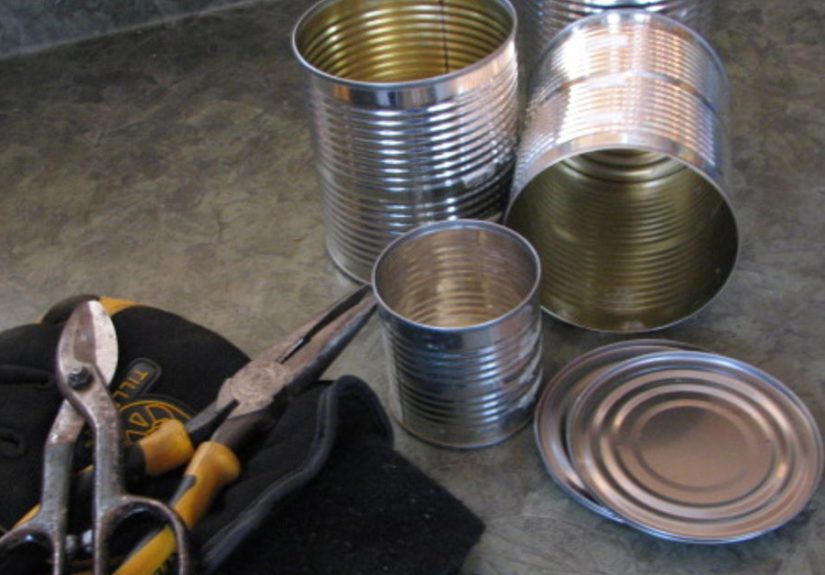
What You Need
- Clean, empty tin cans in a few sizes
- Work gloves
- Safety glasses
- Tin snips or strong metal cutters
- Pliers
- Hammer or rubber mallet
- Nail and hammer or a drill for center holes
- Sandpaper or a metal file
- Spray paint or acrylic paint made for metal
- Primer if your paint requires it
- Buttons, beads, washers, or bottle caps for flower centers
- Floral wire, screws, hot glue, or strong adhesive depending on display style
- Wooden dowels, metal rods, reclaimed wood, or wreath forms for mounting
You do not need every single supply on this list for every version of the project. If you are making a flat wall flower, you may only need one can, paint, and a center embellishment. If you are building layered garden flowers, then extra cans, rods, and hardware help create more dimension.
Step 1: Clean and Prep the Tin Cans
Before you cut anything, wash each can thoroughly. Remove labels, glue residue, and any food left behind. Let the cans dry completely. This part is not glamorous, but it matters. Paint does not stick well to grease, moisture, or mystery soup film. Nobody wants a flower that smells faintly like ravioli in July.
Once the cans are dry, inspect the edges. Many opened cans have sharp rims, so wear gloves and handle them carefully. Lightly sand rough spots and dull any especially sharp edges with sandpaper or a metal file. You are not trying to make the can silky smooth like a luxury sedan. You are just making it safe enough to work with and easier for paint to grip.
If the can has a glossy coating or slick finish, a light scuff with fine-grit sandpaper can help the primer or paint adhere better. Think of this as giving the metal a tiny pep talk: “You are about to become art. Please cooperate.”
Step 2: Plan Your Flower Shape
This is where the fun begins. Decide what kind of flower you want to make. You can go simple with a daisy shape, dramatic with long sunflower-style petals, or layered and rounded for a rose-inspired look. If you are new to metal crafts, start with a basic daisy. It is forgiving, cheerful, and hard to mess up unless you accidentally invent a sea creature.
Easy Petal Ideas
- Daisy: Long narrow petals with a round center
- Sunflower: Pointed petals in two layers
- Zinnia: Short rounded petals with lots of layers
- Whimsical flower: Uneven petals in bright colors for folk-art charm
Use a marker to draw guide lines on the can. Some crafters cut straight from the rim toward the base to create petals. Others flatten the can first and cut petal layers from the sheet metal. Both methods work. If you want a dimensional flower, cutting from the rim downward is easier. If you want precise layered shapes, flattening the can may give you more control.
Step 3: Cut the Petals
Using tin snips or metal cutters, cut evenly spaced slits from the open edge of the can toward the bottom, stopping about an inch before the base if you want the bottom to hold the petals together. Usually, five to eight cuts create a nice flower shape, but there are no metal flower police. More cuts create more petals. Fewer cuts create chunkier petals and a bolder look.
Once the slits are cut, round or point the ends of each section to form petals. Then bend the petals outward with your hands or pliers. If the metal resists, that is normal. Metal is not known for its emotional flexibility.
For a flatter flower, gently tap the petals with a hammer or mallet. Put the piece on a protected work surface and flatten the petals a little at a time. The goal is to open the bloom, not to smash it into a can-shaped pancake. A few light taps usually do more good than one dramatic, reality-show-level whack.
Step 4: Add Layers and a Center
A single can flower looks nice, but layered tin can flowers look fantastic. To build dimension, make two or three flower shapes in different sizes. Stack the smaller bloom on top of the larger one, rotating the petals so they do not line up exactly. That small detail makes the flower look fuller and more realistic.
Punch or drill a hole through the center of each layer. Then fasten them together with floral wire, a screw and nut, or a decorative brad if the metal is thin enough. Once the layers are secure, cover the center with something fun:
- A vintage button
- A bottle cap
- A bead cluster
- A metal washer
- A small wood circle
- A painted cork
The center is the jewelry of the flower. It can be subtle or flashy. A rusty washer gives industrial charm. A bright button makes the flower playful. A bottle cap says, “Yes, I recycle, and yes, I have flair.”
Step 5: Paint and Decorate
This is the stage where your project stops looking like pantry leftovers and starts looking intentional. Paint can completely change the personality of your tin can flowers. Soft pastels feel cottage-core. Bold reds and oranges feel sunny and folk-art inspired. Matte black with a metallic copper center feels modern and surprisingly chic.
If you are using spray paint, work in a shaded, well-ventilated area and apply several light coats instead of one heavy coat. Thin coats reduce drips and help the finish look smoother. Let each coat dry before adding the next. Yes, patience is annoying. Yes, it is still better than fingerprints baked into your petals forever.
Painting Ideas That Look Great on Metal Flowers
- Solid bright colors for a happy garden look
- Ombre petals from dark center to lighter tips
- White petals with gold centers for a crisp modern style
- Distressed finishes for farmhouse decor
- Speckled paint for a vintage enamel look
- Hand-painted lines or dots for folk-art detail
You can also add detail with acrylic paint after the base coat dries. Try outlining petals, brushing a darker color near the center for depth, or dry-brushing metallic paint across raised edges. If the flowers will live outdoors, a clear protective sealer can help them last longer.
Step 6: Display Your DIY Tin Can Flowers
Now that your flowers are made, it is time to show them off. There are several easy ways to display them depending on your style and your skill level.
Option 1: Garden Stakes
Attach the flower to a metal rod, wooden dowel, or reclaimed stick. Push it into the ground near a flower bed, potted plant, or pathway. This version works especially well if you make several flowers in different heights.
Option 2: Fence or Wall Art
Screw the flower onto reclaimed wood or directly onto a fence panel. Group three or five flowers together for a garden-art effect that feels custom and colorful.
Option 3: Wreath Embellishment
Use smaller tin can flowers on a grapevine or wire wreath base. Mix them with faux greenery, ribbon, or burlap for a front-door decoration with plenty of handmade character.
Option 4: Indoor Bouquet
Attach flowers to floral wire stems and arrange them in a painted tin can vase, because apparently we are committed to a strong can-based lifestyle now.
Common Mistakes to Avoid
Even easy recycled crafts have a learning curve. Here are the most common mistakes beginners make when learning how to make tin can flowers:
- Skipping cleanup: Greasy cans make paint peel faster.
- Cutting too fast: Rushed cuts usually lead to jagged petals.
- Using heavy paint coats: Thick coats drip and hide details.
- Ignoring sharp edges: Safety is not optional when working with metal.
- Making every flower identical: Slight variety looks more natural and artistic.
- Overthinking perfection: Handmade charm is the whole point.
Creative Variations to Try
Once you make one flower, you will probably start eyeing every can in your kitchen like it has hidden potential. That is normal. Here are a few creative twists to keep the project fresh:
- Use mini tomato paste cans for tiny layered blooms.
- Mix tin can flowers with bottle caps and wire leaves.
- Create holiday color palettes for seasonal decor.
- Add glitter only to the centers for sparkle without chaos.
- Use stencils for polka dots, stripes, or botanical motifs.
- Leave parts of the metal exposed for an industrial look.
- Make oversized statement flowers from large food cans or coffee cans.
You can also coordinate the flowers with your outdoor decor. Blue and white flowers look great on coastal-style porches. Yellow, coral, and turquoise feel bright and Southwestern. Sage green and cream work beautifully in farmhouse gardens. In other words, these little projects can be as playful or as polished as you want.
Final Thoughts
DIY tin can flowers are proof that craft projects do not have to be expensive or complicated to be memorable. With a few recycled cans, a little paint, and some easy shaping, you can create decor that feels personal, cheerful, and genuinely original. The process is simple enough for a weekend project but flexible enough to keep evolving as your confidence grows.
If you are searching for an upcycled craft that is practical, creative, and surprisingly stylish, this one delivers. Start with one flower. Then make three. Then make a whole garden because you found a can in the pantry and suddenly felt inspired. That is usually how it begins.
And honestly, that is part of the magic. Today it is tin can flowers. Tomorrow you are the kind of person who casually says things like, “Oh, that wall piece? I made it from black beans and optimism.”
Extra Experiences and Lessons From Making DIY Tin Can Flowers
One of the most interesting things about making DIY tin can flowers is how quickly the project changes from a simple craft into a creative experiment. At first, most people assume the flowers will look rough or obviously homemade. Then the first painted layer goes on, the petals start bending outward, and suddenly the project begins to look intentional. That moment is usually what hooks people. It is not just about recycling a can. It is about realizing that ordinary objects can become decor with a little imagination and patience.
Many crafters also discover that no two flowers turn out the same, even when they try to repeat the exact same process. One flower may open up beautifully with rounded petals, while another develops a slightly wild shape that ends up looking even better. That unpredictability is part of the fun. In fact, some of the best-looking tin can flowers come from “mistakes” that turn into design features. A petal bent too far can look whimsical. A slightly uneven center can make the flower feel handmade in the best possible way.
Another common experience is learning that color choices matter more than expected. A plain can flower can look decent, but the right paint combination gives it real personality. Bright yellow with a dark brown center instantly reads like a sunflower. Soft pink with brushed gold edges feels delicate and decorative. Matte white with a black center can look modern and surprisingly upscale. People often begin with whatever leftover paint they have at home, then end up planning full color palettes after seeing how dramatic the transformation can be.
There is also something satisfying about displaying a finished flower in the yard or on a porch and watching other people react to it. Guests usually do a double take when they learn it started as a food can. That reaction never gets old. Handmade decor often feels more meaningful because it carries a story. It is not just a flower. It is the flower made from the pasta sauce can, the rainy Saturday, the experimental color mix, and the decision to try something new instead of throwing something away.
Perhaps the biggest lesson from this project is that crafting with recycled materials teaches flexibility. Tin can flowers are not about perfection. They are about adaptation. If one can is too small, use it for the center. If the petals look too stiff, curve them more. If the paint drips, turn it into a distressed finish and act like that was always the plan. The more people make these flowers, the more confident they become in trusting the process. And that confidence often spills into other DIY projects too. What starts as a few simple steps with a can and some paint often ends with a deeper appreciation for creative problem-solving, handmade decor, and the strange joy of seeing beauty bloom out of something that was almost trash.


