Table of Contents >> Show >> Hide
- What Are Decorative Herringbone Wood Letters?
- Materials and Tools You Will Need
- Step 1: Choose the Right Letter Base
- Step 2: Prepare the Wood Strips
- Step 3: Sand and Clean Before Layout
- Step 4: Mark the Center Line
- Step 5: Dry-Fit the Herringbone Pattern
- Step 6: Glue the Wood Pieces in Sections
- Step 7: Trim the Edges
- Step 8: Fill Gaps and Refine the Surface
- Step 9: Stain, Paint, or Whitewash
- Step 10: Seal and Add Hanging Hardware
- Design Ideas for Herringbone Wood Letters
- Common Mistakes to Avoid
- Helpful Tips for a Professional Finish
- Experience Notes: What Actually Happens When You Make Herringbone Wood Letters
- Conclusion
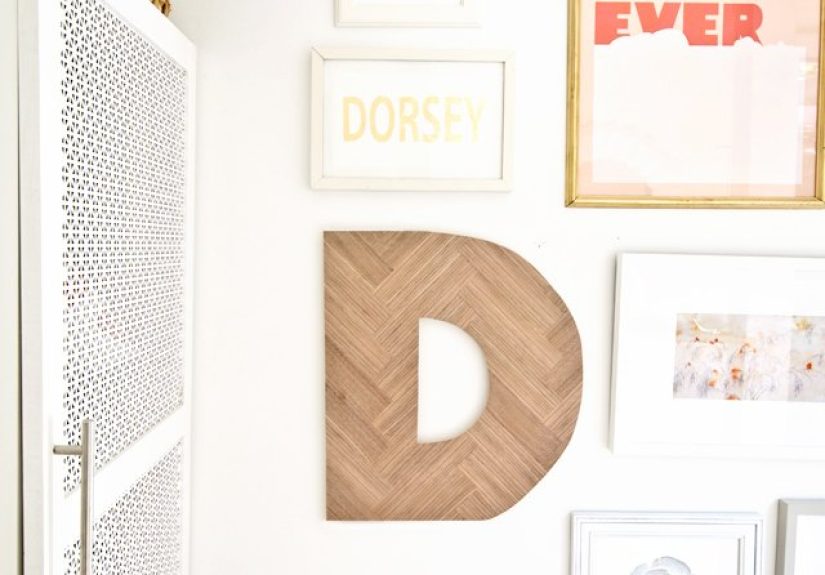
Decorative herringbone wood letters are the kind of DIY project that makes people say, “Wait, you made that?” while quietly checking whether there is a price tag hidden on the back. They look boutique, rustic, modern, farmhouse, and custom all at oncewhich is a pretty impressive résumé for a few thin wood strips and a little patience.
The herringbone pattern has been used for centuries in flooring, tile, furniture, and architectural design because it creates movement without looking chaotic. When scaled down onto wood letters, the pattern turns a simple initial, monogram, nursery letter, wedding sign, or wall accent into a handcrafted statement piece. The best part? You do not need to be a master carpenter. You just need a steady layout, safe cutting habits, the right adhesive, and the emotional strength to accept that tiny wood triangles will temporarily take over your workspace.
This guide walks you through how to make decorative herringbone wood letters from start to finish, including material choices, layout tips, cutting methods, finishing ideas, common mistakes, and real-world experience notes that will save you from sanding regret later.
What Are Decorative Herringbone Wood Letters?
Decorative herringbone wood letters are wooden or MDF letter forms covered with small wood pieces arranged in a repeating V-shaped pattern. Unlike chevron, where pieces usually meet in a sharp continuous point, herringbone pieces are staggered so each rectangle or strip overlaps the next at a right angle. The result looks woven, layered, and far fancier than the amount of money you spent at the craft store.
You can make one large initial for a front door, several letters for a child’s name, a family monogram for a gallery wall, or small herringbone letters for shelf decor. The project works with plywood, MDF, pre-cut craft letters, reclaimed pallet wood, wood shims, basswood strips, veneer pieces, paint sticks, or leftover trim. In other words, it is a wonderful excuse to keep that box of “perfectly good scraps” you have been defending for years.
Materials and Tools You Will Need
Before you start cutting, gather your supplies. A smooth project begins with preparation, not with digging through a drawer while wood glue slowly turns into rubber cement on your fingers.
Materials
- Wooden or MDF craft letter, or a letter cut from plywood
- Thin wood strips, wood shims, veneer, basswood, lattice strips, or reclaimed wood
- Wood glue or strong craft adhesive suitable for wood
- Pencil and ruler
- Painter’s tape
- Sandpaper in medium and fine grits, such as 120 and 220
- Wood stain, paint, whitewash, or tinted wax
- Clear protective topcoat, such as polyurethane, polycrylic, or furniture wax
- Picture hanger, sawtooth hanger, command strips, or small D-rings
Tools
- Miter saw, hand saw with miter box, scroll saw, craft saw, or sharp utility knife for thin veneer
- Clamps, heavy books, or weights
- Speed square or combination square
- Jigsaw, coping saw, rotary tool, or flush-cut saw for trimming edges
- Orbital sander or sanding block
- Safety glasses, dust mask, and hearing protection if using power tools
If you are making a small letter, do not feel pressured to use heavy-duty tools. Thin basswood strips or veneer can often be cut with a craft knife and straightedge. For thicker reclaimed wood, a miter saw or hand saw will be more efficient. The main rule is simple: choose the tool that gives you control, not the tool that makes you feel like the star of a home renovation show.
Step 1: Choose the Right Letter Base
Your letter base determines how easy the rest of the project will be. Pre-cut MDF letters from craft stores are convenient because they are smooth, inexpensive, and already shaped. Plywood letters are sturdier and more natural-looking around the edges, but they may need more sanding. Solid wood letters look beautiful but can be heavier and more expensive.
For beginners, a letter that is at least 12 inches tall is easier to work with. Tiny letters look adorable online, but they quickly become a puzzle designed by a mischievous squirrel. Large letters give you more surface area for the herringbone pattern and make mistakes less noticeable.
Letters with broad, straight sectionssuch as H, T, L, M, N, or Eare easier than curvy letters like S, C, G, or O. Curves are absolutely possible, but they require more trimming and patience. If this is your first attempt, start with one large initial before committing to a full name.
Step 2: Prepare the Wood Strips
The herringbone pattern looks best when your wood pieces are consistent in width. You can use strips that are all the same species for a clean modern look, or mix tones for rustic character. Wood shims are popular because they are inexpensive and naturally varied, but they can be uneven. Basswood and craft sticks create a more polished finish. Reclaimed pallet wood adds charm, but it should be cleaned, dried, sanded, and inspected for nails before use.
A good size for decorative letters is usually between 1/2 inch and 1 inch wide. Length depends on the letter size, but pieces between 2 and 4 inches long are manageable for most projects. The classic herringbone look comes from rectangular pieces set at 45-degree angles, so cut several strips with matching angled ends before gluing.
Do not cut every single piece before testing the layout. Make a small batch first, place them on the letter, and check the scale. If the pieces look too chunky, narrow them down. If they look too busy, use longer pieces. Herringbone is dramatic, but it should not look like your letter is wearing a nervous plaid suit.
Step 3: Sand and Clean Before Layout
Sanding before assembly is much easier than trying to sand inside every little corner after the pieces are glued. Lightly sand the letter base and all visible faces of the wood strips. Use medium grit to remove roughness, then fine grit for a smoother finish. Wipe away dust with a tack cloth, microfiber cloth, or slightly damp rag.
If you plan to stain the wood pieces in different shades, test the stain on scraps first. Different woods absorb stain differently. Pine may turn blotchy, oak may show bold grain, and reclaimed wood may surprise you with mystery tones that can only be described as “old barn with opinions.” Testing prevents disappointment and helps you choose a balanced color palette.
Step 4: Mark the Center Line
The secret to a clean herringbone pattern is a strong starting line. Use a pencil and ruler to mark a vertical or diagonal center line on your letter. For many letters, a vertical center line works best. On wide letters, you may want to create multiple sections and run the pattern in different directions for visual interest.
Once you find the center, use a speed square or combination square to sketch 45-degree guidelines. These lines will help the first row stay straight. If the first few pieces drift, the whole pattern may slowly wander across the letter like it has somewhere better to be.
For extra control, place painter’s tape along the center guide or draw a light grid. The marks do not need to be beautiful; they just need to keep your pattern honest.
Step 5: Dry-Fit the Herringbone Pattern
Before applying glue, dry-fit the wood pieces on the letter. Start at the center line and create a V shape by placing one strip angled to the left and the next angled to the right. Continue outward, staggering the ends so the pattern forms that familiar woven look.
Dry-fitting helps you solve problems before glue turns the project into a tiny panic event. You will see where short filler pieces are needed, where the pattern meets curves, and whether the scale feels right. Take a quick photo of the layout with your phone before removing the pieces. That photo will become your map when you begin gluing.
If you are working on a curved letter, let the pattern extend beyond the letter edges. It is much easier to glue full pieces and trim them later than to pre-cut every tiny curve. Think of it as giving your letter a shaggy haircut before the final styling.
Step 6: Glue the Wood Pieces in Sections
Apply a thin, even layer of wood glue to the back of each strip or directly to a small section of the letter. Do not flood the surface with glue. Too much adhesive causes pieces to slide, squeeze-out to appear between seams, and your hands to become permanently associated with sawdust.
Work in small sections, starting at the center and moving outward. Press each piece firmly into place and check alignment often. Use painter’s tape, clamps, or a flat board with light weight on top to hold the pieces while the glue sets. If glue squeezes out, wipe it away with a damp cloth before it dries, especially if you plan to stain the letter. Dried glue blocks stain and leaves pale spots.
Let the glued pieces dry according to the adhesive instructions. For many wood glues, the piece may hold after a short clamp time, but full curing can take longer. Do not rush trimming if pieces still move under pressure. Patience is cheaper than re-gluing half the alphabet.
Step 7: Trim the Edges
Once the glue is dry, turn the letter over so the back side faces up. Use the original letter shape as your guide. Trim the overhanging wood pieces with a jigsaw, scroll saw, coping saw, rotary tool, flush-cut saw, or sharp utility knife if the pieces are thin enough.
For straight edges, a flush-cut saw or fine-tooth hand saw gives good control. For curves, a rotary tool or coping saw can help. Work slowly and keep your cuts just outside the edge, then sand down to the final shape. This approach reduces the chance of chipping or cutting into the base letter.
After trimming, sand the edges until they feel smooth. Slightly round over the sharp corners for a finished look. If your letter will hang where people may touch itsuch as a nursery, hallway, or entrywaysmooth edges are especially important.
Step 8: Fill Gaps and Refine the Surface
Even careful layouts can leave small gaps. That is normal. Decorative herringbone wood letters are handmade, not printed by robots in a secret alphabet factory. Use stainable wood filler for natural finishes or paintable filler if you plan to paint. Apply a small amount, let it dry, and sand smooth.
For rustic letters, you may choose to leave tiny gaps and imperfections. They add texture and character. For modern letters, aim for tighter seams and a smoother top surface. You can also lightly sand across the entire face to level any pieces that sit slightly higher than their neighbors.
Step 9: Stain, Paint, or Whitewash
Finishing is where your decorative herringbone wood letter develops personality. A single medium brown stain gives a warm farmhouse look. Dark walnut creates contrast and drama. Natural clear coat keeps pale woods fresh and Scandinavian-inspired. Whitewash softens the pattern for coastal, cottage, or nursery decor.
If you want extra dimension, stain some pieces before assembly in two or three complementary shades. For example, combine natural pine, weathered gray, and early American brown. Keep the tones related so the letter looks intentional rather than like it lost a fight with a sample rack.
Apply stain with a cloth or brush, following the product directions. Wipe away excess stain and allow it to dry fully. If painting, use thin coats to avoid filling the seams. Dry brushing is a great technique for rustic herringbone because it highlights the raised grain while leaving variation in the pattern.
Step 10: Seal and Add Hanging Hardware
A protective topcoat helps your letter resist dust, handling, and moisture. Use water-based polycrylic for a clear, low-odor finish, oil-based polyurethane for warmth and durability, or furniture wax for a soft hand-rubbed look. Sand lightly between coats if recommended by the finish manufacturer, and remove all dust before recoating.
When the finish is dry, attach hanging hardware to the back. A sawtooth hanger works for lightweight letters. D-rings are better for larger pieces. Command strips may work if the surface is smooth and the letter is not too heavy. For shelf decor, attach small felt pads to the bottom so the letter stands neatly without scratching furniture.
Design Ideas for Herringbone Wood Letters
Rustic Farmhouse Initial
Use reclaimed wood, gray stain, and a matte clear coat. Leave a few nail holes or weathered marks visible for character. This version looks great in entryways, above coat hooks, or as part of a gallery wall.
Modern Nursery Letter
Choose smooth basswood strips and a pale natural finish. Add the baby’s name in small painted script across the lower section, or pair the letter with soft colors like sage, cream, blush, or dusty blue.
Wedding Monogram
Use a large letter for the couple’s last name and stain it in a rich walnut tone. Add small faux greenery, ribbon, or gold accents. It can decorate the reception table first and the couple’s home later.
Holiday Version
Paint the herringbone pieces in seasonal colors. Red, green, and natural wood work for Christmas; orange, walnut, and cream work for fall; navy and white create a crisp patriotic style.
Common Mistakes to Avoid
The first common mistake is skipping the dry fit. Herringbone patterns are not difficult, but they are unforgiving when the first row is crooked. Always test the layout before gluing.
The second mistake is using too much glue. A thin coat is enough. Excess glue creates slippery pieces and stain-resistant blotches.
The third mistake is cutting pieces too small with unsafe hand placement. If a piece is too tiny to hold securely, use a longer strip and cut the angle first, then trim it after gluing, or use a hand tool that gives better control. Safety is not optional decor.
The fourth mistake is sanding only after assembly. Pre-sanding saves time and gives a cleaner finish.
The fifth mistake is choosing a letter that is too small for the pattern. If the strips are wider than the narrow sections of the letter, the design will look cramped. Scale the wood pieces to the letter size.
Helpful Tips for a Professional Finish
Use consistent strip widths for a cleaner pattern. Start from the center and work outward. Keep a damp cloth nearby for glue squeeze-out. Label stain samples before choosing a final color. Use a sharp blade or fine-tooth saw to reduce tear-out. Sand edges carefully after trimming. Seal the final piece so it can be dusted without damaging the finish.
One useful trick is to create a paper template of your letter before gluing. Place the template over the letter and sketch your herringbone lines. This helps you visualize how the pattern will land on tricky areas like inside corners or curves.
Another trick is to make two or three extra wood strips for every size you think you need. You will drop one, miscut one, and stare suspiciously at one because the grain looks weird. Extras keep the project moving.
Experience Notes: What Actually Happens When You Make Herringbone Wood Letters
After making decorative herringbone wood letters, one lesson becomes clear quickly: the project looks more complicated than it is, but it rewards patience at every step. The most satisfying moment is not the final coat of finish. It is the moment when the first few angled strips line up correctly and the herringbone pattern suddenly appears. Before that, the project feels like a pile of craft sticks with ambition. After that, it feels like design magic.
The biggest experience-based tip is to slow down during layout. Many beginners want to start gluing as soon as the pattern makes sense, but dry-fitting the entire visible area saves a surprising amount of frustration. On straight letters like H or L, the pattern behaves nicely. On curved letters like S or C, the edges create odd little spaces that need filler pieces. If you discover those spaces while the glue is wet, your peaceful DIY afternoon may briefly become a geometry exam. A dry fit lets you solve the puzzle calmly.
Another practical lesson is that wood tone matters more than expected. A herringbone pattern already has visual movement, so wildly different colors can become too busy. Three related tones usually look better than six random ones. For example, natural pine, honey stain, and weathered gray create variation without shouting. If you use reclaimed wood, arrange the darker pieces evenly across the letter instead of clustering them in one area. Balance is what makes the design look intentional.
Glue control is also a real-world skill. Too little glue and corners may lift. Too much glue and stain will not absorb evenly. The sweet spot is a thin film spread across the back of each strip. A small craft brush, scrap cardboard, or even a toothpick can help apply glue neatly. Keep a damp rag nearby and wipe squeeze-out right away. Future you, standing there with sandpaper and regret, will be grateful.
Trimming is where confidence matters, but caution matters more. If you are using a power tool, support the letter well and avoid forcing the blade. Let the tool do the cutting. If you are trimming thin veneer or craft wood with a knife, make multiple light passes instead of one aggressive cut. One big cut may seem faster, right up until the blade follows the grain and removes a piece you wanted to keep. Decorative letters are forgiving, but they do not appreciate dramatic knife choreography.
Finishing brings the whole piece together. A light sanding after trimming makes the edges feel smooth and professional. Stain deepens the pattern, but clear coat often looks best when the wood already has attractive natural variation. For farmhouse decor, matte or satin finishes usually look more handmade and warm than glossy finishes. For modern decor, a smooth satin clear coat over pale wood can look clean and expensive.
Finally, expect each letter to have its own personality. Even when you use the same pattern, wood grain and letter shape create unique results. That is the charm of this project. It is not supposed to look factory-perfect. It should look crafted, thoughtful, and slightly more impressive than you casually admit when someone compliments it. A good response is, “Oh, I made that over the weekend,” followed by a humble smile and absolutely no mention of how many tiny offcuts are still hiding under the table.
Conclusion
Learning how to make decorative herringbone wood letters is a rewarding way to turn simple materials into personalized home decor. With a sturdy letter base, thin wood strips, careful 45-degree layout, patient gluing, clean trimming, and a beautiful finish, you can create a custom piece that looks high-end without requiring advanced woodworking skills.
The key is to respect the pattern. Start from the center, dry-fit before gluing, work in small sections, and keep your cuts safe and controlled. Whether you choose rustic reclaimed wood, smooth basswood, painted shims, or stained veneer, the herringbone design adds depth, texture, and movement to any letter.
Use these decorative wood letters for nursery walls, wedding decor, front-door initials, holiday displays, office shelves, or handmade gifts. They are affordable, customizable, and just challenging enough to make you feel proud when the final piece is hanging on the wall. Also, they give you a very respectable reason to say, “I can’t throw away that scrap wood. It might become art.”