Table of Contents >> Show >> Hide
- Introduction: Turning Local Soil into Workable Clay
- What You Need Before You Start
- How to Make Clay from Indigenous Soil: 12 Steps
- 1. Choose a Safe and Legal Collection Site
- 2. Learn to Recognize Clay-Rich Soil
- 3. Run a Simple Jar Test
- 4. Collect Enough Soil for Processing
- 5. Dry and Crush the Soil if Needed
- 6. Slake the Soil in Water
- 7. Screen Out Rocks, Roots, and Debris
- 8. Let the Clay Settle
- 9. Pour Off Extra Water
- 10. Dry the Clay to a Workable Consistency
- 11. Wedge and Test the Clay
- 12. Fire Only After Careful Testing
- Dry Method vs. Wet Method
- How to Improve Natural Clay
- Best Uses for Homemade Indigenous Clay
- Common Mistakes to Avoid
- of Practical Experience: What Making Clay from Local Soil Teaches You
- Conclusion
Note: In this article, “indigenous soil” means local or native soil from your area. Always collect soil only where you have permission, avoid protected public land, culturally significant sites, wetlands, contaminated areas, and archaeological locations. A good clay project should never begin with a bad decision and a suspicious shovel.
Introduction: Turning Local Soil into Workable Clay
Learning how to make clay from indigenous soil feels a little like discovering that your backyard has been quietly hiding an art supply store. Beneath grass, leaves, roots, gravel, and the occasional worm with excellent real estate taste, there may be fine mineral particles that can be cleaned, settled, dried, kneaded, and shaped into natural clay. This process is often called wild clay processing, local clay harvesting, or native clay preparation.
The basic idea is simple: collect clay-rich soil, remove rocks and organic matter, separate heavier sand from finer clay particles using water, then dry the clay until it becomes plastic enough to shape. The actual work is part science, part patience, and part “why is there mud on my elbow?” But when done correctly, it can produce a beautiful, earthy clay body for hand-building, small test tiles, pinch pots, beads, sculptural pieces, or experimental ceramics.
Soil is made from different proportions of sand, silt, clay, organic matter, water, and air. Clay particles are the finest mineral particles in soil, which is why they can suspend in water longer than sand and often feel sticky, smooth, or plastic when wet. That tiny particle size is also what gives clay its magic trick: it can be shaped, hold detail, shrink as it dries, and harden when fired in a kiln.
This guide walks through 12 practical steps for making clay from indigenous soil, including how to identify clay-rich material, process it with the wet method, test plasticity, dry it properly, and avoid common beginner mistakes. Whether you are a potter, homesteader, educator, primitive skills enthusiast, or simply someone who saw a muddy ditch and thought, “Could that become a cup?”welcome. Bring buckets.
What You Need Before You Start
Before digging, gather a few basic tools. You do not need a professional ceramics studio to process natural clay, but you do need containers, patience, and a realistic attitude about mess. Clay processing is not a white-pants activity. If you wear white pants, the soil will know.
Basic Supplies
- Bucket or sturdy container for collecting soil
- Shovel, trowel, or hand scoop
- Large plastic tubs or 5-gallon buckets
- Water
- Screen, sieve, window mesh, or colander
- Stirring stick or drill mixer
- Old pillowcase, cloth bag, plaster slab, or absorbent board
- Gloves and dust mask for dry soil handling
- Notebook for recording where the soil came from and how it behaved
How to Make Clay from Indigenous Soil: 12 Steps
1. Choose a Safe and Legal Collection Site
The first step is not digging. The first step is permission. Collect soil only from property you own or from a place where the owner has clearly allowed it. Do not take soil from national parks, protected lands, burial grounds, sacred sites, construction zones, old industrial areas, roadsides with heavy traffic runoff, or places where pesticides, fuel, paint, or chemicals may have contaminated the ground.
Good clay sources are often found near creek banks, pond edges, exposed cuts in hillsides, old stream beds, construction excavations, and areas where rainwater has washed fine sediments into low spots. Look for subsoil rather than dark, root-filled topsoil. Clay-rich material is often found below the organic top layer, where the soil may appear gray, tan, red, yellow, brown, or bluish depending on local minerals.
2. Learn to Recognize Clay-Rich Soil
Clay-rich soil usually feels smooth and sticky when wet. If you squeeze it in your hand, it may hold together like modeling clay instead of crumbling like sandy soil. Try the ribbon test: wet a small amount of soil, knead it between your fingers, and press it into a ribbon between your thumb and forefinger. If it forms a long, flexible ribbon before breaking, it likely contains a useful amount of clay.
Color alone is not enough. Red soil may contain iron, gray soil may hold fine clay, and brown soil may be mostly organic matter. Texture matters more than appearance. Sandy soil feels gritty. Silty soil feels smooth but less sticky, almost like flour when dry. Clay soil feels slick, dense, and clingy when wetbasically the soil equivalent of a toddler refusing to leave the toy aisle.
3. Run a Simple Jar Test
A jar test helps estimate how much sand, silt, and clay are in your soil. Fill a clear jar about one-third full with crumbled soil, add water almost to the top, and include a small drop of dish soap to help separate particles. Shake the jar thoroughly for several minutes. Set it down and watch the layers settle.
Sand settles first, usually within a minute or two. Silt settles next over the next few hours. Clay can remain cloudy in the water much longer and may take a day or two to settle. A thick fine layer at the top, or water that stays cloudy for a long time, suggests clay content. The jar test is not laboratory-perfect, but it is useful for deciding whether a site deserves more attention.
4. Collect Enough Soil for Processing
Once you find a promising source, collect more soil than you think you need. Natural clay processing removes rocks, roots, sand, organic debris, and extra water, so the final yield may be much smaller than the original bucket of dirt. A 5-gallon bucket of soil may produce only a modest lump of workable clay, depending on how clay-rich the material is.
Break up large chunks as you collect, and avoid including leaves, roots, grass, insects, trash, or large stones. If the soil is very wet, let it firm up slightly before hauling. If it is bone dry, that is fine too; dry soil can be slaked in water later. Label your bucket with the location and date. Future you will appreciate this when one batch becomes gorgeous and another behaves like angry pudding.
5. Dry and Crush the Soil if Needed
If your soil contains hard clods, spread it out on a tarp and let it dry completely. Dry clay-rich soil breaks down more easily when soaked, a process called slaking. Once dry, crush the soil into smaller pieces with a wooden block, rolling pin, or gloved hands. Do not create unnecessary dust, and wear a dust mask when handling dry powdered material.
This step helps water penetrate the soil evenly. Large lumps may hide dry centers, while crushed soil hydrates faster and separates more cleanly. Think of it like making hot chocolate: powder mixes better than a giant chocolate brick, although admittedly the clay version is much less delicious.
6. Slake the Soil in Water
Place the crushed soil into a large bucket or tub and cover it with water. Let it sit for several hours or overnight. The soil will soften, break apart, and form a muddy slurry. Stir thoroughly with a stick or mixer until the mixture looks like thin chocolate milk or heavy cream, depending on how much water you add.
The goal is to suspend the fine clay particles in water while allowing heavier material to be removed. If the mixture is too thick, add more water. If it is too thin, do not panic; extra water can be removed later. Wild clay processing is forgiving, as long as you do not pour your best batch down the drain in a moment of impatience.
7. Screen Out Rocks, Roots, and Debris
Pour the slurry through a screen, sieve, or mesh into a second clean bucket. This removes pebbles, roots, leaves, and other unwanted material. For coarse screening, use a colander or hardware cloth. For finer clay, use window screen or a finer mesh. You may need to press the slurry through with your hand or a rubber scraper.
Screening is one of the most important steps if you want smooth, workable clay. Even a small pebble can ruin a thin coil or create stress during drying and firing. Organic matter can burn out in the kiln and leave holes or weak spots. Remove as much as practical now, because once it is inside your clay body, it will wait patiently for the worst possible moment to cause trouble.
8. Let the Clay Settle
After screening, let the bucket sit undisturbed. Heavier sand and coarse silt settle first. Fine clay stays suspended longer and settles later. There are two common approaches here. For a rough clay body, let everything settle and pour off the clear water. For a finer clay, allow the heaviest particles to settle for a short time, then pour the still-cloudy clay water into another bucket and let that settle fully.
This settling process is called levigation. It uses water and gravity to separate particles by size. The longer you refine the clay, the smoother it may become, but the smaller your final yield may be. A little fine sand can sometimes be useful because it reduces shrinkage and cracking, but too much sand makes the clay short, gritty, and difficult to shape.
9. Pour Off Extra Water
Once the clay has settled into a soft layer at the bottom of the bucket, carefully pour off the clear water from the top. Move slowly so you do not disturb the clay layer. If the water is still very cloudy, let it sit longer. Depending on the clay and water volume, settling may take overnight, a full day, or even longer.
At this stage, the material may look like thick slip rather than clay. That is normal. Slip is simply clay suspended in water. To turn it into a workable clay body, you must remove more moisture without drying it into a brick. This is where patience earns its little pottery badge.
10. Dry the Clay to a Workable Consistency
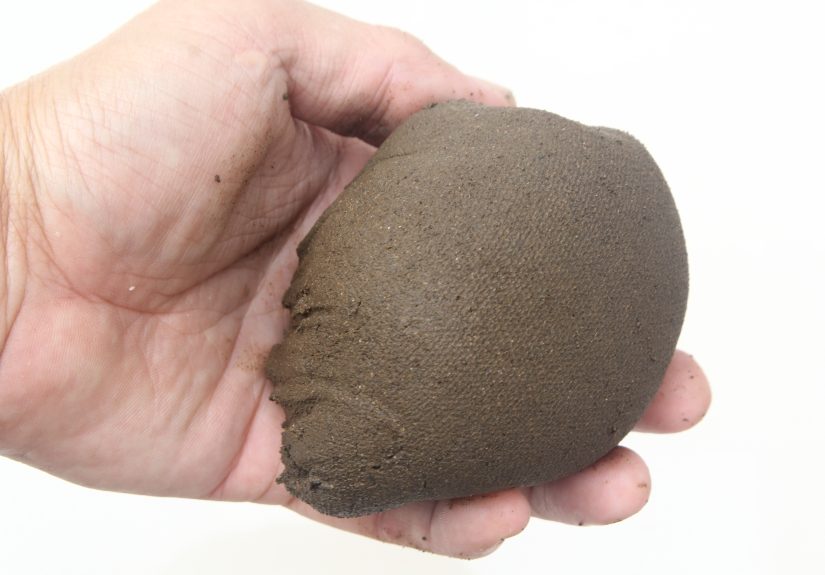
Pour the thick clay slip into a cloth bag, old pillowcase, or onto a plaster slab, absorbent board, or thick layer of clean fabric. Let the water drain or evaporate slowly. Stir or flip the clay occasionally so it dries evenly. When it reaches the texture of soft modeling clay, gather it into a lump.
Avoid drying it too fast in direct sun, especially if your climate is hot. Rapid drying can create hard edges with a soupy center. If the clay becomes too dry, break it up, add water, and rehydrate it. Clay has a dramatic personality, but it is usually willing to reconcile after a little moisture.
11. Wedge and Test the Clay
Wedging is kneading clay to even out moisture, remove air pockets, and improve workability. Push, fold, rotate, and press the clay on a clean surface. If it sticks badly, let it dry a little longer. If it cracks immediately, it may be too dry or too low in plastic clay particles. Add water in small amounts or blend it with a more plastic clay if available.
Make a few test pieces before committing to a large project. Roll a coil and bend it around your finger. If it bends without cracking badly, the clay has decent plasticity. Make a small pinch pot or tile and let it dry slowly. Watch for cracking, warping, or crumbly edges. Natural clay varies widely, so testing is not optional; it is the difference between “beautiful handmade bowl” and “archaeological-looking pancake.”
12. Fire Only After Careful Testing
If you want permanent ceramic pieces, natural clay must be fired in a kiln, not a kitchen oven. A home oven can dry clay, but it cannot vitrify it or make it durable ceramic. Unknown local clay should be fired only in small test pieces at first, ideally by an experienced potter or ceramics studio. Some wild clays mature at low temperatures, while others need higher heat or may bloat, crack, melt, or release smoke from remaining organic material.
Make test tiles and fire them gradually. Measure shrinkage before and after drying, then after firing. Check color, hardness, cracking, absorption, and strength. If the clay cracks too much, add fine grog, sand, or other non-plastic material in small percentages. If it is too gritty, refine it more carefully. If it melts into a puddle, congratulate yourself: you have discovered why ceramic testing exists.
Dry Method vs. Wet Method
There are two main ways to process clay from indigenous soil: the dry method and the wet method. The dry method involves drying, crushing, screening, and rehydrating the clay-rich material. It is faster when the soil is already fairly pure and free from sand or debris. However, it can create dust and may not remove fine impurities as well.
The wet method, described in this guide, uses water to separate clay from heavier particles. It is slower but usually produces smoother, cleaner clay. For beginners, the wet method is often easier to understand because you can see the separation happen: rocks stay in the screen, sand settles first, and clay remains suspended before settling into a fine layer.
How to Improve Natural Clay
Not all wild clay is ready to become pottery straight from the bucket. Some clay is too sticky, some is too sandy, some cracks like a dry lake bed, and some refuses to hold shape no matter how encouragingly you speak to it. Fortunately, clay can often be adjusted.
If the Clay Cracks While Drying
Cracking usually means the clay is shrinking unevenly, drying too fast, or contains too many fine plastic particles without enough temper. Try drying pieces more slowly under loose plastic. You can also add fine sand, grog, or crushed fired clay to reduce shrinkage. Start with small additions and test again.
If the Clay Is Too Sandy
If your clay feels gritty and falls apart, refine it again using the wet method. Let heavy sand settle briefly, then pour the cloudy clay water into another container. This keeps more fine clay and leaves some coarse material behind. Repeat if needed.
If the Clay Is Not Plastic Enough
Low-plasticity clay may crack when rolled into coils or refuse to stretch. Aging can help. Store the moist clay in a sealed bag or bucket for several days or weeks. Some potters find that aged clay becomes more workable as moisture distributes evenly and organic activity changes the clay’s feel. You can also blend it with a small amount of known plastic pottery clay for better handling.
Best Uses for Homemade Indigenous Clay
Homemade clay from local soil is excellent for small experimental projects. Try pinch pots, beads, tiles, small sculptures, coil forms, test stamps, garden markers, or decorative objects. Avoid making food-safe dishes until the clay has been properly tested for firing temperature, absorption, glaze fit, and safety. Natural clay can be beautiful, but beauty alone does not make it suitable for soup.
For educational projects, indigenous clay is wonderful because it connects geology, ecology, craft, and local history. Students can compare clay from different locations, record color changes after firing, measure shrinkage, and learn why ancient pottery traditions often developed near reliable clay deposits.
Common Mistakes to Avoid
One common mistake is collecting topsoil instead of clay-rich subsoil. Topsoil contains more organic matter, roots, and living material, which makes it poor for clean clay processing. Another mistake is skipping the screen. Rocks and roots do not magically become artistic texture; they usually become problems.
Beginners also tend to dry clay too quickly. Slow drying is safer, especially for thicker pieces. Cover fresh work loosely with plastic and let moisture leave gradually. Finally, never assume unknown clay can be fired to a specific temperature without tests. Wild clay is local, variable, and occasionally mischievous.
of Practical Experience: What Making Clay from Local Soil Teaches You
The first experience most people have when making clay from indigenous soil is surprise. The ground stops being “dirt” and becomes a layered material with personality. One bucket may contain orange clay that stains your hands like powdered sunset. Another may hold gray clay that feels silky in water but dries into a stubborn lump. A third may look promising and then reveal itself to be mostly sand, which is rude but educational.
The most useful lesson is that clay rewards observation. You start noticing where water slows down after rain, where banks expose smooth layers, where soil cracks into plates during dry weather, and where animals have dug into subsoil. You begin to understand that clay is not randomly scattered everywhere. It is shaped by geology, erosion, water movement, and time. Once you see that, every roadside cut and creek bank becomes suspiciously interesting. This is how innocent hobbies become “I pulled over because the ditch looked ceramic.”
Another experience is learning patience through settling. When you first mix soil and water, it looks like a bucket of chaos. Rocks, roots, sand, foam, and cloudy water all swirl together. Then gravity quietly organizes everything. Heavy particles drop. Fine particles linger. Clear water rises. The process feels almost meditative, assuming you are not checking the bucket every six minutes like it owes you money.
Processing local clay also teaches humility. Commercial clay is predictable because someone else has already tested, blended, screened, aged, and packaged it. Wild clay has not signed any customer satisfaction agreement. It may crack, slump, stain, smell earthy, dry slowly, or fire to a completely different color than expected. That unpredictability is not failure; it is information. Each test tile becomes a tiny report card from the earth.
A good habit is to keep detailed notes. Record where the soil came from, how deep you dug, what color it was wet and dry, how long it settled, how it felt when wedged, how much it shrank, and what happened during firing. Without notes, every batch becomes a mystery novel with the last chapter missing. With notes, you can repeat success and avoid repeating disasters wearing different shoes.
One of the most satisfying moments is the first time your processed clay becomes truly workable. The muddy slurry thickens. The sticky mass firms up. You wedge it, roll a coil, bend it, and realize it is not just soil anymore. It is material with potential. Maybe it becomes a small bowl. Maybe it becomes a tile. Maybe it becomes a lumpy creature that looks like a potato with ambition. Either way, it came from the land under your feet, and that gives the object a sense of place that store-bought clay cannot quite copy.
The biggest practical takeaway is to start small. Process one bucket, make test pieces, and learn from them before collecting more. Use simple forms before complex ones. Dry slowly. Fire carefully. Ask local ceramic artists, university extension offices, or pottery studios for guidance when needed. Making clay from indigenous soil is not just a craft technique; it is a conversation with landscape, minerals, water, fire, and your own willingness to get mud in places mud had no formal invitation to visit.
Conclusion
Making clay from indigenous soil is a rewarding blend of soil science, traditional craft, and hands-on experimentation. The process begins with respectful collection and careful identification, then moves through slaking, screening, settling, drying, wedging, and testing. The wet method is especially beginner-friendly because it separates fine clay from heavier sand and debris using water and patience.
The most important rule is to test everything. Test the soil before collecting a large amount. Test the clay before making a serious piece. Test drying behavior before building thick forms. Test firing results before assuming the clay is safe, strong, or suitable for functional pottery. Natural clay can be gorgeous, but it is not standardized. That is exactly what makes it fascinating.
With a bucket, water, a screen, and curiosity, local soil can become a meaningful art material. It may not behave perfectly the first time, but every batch teaches you something about your landscape. And honestly, there are worse ways to spend an afternoon than turning mud into possibility.